Cloud Build を使用して Docker イメージをビルドし、push する
Docker イメージをビルドし、そのイメージを Artifact Registry に push して、Cloud Build の使用を開始する方法を学習します。Artifact Registry では、プライベート・パッケージと Docker コンテナ イメージを管理する単一の場所が準備されています。
まず、Docker 構成ファイルの Dockerfile を使用してイメージをビルドし、次に Cloud Build 構成ファイルを使用して同じイメージをビルドします。
このタスクを Cloud Shell エディタで直接行う際のガイダンスについては、「ガイドを表示」をクリックしてください。
始める前に
- Sign in to your Google Cloud account. If you're new to Google Cloud, create an account to evaluate how our products perform in real-world scenarios. New customers also get $300 in free credits to run, test, and deploy workloads.
-
In the Google Cloud console, on the project selector page, select or create a Google Cloud project.
Roles required to select or create a project
- Select a project: Selecting a project doesn't require a specific IAM role—you can select any project that you've been granted a role on.
-
Create a project: To create a project, you need the Project Creator
(
roles/resourcemanager.projectCreator), which contains theresourcemanager.projects.createpermission. Learn how to grant roles.
-
Verify that billing is enabled for your Google Cloud project.
-
Enable the Cloud Build, Compute Engine and Artifact Registry APIs.
Roles required to enable APIs
To enable APIs, you need the Service Usage Admin IAM role (
roles/serviceusage.serviceUsageAdmin), which contains theserviceusage.services.enablepermission. Learn how to grant roles. -
Install the Google Cloud CLI.
-
外部 ID プロバイダ(IdP)を使用している場合は、まず連携 ID を使用して gcloud CLI にログインする必要があります。
-
gcloud CLI を初期化するには、次のコマンドを実行します。
gcloud init -
Make sure that you have the following role or roles on the project: Artifact Registry Administrator, Cloud Build Editor, Logs Viewer, Service Account User, Service Usage Admin, Storage Bucket Viewer, Storage Object Creator
Check for the roles
-
In the Google Cloud console, go to the IAM page.
Go to IAM - Select the project.
-
In the Principal column, find all rows that identify you or a group that you're included in. To learn which groups you're included in, contact your administrator.
- For all rows that specify or include you, check the Role column to see whether the list of roles includes the required roles.
Grant the roles
-
In the Google Cloud console, go to the IAM page.
IAM に移動 - プロジェクトを選択します。
- [ アクセスを許可] をクリックします。
-
[新しいプリンシパル] フィールドに、ユーザー ID を入力します。 これは通常、Google アカウントのメールアドレスです。
- [ロールを選択] リストでロールを選択します。
- 追加のロールを付与するには、 [別のロールを追加] をクリックして各ロールを追加します。
- [保存] をクリックします。
ターミナル ウィンドウを開きます。
quickstart-dockerという名前で新しいディレクトリを作成し、そのディレクトリに移動します。mkdir quickstart-docker cd quickstart-docker次の内容のファイルを
quickstart.shという名前で作成します。次の内容のファイルを
Dockerfileという名前で作成します。ターミナル ウィンドウで次のコマンドを実行して、
quickstart.shを実行可能にします。chmod +x quickstart.shロケーション
us-west2にquickstart-docker-repoという名前の Docker リポジトリを作成し、「Docker repository」という説明を指定します。gcloud artifacts repositories create quickstart-docker-repo --repository-format=docker \ --location=us-west2 --description="Docker repository"リポジトリが作成されたことを確認します。
gcloud artifacts repositories list表示されたリポジトリのリストに
quickstart-docker-repoが表示されます。次のコマンドを実行して、 Google Cloud プロジェクト ID を取得します。
gcloud config get-value projectquickstart.shとDockerfileを含むディレクトリから次のコマンドを実行します。gcloud builds submit --region=us-west2 --tag us-west2-docker.pkg.dev/PROJECT_ID/quickstart-docker-repo/quickstart-image:tag1quickstart.shとDockerfileがあるディレクトリに、cloudbuild.yamlという名前のファイルを作成します。このファイルには以下を含めます。このファイルがビルド構成ファイルです。ビルド時に、Cloud Build が自動的に$PROJECT_IDをプロジェクト ID に置き換えます。次のコマンドを実行してビルドを開始します。
gcloud builds submit --region=us-west2 --config cloudbuild.yamlGoogle Cloud コンソールで Cloud Build ページを開きます。
必要に応じて、プロジェクトを選択して [開く] をクリックします。
[ビルド履歴] ページが表示されます。

必要に応じて、[リージョン] プルダウン メニューで
us-west2を選択してそのリージョンのビルドを表示します。このクイックスタートで実行したビルドごとに 1 つずつ、2 つのビルドが表示されます。
いずれかのビルドをクリックします。
[ビルドの詳細] ページが表示されます。
ビルドのアーティファクトを表示するには、[ビルドの概要] で [ビルド アーティファクト] をクリックします。
出力は次のようになります。
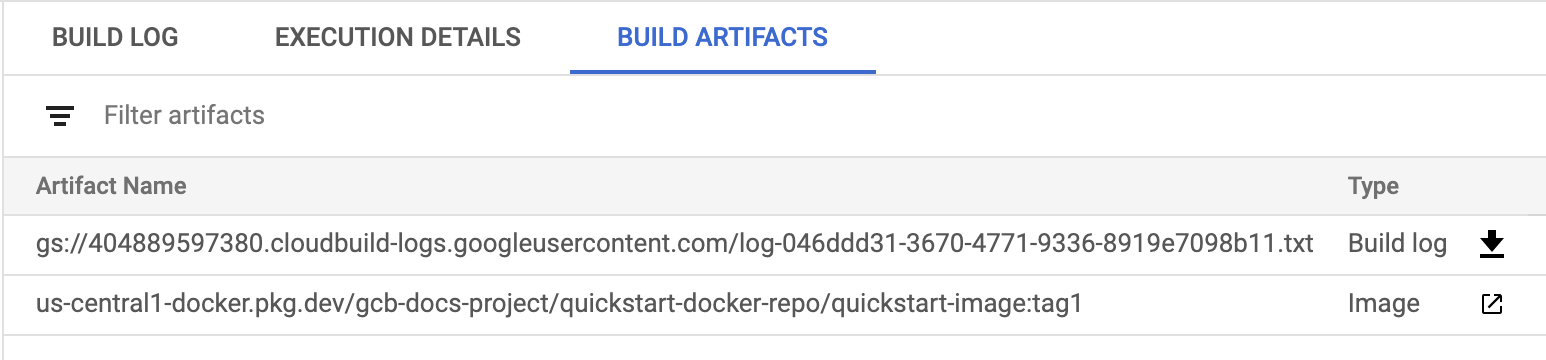
このページから、ビルドログをダウンロードして、Artifact Registry でイメージの詳細を表示できます。
Google Cloud コンソールで Artifact Registry ページを開きます。
プロジェクトを選択し、[開く] をクリックします。
[quickstart-docker-repo] を選択します。
[削除] をクリックします。
- Docker イメージを実行する方法を確認する。
- 基本的なビルド構成ファイルを作成する方法を学習する。
- Cloud Build を使用してデプロイする方法を学習する。
- Node.js アプリケーションをビルドする方法を学習する。
- Java アプリケーションをビルドする方法を学習する。
- Go アプリケーションをビルドする方法を学習する。
ビルドするソースファイルを準備する
コンテナ イメージにパッケージ化するには、サンプルのソースコードが必要です。このセクションでは、シェル スクリプトと
Dockerfileを作成します。Dockerfileは、Docker がイメージを作成するための指示を含むテキスト ドキュメントです。Artifact Registry で Docker リポジトリを作成する
Dockerfile を使用してイメージをビルドする
Cloud Build で、Docker イメージを
Dockerfileを使用してビルドできます。個別の Cloud Build 構成ファイルは不要です。Dockerfileを使用してビルドするには:ビルドが完了すると、次のような出力が表示されます。
DONE ------------------------------------------------------------------------------------------------------------------------------------ ID CREATE_TIME DURATION SOURCE IMAGES STATUS 545cb89c-f7a4-4652-8f63-579ac974be2e 2020-11-05T18:16:04+00:00 16S gs://gcb-docs-project_cloudbuild/source/1604600163.528729-b70741b0f2d0449d8635aa22893258fe.tgz us-west2-docker.pkg.dev/gcb-docs-project/quickstart-docker-repo/quickstart-image:tag1 SUCCESSDockerfileで、quickstart-imageという名前の Docker イメージをビルドしました。このイメージを Artifact Registry に push します。ビルド構成ファイルを使用してイメージをビルドする
このセクションでは、Cloud Build 構成ファイルを使用して、上記と同じ Docker イメージを作成します。ビルド構成ファイルは、指定した内容に基づいてタスクを実行するよう Cloud Build に指示します。
ビルドが完了すると、次のような出力が表示されます。
DONE
------------------------------------------------------------------------------------------------------------------------------------
ID                                    CREATE_TIME                DURATION  SOURCE          IMAGES          STATUS
046ddd31-3670-4771-9336-8919e7098b11  2020-11-05T18:24:02+00:00  15S       gs://gcb-docs-project_cloudbuild/source/1604600641.576884-8153be22c94d438aa86c78abf11403eb.tgz  us-west2-docker.pkg.dev/gcb-docs-project/quickstart-docker-repo/quickstart-image:tag1  SUCCESS
ビルド構成ファイルを使用して
quickstart-imageをビルドし、イメージを Artifact Registry に push しました。ビルドの詳細を表示
クリーンアップ
このページで使用したリソースについて、 Google Cloud アカウントに課金されないようにするには、次の手順を実施します。
このクイックスタートで作成したリポジトリの削除は完了です。
次のステップ
-