Deploy your Bare Metal Solution environment
This guide helps you to activate your Bare Metal Solution environment. Before you begin, you need to decide which networks, servers, and storage components from your Bare Metal Solution order that you want to bring online.
You'll enter this information into an intake form in the Google Cloud console. Google Cloud receives your details, processes your request, and brings your Bare Metal Solution environment online.
Understand the Bare Metal Solution components
To help you visualize which components you need to include in your deployment plan, Figure 1 shows a typical Bare Metal Solution environment.
Figure 1: Bare Metal Solution environment
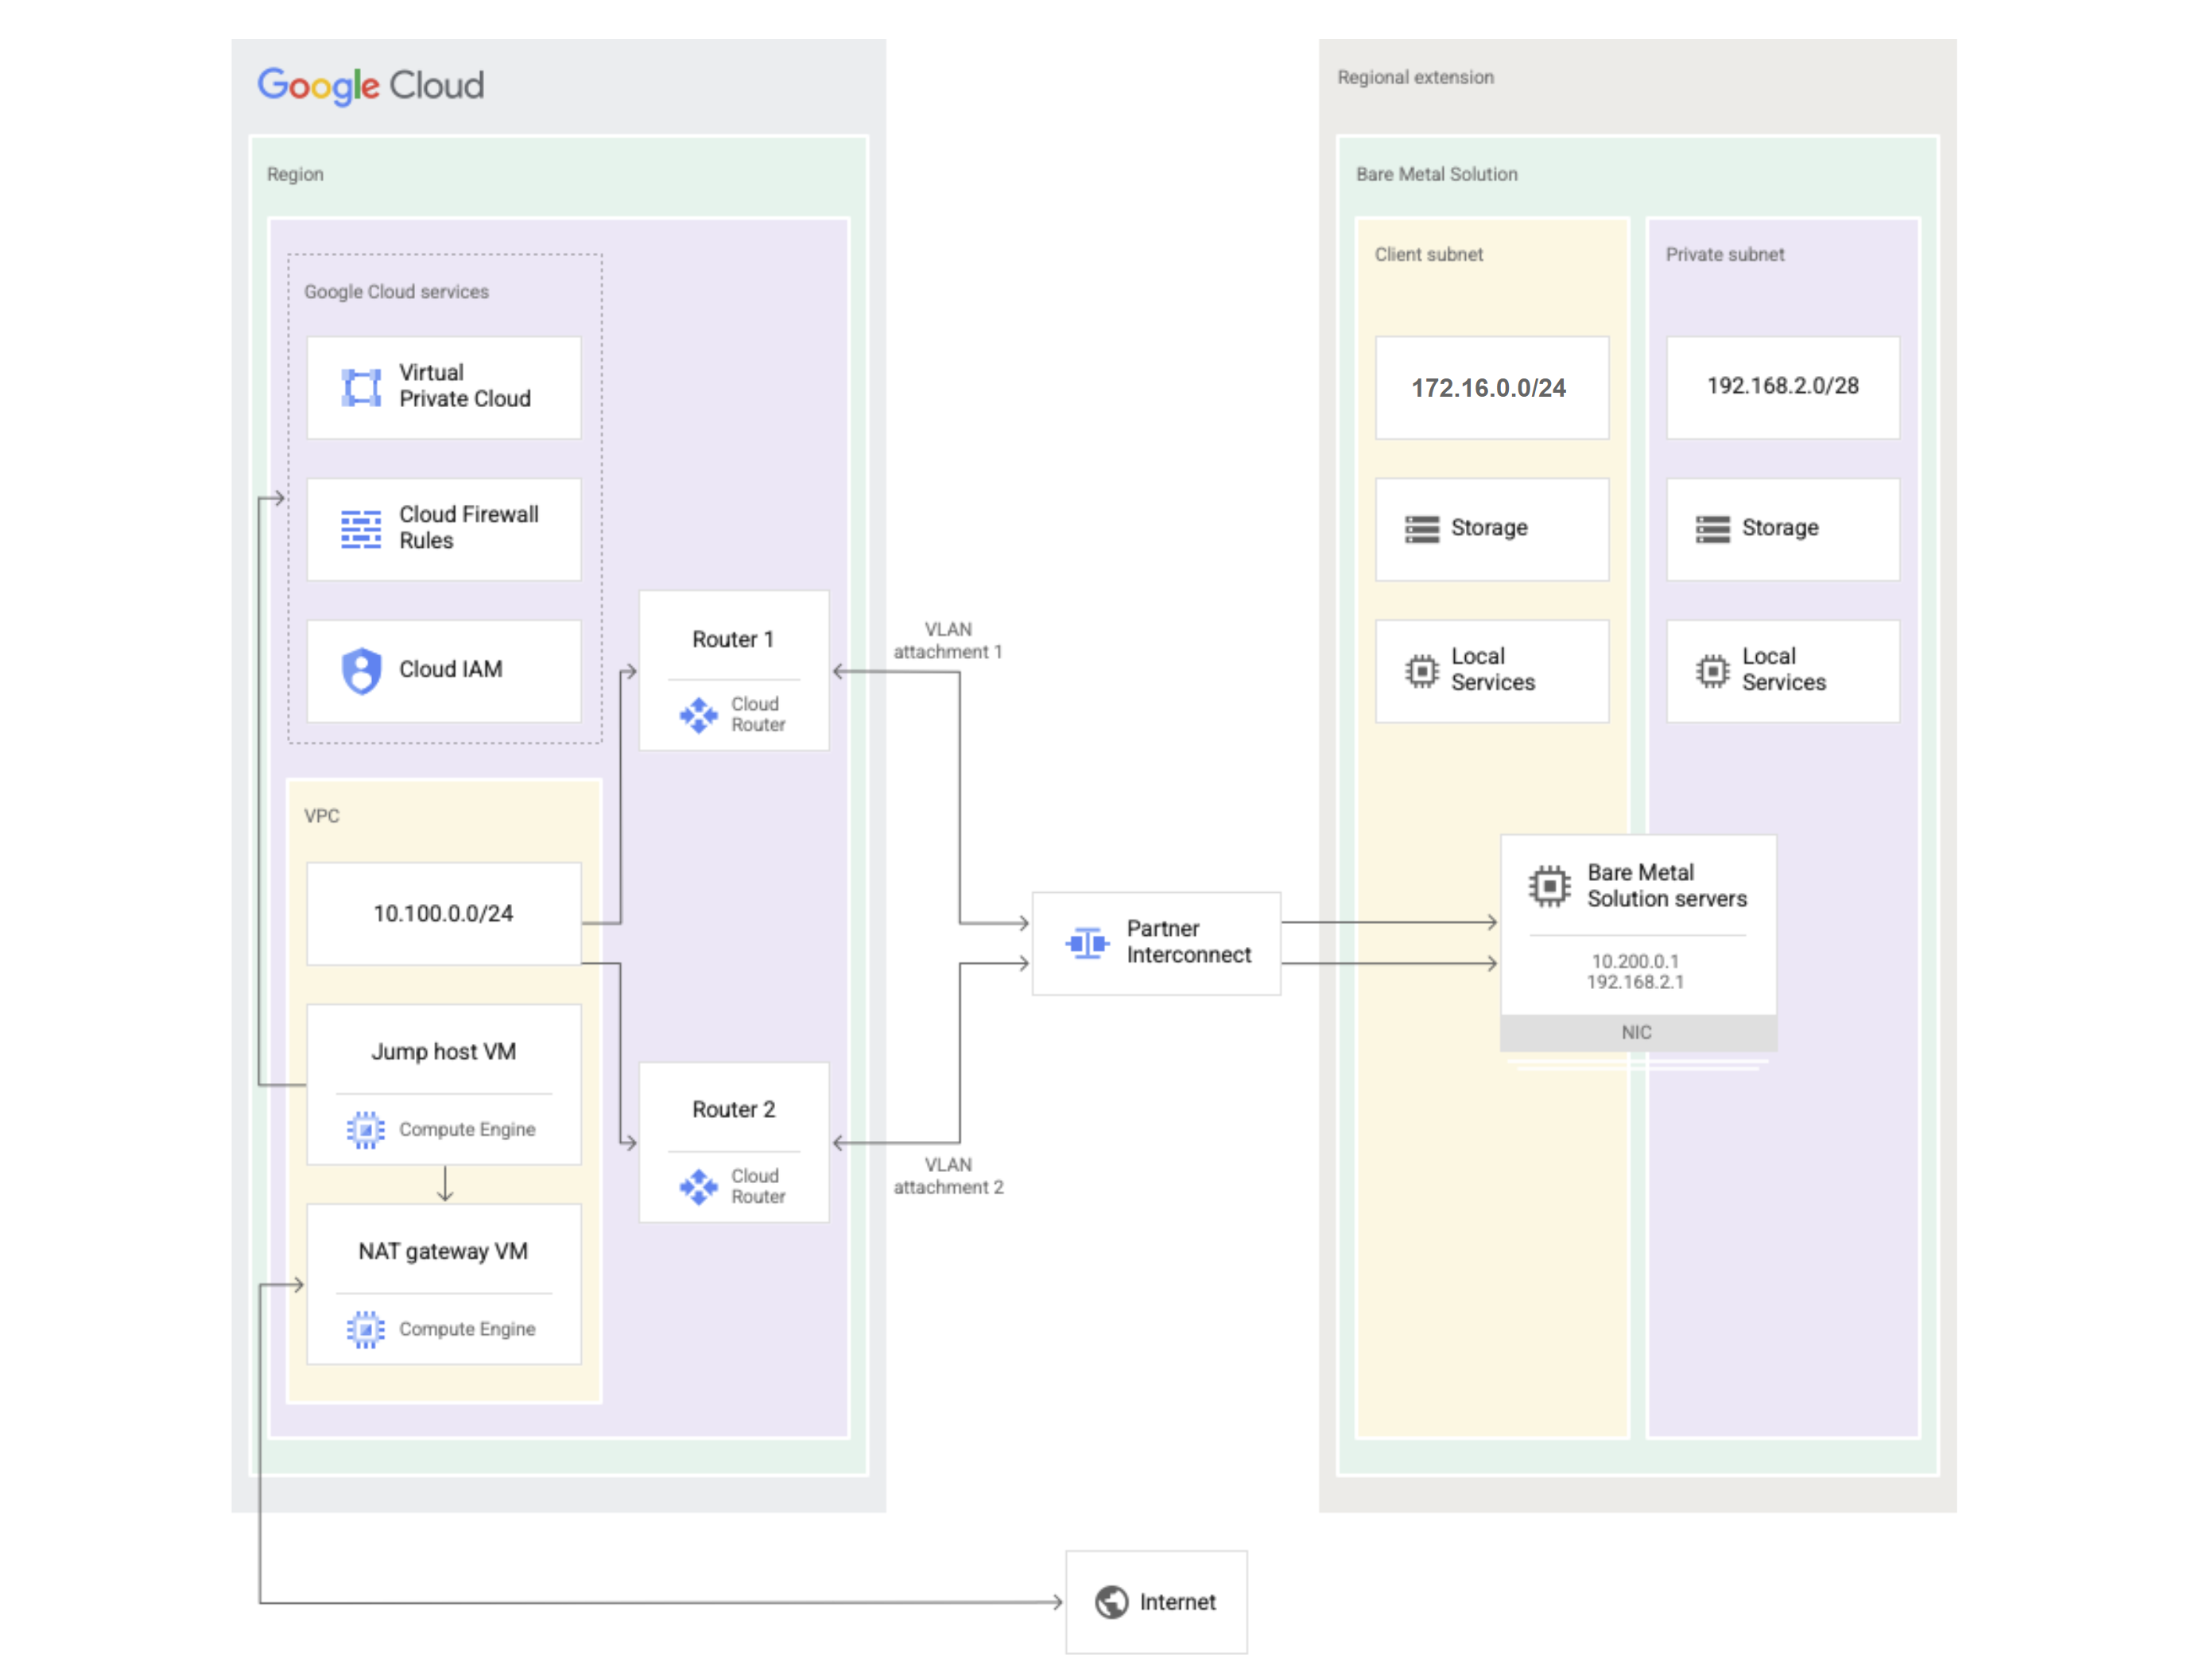
The Google Cloud environment is on the left side of the diagram and the Bare Metal Solution environment is on the right. The Google Cloud environment includes the following components:
- Google Cloud project—You use a Google Cloud project for administration of your Bare Metal Solution resources and billing.
- VPC—Your Google Cloud project needs a Virtual Private Cloud. Inside the VPC, create one virtual machine to act as a jump host and one to act as a Network Address Translation (NAT) gateway.
- Cloud Router—You need to configure two Cloud Routers to provide routing and a redundant path between your VPC and the Bare Metal Solution environment.
- Partner Interconnect—This provides a physical connection between your Google Cloud project and the Bare Metal Solution environment. As part of the Partner Interconnect, you generate VLAN attachments and pairing keys that you enter into the Google Cloud console during your Bare Metal Solution deployment.
- Cloud Firewall Rules—Use firewall rules to allow traffic from your Bare Metal Solution environment to access your Google Cloud project.
- Cloud IAM—Use Identity and Access Management (IAM) to grant Bare Metal Solution permissions to users and administrators.
This guide assumes you've already set up your Google Cloud environment. For more information, see Set up Google Cloud to work with your Bare Metal Solution environment.
The Bare Metal Solution environment includes the following components:
- Networking—There are three important subnets that you can specify
for your Bare Metal Solution environment:
- Client subnet—This mandatory subnet provides access to Google Cloud and your VPC. In the diagram, we've used 172.16.0.0/24 for the client subnet.
- Private subnet—This subnet provides access to other compute, networking, and storage devices located inside the your Bare Metal Solution regional extension. In the diagram, we've used 192.168.2.1/24 for the private subnet.
- Services subnet—This subnet provides a small IP address range to offer IP addresses to devices providing storage and other services. The services subnet is a subset of the client subnet, the private subnet, or both. You can reserve the services subnet from the addresses located at the end of the primary subnet range. For example, a possible services subnet for the 172.16.0.0/24 client subnet in this example is 172.16.0.0/28.
- Servers—You need to decide how many servers you want to include in
your Bare Metal Solution environment, what type, and which operating system.
- To see the list of available server types, see Server configurations.
- To see the list of available operating systems, see Operating systems. After you place an order with Google Cloud, you allocate the servers by using the intake form. However, the maximum number of servers you can enter in the form is limited by the number of servers you ordered.
- Storage—You need to select the type of storage you want to deploy. For more information about storage choices, see Storage.
Before you begin
Before you start filling out the Bare Metal Solution intake form, do the following:
- Place your order for networking, servers, and storage with Google Cloud Sales.
- Get the list of the Bare Metal Solution resources you ordered, including the server types, requested storage, quantity, and location. Note that you can only enter resources in the intake form that match the locations and quantities that you specified in the contract.
- Create a Google Cloud project to provision Bare Metal Solution resources and submit the intake form. You use this project, often referred to as the Management Project, for Identity and Access Management (IAM) and to receive Bare Metal Solution updates and notifications.
- Assign IAM roles, such as Project IAM Admin, Bare Metal Solution Admin, and Compute Network Viewer to the staff members who manage your Bare Metal Solution environment.
- We recommend that you coordinate with your network team to have your IP addresses, VLANs, and other network information ready before you submit the intake form.
- Set up your Partner Interconnect, VLAN attachments, and pairing keys. You need to enter this information into the intake form.
Use the Google Cloud console intake form to enter your selections
Now that you have ordered your Bare Metal Solution resources and are prepared to bring them online, you need to enter the information for your Bare Metal Solution environment into the Google Cloud console intake form.
Go to the Google Cloud console intake form. https://console.cloud.google.com/compute/bareMetalSolution/add
Select the region where your Bare Metal Solution environment is located. For example, use us-central1 for the Iowa region.
From the Pod drop-down list, select a pod in which you want to create your resources.
A pod is a unit of isolation that contains your Bare Metal Solution resources. A region can have multiple pods.
The Pod drop-down list also shows the number of your existing Bare Metal Solution resources in each pod of the selected location.
If you're unsure about which pod to select, contact Google Cloud Sales.
(Optional) To configure multiple networks on your server, click the Enable advanced networking toggle.
Click Add a network and enter your choices for networking components. Based on the region that you select, the Google Cloud console displays a prompt showing the amount of available bandwidth that you can deploy for your Partner Interconnect connection.
Field Description Example Name Enter a name for your network. network-1Type In most cases, you need to create two different networks:
- Client (mandatory) – Network used to access Google Cloud.
- Private (optional) – Network used for access between devices inside the Bare Metal Solution regional extension and required for creating high availability clusters.
ClientIf you selected Client network type, configure the following fields: VLAN attachment's name and project number Select the checkbox if your VLAN attachments are in a different project. For more information about VLAN attachments, see Create the VLAN Attachments for the Cloud Interconnect connection.
Make sure to Enable and activate the Bare Metal Solution API and gcloud CLI in the project that contains your VLAN attachments
Selected the checkbox. If your VLAN attachments are in the same project, that is, you did not select the VLAN attachment's name and project number checkbox, then configure the following fields: Primary VLAN attachment From the drop-down menu, select your primary VLAN attachment. attachment-1Secondary VLAN attachment From the drop-down menu, select your secondary VLAN attachment. attachment-2If your VLAN attachments are in a different project, that is, you selected the VLAN attachment's name and project number checkbox, then configure the following fields: Project number Enter the project number that contains your VLAN attachments. To learn how to find your project number, see Identifying projects.
add dummy project numberPrimary VLAN attachment name Enter the name of your primary VLAN attachment. You can find the name of your VLAN attachment by following these steps:
- In the navigation menu, go to Networking > Hybrid connectivity > Interconnect.
- On VLAN attachments page, find your VLAN attachment.
- Copy the name and paste it in the Primary VLAN attachment name field.
attachment-1Secondary VLAN attachment name Enter the name of your secondary VLAN attachment. attachment-2For your client network, continue configuring the following fields: Bandwidth Speed of the network connection between Google Cloud and the Bare Metal Solution environment. You can choose from the following options: - 1 Gbps
- 2 Gbps
- 5 Gbps
- 10 Gbps
10 GbpsNetwork IP address range Select a range of IP addresses that servers can use in your Bare Metal Solution environment. If you are adding a new server to an existing network range, enter the existing range. 172.16.0.0/24Service IP address range Select a subset of your network IP address range from your client or private network to be used for storage and services. Google Cloud reserves this range for services such as NFS. The service IP address range typically uses a /26, /27, or /28 subnet. 172.16.0.0/28If you selected Private network type, configure the following fields: Network IP address range Select a range of IP addresses that servers can use in your Bare Metal Solution environment. If you are adding a new server to an existing network range, enter the existing range. 172.16.0.0/24Service IP address range Select a subset of your network IP address range from your client or private network to be used for storage and services. Google Cloud reserves this range for services such as NFS. The service IP address range typically uses a /26, /27, or /28 subnet. 172.16.0.0/28- To save your network information, click Done.
- To add a private network or other networks, click Add a network and
repeat the steps listed earlier.
Click Add a server and enter your choices for servers. Based on the region you select, you'll see a prompt telling you the type and number of servers you can deploy.
Field Description Example Name Create a name for your server. server-1Type Type of server found in Server configurations that specifies CPU cores, sockets, and RAM o2-standard-32-metalEnable hyperthreading (checkbox) Hyperthreading uses virtualization to provide additional threading capacity above the normal processing capabilities of a physical server. This feature is disabled by default. Leave the checkbox empty to disable hyperthreading OS image Operating system for the server Red Hat Enterprise Linux 7.7Encryption key for the server's password
(Optional)
Encryption key that you created using Cloud KMS for the server.
- In the Password encryption key list, select a key.
- In the Version list, select a version of the encryption key.
To learn more about how to use encryption keys with Bare Metal Solution, see Set up encryption keys for a server.
SSH keys to be used in provisioning
(Optional)
SSH keys for the server.
- In the SSH keys list, select the keys. You can only select the SSH keys that exist in the same project as that of your server.
If you make any changes to the SSH keys while filling this form, then reload the form for the changes to take effect. Before you reload your form, you can save a draft of it.
To learn more about how to use SSH keys with Bare Metal Solution, see Set up SSH keys for a server.
Select networks (checkbox) Click the checkbox to view and select networks from other projects in your organization Checkbox marked If you did not enable the advanced networking option in Step 4, configure the following fields: Client network Select a client subnet from the menu. This can be a new subnet that you specified earlier in the Networks section, an existing subnet, or a subnet from another project. network-1 (172.16.0.0/24)Client address IP address for your server selected from the client subnet. If you enter an IP address already in use, then the system alerts you to choose a different one. 172.16.0.5Private network Select a private subnet from the menu. This can be a new subnet that you specified earlier in the Networks section, an existing subnet, or a subnet from another project. network-2 (192.168.2.0/24)Private address IP address for your server selected from the private subnet. If you enter an IP address already in use, then the system alerts you to choose a different one. 192.168.2.5If you enabled the advanced networking option in Step 4, configure the following fields: Network template Select a network template from the menu. The bondaa-bondaatemplate is the only default template available. If you require other network templates, contact Google Cloud Sales.bondaa-bondaaNetwork interfaces Click the Add an item to add a network interface. Click the Add an item button. Physical interface Select a physical interface from the menu. In most cases, select bond0for your client network andbond1for your private network.bondaa (bond0)Type Select the network type from the menu: - Client
- Private
ClientNetwork Select a network from the menu. network-1 (172.16.0.0/24)IP address - If you selected the Client network type, enter an IP address from the client subnet.
- If you selected the Private network type, enter an IP address from the private subnet.
172.16.0.5Default gateway Select the Default gateway checkbox to make this network the default gateway for the server. Default gateway checked. - To save your server information, click Done.
- To add more servers, click Add a server and repeat the steps listed earlier.
Click Add a storage volume.
Based on the region you select, the Google Cloud console displays a prompt showing the amount of available storage that you can provision.
You can provision either one storage volume or multiple storage volumes in a single configuration request. Bare Metal Solution lets you provision up to 10 Fiber Channel storage volumes in a single configuration request.
Enter the following information:
Field Description Example Name Enter a name for your storage volume. volume-1Type Select the type of storage:
- SSD – Solid state drive
- HDD – Hard drive
SSDSize Select the size of the drive in GiB. The size ranges from a minimum of 100 GiB to a maximum of 16 TiB. If you need more than 16 TiB, create additional volumes.
1024Enable snapshots (checkbox) Saves a backup copy of your storage volume once per day. Required for custom snapshots, but disabled by default.
Note: When you enable snapshots, Google Cloud reserves 20% of the requested size of the storage volume. For example, if your volume size is 1 TiB, you can use 819 GiB for data storage, and Google Cloud reserves 205 GiB for the snapshots.Checkbox selected to enable snapshots Protocol Select the storage protocol
- Fibre Channel
- NFS
Fibre ChannelLUNs Specify how you want to allocate your Logical Unit Numbers (LUNS) in the storage volume:
- Number of LUNs
- Size of each LUN
4 LUNs200 GiB per LUN
Servers Select the servers that can access the storage. server-1- To save your storage information, click Done.
- To add more storage volumes, click Add a storage volume and repeat the steps listed earlier.
Optional: Click Save Draft to save a draft of your configuration request.
- To receive an email containing the link to your draft configuration, click the checkbox and add your email address.
- To save the draft, click Confirm.
- Copy and save the link to your draft configuration. You can use this link to continue filling out the form at a later time.
- Click Done.
Click Submit Request to submit your configuration request. The system provides a summary of your deployment request.
- We recommend that you provide an email address to receive a link and a copy of your configuration request. Click the checkbox and add your email address.
- To submit your configuration request, click Confirm.
Copy and save the reference number and link to your configuration request. You can use this later to track your configuration request.
Click Done.
When Google Cloud receives your request, we bring your selected resources online and notify you when they are ready to use.
Track your configuration request
To track the status of your configuration request, you can use the link you copied when you submitted the configuration request. Also, if you had provided an email address while submitting your configuration request, you received an email containing the link.
Click the link to go to the Configure your order page that shows the summary of your configuration request.
You can view the status of your request on the top of the page. A configuration request can be in one of the following states:
DRAFT—The configuration request is a draft and can be modified.SUBMITTED—The configuration request is submitted and cannot be modified.PROVISIONING—The resources in the configuration request are being provisioned.PROVISIONED—The resources in the configuration request are provisioned.VALIDATED—The configuration request is validated and the resources are ready to use.CANCELLED—The configuration request is cancelled.FAILED—The configuration is submitted but cannot be provisioned due to an error.
If you don't have the link to your configuration request, contact Customer Care with the reference number of your configuration request to know about the status.