예측 설명

이 페이지에서는 특성 중요도를 사용하여 모델이 예측하는 방법을 가시화할 수 있는 방법에 대해 설명합니다.

AI Explanations에 대한 자세한 내용은 AI Platform용 AI Explanations 소개를 참조하세요.

소개

머신러닝 모델을 사용하여 비즈니스 결정을 내릴 때 학습 데이터가 최종 모델에 어떻게 기여했는지와 모델이 개별 예측에 어떻게 전달되었는지 이해하는 것이 중요합니다. 이러한 이해를 통해 모델이 공정하고 정확한지 확인할 수 있습니다.

AutoML Tables는 특성 기여 분석이라고도 하는 특성 중요도를 제공하여 모델 학습(모델 특성 중요도) 및 개별 예측(로컬 특성 중요도)에 가장 많이 기여한 특성을 확인할 수 있습니다.

AutoML Tables는 샘플링된 Shapley 메서드를 사용하여 특성 중요도를 계산합니다. 모델의 설명 기능에 대한 자세한 내용은 AI 설명 소개를 참조하세요.

모델 특성 중요도

모델 특성 중요도는 정보에 입각한 모델 학습 특성이 데이터 및 비즈니스 문제를 해결하는 데 적합한지 확인하는 데 도움이 됩니다. 특성 중요도 값이 큰 모든 특성은 유효한 예측 신호를 나타내야 하며 예측 요청에 일관성 있게 포함될 수 있어야 합니다.

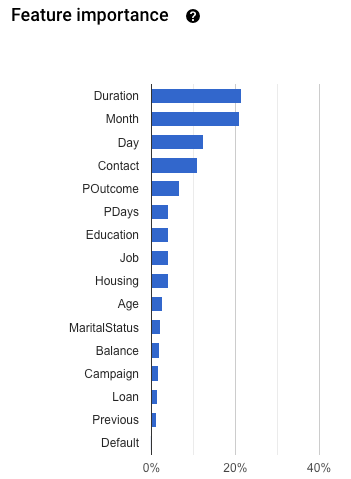
모델 특성 중요도는 각 특성의 백분율로 제공됩니다. 비율이 높을수록 해당 특성이 모델 학습에 더 큰 영향을 미칩니다.

모델 특성 중요도 가져오기

콘솔

Google Cloud Console을 사용하여 모델의 특성 중요도 값을 확인하려면 다음 안내를 따르세요.

  1. Google Cloud Console의 AutoML Tables 페이지로 이동합니다.

    AutoML Tables 페이지로 이동

  2. 왼쪽 탐색창에서 모델 탭을 선택하고, 평가 측정항목을 가져올 모델을 선택합니다.

  3. 평가 탭을 엽니다.

  4. 아래로 스크롤하여 특성 중요도 그래프를 확인합니다.

AutoML Tables 평가 페이지

REST

모델의 특성 중요도 값을 가져오려면 model.get 메서드를 사용합니다.

요청 데이터를 사용하기 전에 다음을 바꿉니다.

  • endpoint: 전역 위치인 경우 automl.googleapis.com, EU 리전인 경우 eu-automl.googleapis.com입니다.
  • project-id: Google Cloud 프로젝트 ID입니다.
  • location: 리소스의 위치로 전역인 경우 us-central1, 유럽 연합인 경우 eu입니다.
  • model-id: 특성 중요도 정보를 가져올 모델의 ID입니다. 예를 들면 TBL543입니다.

HTTP 메서드 및 URL:

GET https://endpoint/v1beta1/projects/project-id/locations/location/models/model-id

요청을 보내려면 다음 옵션 중 하나를 선택합니다.

curl

다음 명령어를 실행합니다.

curl -X GET \
-H "Authorization: Bearer $(gcloud auth print-access-token)" \
-H "x-goog-user-project: project-id" \
"https://endpoint/v1beta1/projects/project-id/locations/location/models/model-id"

PowerShell

다음 명령어를 실행합니다.

$cred = gcloud auth print-access-token
$headers = @{ "Authorization" = "Bearer $cred"; "x-goog-user-project" = "project-id" }

Invoke-WebRequest `
-Method GET `
-Headers $headers `
-Uri "https://endpoint/v1beta1/projects/project-id/locations/location/models/model-id" | Select-Object -Expand Content
각 열의 특성 중요도 값은 TablesModelColumnInfo 객체에 반환됩니다.
{
  "name": "projects/292381/locations/us-central1/models/TBL543",
  "displayName": "Quickstart_Model",
  ...
  "tablesModelMetadata": {
    "targetColumnSpec": {
    ...
    },
    "inputFeatureColumnSpecs": [
    ...
    ],
    "optimizationObjective": "MAXIMIZE_AU_ROC",
    "tablesModelColumnInfo": [
      {
        "columnSpecName": "projects/292381/locations/us-central1/datasets/TBL543/tableSpecs/246/columnSpecs/331",
        "columnDisplayName": "Contact",
        "featureImportance": 0.093201876
      },
      {
        "columnSpecName": "projects/292381/locations/us-central1/datasets/TBL543/tableSpecs/246/columnSpecs/638",
        "columnDisplayName": "Month",
        "featureImportance": 0.215029223
      },
      ...
    ],
    "trainBudgetMilliNodeHours": "1000",
    "trainCostMilliNodeHours": "1000",
    "classificationType": "BINARY",
    "predictionSampleRows": [
    ...
    ],
    "splitPercentageConfig": {
    ...
    }
  },
  "creationState": "CREATED",
  "deployedModelSizeBytes": "1160941568"
}

Java

리소스가 EU 리전에 있다면 엔드포인트를 명시적으로 설정해야 합니다. 자세히 알아보기


import com.google.cloud.automl.v1beta1.AutoMlClient;
import com.google.cloud.automl.v1beta1.Model;
import com.google.cloud.automl.v1beta1.ModelName;
import com.google.cloud.automl.v1beta1.TablesModelColumnInfo;
import io.grpc.StatusRuntimeException;
import java.io.IOException;
import java.text.DateFormat;
import java.text.SimpleDateFormat;

public class TablesGetModel {

  public static void main(String[] args) throws IOException, StatusRuntimeException {
    // TODO(developer): Replace these variables before running the sample.
    String projectId = "YOUR_PROJECT_ID";
    String region = "YOUR_REGION";
    String modelId = "YOUR_MODEL_ID";
    getModel(projectId, region, modelId);
  }

  // Demonstrates using the AutoML client to get model details.
  public static void getModel(String projectId, String computeRegion, String modelId)
      throws IOException, StatusRuntimeException {
    // Initialize client that will be used to send requests. This client only needs to be created
    // once, and can be reused for multiple requests. After completing all of your requests, call
    // the "close" method on the client to safely clean up any remaining background resources.
    try (AutoMlClient client = AutoMlClient.create()) {

      // Get the full path of the model.
      ModelName modelFullId = ModelName.of(projectId, computeRegion, modelId);

      // Get complete detail of the model.
      Model model = client.getModel(modelFullId);

      // Display the model information.
      System.out.format("Model name: %s%n", model.getName());
      System.out.format(
          "Model Id: %s\n", model.getName().split("/")[model.getName().split("/").length - 1]);
      System.out.format("Model display name: %s%n", model.getDisplayName());
      System.out.format("Dataset Id: %s%n", model.getDatasetId());
      System.out.println("Tables Model Metadata: ");
      System.out.format(
          "\tTraining budget: %s%n", model.getTablesModelMetadata().getTrainBudgetMilliNodeHours());
      System.out.format(
          "\tTraining cost: %s%n", model.getTablesModelMetadata().getTrainBudgetMilliNodeHours());

      DateFormat dateFormat = new SimpleDateFormat("yyyy-MM-dd'T'HH:mm:ss.SSSZ");
      String createTime =
          dateFormat.format(new java.util.Date(model.getCreateTime().getSeconds() * 1000));
      System.out.format("Model create time: %s%n", createTime);

      System.out.format("Model deployment state: %s%n", model.getDeploymentState());

      // Get features of top importance
      for (TablesModelColumnInfo info :
          model.getTablesModelMetadata().getTablesModelColumnInfoList()) {
        System.out.format(
            "Column: %s - Importance: %.2f%n",
            info.getColumnDisplayName(), info.getFeatureImportance());
      }
    }
  }
}

Node.js

리소스가 EU 리전에 있다면 엔드포인트를 명시적으로 설정해야 합니다. 자세히 알아보기

const automl = require('@google-cloud/automl');
const client = new automl.v1beta1.AutoMlClient();

/**
 * Demonstrates using the AutoML client to get model details.
 * TODO(developer): Uncomment the following lines before running the sample.
 */
// const projectId = '[PROJECT_ID]' e.g., "my-gcloud-project";
// const computeRegion = '[REGION_NAME]' e.g., "us-central1";
// const modelId = '[MODEL_ID]' e.g., "TBL4704590352927948800";

// Get the full path of the model.
const modelFullId = client.modelPath(projectId, computeRegion, modelId);

// Get complete detail of the model.
client
  .getModel({name: modelFullId})
  .then(responses => {
    const model = responses[0];

    // Display the model information.
    console.log(`Model name: ${model.name}`);
    console.log(`Model Id: ${model.name.split('/').pop(-1)}`);
    console.log(`Model display name: ${model.displayName}`);
    console.log(`Dataset Id: ${model.datasetId}`);
    console.log('Tables model metadata: ');
    console.log(
      `\tTraining budget: ${model.tablesModelMetadata.trainBudgetMilliNodeHours}`
    );
    console.log(
      `\tTraining cost: ${model.tablesModelMetadata.trainCostMilliNodeHours}`
    );
    console.log(`Model deployment state: ${model.deploymentState}`);
  })
  .catch(err => {
    console.error(err);
  });

Python

AutoML Tables용 클라이언트 라이브러리에는 AutoML Tables API로 간소화할 수 있는 추가 Python 메서드가 포함됩니다. 이러한 메서드는 데이터세트와 모델을 id가 아닌 이름으로 지칭합니다. 데이터 세트와 모델 이름은 고유해야 합니다. 자세한 내용은 클라이언트 참조를 확인하세요.

리소스가 EU 리전에 있다면 엔드포인트를 명시적으로 설정해야 합니다. 자세히 알아보기

# TODO(developer): Uncomment and set the following variables
# project_id = 'PROJECT_ID_HERE'
# compute_region = 'COMPUTE_REGION_HERE'
# model_display_name = 'MODEL_DISPLAY_NAME_HERE'

from google.cloud import automl_v1beta1 as automl

client = automl.TablesClient(project=project_id, region=compute_region)

# Get complete detail of the model.
model = client.get_model(model_display_name=model_display_name)

# Retrieve deployment state.
if model.deployment_state == automl.Model.DeploymentState.DEPLOYED:
    deployment_state = "deployed"
else:
    deployment_state = "undeployed"

# get features of top importance
feat_list = [
    (column.feature_importance, column.column_display_name)
    for column in model.tables_model_metadata.tables_model_column_info
]
feat_list.sort(reverse=True)
if len(feat_list) < 10:
    feat_to_show = len(feat_list)
else:
    feat_to_show = 10

# Display the model information.
print(f"Model name: {model.name}")
print("Model id: {}".format(model.name.split("/")[-1]))
print(f"Model display name: {model.display_name}")
print("Features of top importance:")
for feat in feat_list[:feat_to_show]:
    print(feat)
print(f"Model create time: {model.create_time}")
print(f"Model deployment state: {deployment_state}")

로컬 특성 중요도

로컬 특성 중요도는 특정 예측 요청의 개별 기능이 결과 예측에 어떤 영향을 주었는지 보여줍니다.

각 로컬 특성 중요도 값에 도달하려면 먼저 기준이 되는 예측 점수를 계산해야 합니다. 기준 값은 숫자 특성의 중앙 값과 범주형 특성의 최빈값을 사용해 학습 데이터에서 계산됩니다. 기본 값에서 생성된 예측은 기본 예측 점수가 됩니다.

분류 모델에서 로컬 특성 중요도는 기본 예측 점수와 비교할 때 점수가 가장 높은 클래스에 할당된 확률에 각 특성을 얼마나 가감해야 하는지 알려줍니다. 점수 값은 0.0과 1.0 사이이므로 분류 모델의 로컬 특성 중요도는 항상 -1.0과 1.0(포함) 사이입니다.

회귀 모델에서 특정 예측의 로컬 특성 중요도는 기본 예측 점수와 비교할 때 결과에 각 특성을 얼마나 가감해야 하는지 알려줍니다.

로컬 특성 중요도는 온라인 및 일괄 예측 모두에 사용할 수 있습니다.

온라인 예측을 위한 로컬 특성 중요도 가져오기

콘솔

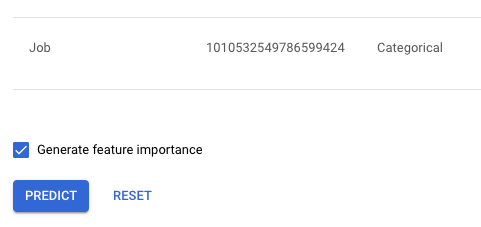
Google Cloud Console을 사용하여 온라인 예측을 위해 로컬 특성 중요도 값을 가져오려면 온라인 예측 가져오기의 단계를 따라 특성 중요도 생성 체크박스를 선택합니다.

AutoML Tables 특성 중요도 체크박스

REST

온라인 예측 요청을 위해 로컬 특성 중요도를 가져오려면 feature_importance 매개변수를 true로 설정하여 model.predict 메서드를 사용합니다.

요청 데이터를 사용하기 전에 다음을 바꿉니다.

  • endpoint: 전역 위치인 경우 automl.googleapis.com, EU 리전인 경우 eu-automl.googleapis.com입니다.
  • project-id: Google Cloud 프로젝트 ID입니다.
  • location: 리소스의 위치로 전역인 경우 us-central1, 유럽 연합인 경우 eu입니다.
  • model-id: 모델의 ID입니다. 예를 들면 TBL543입니다.
  • valueN: 각 열의 값이 올바른 순서로 표시됩니다.

HTTP 메서드 및 URL:

POST https://endpoint/v1beta1/projects/project-id/locations/location/models/model-id:predict

JSON 요청 본문:

{
  "payload": {
    "row": {
      "values": [
        value1, value2,...
      ]
    }
  }
  "params": {
    "feature_importance": "true"
  }
}

요청을 보내려면 다음 옵션 중 하나를 선택합니다.

curl

요청 본문을 request.json 파일에 저장하고 다음 명령어를 실행합니다.

curl -X POST \
-H "Authorization: Bearer $(gcloud auth print-access-token)" \
-H "x-goog-user-project: project-id" \
-H "Content-Type: application/json; charset=utf-8" \
-d @request.json \
"https://endpoint/v1beta1/projects/project-id/locations/location/models/model-id:predict"

PowerShell

요청 본문을 request.json 파일에 저장하고 다음 명령어를 실행합니다.

$cred = gcloud auth print-access-token
$headers = @{ "Authorization" = "Bearer $cred"; "x-goog-user-project" = "project-id" }

Invoke-WebRequest `
-Method POST `
-Headers $headers `
-ContentType: "application/json; charset=utf-8" `
-InFile request.json `
-Uri "https://endpoint/v1beta1/projects/project-id/locations/location/models/model-id:predict" | Select-Object -Expand Content
특성 중요도 결과는 `tablesModelColumnInfo` 객체에 반환됩니다.
"tablesModelColumnInfo": [
  {
     "columnSpecName": "projects/2381/locations/us-central1/datasets/TBL8440/tableSpecs/766336/columnSpecs/4704",
     "columnDisplayName": "Promo",
     "featureImportance": 1626.5464
  },
  {
     "columnSpecName": "projects/2381/locations/us-central1/datasets/TBL8440/tableSpecs/766336/columnSpecs/6800",
     "columnDisplayName": "Open",
     "featureImportance": -7496.5405
  },
  {
     "columnSpecName": "projects/2381/locations/us-central1/datasets/TBL8440/tableSpecs/766336/columnSpecs/9824",
     "columnDisplayName": "StateHoliday"
  }
],

열에 값이 0인 특성 중요도가 포함되어 있으면 특성 중요도가 해당 열에 표시되지 않습니다.

Java

리소스가 EU 리전에 있다면 엔드포인트를 명시적으로 설정해야 합니다. 자세히 알아보기

import com.google.cloud.automl.v1beta1.AnnotationPayload;
import com.google.cloud.automl.v1beta1.ExamplePayload;
import com.google.cloud.automl.v1beta1.ModelName;
import com.google.cloud.automl.v1beta1.PredictRequest;
import com.google.cloud.automl.v1beta1.PredictResponse;
import com.google.cloud.automl.v1beta1.PredictionServiceClient;
import com.google.cloud.automl.v1beta1.Row;
import com.google.cloud.automl.v1beta1.TablesAnnotation;
import com.google.protobuf.Value;
import java.io.IOException;
import java.util.ArrayList;
import java.util.List;

class TablesPredict {

  public static void main(String[] args) throws IOException {
    // TODO(developer): Replace these variables before running the sample.
    String projectId = "YOUR_PROJECT_ID";
    String modelId = "YOUR_MODEL_ID";
    // Values should match the input expected by your model.
    List<Value> values = new ArrayList<>();
    // values.add(Value.newBuilder().setBoolValue(true).build());
    // values.add(Value.newBuilder().setNumberValue(10).build());
    // values.add(Value.newBuilder().setStringValue("YOUR_STRING").build());
    predict(projectId, modelId, values);
  }

  static void predict(String projectId, String modelId, List<Value> values) throws IOException {
    // Initialize client that will be used to send requests. This client only needs to be created
    // once, and can be reused for multiple requests. After completing all of your requests, call
    // the "close" method on the client to safely clean up any remaining background resources.
    try (PredictionServiceClient client = PredictionServiceClient.create()) {
      // Get the full path of the model.
      ModelName name = ModelName.of(projectId, "us-central1", modelId);
      Row row = Row.newBuilder().addAllValues(values).build();
      ExamplePayload payload = ExamplePayload.newBuilder().setRow(row).build();

      // Feature importance gives you visibility into how the features in a specific prediction
      // request informed the resulting prediction. For more info, see:
      // https://cloud.google.com/automl-tables/docs/features#local
      PredictRequest request =
          PredictRequest.newBuilder()
              .setName(name.toString())
              .setPayload(payload)
              .putParams("feature_importance", "true")
              .build();

      PredictResponse response = client.predict(request);

      System.out.println("Prediction results:");
      for (AnnotationPayload annotationPayload : response.getPayloadList()) {
        TablesAnnotation tablesAnnotation = annotationPayload.getTables();
        System.out.format(
            "Classification label: %s%n", tablesAnnotation.getValue().getStringValue());
        System.out.format("Classification score: %.3f%n", tablesAnnotation.getScore());
        // Get features of top importance
        tablesAnnotation
            .getTablesModelColumnInfoList()
            .forEach(
                info ->
                    System.out.format(
                        "\tColumn: %s - Importance: %.2f%n",
                        info.getColumnDisplayName(), info.getFeatureImportance()));
      }
    }
  }
}

Node.js

리소스가 EU 리전에 있다면 엔드포인트를 명시적으로 설정해야 합니다. 자세히 알아보기


/**
 * Demonstrates using the AutoML client to request prediction from
 * automl tables using csv.
 * TODO(developer): Uncomment the following lines before running the sample.
 */
// const projectId = '[PROJECT_ID]' e.g., "my-gcloud-project";
// const computeRegion = '[REGION_NAME]' e.g., "us-central1";
// const modelId = '[MODEL_ID]' e.g., "TBL000000000000";
// const inputs = [{ numberValue: 1 }, { stringValue: 'value' }, { stringValue: 'value2' } ...]

const automl = require('@google-cloud/automl');

// Create client for prediction service.
const automlClient = new automl.v1beta1.PredictionServiceClient();

// Get the full path of the model.
const modelFullId = automlClient.modelPath(projectId, computeRegion, modelId);

async function predict() {
  // Set the payload by giving the row values.
  const payload = {
    row: {
      values: inputs,
    },
  };

  // Params is additional domain-specific parameters.
  // Currently there is no additional parameters supported.
  const [response] = await automlClient.predict({
    name: modelFullId,
    payload: payload,
    params: {feature_importance: true},
  });
  console.log('Prediction results:');

  for (const result of response.payload) {
    console.log(`Predicted class name: ${result.displayName}`);
    console.log(`Predicted class score: ${result.tables.score}`);

    // Get features of top importance
    const featureList = result.tables.tablesModelColumnInfo.map(
      columnInfo => {
        return {
          importance: columnInfo.featureImportance,
          displayName: columnInfo.columnDisplayName,
        };
      }
    );
    // Sort features by their importance, highest importance first
    featureList.sort((a, b) => {
      return b.importance - a.importance;
    });

    // Print top 10 important features
    console.log('Features of top importance');
    console.log(featureList.slice(0, 10));
  }
}
predict();

Python

AutoML Tables용 클라이언트 라이브러리에는 AutoML Tables API로 간소화할 수 있는 추가 Python 메서드가 포함됩니다. 이러한 메서드는 데이터세트와 모델을 id가 아닌 이름으로 지칭합니다. 데이터 세트와 모델 이름은 고유해야 합니다. 자세한 내용은 클라이언트 참조를 확인하세요.

리소스가 EU 리전에 있다면 엔드포인트를 명시적으로 설정해야 합니다. 자세히 알아보기

# TODO(developer): Uncomment and set the following variables
# project_id = 'PROJECT_ID_HERE'
# compute_region = 'COMPUTE_REGION_HERE'
# model_display_name = 'MODEL_DISPLAY_NAME_HERE'
# inputs = {'value': 3, ...}

from google.cloud import automl_v1beta1 as automl

client = automl.TablesClient(project=project_id, region=compute_region)

if feature_importance:
    response = client.predict(
        model_display_name=model_display_name,
        inputs=inputs,
        feature_importance=True,
    )
else:
    response = client.predict(model_display_name=model_display_name, inputs=inputs)

print("Prediction results:")
for result in response.payload:
    print(f"Predicted class name: {result.tables.value}")
    print(f"Predicted class score: {result.tables.score}")

    if feature_importance:
        # get features of top importance
        feat_list = [
            (column.feature_importance, column.column_display_name)
            for column in result.tables.tables_model_column_info
        ]
        feat_list.sort(reverse=True)
        if len(feat_list) < 10:
            feat_to_show = len(feat_list)
        else:
            feat_to_show = 10

        print("Features of top importance:")
        for feat in feat_list[:feat_to_show]:
            print(feat)

일괄 예측을 위한 로컬 특성 중요도 가져오기

콘솔

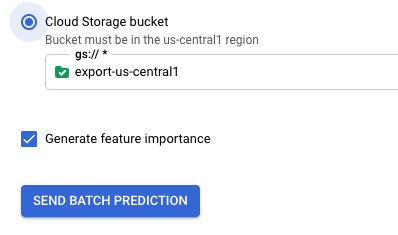
Google Cloud Console을 사용하여 일괄 예측을 위한 로컬 특성 중요도 값을 가져오려면 일괄 예측 요청의 단계를 따르고 특성 중요도 생성 체크박스를 선택합니다.

AutoML Tables 특성 중요도 체크박스

특성 중요도는 feature_importance.<feature_name>라는 모든 특성에 새 열을 추가하여 반환됩니다.

REST

일괄 예측 요청을 위한 로컬 특성 중요도를 가져오려면 feature_importance 매개변수를 true로 설정하여 model.batchPredict 메서드를 사용합니다.

다음 예에서는 요청 데이터 및 결과에 BigQuery를 사용합니다. Cloud Storage를 사용하는 요청에 동일한 추가 매개변수를 사용합니다.

요청 데이터를 사용하기 전에 다음을 바꿉니다.

  • endpoint: 전역 위치인 경우 automl.googleapis.com, EU 리전인 경우 eu-automl.googleapis.com입니다.
  • project-id: Google Cloud 프로젝트 ID입니다.
  • location: 리소스의 위치로 전역인 경우 us-central1, 유럽 연합인 경우 eu입니다.
  • model-id: 모델의 ID입니다. 예를 들면 TBL543입니다.
  • dataset-id: 예측 데이터가 있는 BigQuery 데이터 세트의 ID입니다.
  • table-id: 예측 데이터가 있는 BigQuery 테이블의 ID입니다.

    AutoML Tables는 project-id.dataset-id.table-idprediction-<model_name>-<timestamp>라는 예측 결과에 대한 하위 폴더를 만듭니다.

HTTP 메서드 및 URL:

POST https://endpoint/v1beta1/projects/project-id/locations/location/models/model-id:batchPredict

JSON 요청 본문:

{
  "inputConfig": {
    "bigquerySource": {
      "inputUri": "bq://project-id.dataset-id.table-id"
    },
  },
  "outputConfig": {
    "bigqueryDestination": {
      "outputUri": "bq://project-id"
    },
  },
  "params": {"feature_importance": "true"}
}

요청을 보내려면 다음 옵션 중 하나를 선택합니다.

curl

요청 본문을 request.json 파일에 저장하고 다음 명령어를 실행합니다.

curl -X POST \
-H "Authorization: Bearer $(gcloud auth print-access-token)" \
-H "x-goog-user-project: project-id" \
-H "Content-Type: application/json; charset=utf-8" \
-d @request.json \
"https://endpoint/v1beta1/projects/project-id/locations/location/models/model-id:batchPredict"

PowerShell

요청 본문을 request.json 파일에 저장하고 다음 명령어를 실행합니다.

$cred = gcloud auth print-access-token
$headers = @{ "Authorization" = "Bearer $cred"; "x-goog-user-project" = "project-id" }

Invoke-WebRequest `
-Method POST `
-Headers $headers `
-ContentType: "application/json; charset=utf-8" `
-InFile request.json `
-Uri "https://endpoint/v1beta1/projects/project-id/locations/location/models/model-id:batchPredict" | Select-Object -Expand Content
일괄 예측은 장기 실행 작업입니다. 작업 상태를 폴링하거나 작업이 반환될 때까지 기다립니다. 자세히 알아보기

특성 중요도는 feature_importance.<feature_name>라는 모든 특성에 새 열을 추가하여 반환됩니다.

로컬 특성 중요도 사용 시 고려사항:

  • 로컬 특성 중요도 결과는 2019년 11월 15일 이후에 학습된 모델에만 사용할 수 있습니다.

  • 행이 1,000,000개 이상 또는 열이 300개 이상인 일괄 예측 요청에서 로컬 특성 중요도를 사용 설정하는 것은 지원되지 않습니다.

  • 각 로컬 특성 중요도 값은 특성이 해당 행의 예측에 영향을 미친 정도만 나타냅니다. 모델의 전반적인 동작을 이해하려면 모델 특성 중요도를 사용하세요.

  • 로컬 특성 중요도 값은 항상 기준 값을 기준으로 합니다. 로컬 특성 중요도 결과를 평가할 때 기준 값을 참조해야 합니다. 기준 값은 Google Cloud Console에서만 사용할 수 있습니다.

  • 로컬 특성 중요도 값은 모델을 학습시키는 데 사용되는 모델 및 데이터에 전적으로 의존합니다. 이러한 값은 모델이 데이터에서 찾아내는 패턴에는 영향을 미치지만 데이터에서 근본적인 관계를 밝히지는 못합니다. 따라서 특정 특성의 특성 중요도가 높으면 해당 특성과 타겟 사이의 관계를 입증하지 못하며, 모델이 예측에 이 특성을 사용 중이라는 점만 나타낼 뿐입니다.

  • 예측에 학습 데이터 범위를 완전히 벗어나는 데이터가 포함된 경우 로컬 특성 중요도가 의미 있는 결과를 제공하지 못할 수 있습니다.

  • 특성 중요도를 생성하면 예측에 필요한 시간과 컴퓨팅 리소스가 늘어납니다. 또한 요청은 특성 중요도가 없는 예측 요청과 다른 할당량을 사용합니다. 자세히 알아보기

  • 특성 중요도 값만으로는 모델이 공평하고, 편향되지 않았으며, 품질을 신뢰할 수 있는지 여부를 알 수 없습니다. 특성 중요도 외에 학습 데이터 세트, 절차, 평가 측정항목을 신중하게 평가해야 합니다.