Google Distributed Cloud can run in one of three load balancing modes: integrated, manual, or bundled. This document shows how to configure Google Distributed Cloud to run in bundled load balancing mode.
The bundled load balancer that Google Distributed Cloud provides is the Seesaw load balancer.
The instructions here are complete. For a shorter introduction to using the Seesaw load balancer, see Seesaw load balancer (quickstart).
In bundled load balancing mode, Google Distributed Cloud provides and manages the load balancer. You do not have to get a license for a load balancer, and the amount of setup that you have to do is minimal.
This document shows how to configure bundled load balancing for an admin cluster and one associated user cluster.
Advantages of bundled load balancing mode
Bundled load balancing mode provides these advantages compared to manual load balancing mode:
A single team can be in charge of both cluster creation and load balancer configuration. For example, a cluster administration team would not have to rely on a separate networking team to acquire, run, and configure the load balancer ahead of time.
Google Distributed Cloud automatically configures virtual IP addresses (VIPs) on the load balancer. At cluster creation time, Google Distributed Cloud configures the load balancer with VIPs for the Kubernetes API server, the ingress service, and the cluster add-ons. As clients create Services of type LoadBalancer, Google Distributed Cloud automatically configures the Service VIPs on the load balancer.
Dependencies among organizations, groups, and administrators are reduced. In particular, the group that manages a cluster is less dependent on the group that manages the network.
Recommended versions
We strongly recommend that you use vSphere 6.7 or later, and Virtual Distributed Switch (VDS) 6.6 or later, for bundled load balancing mode.
If you prefer, you can use earlier versions, but your installation will be less secure. The remaining sections in this topic give more detail about the security advantages of using vSphere 6.7+ and VDS 6.6+.
Virtual Router Redundancy Protocol
You can run the Seesaw load balancer on a single VM, or you can run the load balancer in high-availability (HA) mode, which uses two VMs. In HA mode, the Seesaw load balancer uses the Virtual Router Redundancy Protocol (VRRP). The two VMs are called the Master and the Backup. Each Seesaw VM is given a virtual router identifier (VRID) of your choice.
Plan your VLANs
In this exercise, you create an admin cluster and one user cluster. With bundled load balancing mode, we strongly recommend that you have your clusters on separate VLANs.
If your admin cluster is on its own VLAN, control plane traffic is separate from the data plane traffic. This separation protects the admin cluster and the user cluster control planes from inadvertent configuration mistakes. Such mistakes can lead, for example, to issues like a broadcast storm due to layer 2 loops in the same VLAN, or a conflicting IP address that eliminates the desired separation between the data plane and the control plane.
Provision VM resources
For the VMs that run your Seesaw load balancer, provision CPU and memory resources according to the network traffic you expect to encounter.
The Seesaw load balancer is not memory-intensive, and can run in VMs with 1GB of memory. However, the CPU requirement increases as the network packet rate increases.
The following table shows storage, CPU, and memory guidelines for provisioning Seesaw VMs. Because packet rate is not a typical measure of network performance, the table also shows guidelines for the maximum number of active network connections. The guidelines assume an environment where VMs have a 10 Gbps link and CPUs run at less than 70% capacity.
When the Seesaw load balancer runs in HA mode, it uses a (Master, Backup) pair.), so all traffic flows through a single VM.
Because actual use cases vary, these guidelines need to be modified based on your actual traffic. Monitor your CPU and packet rate metrics to determine the necessary changes.
If you need to change CPU and memory for your Seesaw VMs, see Upgrading a load balancer. Note that you can keep the same version of the load balancer, and change the number of CPUs and the memory allocation.
For small admin clusters, we recommend 2 CPUs, and for large admin clusters we recommend 4 CPUs.
| Storage | CPU | Memory | Packet rate (pps) | Maximum active connections |
|---|---|---|---|---|
| 20 GB | 1 (non-production) | 1 GB | 250k | 100 |
| 20 GB | 2 | 3 GB | 450k | 300 |
| 20 GB | 4 | 3 GB | 850k | 6,000 |
| 20 GB | 6 | 3 GB | 1,000k | 10,000 |
Set aside virtual IP addresses
Regardless of your choice of load balancing mode, you must set aside several virtual IP addresses (VIPs) that you intend to use for load balancing. These VIPs allow external clients to reach your Kubernetes API servers, your ingress services, and your add-on services.
Admin cluster VIPs
Set aside a VIP for the Kubernetes API server of your admin cluster. In the
admin cluster configuration file, this is called controlPlaneVIP. This VIP
must be on the same VLAN as the admin cluster nodes and the Seesaw VMs for the
admin cluster.
Set aside a VIP for add-ons in your admin cluster. In the admin cluster
configuration file, this is called addonsVIP. This VIP must be on the same
VLAN as the admin cluster nodes and the Seesaw VMs for the admin cluster.
User cluster VIPs
Set aside a VIP for the Kubernetes API server of your user cluster. In the
user cluster configuration file, this is called controlPlaneVIP. This VIP
must be on the same VLAN as the admin cluster nodes and the Seesaw VMs for the
admin cluster. This is because the Kubernetes API server for the user cluster
runs on a node in the admin cluster.
Set aside a VIP for ingress in your user cluster. In the user cluster
configuration file, this is called ingressVIP. This VIP must be on the same
VLAN as the user cluster nodes and the Seesaw VMs for the user cluster.
Set aside node IP addresses
With bundled load balancing mode, you can specify static IP addresses for your cluster nodes, or your cluster nodes can get their IP addresses from a DHCP server.
If you want your cluster nodes to have static IP addresses, set aside enough addresses for the nodes in the admin cluster and the nodes in all the user clusters you intend to create. For details about how many node IP addresses to set aside, see Creating an admin cluster.
Set aside IP addresses for Seesaw VMs
Next, set aside IP addresses for the VMs that will run your Seesaw load balancers.
The number of addresses you set aside depends on whether you want to create HA Seesaw load balancers or non-HA Seesaw load balancers.
Case 1: HA Seesaw load balancers
For your admin cluster, set aside two IP addresses for a pair of Seesaw VMs. Also for your admin cluster, set aside a single master IP address for the pair of Seesaw VMs. All three of these addresses must be on the same VLAN as your admin cluster nodes.
For your user cluster, set aside two IP addresses for a pair of Seesaw VMs. Also set aside a single master IP address for the pair of Seesaw VMs. All three of these addresses must be on the same VLAN as the user cluster nodes.
Case 2: Non-HA Seesaw load balancers
For your admin cluster, set aside one IP address for a Seesaw VM. Also for your admin cluster, set aside a master IP address for the Seesaw load balancer. Both of these addresses must be on the same VLAN as your admin cluster nodes.
For your user cluster, set aside one IP address for a Seesaw VM. Also set aside a master IP address for the Seesaw load balancer. Both of these addresses must be on the same VLAN as the user cluster nodes.
Plan your port groups
Each of your Seesaw VMs has two network interfaces. For a master Seesaw VM, one of those network interfaces is configured with VIPs, and the other network interface is configured with an IP address taken from an IP block file that you provide. For a backup Seesaw VM, one interface is configured with an IP address taken from the IP block file, and nothing is configured on the other network interface.
For an individual Seesaw VM, the two network interfaces can be connected to the same vSphere port group, or they can be connected to separate port groups. If the port groups are separate, they must be on the same VLAN.
This topic refers to two port groups:
load-balancer port group: For a Seesaw VM, the network interface that is configured with VIPs is connected to this port group.
cluster-node port group: For a Seesaw VM, the network interface that is configured with an IP address taken from your IP block file is connected to this port group. Your cluster nodes are also connected to this port group.
The load-balancer port group and the cluster-node port group can be one and the same. But we strongly recommend that they are separate.
The following diagram illustrates the recommended network configuration for Seesaw load balancing:
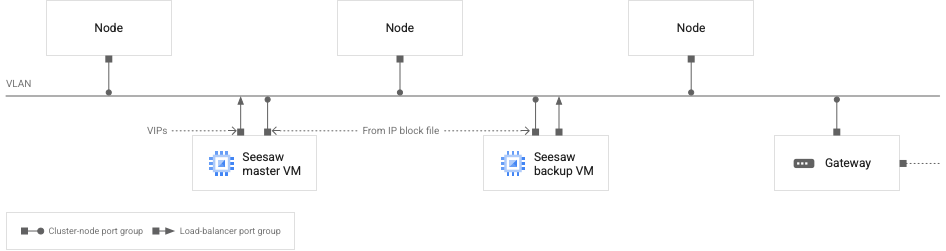 Seesaw VMs and cluster nodes on a VLAN
The preceding diagram represents a single cluster, either an admin cluster or a user cluster. Recall that we recommend that each cluster is on its own VLAN.
In the diagram, you can see the following characteristics of the network:
There are two Seesaw VMs, one master and one backup.
The Seesaw VMs are on the same VLAN as the cluster nodes.
The backup Seesaw VM has two network interfaces. One interface is configured with an IP address taken from your Seesaw IP block file. The other interface is not configured with any IP addresses.
The master Seesaw VM has two network interfaces. One interface is configured with an IP address taken from your Seesaw IP block file. The other interface is configured with VIPs.
Each Seesaw VM has one network interface connected to the load-balancer port group. All other network interfaces in the diagram are connected to the cluster-node port group.
All IP addresses, including VIPs, configured on the network interfaces shown in the diagram must be routable to the VLAN.
For an admin cluster, the VIPs interface on the Seesaw master VM is configured with the following IP addresses:
- The VIP for the master Seesaw VM of the admin cluster
- The admin cluster add-ons VIP
- The control-plane VIP for the admin cluster
- The control plane VIP for the user cluster
- VIPs for Services of type LoadBalancer running in the admin cluster
For a user cluster, the VIPs interface on the Seesaw master VM is configured with the following IP addresses:
- The VIP for the master Seesaw VM of the user cluster
- The user cluster ingress VIP
- VIPs for Services of type LoadBalancer running in the user cluster
Create IP block files
For each cluster, admin and user, specify the addresses you have chosen for your Seesaw VMs in an IP block file. This IP block file is for your load balancer VMs, not your cluster nodes. If you intend to use static IP addresses for your cluster nodes, you must create a separate IP block file for those addresses. Here's an example of an IP block file that specifies two IP addresses for Seesaw VMs:
blocks:
  - netmask: "255.255.255.0"
    gateway: "172.16.20.1"
    ips:
    - ip: "172.16.20.18"
      hostname: "seesaw-vm-1"
    - ip: "172.16.20.19"
      hostname: "seesaw-vm-2"
Fill in your configuration files
Prepare a configuration file for your admin cluster and another configuration file for your user cluster.
In your configuration file for a given cluster, set loadBalancer.kind to
"Seesaw".
Under loadBalancer, fill in the seesaw section:
loadBalancer:
  kind: Seesaw
  seesaw:
    ipBlockFilePath:
    vrid:
    masterIP:
    cpus:
    memoryMB:
    vCenter:
      networkName:
    enableHA:
    disableVRRPMAC:
For information on how to fill in the seesaw section of a cluster
configuration file,
loadbalancer.seesaw (admin cluster)
or loadbalancer.seesaw (user cluster)
Enable MAC learning or promiscuous mode (HA only)
If you are setting up a non-HA Seesaw load balancer, you can skip this section.
If you have set loadBalancer.seesaw.disableVRRPMAC to true, you can skip this
section.
If you are setting up an HA Seesaw load balancer and you have set loadBalancer.seesaw.disableVRRPMAC to false, you must enable some combination of MAC learning, forged transmits, and promiscuous mode on your
load-balancer port group.
How you enable these features varies according to the type of switch you have:
| Switch type | Enabling features | Security impact |
|---|---|---|
| vSphere 7.0 VDS |
For vSphere 7.0 with HA, you are required to set loadBalancer.seesaw.disableVRRPMAC to true. MAC learning is not supported.
|
|
| vSphere 6.7 with VDS 6.6 |
Enable MAC learning and
forged transmits
for your load balancer by running this command:
|
Minimal. If your load-balancer port group is connected only to your Seesaw VMs, then you can limit MAC learning to your trusted Seesaw VMs. |
vSphere 6.5 or vSphere 6.7 with a version of VDS lower than 6.6 |
Enable promiscuous mode and forged transmits for your load-balancer port group. Use the vSphere user interface on the port group page in Networking tab: Edit Settings -> Security. | All VMs on your load-balancer port group are in promiscuous mode. So any VM on your load-balancer port group can see all traffic. If your load-balancer port group is connected only to your Seesaw VMs, then it is only those VMs that can see all traffic. |
| NSX-T logical switch | Enable MAC learning on the logical switch. | vSphere does not support creating two logical switches in the same layer-2 domain. So the Seesaw VMs and the cluster nodes must be on the same logical switch. This means that MAC learning is enabled for all cluster nodes. An attacker might be able to achieve a MAC spoof by running privileged Pods in the cluster. |
| vSphere Standard Switch | Enable promiscuous mode and forged transmits for your load-balancer port group. Use the vSphere user interface on each ESXI host: Configure -> Virtual switches -> Standard Switch -> Edit Setting on the port group -> Security. | All VMs on your load-balancer port group are in promiscuous mode. So any VM on your load-balancer port group can see all traffic. If your load balancer-port group is connected only to your Seesaw VMs, then it is only those VMs that can see all traffic. |
Finish filling in your admin cluster configuration file
Follow the instructions in Create an admin cluster to finish filling in your admin cluster configuration file.
Run preflight checks
Run preflight checks on your admin cluster configuration file:
gkectl check-config --config ADMIN_CLUSTER_CONFIG
Replace ADMIN_CLUSTER_CONFIG with the path of your admin cluster configuration file.
Upload OS images
Upload OS images to your vSphere environment:
gkectl prepare --config ADMIN_CLUSTER_CONFIG
Create a load balancer for your admin cluster
gkectl create loadbalancer --config [ADMIN_CLUSTER_CONFIG]
Create your admin cluster
Follow the instructions in Create an admin cluster to create your admin cluster.
Finish filling in your user cluster configuration files
Follow the instructions in Create a user cluster to finish filling in your user cluster configuration file.
Run preflight checks
Run preflight checks on your user cluster configuration file:
gkectl check-config --kubeconfig ADMIN_CLUSTER_KUBECONFIG --config USER_CLUSTER_CONFIG
Replace the following:
ADMIN_CLUSTERE_KUBECONFIG: the path of your admin cluster kubeconfig file
USER_CLUSTER_CONFIG: the path of your user cluster configuration file
Upload OS images
Upload OS images to your vSphere environment:
gkectl prepare --config USER_CLUSTER_CONFIG
Create a load balancer for your user cluster
Create a load balancer for your user cluster:
gkectl create loadbalancer --config USER_CLUSTER_CONFIG
Create your user cluster
Follow the instructions in Create a user cluster to create your user cluster.
Performance and load testing
The download throughput of your application scales linearly with the number of backends. This is because the backends send responses directly to the clients, bypassing the load balancer, using Direct Server Return.
In contrast, the upload throughput of your application is limited by the capacity of the one Seesaw VM that performs the load balancing.
Applications vary in the amount of CPU and memory that they require, so it is critically important that you do a load test before you start serving a large number of clients.
Testing indicates that a single Seesaw VM with 6 CPUs and 3 GB of memory can handle 10 GB/s (line rate) uploading traffic with 10 K concurrent TCP connections. However, it is important that you run your own load test if you plan to support a large number of concurrent TCP connections.
Scaling limits
With bundled load balancing, there are limits to how much your cluster can scale. There is a limit on the number of nodes in your cluster, and there is a limit on the number of Services that can be configured on your load balancer. There is also a limit on health checks. The number of health checks depends on both the number of nodes and the number of Services.
Starting with version 1.3.1, the number of health checks depends on the number
of nodes and the number of traffic local Services. A traffic local Service is
a Service that has its
externalTrafficPolicy
set to "Local".
| Version 1.3.0 | Version 1.3.1 and later | |
|---|---|---|
| Max Services (S) | 100 | 500 |
| Max nodes (N) | 100 | 100 |
| Max health checks | S * N <= 10K | N + L * N <= 10K, where L is number of traffic local services |
Example: In version 1.3.1, suppose you have 100 nodes and 99 traffic local Services. Then the number of health checks is 100 + 99 * 100 = 10,000, which is within the 10K limit.
Upgrade the load balancer for a cluster
When you upgrade a cluster, the load balancer is automatically upgraded. You don't need to run a separate command to upgrade the load balancer.
If you like, you can update the CPUs or memory of your Seesaw VMs without
doing a full upgrade. First edit the cpus and memoryMB values in your
cluster configuration file. For example:
apiVersion: v1
bundlePath:
loadBalancer:
  kind: Seesaw
  seesaw:
    cpus: 3
    memoryMB: 3072
Then, to update the load balancer for an admin cluster:
gkectl upgrade loadbalancer --kubeconfig ADMIN_CLUSTER_KUBECONFIG \
    --config ADMIN_CLUSTER_CONFIG --admin-cluster
gkectl upgrade loadbalancer --kubeconfig ADMIN_CLUSTER_KUBECONFIG \
    --config USER_CLUSTER_CONFIG
Replace the following:
ADMIN_CLUSTER_KUBECONFIG: the path your admin cluster kubeconfig file
ADMIN_CLUSTER_CONFIG: the path of your admin cluster configuration file
USER_CLUSTER_CONFIG: the path of your user cluster configuration file
View Seesaw logs
The Seesaw bundled load balancer stores log files on the Seesaw VMs in
/var/log/seesaw/. The most important log file is seesaw_engine.INFO.
Starting with v1.6, if Stackdriver is enabled, logs are uploaded to Cloud as well. You can view them under resource "anthos_l4lb". To disable log uploading, you can ssh to the VM and run:
sudo systemctl disable --now docker.fluent-bit.service
View information about your Seesaw VMs
You can get information about your Seesaw VMs for a cluster from the SeesawGroup custom resource.
View the SeesawGroup custom resource for a cluster:
kubectl --kubeconfig CLUSTER_KUBECONFIG get seesawgroups -n kube-system -o yaml
Replace CLUSTER_KUBECONFIG with the path of the cluster kubeconfig file.
The output has an isReady field that shows whether the VMs are ready to
handle traffic. The output also shows the names and IP addresses of the Seesaw
VMs, and which VM is the primary VM:
apiVersion: seesaw.gke.io/v1alpha1
kind: SeesawGroup
metadata:
  ...
  name: seesaw-for-cluster-1
  namespace: kube-system
  ...
spec: {}
status:
  machines:
  - hostname: cluster-1-seesaw-1
    ip: 172.16.20.18
    isReady: true
    lastCheckTime: "2020-02-25T00:47:37Z"
    role: Master
  - hostname: cluster-1-seesaw-2
    ip: 172.16.20.19
    isReady: true
    lastCheckTime: "2020-02-25T00:47:37Z"
    role: Backup
View Seesaw metrics
The Seesaw bundled load balancer provides the following metrics:
- Throughput per Service or node
- Packet rate per Service or node
- Active connections per Service or node
- CPU and memory usage
- Number of healthy backend Pods per Service
- Which VM is the primary and which is the backup
- Uptime
Starting with v1.6, those metrics are uploaded to Cloud with Stackdriver. You can view them under monitoring resource of "anthos_l4lb".
You can also use any monitoring and dashboarding solutions of your choice, as long as they support the Prometheus format.
Delete a load balancer
If you delete a cluster that uses bundled load balancing, you should then delete the Seesaw VMs for that cluster. You can do this by deleting the Seesaw VMs in the vSphere user interface.
As an alternative, you can run gkectl delete loadbalancer.
For an admin cluster:
gkectl delete loadbalancer --config ADMIN_CLUSTER_CONFIG --seesaw-group-file GROUP_FILE
For a user cluster:
gkectl delete loadbalancer  --kubeconfig ADMIN_CLUSTER_KUBECONFIG --config USER_CLUSTER_CONFIG \
    --seesaw-group-file GROUP_FILE
Replace the following:
ADMIN_CLUSTER_CONFIG: the path of the admin cluster configuration file
USER_CLUSTER_CONFIG: the path of the user cluster configuration file
ADMIN_CLUSTER_KUBECONFIG: the path of the admin cluster kubeconfig file
GROUP_FILE: the path of the Seesaw group file. The name of the group file has this form
seesaw-for-CLUSTER_NAME-IDENTIFIER.yaml.
For example:seesaw-for-gke-admin-12345.yaml.
Troubleshooting
Get an SSH connection to a Seesaw VM
Occasionally you might want to SSH into a Seesaw VM for troubleshooting or debugging.
Get the SSH key
If you have already created your cluster, use the following steps to get the SSH key:
Get the
seesaw-sshSecret from the cluster. Get the SSH key from the Secret and base64 decode it. Save the decoded key in a temporary file:kubectl --kubeconfig CLUSTER_KUBECONFIG get -n kube-system secret seesaw-ssh -o \ jsonpath='{@.data.seesaw_ssh}' | base64 -d | base64 -d > /tmp/seesaw-ssh-keyReplace CLUSTER_KUBECONFIG with the path of the cluster kubeconfig file.
Set the appropriate permissions for the key file:
chmod 0600 /tmp/seesaw-ssh-key
If you have not already created your cluster, use the following steps to get the SSH key:
Locate the file named
seesaw-for-CLUSTER_NAME-IDENTIFIER.yaml.The file is called the group file and is located next to
config.yaml.Also,
gkectl create loadbalancerprints the location of the group file.In the file, get the value of
credentials.ssh.privateKey, and base64 decode it. Save the decoded key in a temporary file:cat seesaw-for-CLUSTER_NAME-IDENTIFIER.yaml | grep privatekey | sed 's/ privatekey: //g' \ | base64 -d > /tmp/seesaw-ssh-key
Set the appropriate permissions for the key file:
chmod 0600 /tmp/seesaw-ssh-key
Now you can SSH into the Seesaw VM:
ssh -i /tmp/seesaw-ssh-key ubuntu@SEESAW_IP
Replace SEESAW_IP with the IP address of the Seesaw VM.
Get snapshots
You can capture snapshots for Seesaw VMs by using the
gkectl diagnose snapshot
command along with the --scenario flag.
If you set --scenario to all or all-with-logs, the output includes Seesaw
snapshots along with other snapshots.
If you set --scenario to seesaw, the output includes only Seesaw snapshots.
Examples:
gkectl diagnose snapshot --kubeconfig ADMIN_CLUSTER_KUBECONFIG --scenario seesaw

gkectl diagnose snapshot --kubeconfig ADMIN_CLUSTER_KUBECONFIG --cluster-name CLUSTER_NAME --scenario seesaw

gkectl diagnose snapshot --seesaw-group-file GROUP_FILE --scenario seesaw
Replace the following:
ADMIN_CLUSTER_KUBECONFIG: the path of the admin cluster kubeconfig file
GROUP_FILE: the path of the group file for the cluster.
Known issues
Cisco ACI doesn't work with Direct Server Return (DSR)
Seesaw runs in DSR mode and by default it doesn't work in Cisco ACI because of data-plane IP learning. Possible workaround using Application Endpoint Group can be found here.
Upgrading the Seesaw load balancer does not work in some cases
If you attempt to upgrade a cluster from 1.8.0, or use gkectl upgrade loadbalancer to update some parameters
of your Seesaw load balancer at version 1.8.0, this will not work
in either DHCP or IPAM mode. Wait for an announced fix in an upcoming version before you upgrade.