This page describes how to connect Microsoft OneDrive to Agentspace using data ingestion.
Use the following procedure to sync data from OneDrive.
After you set up your data source and import data the first time, the data store syncs data from that source at a frequency that you select during setup.
Limitations
Incremental sync does not detect folder-level actions like Copy, Move, or Rename.
Before you begin
To enforce data source access control and secure data in Agentspace, ensure that you have configured your identity provider.
About Microsoft Entra ID application registration
Before you can create the connector in Agentspace, you must set up a Microsoft Entra ID application registration to enable secure access to OneDrive. How you register the application depends on the authentication method that you select when you're creating the connector in Agentspace. You can choose one of the following methods:
-
Allows Google to securely access OneDrive using cryptographically signed tokens, avoiding the need for a real user principal.
Requires a subject ID to register Agentspace in Entra. This is available when you create the OneDrive connector in Agentspace.
When you register your app in Entra ID, you must gather the following details:
- Instance URI:
- For all first-level sites:
https://DOMAIN_OR_SERVER.onedrive.com—for example,mydomain.onedrive.com. - For a single site:
https://DOMAIN_OR_SERVER.onedrive.com/[sites/]WEBSITE—for example,mydomain.onedrive.com/sites/sample-site.
- For all first-level sites:
- Tenant ID
- Client ID
These details are necessary to complete the authentication and create the OneDrive connector in Agentspace.
- Instance URI:
Google recommends that you use this method.
-
Gives a granular control over who connects to the OneDrive API.
When you register your app in Entra ID, you must gather the following details:
- Instance URI: This is in the following form:
- For all first-level sites:
https://DOMAIN_OR_SERVER.onedrive.com—for example,mydomain.onedrive.com. - For a single site:
https://DOMAIN_OR_SERVER.onedrive.com/[sites/]WEBSITE—for example,mydomain.onedrive.com/sites/sample-site.
- For all first-level sites:
- Tenant ID
- Client ID
- Client secret
These details are necessary to complete the authentication and create the OneDrive data store in Agentspace.
- Instance URI: This is in the following form:
The authentication process includes signing in to your OneDrive account.
This method is suitable when your OneDrive set up requires a two-factor authentication.
Requires you to create a new OneDrive user, which might add licensing costs.
-
Gives granular control over who connects to the OneDrive API.
When you register your app in Entra ID, you must gather the following details:
- Instance URI:
- For all first-level sites:
https://DOMAIN_OR_SERVER.onedrive.com—for example,mydomain.onedrive.com. - For a single site:
https://DOMAIN_OR_SERVER.onedrive.com/[sites/]WEBSITE—for example,mydomain.onedrive.com/sites/sample-site.
- For all first-level sites:
- Tenant ID
- Client ID
- Client secret
These details are necessary to complete the authentication and create the OneDrive data store in Agentspace.
- Instance URI:
The authentication process includes providing your Entra ID admin-provided username and password.
This method is suitable when your OneDrive setup doesn't require a two-factor authentication.
This method requires you to create a new OneDrive user, which might add licensing costs.
Set up federated credentials
Use the following steps to configure the app registration, grant permissions, and establish authentication. Google recommends that you use the federated credentials method.
Some common error messages that you might encounter during this process are listed in Error messages.
Obtain service account client ID:
- In the Google Cloud console, go to the Agentspace page.
- In the navigation menu, click Data Stores.
- Click Create Data Store.
- On the Select a data source page, scroll or search for OneDrive to connect your third-party source.
- Note the Subject identifier. Don't click Continue yet. Perform the next steps in this task and then complete the steps in the Google Cloud console by following the instructions in Create a OneDrive connector.
Register app in Entra ID:
- Navigate to Microsoft Entra administrator center.
- In the menu, expand the Applications section and select App registrations.
On the App registrations page, select New registration.

Register a new app in Microsoft Entra admin center Create an app registration on the Register an application page:
- In the Supported account types section, select Accounts in the organizational directory only.
- In the Redirect URI section, select Web and enter the redirect
URI
https://vertexaisearch.cloud.google.com/console/oauth/onedrive_oauth.html - Keep the default values for the other settings and click Register.
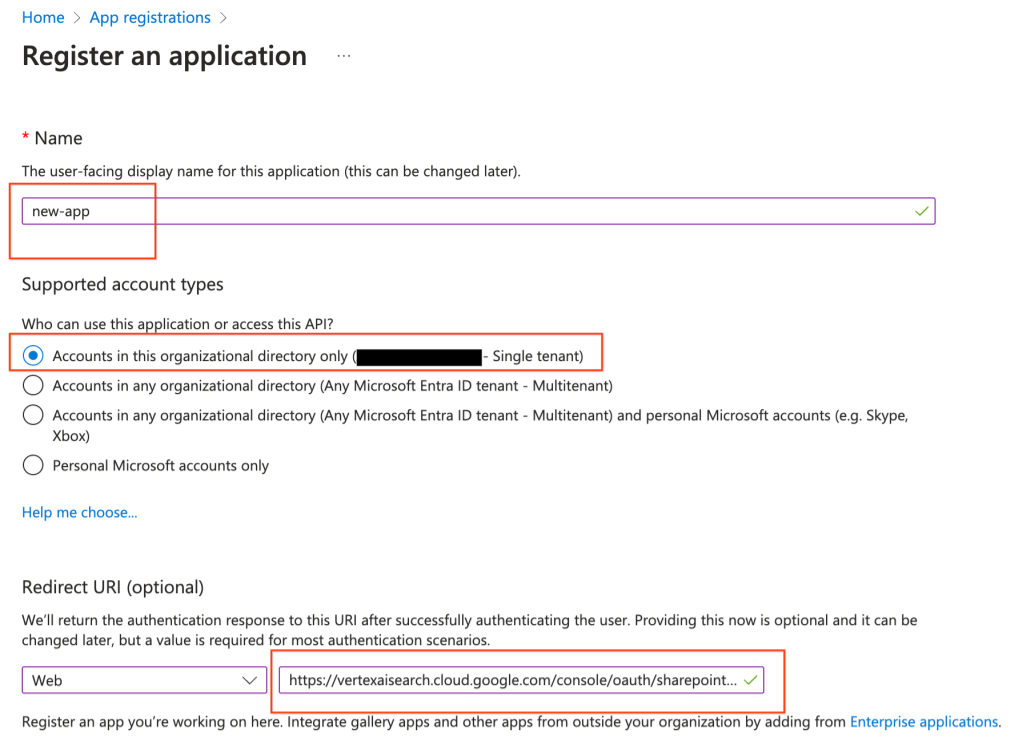
Select the account type and enter the redirect URI Note the Client ID and Tenant ID.
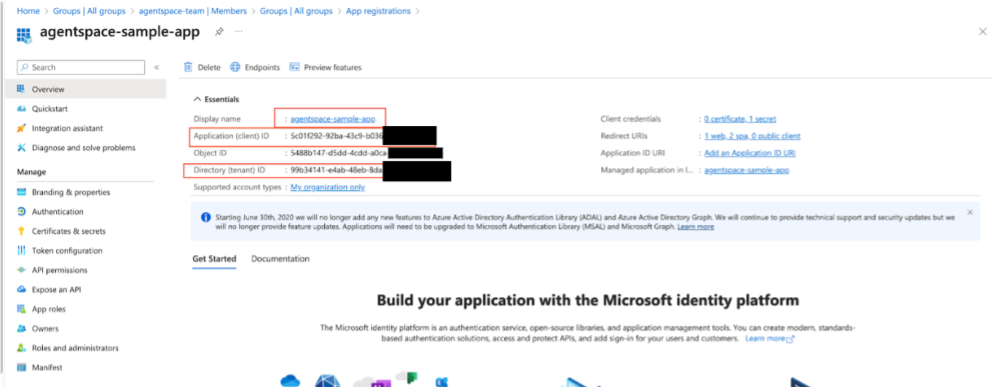
App details page
Add federated credentials:
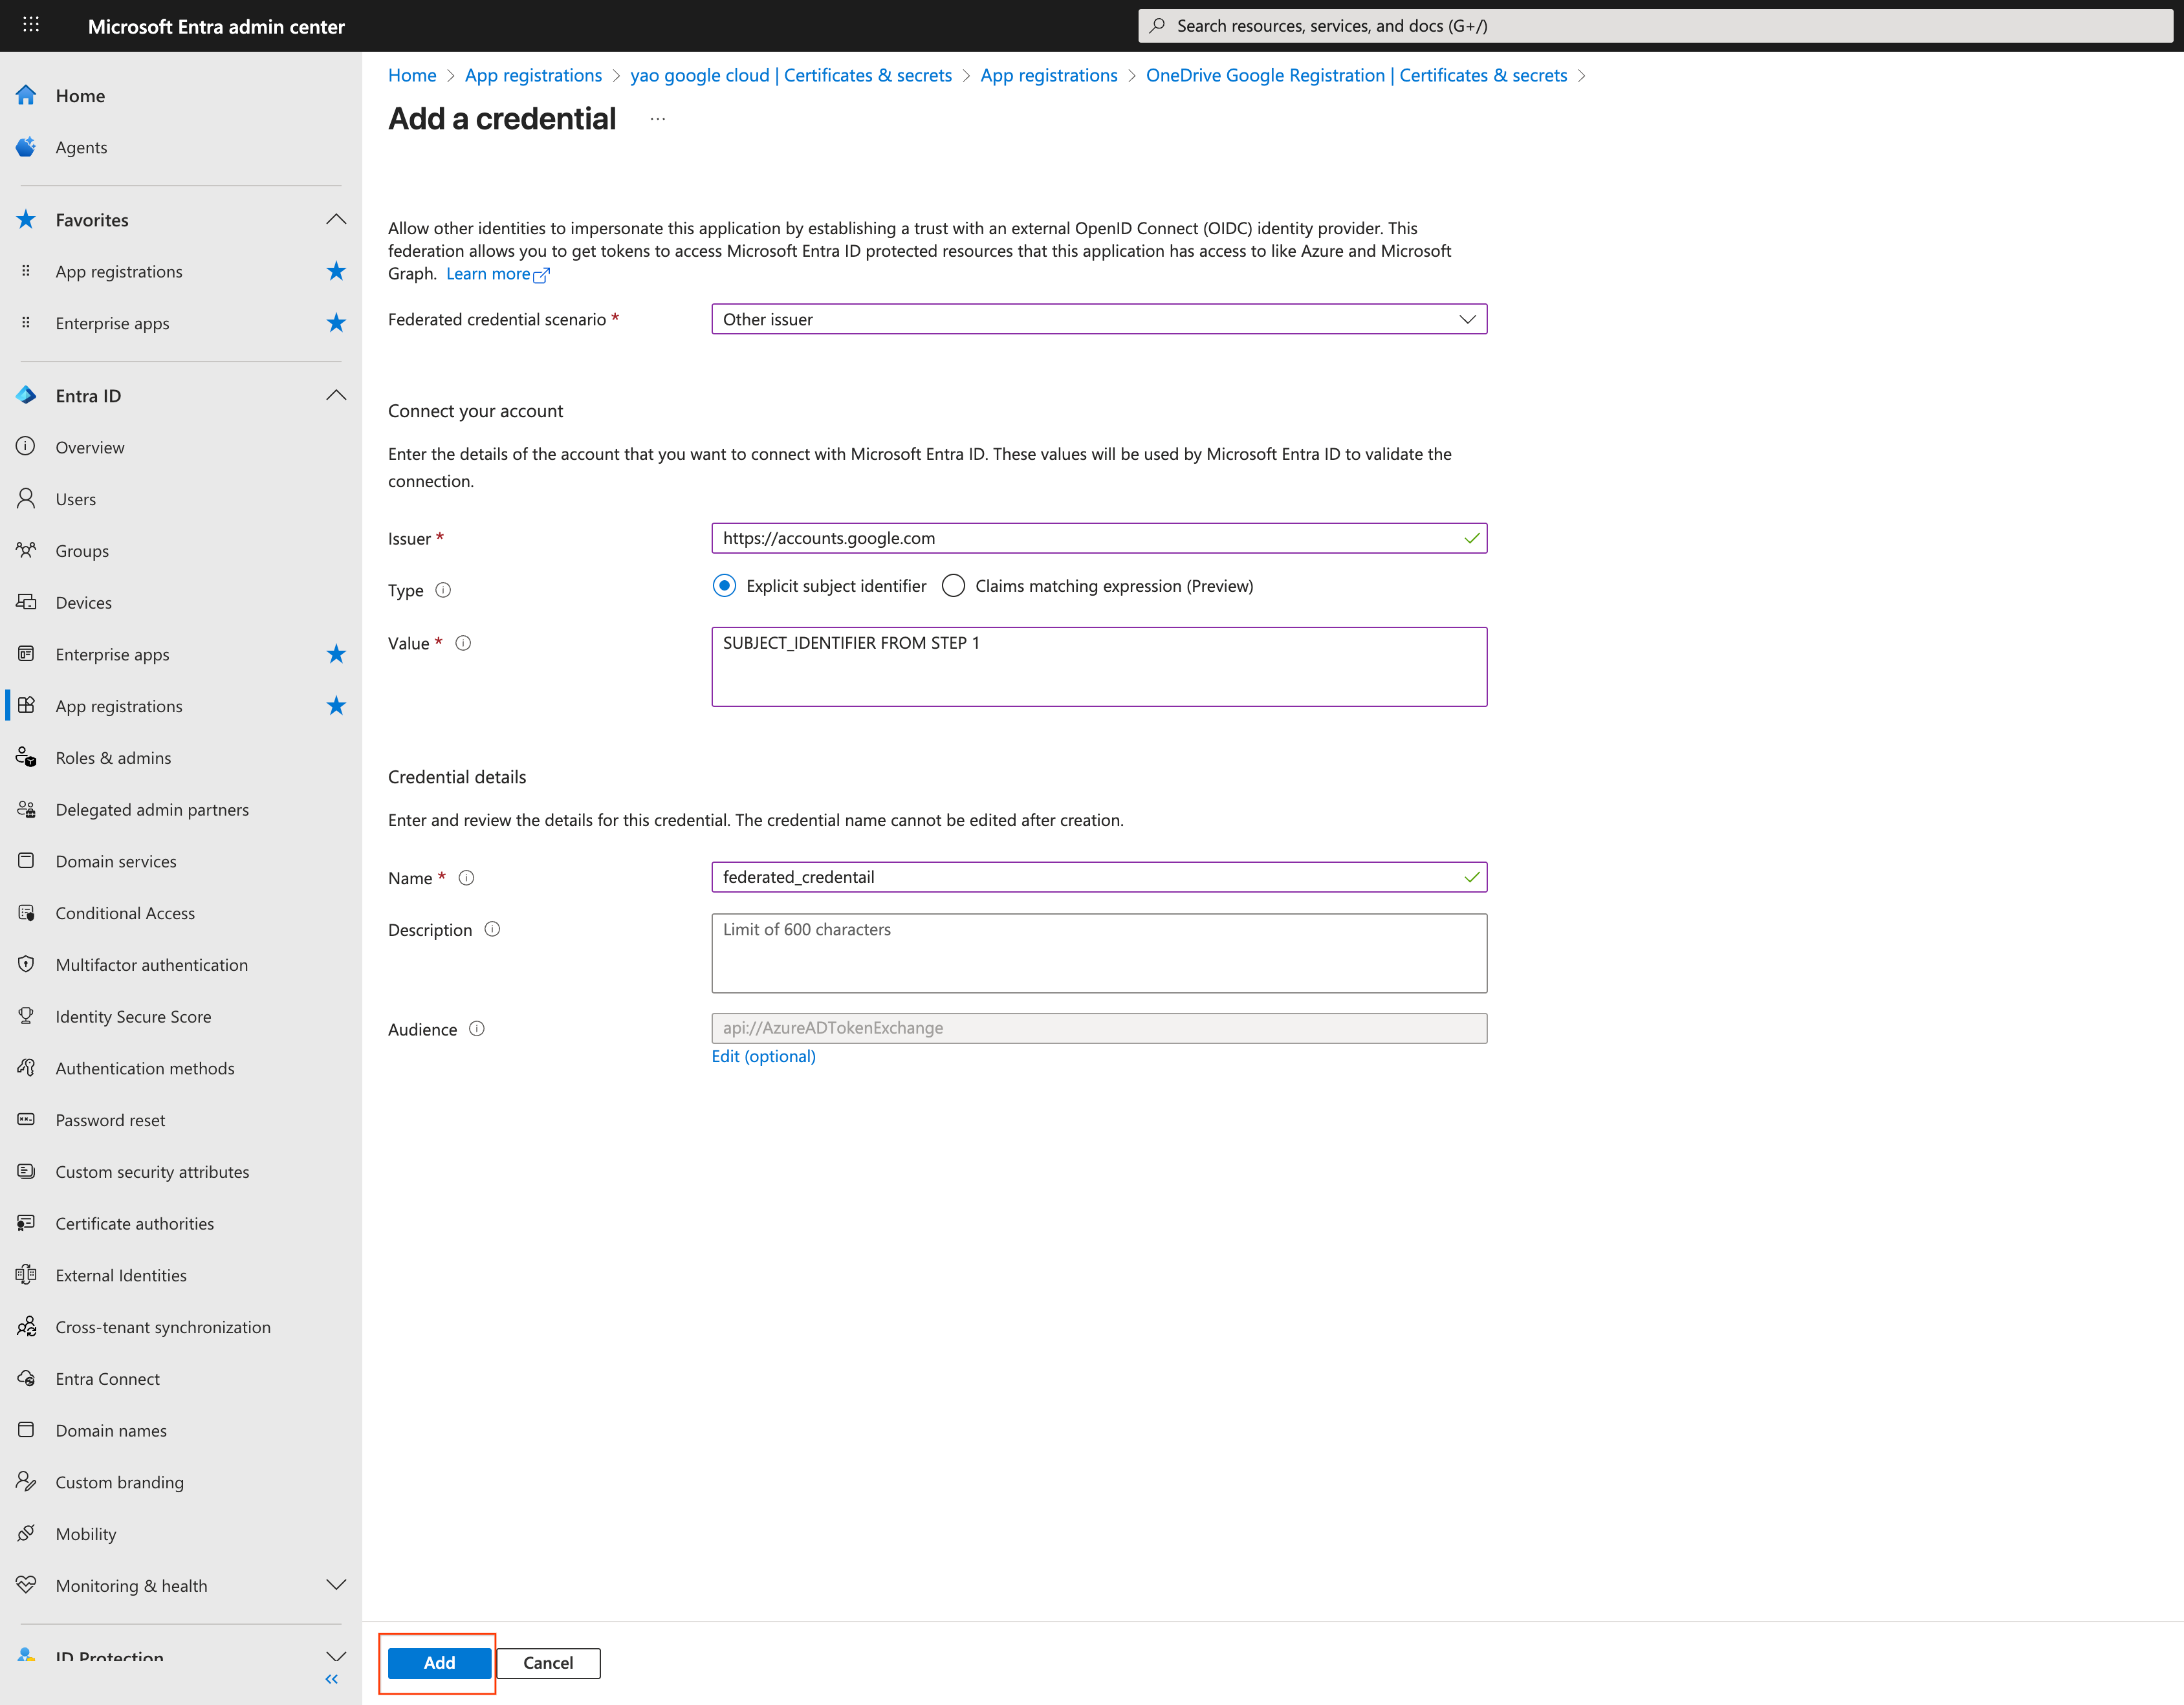
Go to Certificates & secrets > Federated credentials > Add credential.

Add federated credentials in Microsoft Entra Use the following settings:
Federated credential scenario: Other issuer
Issuer:
https://accounts.google.comSubject identifier: Use the value of Subject identifier that you noted in the previous step.
Name: Provide a unique name.
Click Add to grant access.
Connect your Google Account to Microsoft Entra ID
Set API permissions.

Select the app to set API permissions Add and grant the following Microsoft Graph permissions. You can choose between the site control options (
Sites.FullControl.AllandSites.Selected) and profile reading options (User.Read.AllandUser.ReadBasic.All):Microsoft Graph permissions for federated credentials
Permission Type Description Justification GroupMember.Read.AllApplication Read all group memberships This permission allows Agentspace to understand the memberships of the user groups in the OneDrive site. User.ReadDelegated Sign in and read user's profile This is a default permission that must not be removed. When removed, OneDrive displays an error asking you to reinstate this permission.
Files.Read.AllApplication Read files in all site collections This permission allows Agentspace to read all files in all site collections.
Site control options Option 1: Sites.FullControl.AllApplication Full control over all sites This permission allows Agentspace to obtain the OneDrive user groups and role assignments, which aren't included in the
Sites.Read.Allpermission. It also allows Agentspace to index documents, events, comments, attachments, and files across all OneDrive sites.If giving full control over all sites seems excessive, use Option 2:
Sites.Selectedto give granular control.Option 2: Sites.SelectedApplication Control over selected sites This permission allows Agentspace to obtain the OneDrive user groups and role assignments, which aren't included in the
Sites.Read.Allpermission. It also allows Agentspace to index documents, events, comments, attachments, and files across selected OneDrive sites. This permission provides more granular control instead ofSites.FullControl.AllProfile reading options Option 1: User.Read.AllApplication Read all users' full profiles This permission allows Agentspace to understand the data access control for your OneDrive content. Option 2: User.ReadBasic.AllApplication Read all users' basic profiles This permission allows Agentspace to understand the data access control for your OneDrive content. Add and grant the following OneDrive permissions. You can choose between
Sites.FullControl.AllandSites.Selected:OneDrive permissions for federated credentials
Permission Type Description Justification Option 1: Sites.FullControl.AllApplication Full control over all sites This permission allows Agentspace to obtain the OneDrive user groups and role assignments, which aren't included in the
Sites.Read.Allpermission. It also allows Agentspace to index documents, events, comments, attachments, and files across all OneDrive sites.If giving full control over all sites seems excessive, use Option 2:
Sites.Selectedto give granular control.Option 2: Sites.SelectedApplication Control over selected sites This permission allows Agentspace to obtain the OneDrive user groups and role assignments, which aren't included in the Sites.Read.Allpermission. It also allows Agentspace to index documents, events, comments, attachments, and files across selected OneDrive sites.For the added permissions, check that the Status column lists the permission as
Grantedand has a green check icon.
Grant administrator consent. For information about how to grant consent, see Grant tenant-wide administrator consent to an application in the Microsoft Entra documentation.
Set up OAuth 2.0 for refresh token and password grant
You can use the OAuth 2.0 method to set up an Entra ID application registration and enable secure access to OneDrive. This method includes steps to configure the app registration, grant permissions, and establish authentication.
You can use the following process to register the application in Entra ID using OAuth 2.0 authentication for refresh token and for password grant. This method is preferred when you need granular control over OneDrive REST API permissions, allowing you to restrict resource access on the user account.
Some common error messages that you might encounter during this process are listed in Error messages.
The following table describes the OneDrive roles that are recommended for OAuth 2.0 authentication methods:
Create app registration:
Navigate to Entra ID administrator center.
Create an app registration:
- Supported account types: Accounts in the organizational directory only.
- Redirect URI:
https://vertexaisearch.cloud.google.com/console/oauth/onedrive_oauth.html.
Note the Client ID and Tenant ID.
Add client secret:
- Go to Certificates & secrets > New client secret.
- Note the secret string.
Set API permissions.
Add and grant the following Microsoft Graph permissions. You can choose between
Sites.FullControl.AllandSites.Selected:Microsoft Graph permissions for OAuth 2.0 authentication
Permission Type Description Justification GroupMember.Read.AllApplication Read all group memberships This permission allows Agentspace to understand the memberships of the user groups in the OneDrive site. User.ReadDelegated Sign in and read user's profile This is a default permission that must not be removed. When removed, OneDrive displays an error asking you to reinstate this permission.
Option 1: Sites.FullControl.AllApplication Full control over all sites This permission allows Agentspace to obtain the OneDrive user groups and role assignments, which aren't included in the
Sites.Read.Allpermission. It also allows Agentspace to index documents, events, comments, attachments, and files across all OneDrive sites.Option 2: Sites.SelectedApplication Control over selected sites This permission allows Agentspace to obtain the OneDrive user groups and role assignments, which aren't included in the
Sites.Read.Allpermission. It also allows Agentspace to index documents, events, comments, attachments, and files across selected OneDrive sites. This permission provides more granular control instead ofSites.FullControl.AllUser.Read.AllApplication Read all users' full profiles This permission allows Agentspace to understand the data access control for your OneDrive content. Add and grant the following OneDrive permissions for OAuth 2.0 authentication. You can choose between
AllSites.FullControlandSites.Selected:OneDrive permissions for OAuth 2.0 authentication
Permission Type Description Justification Option 1: AllSites.FullControlDelegated Full control over all sites This permission allows Agentspace to obtain the OneDrive user groups and role assignments, which aren't included in the
Sites.Read.Allpermission. It also allows Agentspace to index documents, events, comments, attachments, and files across all OneDrive sites.Option 2: Sites.SelectedDelegated Control over selected sites This permission allows Agentspace to obtain the OneDrive user groups and role assignments, which aren't included in the
Sites.Read.Allpermission. It also allows Agentspace to index documents, events, comments, attachments, and files across selected OneDrive sites. This permission provides more granular control instead ofAllSites.FullControl.For the added permissions, check that the Status column lists the permission as
Grantedand has a green check icon.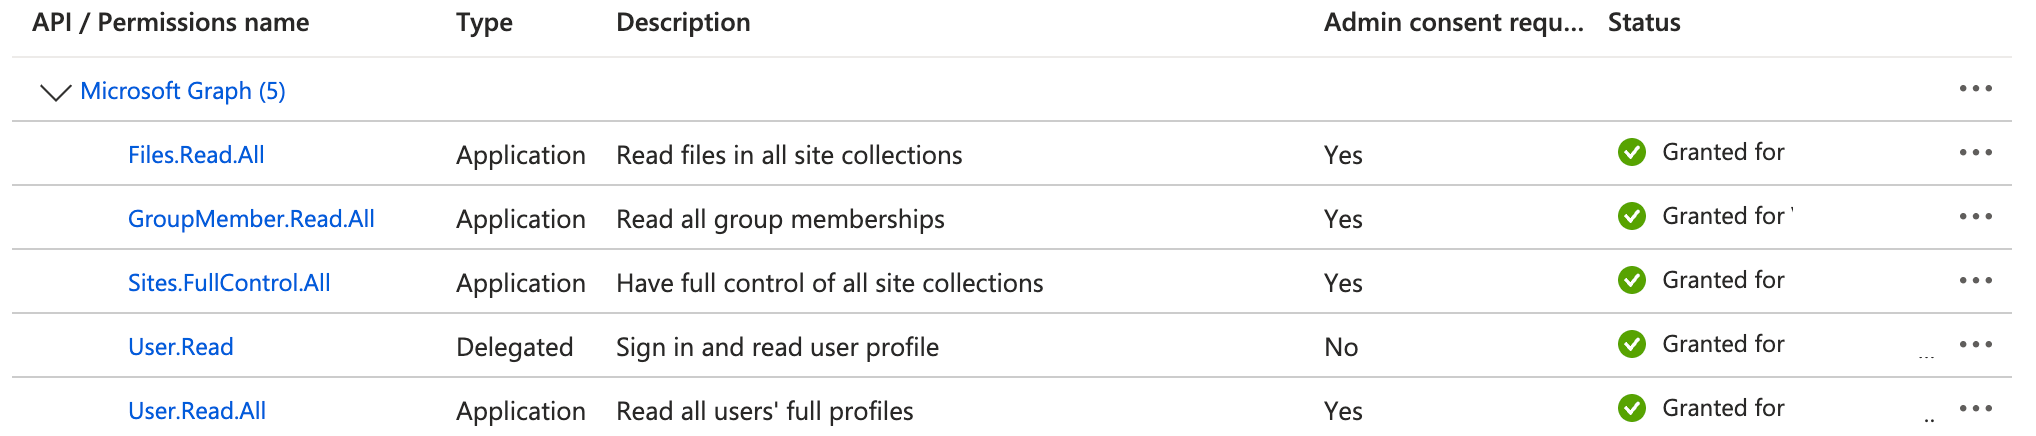
Verify the API permissions Use a dedicated user account with limited access to specific sites. Verify that this account has Owner access to the selected sites.
Grant administrator consent. For information about how to grant consent, see Grant tenant-wide administrator consent to an application in the Microsoft Entra ID documentation.
Error messages
The following table describes the common error messages and their descriptions that you might encounter when connecting OneDrive with Agentspace.
| Error code | Error message |
|---|---|
ONEDRIVE_MISSING_PERMISSION_1 |
Missing required REST API role (Sites.FullControl.All or Sites.Selected). For delegated permissions, missing AllSites.FullControl or Sites.Selected. |
ONEDRIVE_MISSING_PERMISSION_2 |
Missing required Graph API role (Sites.FullControl.All or Sites.Selected). |
ONEDRIVE_MISSING_PERMISSION_3 |
Missing required Graph API role GroupMember.Read.All. |
ONEDRIVE_MISSING_PERMISSION_4 |
Missing required Graph API role (User.Read.All or User.ReadBasic.All). |
ONEDRIVE_INVALID_SITE_URI |
Failed to retrieve Graph API access token. Possible causes: invalid client ID, secret value, or missing federated credentials. |
ONEDRIVE_INVALID_AUTH |
Failed to retrieve Graph API access token. Possible causes: invalid client ID, secret value, or missing federated credentials. |
ONEDRIVE_INVALID_JSON |
Failed to parse JSON content. |
ONEDRIVE_TOO_MANY_REQUESTS |
Too many HTTP requests sent to OneDrive; received 429 HTTP response. |
Manifest file:
- Go to the Manifest tab.
Delete the contents between
[and]underrequiredResourceAccess.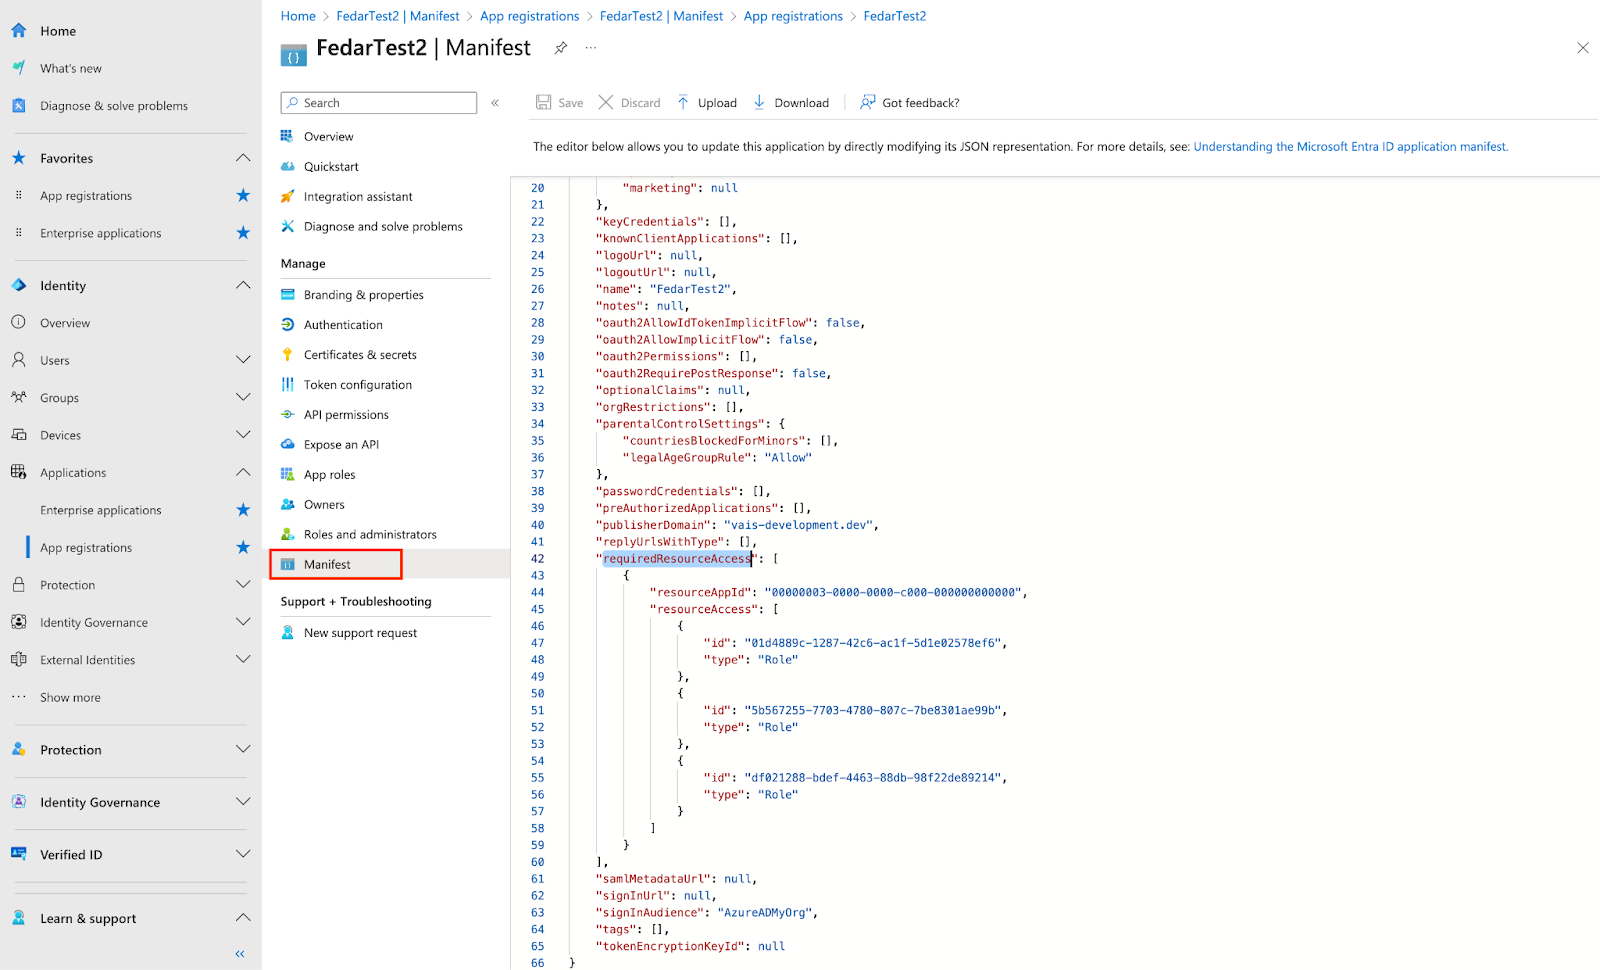
Edit the manifest file Paste the following JSON between the brackets.
{
 "resourceAppId": "00000003-0000-0000-c000-000000000000",
 "resourceAccess": [
   {
     "id": "01d4889c-1287-42c6-ac1f-5d1e02578ef6",
     "type": "Role"
   },
   {
     "id": "5b567255-7703-4780-807c-7be8301ae99b",
     "type": "Role"
   },
   {
     "id": "df021288-bdef-4463-88db-98f22de89214",
     "type": "Role"
   }
 ]
}
Return to API permissions.
Confirm all required permissions are present.
Grant administrator consent.
Create a OneDrive connector
Console
To use the Google Cloud console to sync data from OneDrive to Agentspace, follow these steps:
In the Google Cloud console, go to the Agentspace page.
In the navigation menu, click Data Stores.
Click Create Data Store.
On the Select a data source page, scroll or search for OneDrive to connect your third-party source.
Under Authentication settings, select the authentication method to use.
Enter your authentication information.
Click Continue.
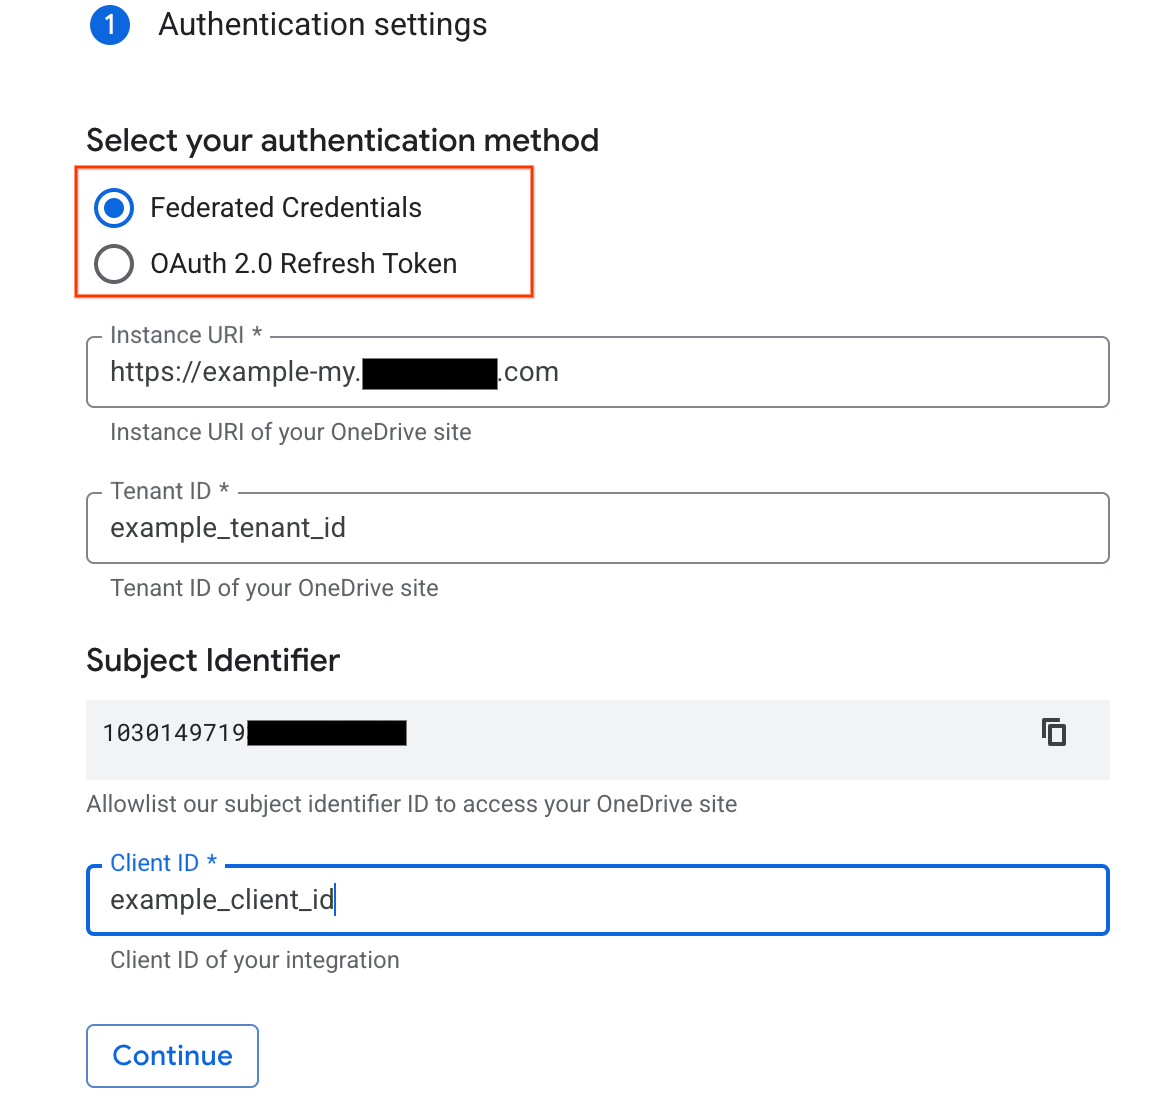
Select the authentication method and provide your authentication information.
Select the following entities to sync:
- File
To filter entities out of the index or ensure that they are included in the index, click Filter.
fileNamematches the filename only.filePathmust be a full Microsoft Graph API path, usually prefixed with/drive/root:. For example, if the OneDrive direct link ishttps:/example-my.onedrive.com/personal/user_example_com/Documents/folder1/folder2, thenfilePathis/drive/root:/folder1/folder2.
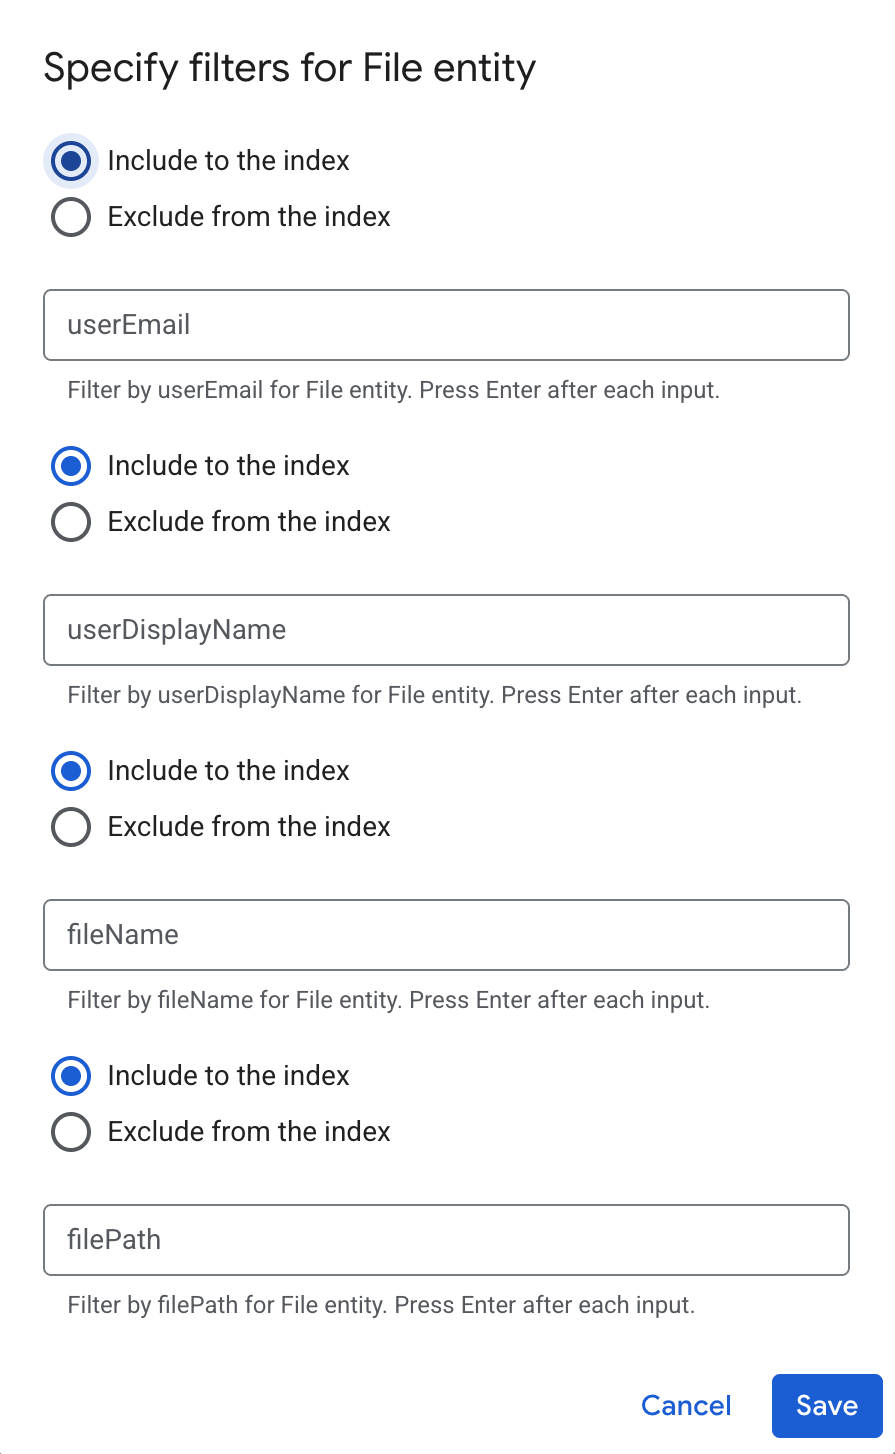
Specify filters to include or exclude entities Click Continue.
Select the Sync frequency for Full sync and the Incremental sync frequency for Incremental data sync. For more information, see Sync schedules.
If you want to schedule separate full syncs of entity and identity data, expand the menu under Full sync and then select Custom options.
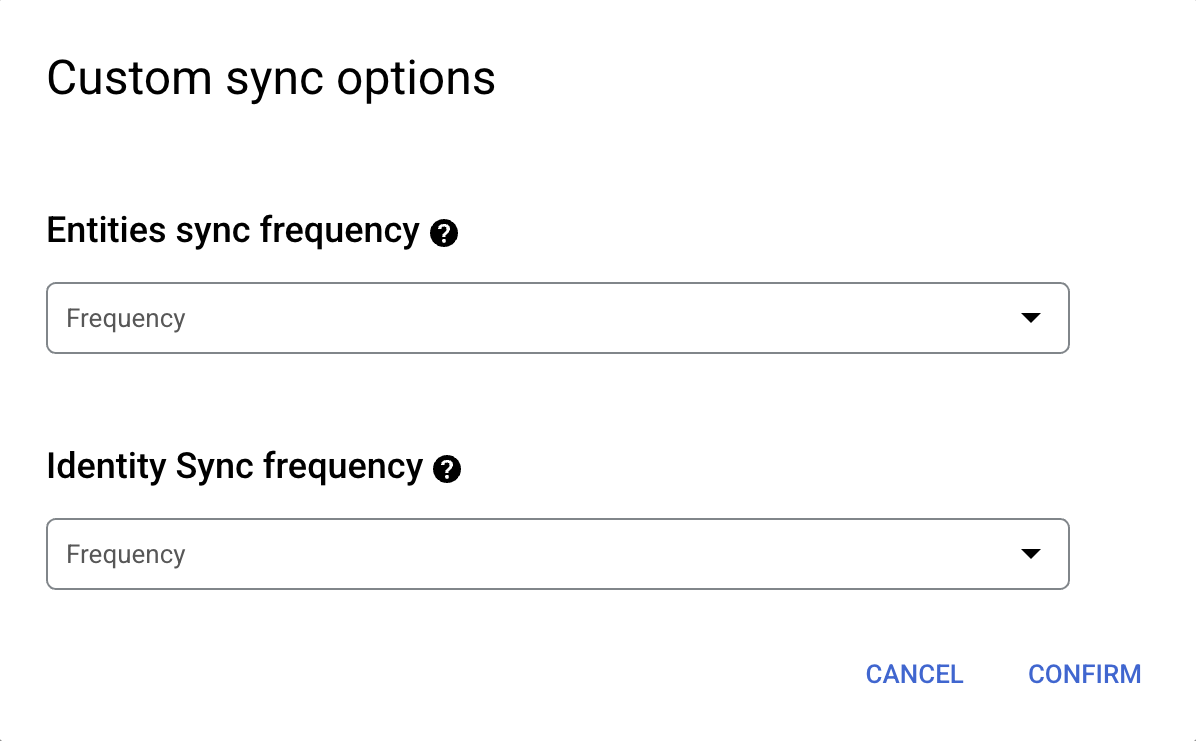
Setting separate schedules for full entity sync and full identity sync. Select a region for your data store.
Enter a name for your data store.
Click Create. Agentspace creates your data store and displays your data stores on the Data Stores page.
To check the status of your ingestion, go to the Data Stores page and click your data store name to see details about it on its Data page. The Connector state changes from Creating to Running when it starts synchronizing data. When ingestion is complete, the state changes to Active to indicate that the connection to your data source is set up and awaiting the next scheduled synchronization.
Depending on the size of your data, ingestion can take minutes or hours.
Enable real-time sync
To enable real-time sync for your data store, follow these steps.
In the Google Cloud console, go to the Agentspace page.
In the navigation menu, click Data Stores.
Click the name of the OneDrive data store for which you want to enable real-time sync.
On the data store Data page, wait until the Connector state changes to Active.
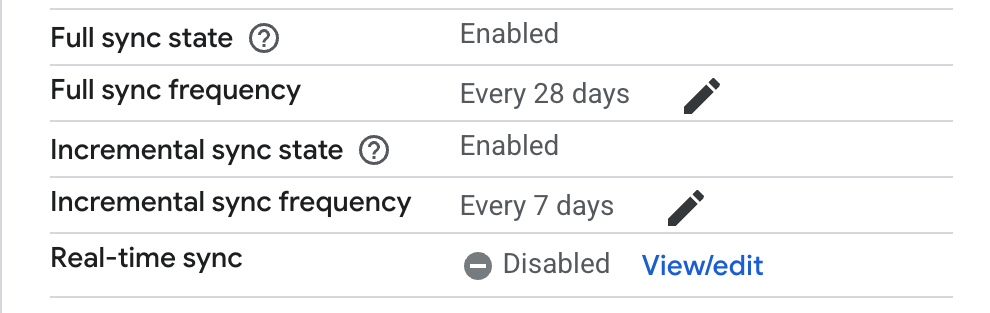
In the Real-time sync field, click View/edit.
View and edit real-time sync settings. Click the Enable real-time sync toggle to the on position.
Provide a value for Client secret. This value is used to verify OneDrive webhook events. We recommend using a string of 20 characters.
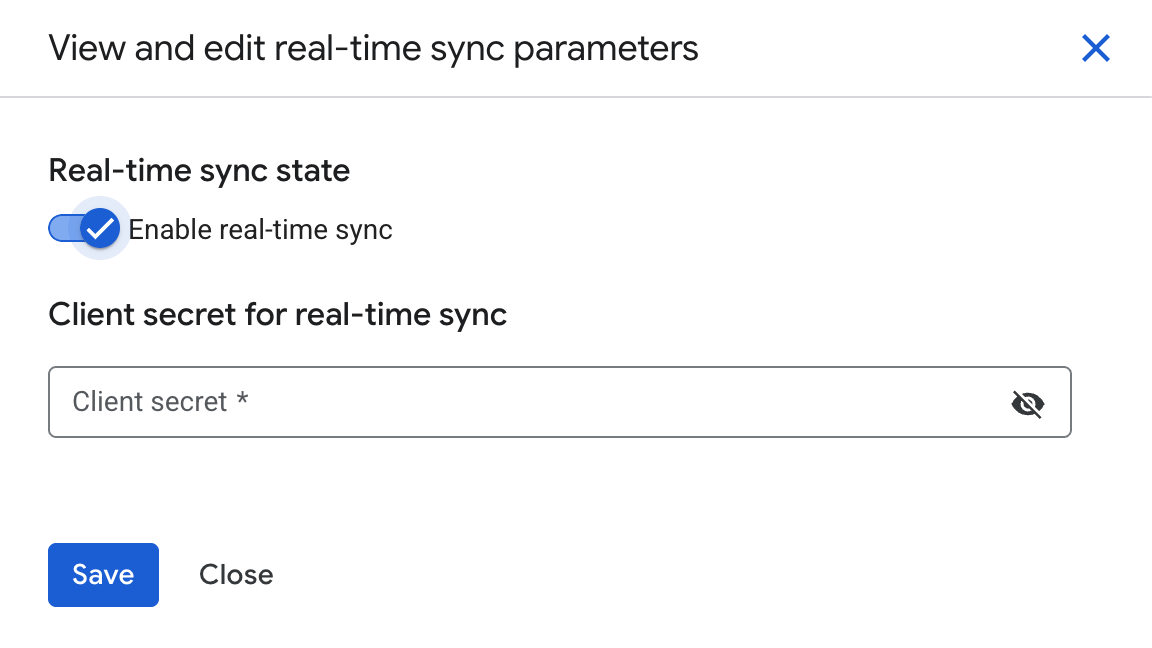
Enable real-time sync and provide a client secret. Click Save.
Wait for the Real-time sync field to change to Running.
Error codes
The following table lists OneDrive error codes and descriptions.
| Error code | Description |
|---|---|
| ONEDRIVE_MISSING_PERMISSION_1 | The application does not have a required Files.Read.All role for Graph API. |
| ONEDRIVE_MISSING_PERMISSION_2 | The application does not have a required Group.Read.All role for Graph API. |
| ONEDRIVE_MISSING_PERMISSION_3 | The application does not have a required User.Read.All role or User.ReadBasic.All role for Graph API. |
| ONEDRIVE_INVALID_SITE_URI | The instance URL is invalid. |
| ONEDRIVE_INVALID_AUTH | Error when retrieving Graph API access token. This may be due to an invalid client id, secret value, or missing federated credentials. |
| ONEDRIVE_UNCATEGORIZED_ERROR | Invalid or no ACL is present in file. |
| ONEDRIVE_TOO_MANY_REQUESTS | Too many HTTP requests are sent to OneDrive. Received HTTP 429 response. |
Next steps
To attach your data store to an app, create an app and select your data store following the steps in Create an app.
To preview how your search results appear after your app and data store are set up, see Preview search results.