工作站設定可做為範本,為多位開發人員建立一致的工作站,並指定機器類型、可用區、磁碟大小、工具和預先安裝的程式庫等設定。對工作站設定執行的任何作業 (例如變更機器類型或容器映像檔),都會在下次啟動工作站時反映在每個工作站上。
本節說明建立工作站設定的四個步驟:
如要直接在 Google Cloud 控制台按照逐步指南操作,請按一下「Guide me」(逐步引導):
事前準備
開始使用 Cloud Workstations 前,請務必確認您具備必要權限,並完成這些必要設定步驟。如果已完成這項設定,可以略過這個部分。
- Sign in to your Google Cloud account. If you're new to Google Cloud, create an account to evaluate how our products perform in real-world scenarios. New customers also get $300 in free credits to run, test, and deploy workloads.
-
In the Google Cloud console, on the project selector page, select or create a Google Cloud project.
Roles required to select or create a project
- Select a project: Selecting a project doesn't require a specific IAM role—you can select any project that you've been granted a role on.
-
Create a project: To create a project, you need the Project Creator
(
roles/resourcemanager.projectCreator), which contains theresourcemanager.projects.createpermission. Learn how to grant roles.
-
Verify that billing is enabled for your Google Cloud project.
-
Enable the Cloud Workstations API.
Roles required to enable APIs
To enable APIs, you need the Service Usage Admin IAM role (
roles/serviceusage.serviceUsageAdmin), which contains theserviceusage.services.enablepermission. Learn how to grant roles. -
請確認您具備專案的 Cloud Workstations 管理員 IAM 角色,才能建立工作站設定。如要在 Google Cloud 控制台中查看 IAM 角色,請前往「IAM」頁面:
-
Cloud Workstations 託管於從 Compute Engine 預先設定的公開 Container-Optimized OS (COS) 映像檔啟動的 VM。如果強制執行
constraints/compute.trustedimageProjects組織政策限制,您必須設定映像檔存取限制,允許使用者從projects/cos-cloud或所有公開映像檔建立開機磁碟。 -
選用:啟用 Container File System API,加快工作站啟動速度。
詳情請參閱「使用映像檔串流技術縮短工作站啟動時間」。
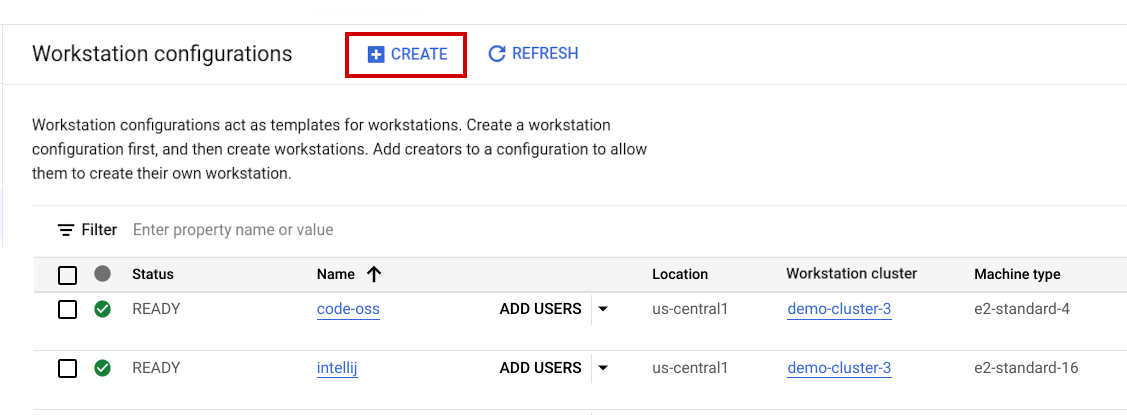
在控制台中,依序前往「Cloud Workstations」>「Workstation configurations」(工作站設定)。
在「工作站設定」頁面中,按一下 add_box「建立」。
在「Name」(名稱) 欄位中,輸入
test-configuration做為設定名稱。從「Clusters」(叢集) 清單中選擇工作站叢集的名稱,然後按一下「Continue」(繼續)。
如果沒有可用的工作站叢集,請按一下 arrow_drop_down 展開箭頭,然後選取「New Cluster」(新增叢集)。如要進一步瞭解這些設定,請參閱「建立新的工作站叢集」。
在「Quick start workstations」(快速入門起始工作站) 部分,選取「Enabled」(已啟用) 可縮短工作站啟動時間,選取「Disabled」(已停用) 則可降低費用。
這個值指定要維持在預先啟動狀態的虛擬機器 (VM) 數量,可縮短工作站啟動時間。不過,系統會針對這些 VM 向專案收費。根據預期的新開發人員人數、用途和預算,選擇集區大小。如果選擇「已停用」,新工作站啟動時間會較長。預設的「快速啟動集區大小」為 1。
選用:新增「標籤」,將鍵/值組合標籤套用至基礎 Compute Engine 資源。
按一下「繼續」,即可前往「機器設定」頁面。
根據需求選取「Machine type」(機器類型)。舉例來說,您可以選擇「e2-standard-4」 (4 個 CPU,16 GB 記憶體)。
在所選區域中選取兩個「區域」。Cloud Workstations 會在這些可用區中建立 VM 資源並儲存資料。
選擇可用區也會影響可用的運算資源類型。舉例來說,如果您選取 N1 機器類型並想使用 GPU,請務必選取兩個區域,並在「依區域和可用區列出的 GPU 供應情形」表格中,確認所選 GPU 類型在這些區域中可用。
在「Cost savings」(節省費用) 區段中,設定自動休眠前的等待時間。將「Auto-sleep」(自動休眠) 欄位設為「After 2 hours of inactivity (default)」(閒置 2 小時後 (預設)),即可自動關閉閒置超過 2 小時的工作站。
選用:在「Advanced options」(進階選項) 部分,按一下「展開更多」expand_more。
如要新增網路標記,請在「Network tags」(網路標記) 欄位中輸入文字。
網路標記是套用至基礎 Compute Engine VM 的中繼資料,可讓您建立適用於特定 VM 執行個體的防火牆規則和路徑。在 Cloud Workstations 中,您可以使用網路標記,為工作站設定檔中的所有工作站建立適用的防火牆規則或路徑。
如要關閉公開 IP 位址,請選取「停用公開 IP 位址」核取方塊。
如果停用公開 IP 位址,您必須在網路上設定私人 Google 存取權或 Cloud NAT。 如果您使用 Private Google Access,並透過
private.googleapis.com或restricted.googleapis.com存取 Artifact Registry,請務必為網域*.pkg.dev設定 DNS 記錄。如要開啟巢狀虛擬化功能,請選取「啟用巢狀虛擬化功能」核取方塊。巢狀虛擬化功能可讓您在工作站中執行 VM 執行個體。
啟用巢狀虛擬化前,請先考量下列重要事項。
Cloud Workstations 執行個體也 適用與 Compute Engine 執行個體相同的限制:
機構政策:如果機構政策強制執行「停用 VM 巢狀虛擬化」限制,專案、資料夾或機構可能無法建立巢狀 VM。詳情請參閱 Compute Engine 專區的「檢查是否允許巢狀虛擬化」。
效能:對於 CPU 處理工作負載,巢狀 VM 的效能可能會降低 10% 以上;對於輸入或輸出處理工作負載,效能降低幅度可能超過 10%。
機器類型:巢狀虛擬化只能在指定 N1 或 N2 機器系列機器類型的工作站設定中啟用。
如要在這部 VM 上處理資料時加密,請選取「Confidential VM service」(機密 VM 服務) 核取方塊。詳情請參閱建立機密 VM 執行個體。
如要設定受防護的 VM 設定,請選取對應的功能核取方塊。 受防護的 VM 功能包含可信任的 UEFI 韌體,並提供啟動、vTPM 和完整性監控選項。
根據預設,Cloud Workstations 會使用 Google-owned and Google-managed encryption key 加密透過這個工作站設定建立的資源。如要改用客戶自行管理的加密金鑰,請選取「使用客戶自行管理的加密金鑰 (CMEK)」。
按一下「繼續」前往「環境設定」頁面。
設定容器映像檔,選擇使用其中一個預先設定的基本映像檔,或提供您建立的自訂容器映像檔參考資料。
如要使用預先設定的基本映像檔,請按照下列步驟操作:
選用步驟:如要使用自己的自訂容器映像檔,而非預先設定的基本映像檔,請按照下列步驟操作:
選取「自訂容器映像檔」。
指定容器映像檔網址。
按一下「服務帳戶」選單,然後選取要在工作站設定下建立的 VM 執行個體上使用的服務帳戶。這個服務帳戶必須具備提取自訂容器映像檔的權限 (或映像檔必須能公開存取)。詳情請參閱「自訂開發環境」一文中的
serviceAccount說明。
在「儲存空間設定」部分,選擇初始主目錄和磁碟屬性的偏好設定:
如要建立空白主目錄,請選取「建立空白的永久磁碟」。如要使用磁碟快照做為主目錄,請選擇「根據來源磁碟快照建立永久磁碟」。
將永久目錄的「磁碟類型」設為「平衡」,這種磁碟的效能較高,但比「SSD」更經濟實惠。
設定永久目錄的「磁碟大小」。預設值為
200GB,但有效值為10、50、100、200、500或1000GB。 選擇最符合團隊需求的磁碟大小。將「回收政策」設為「刪除」或「保留」。預設值為「刪除」。這項政策決定工作站刪除時,永久磁碟會受到什麼影響。
選用:新增準備檢查。
如有需要,請指定完備性檢查,確認工作站啟動時,會接受特定路徑和通訊埠的要求 (與這個工作站設定相關聯)。
選用:展開「Advanced container options」(進階容器選項)。
視需要為使用的容器映像檔指定其他參數。例如,指定工作目錄覆寫、使用者覆寫、指令覆寫、要傳遞至
entrypoint指令的引數,以及環境變數。按一下「繼續」,即可前往「IAM policy」(身分與存取權管理政策) 頁面。
在「IAM Policy」(身分與存取權管理政策) 頁面中,按一下「Users」(使用者) 欄位,並輸入要授予存取權的一或多個使用者或 Google 群組的電子郵件地址。這項操作會為這些使用者設定 Cloud Workstations 建立者身分與存取權管理政策。
選用步驟:如要新增 Cloud Workstations 政策管理員存取權,請展開「Advanced IAM options」(進階 IAM 選項)。
如要將
roles/workstations.policyAdmin角色授予工作站建立者,請選取「Grant Policy Admin role to workstation creators」(將「政策管理員」角色授予工作站建立者) 核取方塊。這可讓工作站建立者更新工作站的 IAM 政策,授予工作站及個別通訊埠的存取權。如要進一步瞭解 Cloud Workstations 連接埠共用功能,請參閱「授予個別 Cloud Workstations 通訊埠存取權」頁面。
如要建立工作站設定並將這些使用者新增至該設定,請按一下
「Create」(建立) 。如果您也選擇建立新叢集,叢集建立作業最多可能需要 20 分鐘才能完成。
- 在 Google Cloud 控制台中,依序前往「Cloud Workstations」>「Workstation configurations」(工作站設定)。
- 在要刪除的工作站設定旁,選取核取方塊。
- 按一下「更多」more_vert選項選單,然後選取「刪除」,即可刪除所選工作站設定。
進行基本設定
如要設定工作站設定的基本資訊,請按照下列步驟操作:定義機器設定
自訂環境
按照下列步驟設定工作站容器映像檔和永久儲存空間,自訂 Cloud Workstations 環境:
您也可以按照下列選用步驟進一步自訂:
新增使用者
如要允許多位使用者建立工作站,請將使用者新增至工作站設定:
您已建立第一個工作站設定,並將使用者新增至該設定。
如要依據這項設定建立及啟動工作站,請按「Next」(下一步)。
清除所用資源
如果您特地為了學習 Cloud Workstations 而建立新的工作站設定,但已不再需要,可以透過 Google Cloud 控制台刪除設定: