Gestione dei set di dati

Un progetto può avere più set di dati, ognuno dei quali viene utilizzato per addestrare un modello separato. Puoi ottenere un elenco dei set di dati disponibili, ottenere uno specifico set di dati, esportarne uno e puoi eliminare un set di dati che non ti serve più.

Elenco dei set di dati

Un progetto può includere numerosi set di dati. In questa sezione viene descritto come recuperare un elenco dei set di dati disponibili per un progetto.

UI web

Per visualizzare un elenco dei set di dati disponibili utilizzando l'interfaccia utente di AutoML Vision Object Detection, fai clic sul link Set di dati nella parte superiore del menu di navigazione a sinistra.

Pagina di elenco di set di dati

Per visualizzare i set di dati di un altro progetto, seleziona il progetto dall'elenco a discesa sul lato sinistro della barra del titolo.

REST

Prima di utilizzare i dati della richiesta, effettua le seguenti sostituzioni:

  • project-id: l'ID del tuo progetto Google Cloud.

Metodo HTTP e URL:

GET https://automl.googleapis.com/v1/projects/PROJECT_ID/locations/us-central1/datasets

Per inviare la richiesta, scegli una delle seguenti opzioni:

arricciatura

Esegui questo comando:

curl -X GET \
-H "Authorization: Bearer $(gcloud auth print-access-token)" \
-H "x-goog-user-project: project-id" \
"https://automl.googleapis.com/v1/projects/PROJECT_ID/locations/us-central1/datasets"

PowerShell

Esegui questo comando:

$cred = gcloud auth print-access-token
$headers = @{ "Authorization" = "Bearer $cred"; "x-goog-user-project" = "project-id" }

Invoke-WebRequest `
-Method GET `
-Headers $headers `
-Uri "https://automl.googleapis.com/v1/projects/PROJECT_ID/locations/us-central1/datasets" | Select-Object -Expand Content

Dovresti ricevere una risposta JSON simile alla seguente:

{
  "datasets": [
    {
      "name": "projects/PROJECT_ID/locations/us-central1/datasets/DATASET_ID",
      "displayName": "DISPLAY_NAME",
      "createTime": "2018-10-29T15:45:53.353442Z",
      "exampleCount": 227,
      "imageObjectDetectionDatasetMetadata": {}
    }
  ]
}

Go

Prima di provare questo esempio, segui le istruzioni di configurazione per questa lingua nella pagina Librerie client.

import (
	"context"
	"fmt"
	"io"

	automl "cloud.google.com/go/automl/apiv1"
	"cloud.google.com/go/automl/apiv1/automlpb"
	"google.golang.org/api/iterator"
)

// listDatasets lists existing datasets.
func listDatasets(w io.Writer, projectID string, location string) error {
	// projectID := "my-project-id"
	// location := "us-central1"

	ctx := context.Background()
	client, err := automl.NewClient(ctx)
	if err != nil {
		return fmt.Errorf("NewClient: %w", err)
	}
	defer client.Close()

	req := &automlpb.ListDatasetsRequest{
		Parent: fmt.Sprintf("projects/%s/locations/%s", projectID, location),
	}

	it := client.ListDatasets(ctx, req)

	// Iterate over all results
	for {
		dataset, err := it.Next()
		if err == iterator.Done {
			break
		}
		if err != nil {
			return fmt.Errorf("ListGlossaries.Next: %w", err)
		}

		fmt.Fprintf(w, "Dataset name: %v\n", dataset.GetName())
		fmt.Fprintf(w, "Dataset display name: %v\n", dataset.GetDisplayName())
		fmt.Fprintf(w, "Dataset create time:\n")
		fmt.Fprintf(w, "\tseconds: %v\n", dataset.GetCreateTime().GetSeconds())
		fmt.Fprintf(w, "\tnanos: %v\n", dataset.GetCreateTime().GetNanos())

		// Vision object detection
		if metadata := dataset.GetImageObjectDetectionDatasetMetadata(); metadata != nil {
			fmt.Fprintf(w, "Image object detection dataset metadata: %v\n", metadata)
		}

	}

	return nil
}

Java

Prima di provare questo esempio, segui le istruzioni di configurazione per questa lingua nella pagina Librerie client.

import com.google.cloud.automl.v1.AutoMlClient;
import com.google.cloud.automl.v1.Dataset;
import com.google.cloud.automl.v1.ListDatasetsRequest;
import com.google.cloud.automl.v1.LocationName;
import java.io.IOException;

class ListDatasets {

  static void listDatasets() throws IOException {
    // TODO(developer): Replace these variables before running the sample.
    String projectId = "YOUR_PROJECT_ID";
    listDatasets(projectId);
  }

  // List the datasets
  static void listDatasets(String projectId) throws IOException {
    // Initialize client that will be used to send requests. This client only needs to be created
    // once, and can be reused for multiple requests. After completing all of your requests, call
    // the "close" method on the client to safely clean up any remaining background resources.
    try (AutoMlClient client = AutoMlClient.create()) {
      // A resource that represents Google Cloud Platform location.
      LocationName projectLocation = LocationName.of(projectId, "us-central1");
      ListDatasetsRequest request =
          ListDatasetsRequest.newBuilder().setParent(projectLocation.toString()).build();

      // List all the datasets available in the region by applying filter.
      System.out.println("List of datasets:");
      for (Dataset dataset : client.listDatasets(request).iterateAll()) {
        // Display the dataset information
        System.out.format("\nDataset name: %s\n", dataset.getName());
        // To get the dataset id, you have to parse it out of the `name` field. As dataset Ids are
        // required for other methods.
        // Name Form: `projects/{project_id}/locations/{location_id}/datasets/{dataset_id}`
        String[] names = dataset.getName().split("/");
        String retrievedDatasetId = names[names.length - 1];
        System.out.format("Dataset id: %s\n", retrievedDatasetId);
        System.out.format("Dataset display name: %s\n", dataset.getDisplayName());
        System.out.println("Dataset create time:");
        System.out.format("\tseconds: %s\n", dataset.getCreateTime().getSeconds());
        System.out.format("\tnanos: %s\n", dataset.getCreateTime().getNanos());
        System.out.format(
            "Image object detection dataset metadata: %s\n",
            dataset.getImageObjectDetectionDatasetMetadata());
      }
    }
  }
}

Node.js

Prima di provare questo esempio, segui le istruzioni di configurazione per questa lingua nella pagina Librerie client.

/**
 * TODO(developer): Uncomment these variables before running the sample.
 */
// const projectId = 'YOUR_PROJECT_ID';
// const location = 'us-central1';

// Imports the Google Cloud AutoML library
const {AutoMlClient} = require('@google-cloud/automl').v1;

// Instantiates a client
const client = new AutoMlClient();

async function listDatasets() {
  // Construct request
  const request = {
    parent: client.locationPath(projectId, location),
    filter: 'translation_dataset_metadata:*',
  };

  const [response] = await client.listDatasets(request);

  console.log('List of datasets:');
  for (const dataset of response) {
    console.log(`Dataset name: ${dataset.name}`);
    console.log(
      `Dataset id: ${
        dataset.name.split('/')[dataset.name.split('/').length - 1]
      }`
    );
    console.log(`Dataset display name: ${dataset.displayName}`);
    console.log('Dataset create time');
    console.log(`\tseconds ${dataset.createTime.seconds}`);
    console.log(`\tnanos ${dataset.createTime.nanos / 1e9}`);
    console.log(
      `Image object detection dataset metatdata: ${dataset.imageObjectDetectionDatasetMetatdata}`
    );
  }
}

listDatasets();

Python

Prima di provare questo esempio, segui le istruzioni di configurazione per questa lingua nella pagina Librerie client.

from google.cloud import automl

# TODO(developer): Uncomment and set the following variables
# project_id = "YOUR_PROJECT_ID"

client = automl.AutoMlClient()
# A resource that represents Google Cloud Platform location.
project_location = f"projects/{project_id}/locations/us-central1"

# List all the datasets available in the region.
request = automl.ListDatasetsRequest(parent=project_location, filter="")
response = client.list_datasets(request=request)

print("List of datasets:")
for dataset in response:
    print(f"Dataset name: {dataset.name}")
    print("Dataset id: {}".format(dataset.name.split("/")[-1]))
    print(f"Dataset display name: {dataset.display_name}")
    print(f"Dataset create time: {dataset.create_time}")
    print(
        "Image object detection dataset metadata: {}".format(
            dataset.image_object_detection_dataset_metadata
        )
    )

Linguaggi aggiuntivi

C#: segui le istruzioni di configurazione di C# nella pagina delle librerie client e poi consulta la documentazione di riferimento di AutoML Vision Object Detection per .NET.

PHP: segui le istruzioni per la configurazione dei file PHP nella pagina delle librerie client e consulta la documentazione di riferimento di AutoML Vision Object Detection per PHP.

Ruby: segui le istruzioni di configurazione di Ruby nella pagina delle librerie client e poi visita la documentazione di riferimento di AutoML Vision Object Detection per Ruby.

Recupero di un set di dati

Puoi anche ottenere un set di dati specifico utilizzando un ID set di dati.

UI web

Per visualizzare un elenco dei set di dati disponibili utilizzando l'interfaccia utente di AutoML Vision Object Detection, fai clic sul link Set di dati nella parte superiore del menu di navigazione a sinistra.

Pagina di elenco di set di dati

Per visualizzare i set di dati di un altro progetto, seleziona il progetto dall'elenco a discesa sul lato sinistro della barra del titolo.

Accedi a un set di dati specifico selezionandone il nome dall'elenco.

REST

Prima di utilizzare i dati della richiesta, effettua le seguenti sostituzioni:

  • project-id: l'ID del tuo progetto Google Cloud.
  • dataset-id: l'ID del set di dati. L'ID è l'ultimo elemento del nome del set di dati. Ecco alcuni esempi:
    • nome set di dati: projects/project-id/locations/location-id/datasets/3104518874390609379
    • ID set di dati: 3104518874390609379

Metodo HTTP e URL:

GET https://automl.googleapis.com/v1/projects/PROJECT_ID/locations/us-central1/datasets/DATASET_ID

Per inviare la richiesta, scegli una delle seguenti opzioni:

arricciatura

Esegui questo comando:

curl -X GET \
-H "Authorization: Bearer $(gcloud auth print-access-token)" \
-H "x-goog-user-project: project-id" \
"https://automl.googleapis.com/v1/projects/PROJECT_ID/locations/us-central1/datasets/DATASET_ID"

PowerShell

Esegui questo comando:

$cred = gcloud auth print-access-token
$headers = @{ "Authorization" = "Bearer $cred"; "x-goog-user-project" = "project-id" }

Invoke-WebRequest `
-Method GET `
-Headers $headers `
-Uri "https://automl.googleapis.com/v1/projects/PROJECT_ID/locations/us-central1/datasets/DATASET_ID" | Select-Object -Expand Content

Dovresti ricevere una risposta JSON simile alla seguente:

{
  "name": "projects/PROJECT_ID/locations/us-central1/datasets/DATASET_ID",
  "displayName": "DISPLAY_NAME",
  "createTime": "2019-03-31T22:29:41.136184Z",
  "etag": "AB3BwFo-bssF99O7d4iI4_kwfnSi5pIK8FQ4D8h6Z_EaC4thAeZFbgbaIDvqXWuzjx9s",
  "exampleCount": 225,
  "imageObjectDetectionDatasetMetadata": {}
}

Go

Prima di provare questo esempio, segui le istruzioni di configurazione per questa lingua nella pagina Librerie client.

import (
	"context"
	"fmt"
	"io"

	automl "cloud.google.com/go/automl/apiv1"
	"cloud.google.com/go/automl/apiv1/automlpb"
)

// getDataset gets a dataset.
func getDataset(w io.Writer, projectID string, location string, datasetID string) error {
	// projectID := "my-project-id"
	// location := "us-central1"
	// datasetID := "TRL123456789..."

	ctx := context.Background()
	client, err := automl.NewClient(ctx)
	if err != nil {
		return fmt.Errorf("NewClient: %w", err)
	}
	defer client.Close()

	req := &automlpb.GetDatasetRequest{
		Name: fmt.Sprintf("projects/%s/locations/%s/datasets/%s", projectID, location, datasetID),
	}

	dataset, err := client.GetDataset(ctx, req)
	if err != nil {
		return fmt.Errorf("DeleteDataset: %w", err)
	}

	fmt.Fprintf(w, "Dataset name: %v\n", dataset.GetName())
	fmt.Fprintf(w, "Dataset display name: %v\n", dataset.GetDisplayName())
	fmt.Fprintf(w, "Dataset create time:\n")
	fmt.Fprintf(w, "\tseconds: %v\n", dataset.GetCreateTime().GetSeconds())
	fmt.Fprintf(w, "\tnanos: %v\n", dataset.GetCreateTime().GetNanos())

	// Vision object detection
	if metadata := dataset.GetImageObjectDetectionDatasetMetadata(); metadata != nil {
		fmt.Fprintf(w, "Image object detection dataset metadata: %v\n", metadata)
	}

	return nil
}

Java

Prima di provare questo esempio, segui le istruzioni di configurazione per questa lingua nella pagina Librerie client.

import com.google.cloud.automl.v1.AutoMlClient;
import com.google.cloud.automl.v1.Dataset;
import com.google.cloud.automl.v1.DatasetName;
import java.io.IOException;

class GetDataset {

  static void getDataset() throws IOException {
    // TODO(developer): Replace these variables before running the sample.
    String projectId = "YOUR_PROJECT_ID";
    String datasetId = "YOUR_DATASET_ID";
    getDataset(projectId, datasetId);
  }

  // Get a dataset
  static void getDataset(String projectId, String datasetId) throws IOException {
    // Initialize client that will be used to send requests. This client only needs to be created
    // once, and can be reused for multiple requests. After completing all of your requests, call
    // the "close" method on the client to safely clean up any remaining background resources.
    try (AutoMlClient client = AutoMlClient.create()) {
      // Get the complete path of the dataset.
      DatasetName datasetFullId = DatasetName.of(projectId, "us-central1", datasetId);
      Dataset dataset = client.getDataset(datasetFullId);

      // Display the dataset information
      System.out.format("Dataset name: %s\n", dataset.getName());
      // To get the dataset id, you have to parse it out of the `name` field. As dataset Ids are
      // required for other methods.
      // Name Form: `projects/{project_id}/locations/{location_id}/datasets/{dataset_id}`
      String[] names = dataset.getName().split("/");
      String retrievedDatasetId = names[names.length - 1];
      System.out.format("Dataset id: %s\n", retrievedDatasetId);
      System.out.format("Dataset display name: %s\n", dataset.getDisplayName());
      System.out.println("Dataset create time:");
      System.out.format("\tseconds: %s\n", dataset.getCreateTime().getSeconds());
      System.out.format("\tnanos: %s\n", dataset.getCreateTime().getNanos());
      System.out.format(
          "Image object detection dataset metadata: %s\n",
          dataset.getImageObjectDetectionDatasetMetadata());
    }
  }
}

Node.js

Prima di provare questo esempio, segui le istruzioni di configurazione per questa lingua nella pagina Librerie client.

/**
 * TODO(developer): Uncomment these variables before running the sample.
 */
// const projectId = 'YOUR_PROJECT_ID';
// const location = 'us-central1';
// const datasetId = 'YOUR_DATASET_ID';

// Imports the Google Cloud AutoML library
const {AutoMlClient} = require('@google-cloud/automl').v1;

// Instantiates a client
const client = new AutoMlClient();

async function getDataset() {
  // Construct request
  const request = {
    name: client.datasetPath(projectId, location, datasetId),
  };

  const [response] = await client.getDataset(request);

  console.log(`Dataset name: ${response.name}`);
  console.log(
    `Dataset id: ${
      response.name.split('/')[response.name.split('/').length - 1]
    }`
  );
  console.log(`Dataset display name: ${response.displayName}`);
  console.log('Dataset create time');
  console.log(`\tseconds ${response.createTime.seconds}`);
  console.log(`\tnanos ${response.createTime.nanos / 1e9}`);
  console.log(
    `Image object detection dataset metatdata: ${response.imageObjectDetectionDatasetMetatdata}`
  );
}

getDataset();

Python

Prima di provare questo esempio, segui le istruzioni di configurazione per questa lingua nella pagina Librerie client.

from google.cloud import automl

# TODO(developer): Uncomment and set the following variables
# project_id = "YOUR_PROJECT_ID"
# dataset_id = "YOUR_DATASET_ID"

client = automl.AutoMlClient()
# Get the full path of the dataset
dataset_full_id = client.dataset_path(project_id, "us-central1", dataset_id)
dataset = client.get_dataset(name=dataset_full_id)

# Display the dataset information
print(f"Dataset name: {dataset.name}")
print("Dataset id: {}".format(dataset.name.split("/")[-1]))
print(f"Dataset display name: {dataset.display_name}")
print(f"Dataset create time: {dataset.create_time}")
print(
    "Image object detection dataset metadata: {}".format(
        dataset.image_object_detection_dataset_metadata
    )
)

Linguaggi aggiuntivi

C#: segui le istruzioni di configurazione di C# nella pagina delle librerie client e poi consulta la documentazione di riferimento di AutoML Vision Object Detection per .NET.

PHP: segui le istruzioni per la configurazione dei file PHP nella pagina delle librerie client e consulta la documentazione di riferimento di AutoML Vision Object Detection per PHP.

Ruby: segui le istruzioni di configurazione di Ruby nella pagina delle librerie client e poi visita la documentazione di riferimento di AutoML Vision Object Detection per Ruby.

Esportare un set di dati

Puoi esportare un file CSV con tutte le informazioni di un set di dati in un bucket Google Cloud Storage. Questo è particolarmente utile nei casi in cui hai aggiunto, eliminato o modificato annotazioni delle immagini di addestramento nella UI.

UI web

Per esportare un set di dati non vuoto:

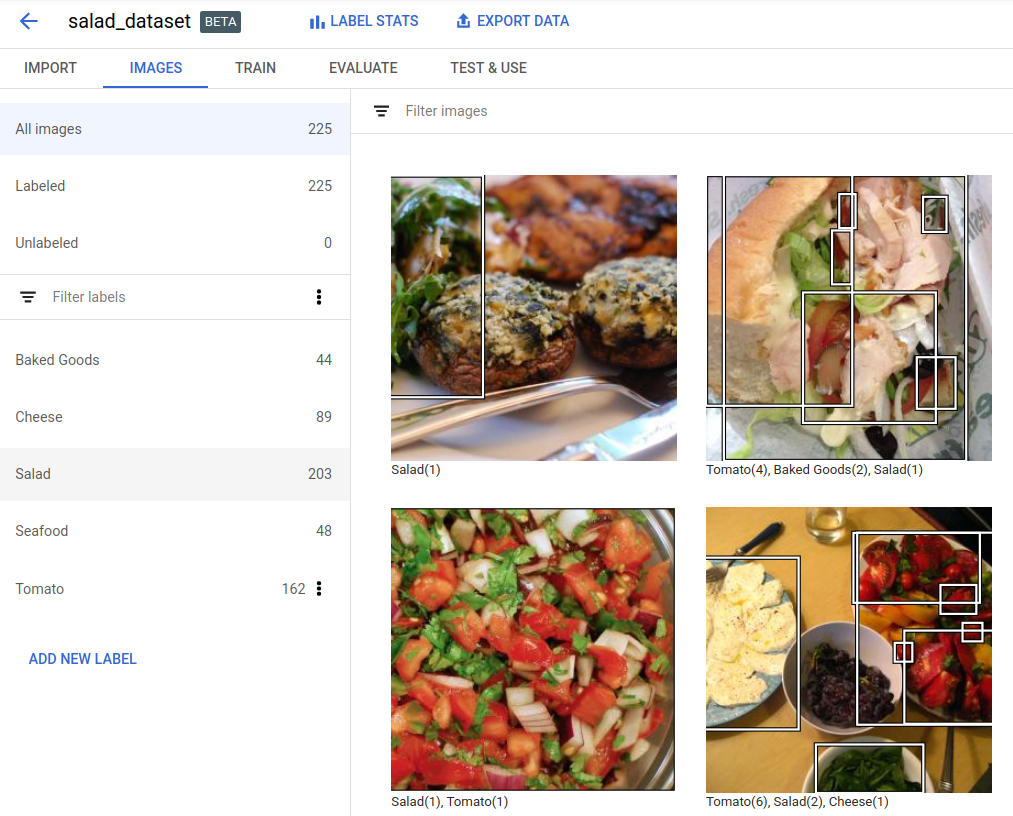
  1. Seleziona il set di dati non vuoto dalla pagina Set di dati.

    Elenco dell'immagine del set di dati

    Se selezioni il set di dati non vuoto, verrà visualizzata la pagina Dettagli del set di dati.

    UI immagini di addestramento etichetta

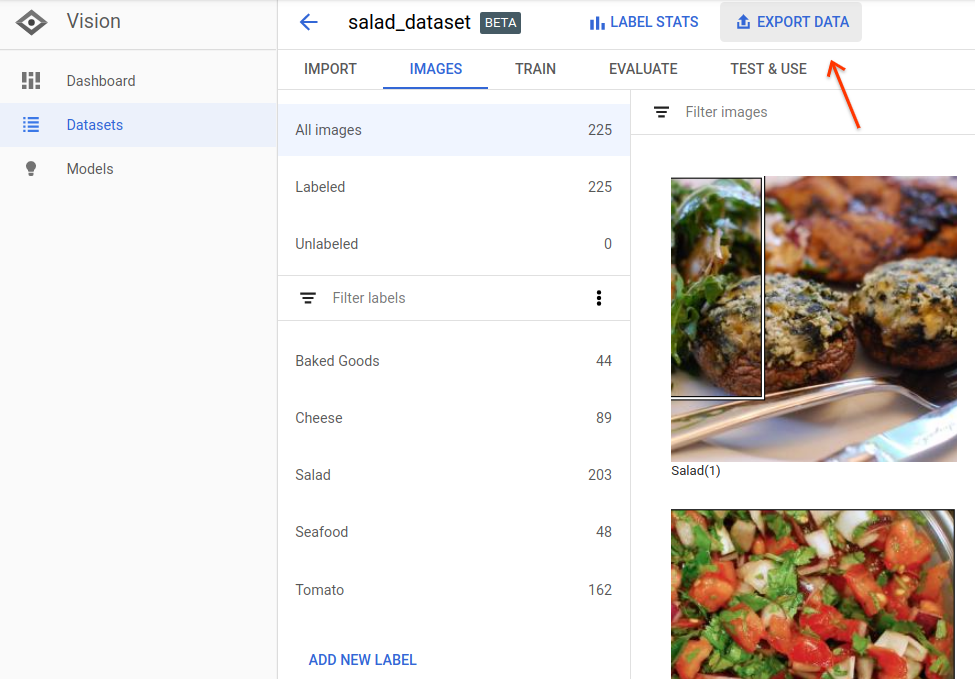
  2. Seleziona l'opzione Esporta dati nella parte superiore della pagina dei dettagli del set di dati.

    pulsante Esporta set di dati

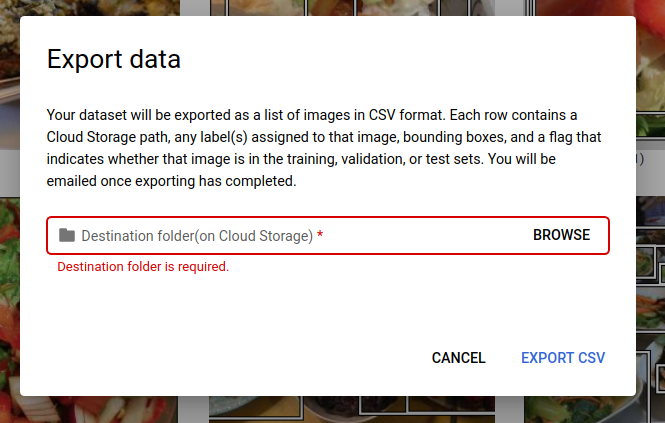
    Viene visualizzata una finestra in cui puoi scegliere la località di un bucket Google Cloud Storage o creare un nuovo bucket e designarlo come posizione in cui archiviare il file CSV.

    finestra popout delle statistiche delle etichette

  3. Seleziona Esporta CSV dopo aver selezionato una località per il bucket Google Cloud Storage nuovo o esistente.

    pulsante Esporta CSV

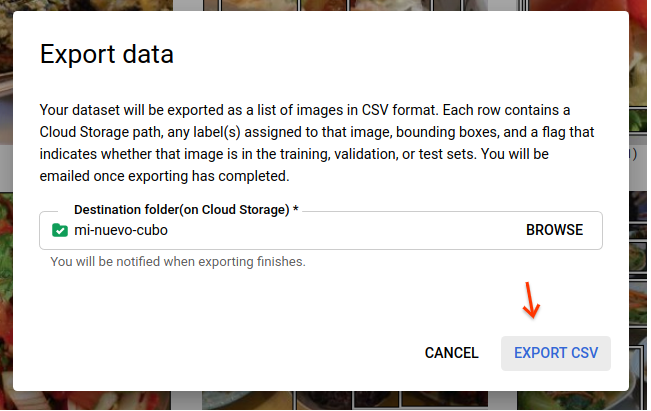
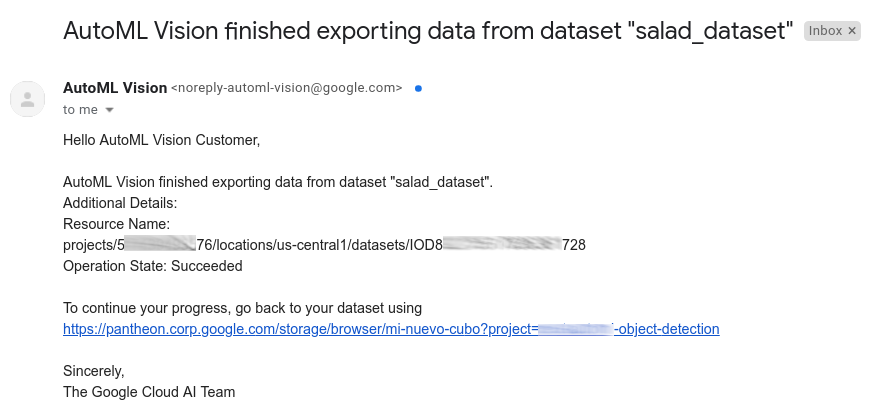
  4. Riceverai un'email al termine del processo di esportazione dei dati.

    esportazione email completa

REST

Prima di utilizzare i dati della richiesta, effettua le seguenti sostituzioni:

  • project-id: l'ID del tuo progetto Google Cloud.
  • dataset-id: l'ID del set di dati. L'ID è l'ultimo elemento del nome del set di dati. Ecco alcuni esempi:
    • nome set di dati: projects/project-id/locations/location-id/datasets/3104518874390609379
    • ID set di dati: 3104518874390609379
  • output-storage-bucket: una directory o un bucket Google Cloud Storage in cui salvare i file di output, espresso nel seguente formato: gs://bucket/directory/. L'utente richiedente deve avere l'autorizzazione di scrittura per il bucket.

Metodo HTTP e URL:

POST https://automl.googleapis.com/v1/projects/PROJECT_ID/locations/us-central1/datasets/DATASET_ID:exportData

Corpo JSON della richiesta:

{
  "outputConfig": {
    "gcsDestination": {
      "outputUriPrefix": "CLOUD_STORAGE_BUCKET"
    }
  }
}

Per inviare la richiesta, scegli una delle seguenti opzioni:

arricciatura

Salva il corpo della richiesta in un file denominato request.json ed esegui questo comando:

curl -X POST \
-H "Authorization: Bearer $(gcloud auth print-access-token)" \
-H "x-goog-user-project: project-id" \
-H "Content-Type: application/json; charset=utf-8" \
-d @request.json \
"https://automl.googleapis.com/v1/projects/PROJECT_ID/locations/us-central1/datasets/DATASET_ID:exportData"

PowerShell

Salva il corpo della richiesta in un file denominato request.json ed esegui questo comando:

$cred = gcloud auth print-access-token
$headers = @{ "Authorization" = "Bearer $cred"; "x-goog-user-project" = "project-id" }

Invoke-WebRequest `
-Method POST `
-Headers $headers `
-ContentType: "application/json; charset=utf-8" `
-InFile request.json `
-Uri "https://automl.googleapis.com/v1/projects/PROJECT_ID/locations/us-central1/datasets/DATASET_ID:exportData" | Select-Object -Expand Content

Dovresti vedere un output simile al seguente. Puoi utilizzare l'ID operazione per conoscere lo stato dell'attività. Per un esempio, consulta Operazioni con operazioni a lunga esecuzione.

{
  "name": "projects/PROJECT_ID/locations/us-central1/operations/OPERATION_ID",
  "metadata": {
    "@type": "type.googleapis.com/google.cloud.automl.v1.OperationMetadata",
    "createTime": "2019-08-12T18:52:31.637075Z",
    "updateTime": "2019-08-12T18:52:31.637075Z",
    "exportDataDetails": {
      "outputInfo": {
        "gcsOutputDirectory": "CLOUD_STORAGE_BUCKET/export_data-DATASET_NAME-TIMESTAMP_OF_EXPORT_CALL/"
      }
    }
  }
}

Go

Prima di provare questo esempio, segui le istruzioni di configurazione per questa lingua nella pagina Librerie client.

import (
	"context"
	"fmt"
	"io"

	automl "cloud.google.com/go/automl/apiv1"
	"cloud.google.com/go/automl/apiv1/automlpb"
)

// exportDataset exports a dataset.
func exportDataset(w io.Writer, projectID string, location string, datasetID string, outputURI string) error {
	// projectID := "my-project-id"
	// location := "us-central1"
	// datasetID := "TRL123456789..."
	// outputURI := "gs://BUCKET_ID/path_to_export/"

	ctx := context.Background()
	client, err := automl.NewClient(ctx)
	if err != nil {
		return fmt.Errorf("NewClient: %w", err)
	}
	defer client.Close()

	req := &automlpb.ExportDataRequest{
		Name: fmt.Sprintf("projects/%s/locations/%s/datasets/%s", projectID, location, datasetID),
		OutputConfig: &automlpb.OutputConfig{
			Destination: &automlpb.OutputConfig_GcsDestination{
				GcsDestination: &automlpb.GcsDestination{
					OutputUriPrefix: outputURI,
				},
			},
		},
	}

	op, err := client.ExportData(ctx, req)
	if err != nil {
		return fmt.Errorf("ExportData: %w", err)
	}
	fmt.Fprintf(w, "Processing operation name: %q\n", op.Name())

	if err := op.Wait(ctx); err != nil {
		return fmt.Errorf("Wait: %w", err)
	}

	fmt.Fprintf(w, "Dataset exported.\n")

	return nil
}

Java

Prima di provare questo esempio, segui le istruzioni di configurazione per questa lingua nella pagina Librerie client.

import com.google.cloud.automl.v1.AutoMlClient;
import com.google.cloud.automl.v1.DatasetName;
import com.google.cloud.automl.v1.GcsDestination;
import com.google.cloud.automl.v1.OutputConfig;
import com.google.protobuf.Empty;
import java.io.IOException;
import java.util.concurrent.ExecutionException;

class ExportDataset {

  static void exportDataset() throws IOException, ExecutionException, InterruptedException {
    // TODO(developer): Replace these variables before running the sample.
    String projectId = "YOUR_PROJECT_ID";
    String datasetId = "YOUR_DATASET_ID";
    String gcsUri = "gs://BUCKET_ID/path_to_export/";
    exportDataset(projectId, datasetId, gcsUri);
  }

  // Export a dataset to a GCS bucket
  static void exportDataset(String projectId, String datasetId, String gcsUri)
      throws IOException, ExecutionException, InterruptedException {
    // Initialize client that will be used to send requests. This client only needs to be created
    // once, and can be reused for multiple requests. After completing all of your requests, call
    // the "close" method on the client to safely clean up any remaining background resources.
    try (AutoMlClient client = AutoMlClient.create()) {
      // Get the complete path of the dataset.
      DatasetName datasetFullId = DatasetName.of(projectId, "us-central1", datasetId);
      GcsDestination gcsDestination =
          GcsDestination.newBuilder().setOutputUriPrefix(gcsUri).build();

      // Export the dataset to the output URI.
      OutputConfig outputConfig =
          OutputConfig.newBuilder().setGcsDestination(gcsDestination).build();

      System.out.println("Processing export...");
      Empty response = client.exportDataAsync(datasetFullId, outputConfig).get();
      System.out.format("Dataset exported. %s\n", response);
    }
  }
}

Node.js

Prima di provare questo esempio, segui le istruzioni di configurazione per questa lingua nella pagina Librerie client.

/**
 * TODO(developer): Uncomment these variables before running the sample.
 */
// const projectId = 'YOUR_PROJECT_ID';
// const location = 'us-central1';
// const datasetId = 'YOUR_DATASET_ID';
// const gcsUri = 'gs://BUCKET_ID/path_to_export/';

// Imports the Google Cloud AutoML library
const {AutoMlClient} = require('@google-cloud/automl').v1;

// Instantiates a client
const client = new AutoMlClient();

async function exportDataset() {
  // Construct request
  const request = {
    name: client.datasetPath(projectId, location, datasetId),
    outputConfig: {
      gcsDestination: {
        outputUriPrefix: gcsUri,
      },
    },
  };

  const [operation] = await client.exportData(request);
  // Wait for operation to complete.
  const [response] = await operation.promise();
  console.log(`Dataset exported: ${response}`);
}

exportDataset();

Python

Prima di provare questo esempio, segui le istruzioni di configurazione per questa lingua nella pagina Librerie client.

from google.cloud import automl

# TODO(developer): Uncomment and set the following variables
# project_id = "YOUR_PROJECT_ID"
# dataset_id = "YOUR_DATASET_ID"
# gcs_uri = "gs://YOUR_BUCKET_ID/path/to/export/"

client = automl.AutoMlClient()

# Get the full path of the dataset
dataset_full_id = client.dataset_path(project_id, "us-central1", dataset_id)

gcs_destination = automl.GcsDestination(output_uri_prefix=gcs_uri)
output_config = automl.OutputConfig(gcs_destination=gcs_destination)

response = client.export_data(name=dataset_full_id, output_config=output_config)
print(f"Dataset exported. {response.result()}")

Linguaggi aggiuntivi

C#: segui le istruzioni di configurazione di C# nella pagina delle librerie client e poi consulta la documentazione di riferimento di AutoML Vision Object Detection per .NET.

PHP: segui le istruzioni per la configurazione dei file PHP nella pagina delle librerie client e consulta la documentazione di riferimento di AutoML Vision Object Detection per PHP.

Ruby: segui le istruzioni di configurazione di Ruby nella pagina delle librerie client e poi visita la documentazione di riferimento di AutoML Vision Object Detection per Ruby.

Formato CSV esportato

Il file CSV esportato contiene la stessa formattazione del file CSV per l'importazione dei dati di addestramento:

set,path,label,x_min,y_min,x_max,y_min,x_max,y_max,x_min,y_max

Questo file CSV viene salvato in una cartella di esportazione creata che si distingue da un timestamp univoco. Di seguito sono riportate alcune righe di esempio tratte da un file CSV esportato:

/export_data-salad_dataset-2019-05-29T18:12:18.750Z/image_object_detection_1.csv

TRAIN,gs://my-storage-bucket/img/img009.jpg,Cheese,0.643239,0.362779,0.662498,0.362779,0.662498,0.416544,0.643239,0.416544
TRAIN,gs://my-storage-bucket/img/img009.jpg,Salad,0.205697,0.255249,0.459074,0.255249,0.459074,0.775244,0.205697,0.775244
TEST,gs://my-storage-bucket/img/img118.jpg,Cheese,0.320334,0.501238,0.726751,0.501238,0.726751,0.741431,0.320334,0.741431
TEST,gs://my-storage-bucket/img/img118.jpg,Salad,0.0,0.037361,1.0,0.037361,1.0,0.926321,0.0,0.926321
TEST,gs://my-storage-bucket/img/img118.jpg,Cheese,0.358745,0.29076,0.740381,0.29076,0.740381,0.497936,0.358745,0.497936
TRAIN,gs://my-storage-bucket/img/img375.jpg,Tomato,0.027274,0.41247,0.43122,0.41247,0.43122,0.702593,0.027274,0.702593
VALIDATION,gs://my-storage-bucket/img/img852.jpg,Tomato,0.716958,0.178534,0.805999,0.178534,0.805999,0.329861,0.716958,0.329861
VALIDATION,gs://my-storage-bucket/img/img852.jpg,Tomato,0.858044,0.297255,0.950847,0.297255,0.950847,0.39173,0.858044,0.39173
VALIDATION,gs://my-storage-bucket/img/img852.jpg,Tomato,0.199644,0.624155,0.321919,0.624155,0.321919,0.796384,0.199644,0.796384
VALIDATION,gs://my-storage-bucket/img/img852.jpg,Cheese,0.399672,0.277189,0.600955,0.277189,0.600955,0.47032,0.399672,0.47032

Tieni presente che esiste una sola rappresentazione di un riquadro di delimitazione e della relativa etichetta per riga. Queste informazioni indicano quanto segue:

  • img009.jpg è nel set TRAIN e contiene due riquadri di delimitazione con etichette Cheese e Salad
  • img118.jpg è nel set di TEST e ha tre riquadri di delimitazione con etichette Cheese, Salad e Cheese
  • img375.jpg - è nel set TRAIN e ha un riquadro di delimitazione con un'etichetta Tomato
  • img852.jpg è nel set VALIDATION e ha 4 riquadri di delimitazione distinti con etichette Tomato, Tomato, Tomato e Cheese

Eliminazione di un set di dati

Puoi eliminare una risorsa del set di dati utilizzando l'ID del set di dati.

UI web

  1. Nell'interfaccia utente di AutoML Vision Object Detection, fai clic sul link Set di dati nella parte superiore del menu di navigazione a sinistra per visualizzare l'elenco dei set di dati disponibili.

    Eliminazione della UI di un set di dati

  2. Fai clic sul menu con tre puntini all'estrema destra della riga che vuoi eliminare e seleziona Elimina set di dati.

  3. Fai clic su Elimina nella finestra di dialogo di conferma.

REST

Prima di utilizzare i dati della richiesta, effettua le seguenti sostituzioni:

  • project-id: l'ID del tuo progetto Google Cloud.
  • dataset-id: l'ID del set di dati. L'ID è l'ultimo elemento del nome del set di dati. Ecco alcuni esempi:
    • nome set di dati: projects/project-id/locations/location-id/datasets/3104518874390609379
    • ID set di dati: 3104518874390609379

Metodo HTTP e URL:

DELETE https://automl.googleapis.com/v1/projects/PROJECT_ID/locations/us-central1/datasets/DATASET_ID

Per inviare la richiesta, scegli una delle seguenti opzioni:

arricciatura

Esegui questo comando:

curl -X DELETE \
-H "Authorization: Bearer $(gcloud auth print-access-token)" \
-H "x-goog-user-project: project-id" \
"https://automl.googleapis.com/v1/projects/PROJECT_ID/locations/us-central1/datasets/DATASET_ID"

PowerShell

Esegui questo comando:

$cred = gcloud auth print-access-token
$headers = @{ "Authorization" = "Bearer $cred"; "x-goog-user-project" = "project-id" }

Invoke-WebRequest `
-Method DELETE `
-Headers $headers `
-Uri "https://automl.googleapis.com/v1/projects/PROJECT_ID/locations/us-central1/datasets/DATASET_ID" | Select-Object -Expand Content

Dovresti vedere un output simile al seguente. Puoi utilizzare l'ID operazione per conoscere lo stato dell'attività. Per un esempio, consulta Operazioni con operazioni a lunga esecuzione.

{
  "name": "projects/PROJECT_ID/locations/us-central1/operations/OPERATION_ID",
  "metadata": {
    "@type": "type.googleapis.com/google.cloud.automl.v1.OperationMetadata",
    "createTime": "2019-11-08T22:37:19.822128Z",
    "updateTime": "2019-11-08T22:37:19.822128Z",
    "deleteDetails": {}
  },
  "done": true,
  "response": {
    "@type": "type.googleapis.com/google.protobuf.Empty"
  }
}

Go

Prima di provare questo esempio, segui le istruzioni di configurazione per questa lingua nella pagina Librerie client.

import (
	"context"
	"fmt"
	"io"

	automl "cloud.google.com/go/automl/apiv1"
	"cloud.google.com/go/automl/apiv1/automlpb"
)

// deleteDataset deletes a dataset.
func deleteDataset(w io.Writer, projectID string, location string, datasetID string) error {
	// projectID := "my-project-id"
	// location := "us-central1"
	// datasetID := "TRL123456789..."

	ctx := context.Background()
	client, err := automl.NewClient(ctx)
	if err != nil {
		return fmt.Errorf("NewClient: %w", err)
	}
	defer client.Close()

	req := &automlpb.DeleteDatasetRequest{
		Name: fmt.Sprintf("projects/%s/locations/%s/datasets/%s", projectID, location, datasetID),
	}

	op, err := client.DeleteDataset(ctx, req)
	if err != nil {
		return fmt.Errorf("DeleteDataset: %w", err)
	}
	fmt.Fprintf(w, "Processing operation name: %q\n", op.Name())

	if err := op.Wait(ctx); err != nil {
		return fmt.Errorf("Wait: %w", err)
	}

	fmt.Fprintf(w, "Dataset deleted.\n")

	return nil
}

Java

Prima di provare questo esempio, segui le istruzioni di configurazione per questa lingua nella pagina Librerie client.

import com.google.cloud.automl.v1.AutoMlClient;
import com.google.cloud.automl.v1.DatasetName;
import com.google.protobuf.Empty;
import java.io.IOException;
import java.util.concurrent.ExecutionException;

class DeleteDataset {

  static void deleteDataset() throws IOException, ExecutionException, InterruptedException {
    // TODO(developer): Replace these variables before running the sample.
    String projectId = "YOUR_PROJECT_ID";
    String datasetId = "YOUR_DATASET_ID";
    deleteDataset(projectId, datasetId);
  }

  // Delete a dataset
  static void deleteDataset(String projectId, String datasetId)
      throws IOException, ExecutionException, InterruptedException {
    // Initialize client that will be used to send requests. This client only needs to be created
    // once, and can be reused for multiple requests. After completing all of your requests, call
    // the "close" method on the client to safely clean up any remaining background resources.
    try (AutoMlClient client = AutoMlClient.create()) {
      // Get the full path of the dataset.
      DatasetName datasetFullId = DatasetName.of(projectId, "us-central1", datasetId);
      Empty response = client.deleteDatasetAsync(datasetFullId).get();
      System.out.format("Dataset deleted. %s\n", response);
    }
  }
}

Node.js

Prima di provare questo esempio, segui le istruzioni di configurazione per questa lingua nella pagina Librerie client.

/**
 * TODO(developer): Uncomment these variables before running the sample.
 */
// const projectId = 'YOUR_PROJECT_ID';
// const location = 'us-central1';
// const datasetId = 'YOUR_DATASET_ID';

// Imports the Google Cloud AutoML library
const {AutoMlClient} = require('@google-cloud/automl').v1;

// Instantiates a client
const client = new AutoMlClient();

async function deleteDataset() {
  // Construct request
  const request = {
    name: client.datasetPath(projectId, location, datasetId),
  };

  const [operation] = await client.deleteDataset(request);

  // Wait for operation to complete.
  const [response] = await operation.promise();
  console.log(`Dataset deleted: ${response}`);
}

deleteDataset();

Python

Prima di provare questo esempio, segui le istruzioni di configurazione per questa lingua nella pagina Librerie client.

from google.cloud import automl

# TODO(developer): Uncomment and set the following variables
# project_id = "YOUR_PROJECT_ID"
# dataset_id = "YOUR_DATASET_ID"

client = automl.AutoMlClient()
# Get the full path of the dataset
dataset_full_id = client.dataset_path(project_id, "us-central1", dataset_id)
response = client.delete_dataset(name=dataset_full_id)

print(f"Dataset deleted. {response.result()}")

Linguaggi aggiuntivi

C#: segui le istruzioni di configurazione di C# nella pagina delle librerie client e poi consulta la documentazione di riferimento di AutoML Vision Object Detection per .NET.

PHP: segui le istruzioni per la configurazione dei file PHP nella pagina delle librerie client e consulta la documentazione di riferimento di AutoML Vision Object Detection per PHP.

Ruby: segui le istruzioni di configurazione di Ruby nella pagina delle librerie client e poi visita la documentazione di riferimento di AutoML Vision Object Detection per Ruby.