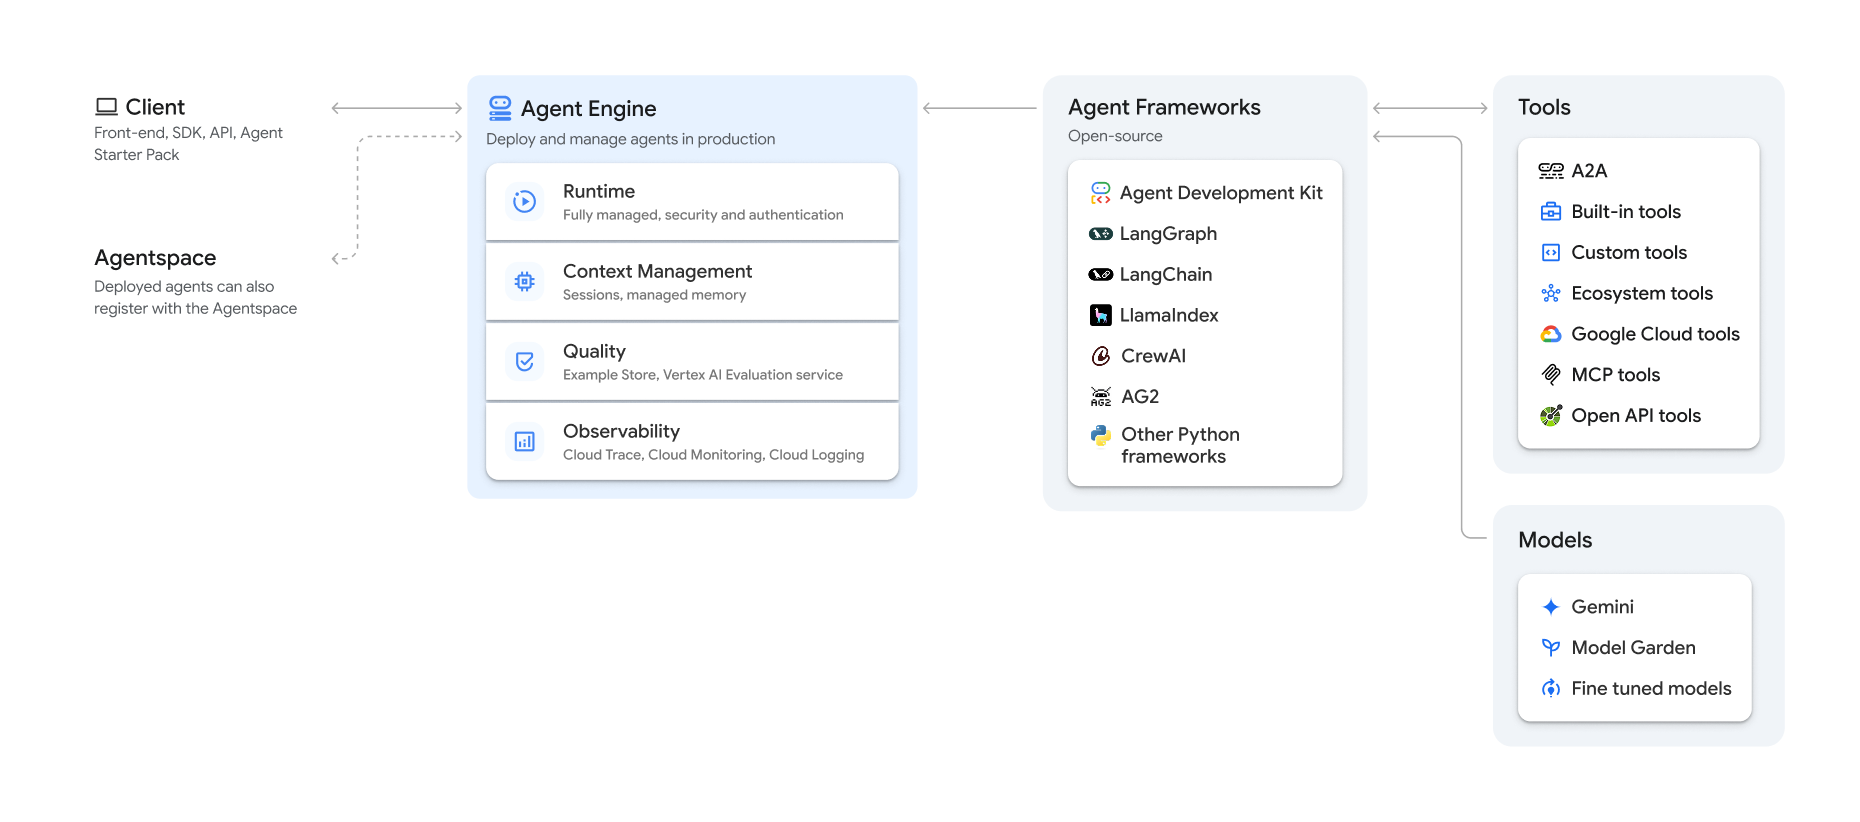
Vertex AI Platform의 일부로 제공되는 Vertex AI Agent Engine은 개발자가 프로덕션에서 AI 에이전트를 배포, 관리, 확장할 수 있도록 지원하는 서비스 집합입니다. Agent Engine이 인프라를 처리하여 프로덕션에서 에이전트를 확장하므로 애플리케이션을 만드는 데 집중할 수 있습니다. Vertex AI Agent Engine은 개별적으로 또는 조합하여 사용할 수 있는 다음 서비스를 제공합니다.
런타임:
- 관리형 런타임 및 엔드 투 엔드 관리 기능으로 에이전트를 배포하고 확장합니다.
- 시스템 종속 항목의 빌드 시간 설치 스크립트를 사용하여 에이전트의 컨테이너 이미지를 맞춤설정합니다.
- VPC-SC 규정 준수, 인증 및 IAM 구성 등의 보안 기능을 사용합니다.
- 함수 호출과 같은 모델 및 도구에 액세스합니다.
- 다양한 Python 프레임워크와 Agent2Agent 개방형 프로토콜을 사용하여 빌드된 에이전트를 배포합니다.
- Google Cloud Trace(OpenTelemetry 지원), Cloud Monitoring, Cloud Logging을 사용하여 에이전트 동작을 파악합니다.
품질 및 평가(프리뷰): 통합된 Gen AI Evaluation Service를 사용하여 에이전트 품질을 평가하고 Gemini 모델 학습 실행으로 에이전트를 최적화합니다.
Example Store(프리뷰): 퓨샷 예시를 저장하고 동적으로 검색하여 에이전트 성능을 개선합니다.
Sessions(프리뷰): 에이전트 엔진 세션을 사용하면 사용자와 에이전트 간의 개별 상호작용을 저장하여 대화 컨텍스트의 명확한 소스를 제공할 수 있습니다.
Memory Bank(프리뷰): Agent Engine 메모리 뱅크를 사용하면 세션에서 정보를 저장하고 검색하여 에이전트 상호작용을 맞춤설정할 수 있습니다.
Code Execution(프리뷰): Agent Engine Code Execution을 사용하면 에이전트가 안전하고 격리된 관리형 샌드박스 환경에서 코드를 실행할 수 있습니다.

Vertex AI Agent Engine은 AI 에이전트를 탐색, 빌드, 배포하기 위한 기능 모음인 Vertex AI Agent Builder의 일부입니다.
Vertex AI Agent Engine에서 만들기 및 배포
참고: Vertex AI Agent Engine으로 간소화된 IDE 기반 개발 및 배포 환경을 사용하려면 agent-starter-pack을 고려하세요. 즉시 사용할 수 있는 템플릿, 실험을 위한 기본 제공 UI를 제공하고 배포, 운영, 평가, 맞춤설정, 관찰 가능성을 간소화합니다.
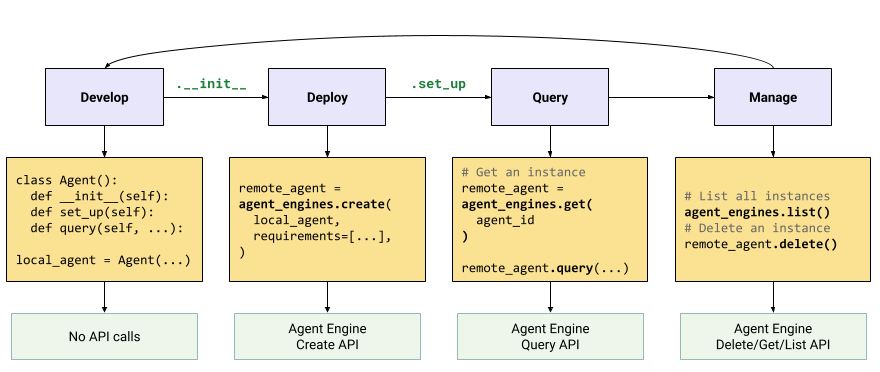
Vertex AI Agent Engine에서 에이전트를 빌드하는 워크플로는 다음과 같습니다.
| 단계 | 설명 |
|---|---|
| 1. 환경 설정 | Google 프로젝트를 설정하고 Vertex AI SDK for Python의 최신 버전을 설치합니다. |
| 2. 에이전트 개발 | Vertex AI Agent Engine에서 배포할 수 있는 에이전트를 개발합니다. |
| 3. 에이전트 배포 | Vertex AI Agent Engine 관리형 런타임에서 에이전트를 배포합니다. |
| 4. 에이전트 사용 | API 요청을 전송하여 에이전트를 쿼리합니다. |
| 5. 배포된 에이전트 관리 | Vertex AI Agent Engine에 배포한 에이전트를 관리하고 삭제합니다. |
단계는 다음 다이어그램에 나와 있습니다.

지원되는 프레임워크
다음 표에서는 Vertex AI Agent Engine이 다양한 에이전트 프레임워크에 제공하는 지원 수준을 설명합니다.
| 지원 수준 | 에이전트 프레임워크 |
|---|---|
| 커스텀 템플릿: 프레임워크에서 Vertex AI Agent Engine으로의 배포를 지원하도록 커스텀 템플릿을 적용할 수 있습니다. | CrewAI, 커스텀 프레임워크 |
| Vertex AI SDK 통합: Vertex AI Agent Engine은 Vertex AI SDK 및 문서에서 프레임워크별로 관리되는 템플릿을 제공합니다. | AG2, LlamaIndex |
| 완전한 통합: 프레임워크, Vertex AI Agent Engine, 더 광범위한 Google Cloud 생태계에서 작동하도록 기능이 통합됩니다. | 에이전트 개발 키트(ADK), LangChain, LangGraph |
에이전트 스타터 팩을 사용하여 프로덕션에 배포
에이전트 스타터 팩은 Vertex AI Agent Engine을 위해 빌드된 프로덕션에 즉시 사용 가능한 생성형 AI 에이전트 템플릿 모음입니다. 에이전트 스타터 팩은 다음을 제공합니다.
- 사전 빌드된 에이전트 템플릿: ReAct, RAG, 멀티 에이전트, 기타 템플릿을 제공합니다.
- 대화형 플레이그라운드: 에이전트를 테스트하고 상호작용합니다.
- 자동화된 인프라: 효율적인 리소스 관리를 위해 Terraform을 사용합니다.
- CI/CD 파이프라인: Cloud Build를 활용하는 자동화된 배포 워크플로입니다.
- 모니터링 가능성: Cloud Trace 및 Cloud Logging을 위한 기본 제공되는 지원을 포함합니다.
시작하려면 빠른 시작을 참조하세요.
사용 사례
엔드 투 엔드 예시를 통해 Vertex AI Agent Engine을 알아보려면 다음 리소스를 참조하세요.
엔터프라이즈 보안
Vertex AI Agent Engine은 기업 보안 요구사항을 충족하고, 조직의 보안 정책을 준수하고, 보안 권장사항을 따르는 데 도움이 되는 여러 기능을 지원합니다. 다음 기능이 지원됩니다.
고객 관리 암호화 키(CMEK): Vertex AI Agent Engine은 CMEK를 지원하여 자체 암호화 키로 데이터를 보호하므로 Google Cloud에서 저장 데이터를 보호하는 키를 소유하고 완전히 제어할 수 있습니다. 자세한 내용은 Agent Engine CMEK를 참조하세요.
VPC 서비스 제어: Vertex AI Agent Engine은 VPC 서비스 제어를 지원하여 데이터 보안을 강화하고 데이터 무단 반출 위험을 완화합니다. VPC 서비스 제어가 구성되면 배포된 에이전트는 BigQuery API, Cloud SQL Admin API, Vertex AI API와 같은 Google API 및 서비스에 대한 보안 액세스 권한을 유지하므로 정의된 경계 내에서 원활한 작업을 보장합니다. 중요한 점은 VPC 서비스 제어는 모든 공개 인터넷 액세스를 효과적으로 차단하여 승인된 네트워크 경계로 데이터 이동을 제한하고 엔터프라이즈 보안 상황을 크게 향상시킨다는 점입니다.
데이터 상주(DRZ): Vertex AI Agent Engine은 데이터 상주(DRZ)를 지원하여 모든 저장 데이터가 특정 리전 내에 저장되도록 합니다.
Private Service Connect 인터페이스: PSC-I를 사용하면 에이전트가 VPC에서 비공개로 호스팅된 서비스와 상호작용할 수 있습니다. 자세한 내용은 Vertex AI Agent Engine에서 Private Service Connect 인터페이스 사용을 참조하세요.
HIPAA: Vertex AI Platform의 일부로 제공되는 Vertex AI Agent Engine은 HIPAA 워크로드를 지원합니다.
지원되는 리전
Vertex AI Agent Engine 및 Agent Engine Sessions는 다음 리전에서 지원됩니다.
| 리전 | 위치 | 지원되는 버전 |
|---|---|---|
us-central1 |
아이오와 | v1은 정식 버전 기능에 지원됩니다. v1beta1은 프리뷰 기능에 지원됩니다. |
us-east4 |
북버지니아 | v1은 정식 버전 기능에 지원됩니다. v1beta1은 프리뷰 기능에 지원됩니다. |
us-west1 |
오리건 | v1은 정식 버전 기능에 지원됩니다. v1beta1은 프리뷰 기능에 지원됩니다. |
europe-west1 |
벨기에 | v1은 정식 버전 기능에 지원됩니다. v1beta1은 프리뷰 기능에 지원됩니다. |
europe-west2 |
런던 | v1은 정식 버전 기능에 지원됩니다. v1beta1은 프리뷰 기능에 지원됩니다. |
europe-west3 |
프랑크푸르트 | v1은 정식 버전 기능에 지원됩니다. v1beta1은 프리뷰 기능에 지원됩니다. |
europe-west4 |
네덜란드 | v1은 정식 버전 기능에 지원됩니다. v1beta1은 프리뷰 기능에 지원됩니다. |
europe-southwest1 |
마드리드 | v1은 정식 버전 기능에 지원됩니다. v1beta1은 프리뷰 기능에 지원됩니다. |
asia-east1 |
대만 | v1은 정식 버전 기능에 지원됩니다. v1beta1은 프리뷰 기능에 지원됩니다. |
asia-northeast1 |
도쿄 | v1은 정식 버전 기능에 지원됩니다. v1beta1은 프리뷰 기능에 지원됩니다. |
asia-south1 |
뭄바이 | v1은 정식 버전 기능에 지원됩니다. v1beta1은 프리뷰 기능에 지원됩니다. |
asia-southeast1 |
싱가포르 | v1은 정식 버전 기능에 지원됩니다. v1beta1은 프리뷰 기능에 지원됩니다. |
australia-southeast2 |
멜버른 | v1은 정식 버전 기능에 지원됩니다. v1beta1은 프리뷰 기능에 지원됩니다. |
Agent Engine Memory Bank(프리뷰)의 경우 다음 리전이 지원됩니다.
| 리전 | 위치 | 지원되는 버전 |
|---|---|---|
us-central1 |
아이오와 | 버전 v1beta1이 지원됩니다. |
us-east4 |
북버지니아 | 버전 v1beta1이 지원됩니다. |
us-west1 |
오리건 | 버전 v1beta1이 지원됩니다. |
europe-west1 |
벨기에 | 버전 v1beta1이 지원됩니다. |
europe-west4 |
네덜란드 | 버전 v1beta1이 지원됩니다. |
europe-southwest1 |
마드리드 | 버전 v1beta1이 지원됩니다. |
Agent Engine Code Execution(프리뷰)의 경우 다음 리전이 지원됩니다.
| 리전 | 위치 | 지원되는 버전 |
|---|---|---|
us-central1 |
아이오와 | 버전 v1beta1이 지원됩니다. |
Quota
다음 한도는 각 리전의 특정 프로젝트에 대한 Vertex AI Agent Engine에 적용됩니다.| 설명 | 한도 |
|---|---|
| Vertex AI Agent Engine 만들기, 삭제, 업데이트(분당) | 10 |
| Vertex AI Agent Engine 세션 만들기, 삭제, 업데이트(분당) | 100 |
Vertex AI Agent Engine에 대한 Query 또는 StreamQuery(분당) |
90 |
| Vertex AI Agent Engine 세션에 이벤트 추가(분당) | 300 |
| 최대 Vertex AI Agent Engine 리소스 수 | 100 |
| Vertex AI Agent Engine 메모리 리소스 만들기, 삭제, 업데이트(분당) | 100 |
| Vertex AI Agent Engine Memory Bank에서 가져오기, 나열, 검색(분당) | 300 |
| 샌드박스 환경(Code Execution) 실행 요청 수(분당) | 1000 |
| 샌드박스 환경(Code Execution) 항목 수(리전) | 1000 |
A2A 에이전트 POST 요청(예: sendMessage 및 cancelTask)(분당) |
60 |
A2A 에이전트 GET 요청(예: getTask 및 getCard)(분당) |
600 |
BidiStreamQuery API를 사용하는 동시 라이브 양방향 연결(분당) |
10 |
가격 책정
Agent Engine 런타임 가격은 에이전트가 요청을 처리하는 데 사용하는 컴퓨팅(vCPU 시간) 및 메모리(GiB 시간)를 기준으로 책정됩니다. 배포된 에이전트가 유휴 상태인 동안에는 요금이 부과되지 않습니다.
| 제품 | SKU ID | 가격 |
|---|---|---|
| ReasoningEngine vCPU | 8A55-0B95-B7DC | 시간당 $0.0994/vCPU |
| ReasoningEngine 메모리 | 0B45-6103-6EC1 | 시간당 $0.0105/GiB |
자세한 내용은 가격 책정을 참조하세요.
클라이언트 기반 SDK로 마이그레이션
Vertex AI SDK for Python 내의 agent_engines 모듈은 다음과 같은 주요 이유로 클라이언트 기반 설계로 리팩터링되고 있습니다.
- 표준 유형 표현에서 Google ADK 및 Google Gen AI SDK와의 일치. 이를 통해 다양한 SDK에서 데이터 유형을 일관되고 표준화된 방식으로 표현할 수 있으므로 상호 운용성이 간소화되고 변환 오버헤드가 줄어듭니다.
- 다중 프로젝트 다중 위치 애플리케이션에서 Google Cloud 매개변수의 클라이언트 수준 범위 지정. 이를 통해 애플리케이션은 특정 프로젝트 및 위치 설정으로 각 클라이언트 인스턴스를 구성하여 여러 Google Cloud 프로젝트와 지리적 위치에 걸쳐 리소스와의 상호작용을 관리할 수 있습니다.
- Vertex AI Agent Engine 서비스의 검색 가능성 및 일관성 개선
