使用 Transcoder API 对视频进行转码
本页面介绍如何使用 Transcoder API 和 curl、Windows PowerShell 或客户端库的默认设置创建基本视频转码作业。
您还可以使用以下任一编程语言直接在 Google Cloud 控制台中执行本快速入门:
准备工作
- Sign in to your Google Cloud account. If you're new to Google Cloud, create an account to evaluate how our products perform in real-world scenarios. New customers also get $300 in free credits to run, test, and deploy workloads.
-
Install the Google Cloud CLI.
-
If you're using an external identity provider (IdP), you must first sign in to the gcloud CLI with your federated identity.
-
To initialize the gcloud CLI, run the following command:
gcloud init -
Create or select a Google Cloud project.
-
Create a Google Cloud project:
gcloud projects create PROJECT_ID
Replace
PROJECT_IDwith a name for the Google Cloud project you are creating. -
Select the Google Cloud project that you created:
gcloud config set project PROJECT_ID
Replace
PROJECT_IDwith your Google Cloud project name.
-
-
Make sure that billing is enabled for your Google Cloud project.
-
Enable the Transcoder API:
gcloud services enable transcoder.googleapis.com
-
Create local authentication credentials for your user account:
gcloud auth application-default login
If an authentication error is returned, and you are using an external identity provider (IdP), confirm that you have signed in to the gcloud CLI with your federated identity.
-
Grant roles to your user account. Run the following command once for each of the following IAM roles:
roles/transcoder.admin, roles/storage.admingcloud projects add-iam-policy-binding PROJECT_ID --member="user:USER_IDENTIFIER" --role=ROLE
- Replace
PROJECT_IDwith your project ID. -
Replace
USER_IDENTIFIERwith the identifier for your user account. For example,user:myemail@example.com. - Replace
ROLEwith each individual role.
- Replace
-
Install the Google Cloud CLI.
-
If you're using an external identity provider (IdP), you must first sign in to the gcloud CLI with your federated identity.
-
To initialize the gcloud CLI, run the following command:
gcloud init -
Create or select a Google Cloud project.
-
Create a Google Cloud project:
gcloud projects create PROJECT_ID
Replace
PROJECT_IDwith a name for the Google Cloud project you are creating. -
Select the Google Cloud project that you created:
gcloud config set project PROJECT_ID
Replace
PROJECT_IDwith your Google Cloud project name.
-
-
Make sure that billing is enabled for your Google Cloud project.
-
Enable the Transcoder API:
gcloud services enable transcoder.googleapis.com
-
Create local authentication credentials for your user account:
gcloud auth application-default login
If an authentication error is returned, and you are using an external identity provider (IdP), confirm that you have signed in to the gcloud CLI with your federated identity.
-
Grant roles to your user account. Run the following command once for each of the following IAM roles:
roles/transcoder.admin, roles/storage.admingcloud projects add-iam-policy-binding PROJECT_ID --member="user:USER_IDENTIFIER" --role=ROLE
- Replace
PROJECT_IDwith your project ID. -
Replace
USER_IDENTIFIERwith the identifier for your user account. For example,user:myemail@example.com. - Replace
ROLEwith each individual role.
- Replace
- In the Google Cloud console, go to the Cloud Storage Buckets page.
- Click Create.
- On the Create a bucket page, enter your bucket information. To go to the next
step, click Continue.
- For Name your bucket, enter a unique bucket name. Don't include sensitive information in the bucket name, because the bucket namespace is global and publicly visible.
-
In the Choose where to store your data section, do the following:
- Select a Location type.
- Choose a location where your bucket's data is permanently stored from the Location type drop-down menu.
- If you select the dual-region location type, you can also choose to enable turbo replication by using the relevant checkbox.
- To set up cross-bucket replication, select
Add cross-bucket replication via Storage Transfer Service and
follow these steps:
Set up cross-bucket replication
- In the Bucket menu, select a bucket.
In the Replication settings section, click Configure to configure settings for the replication job.
The Configure cross-bucket replication pane appears.
- To filter objects to replicate by object name prefix, enter a prefix that you want to include or exclude objects from, then click Add a prefix.
- To set a storage class for the replicated objects, select a storage class from the Storage class menu. If you skip this step, the replicated objects will use the destination bucket's storage class by default.
- Click Done.
-
In the Choose how to store your data section, do the following:
- In the Set a default class section, select the following: Standard.
- To enable hierarchical namespace, in the Optimize storage for data-intensive workloads section, select Enable hierarchical namespace on this bucket.
- In the Choose how to control access to objects section, select whether or not your bucket enforces public access prevention, and select an access control method for your bucket's objects.
-
In the Choose how to protect object data section, do the
following:
- Select any of the options under Data protection that you
want to set for your bucket.
- To enable soft delete, click the Soft delete policy (For data recovery) checkbox, and specify the number of days you want to retain objects after deletion.
- To set Object Versioning, click the Object versioning (For version control) checkbox, and specify the maximum number of versions per object and the number of days after which the noncurrent versions expire.
- To enable the retention policy on objects and buckets, click the Retention (For compliance) checkbox, and then do the following:
- To enable Object Retention Lock, click the Enable object retention checkbox.
- To enable Bucket Lock, click the Set bucket retention policy checkbox, and choose a unit of time and a length of time for your retention period.
- To choose how your object data will be encrypted, expand the Data encryption section (), and select a Data encryption method.
- Select any of the options under Data protection that you
want to set for your bucket.
- Click Create.
- 点击创建文件夹并输入名称,以创建一个用于保存已编码的视频输出的文件夹。
创建 Cloud Storage 存储桶
使用 Transcoder API 对视频进行转码
执行以下步骤时,本地机器上必须至少有时长为 5 秒的视频(示例视频)。请参阅支持的输入和输出格式列表。
将视频上传到 Cloud Storage 存储分区
- 在 Google Cloud 控制台中,前往 Cloud Storage 浏览器页面。
前往“Cloud Storage 浏览器”页面 - 点击存储分区的名称将其打开。
- 点击上传文件。
- 选择要从本地机器上传的视频文件。
您的视频现已保存到 Cloud Storage 存储分区。
创建转码作业
默认情况下,Transcoder API 使用 H.264 编码以及 MP4、HLS 和 MPEG-DASH 包装对视频进行转码。对于每个输入视频,它以高清(1280x720 像素)和标清(640x360 像素)提供输出呈现方式。
要创建作业,请使用 projects.locations.jobs.create 方法。 以下代码示例使用预设创建基本转码作业。
REST
在使用任何请求数据之前,请先进行以下替换:
PROJECT_ID:IAM 设置中列出的 Google Cloud 项目 ID。LOCATION:运行作业的位置。请使用其中一个受支持的区域。显示位置us-central1us-west1us-west2us-east1us-east4southamerica-east1northamerica-northeast1asia-east1asia-northeast1asia-northeast3asia-south1asia-southeast1australia-southeast1europe-west1europe-west2europe-west4me-west1me-central1me-central2
STORAGE_BUCKET_NAME:您创建的 Cloud Storage 存储分区的名称。STORAGE_INPUT_VIDEO:您要对其进行转码的 Cloud Storage 存储分区中的视频的名称,例如my-vid.mp4。此字段应考虑您在存储分区中创建的任何文件夹(例如input/my-vid.mp4)。STORAGE_OUTPUT_FOLDER:您要在其中保存已编码视频输出的 Cloud Storage 文件夹名称。
如需发送您的请求,请展开以下选项之一:
此特定 REST 示例使用可选的 fields 查询参数来仅在显示响应中的已创建的资源名称。
{
  "name": "projects/PROJECT_NUMBER/locations/LOCATION/jobs/JOB_ID"
}
gcloud
- 对
gcloud命令进行以下替换: - STORAGE_BUCKET_NAME:您创建的 Cloud Storage 存储分区的名称。
- STORAGE_INPUT_VIDEO:您要对其进行转码的 Cloud Storage 存储分区中的视频的名称,例如
my-vid.mp4。此字段应考虑您在存储分区中创建的任何文件夹(例如input/my-vid.mp4)。 - LOCATION:运行作业的位置。请使用其中一个受支持的区域。显示位置
us-central1us-west1us-west2us-east1us-east4southamerica-east1northamerica-northeast1asia-east1asia-northeast1asia-northeast3asia-south1asia-southeast1australia-southeast1europe-west1europe-west2europe-west4me-west1me-central1me-central2
- STORAGE_OUTPUT_FOLDER:您要在其中保存已编码视频输出的 Cloud Storage 文件夹名称。
- 运行以下命令:
gcloud transcoder jobs create \
  --input-uri="gs://STORAGE_BUCKET_NAME/STORAGE_INPUT_VIDEO" \
  --location=LOCATION \
  --output-uri="gs://STORAGE_BUCKET_NAME/STORAGE_OUTPUT_FOLDER/"
{
  "config": {
   ...
  },
  "createTime": CREATE_TIME,
  "name": "projects/PROJECT_NUMBER/locations/LOCATION/jobs/JOB_ID",
  "state": "PENDING",
  "ttlAfterCompletionDays": 30
}
C#
在试用此示例之前,请按照 Transcoder API 快速入门:使用客户端库中的 C# 设置说明进行操作。 如需了解详情,请参阅 Transcoder API C# API 参考文档。
如需向 Transcoder API 进行身份验证,请设置应用默认凭据。 如需了解详情,请参阅为本地开发环境设置身份验证。
Go
在试用此示例之前,请按照 Transcoder API 快速入门:使用客户端库中的 Go 设置说明进行操作。 如需了解详情,请参阅 Transcoder API Go API 参考文档。
如需向 Transcoder API 进行身份验证,请设置应用默认凭据。 如需了解详情,请参阅为本地开发环境设置身份验证。
Java
在试用此示例之前,请按照 Transcoder API 快速入门:使用客户端库中的 Java 设置说明进行操作。 如需了解详情,请参阅 Transcoder API Java API 参考文档。
如需向 Transcoder API 进行身份验证,请设置应用默认凭据。 如需了解详情,请参阅为本地开发环境设置身份验证。
Node.js
在试用此示例之前,请按照 Transcoder API 快速入门:使用客户端库中的 Node.js 设置说明进行操作。 如需了解详情,请参阅 Transcoder API Node.js API 参考文档。
如需向 Transcoder API 进行身份验证,请设置应用默认凭据。 如需了解详情,请参阅为本地开发环境设置身份验证。
PHP
在试用此示例之前,请按照 Transcoder API 快速入门:使用客户端库中的 PHP 设置说明进行操作。 如需了解详情,请参阅 Transcoder API PHP API 参考文档。
如需向 Transcoder API 进行身份验证,请设置应用默认凭据。 如需了解详情,请参阅为本地开发环境设置身份验证。
Python
在试用此示例之前,请按照 Transcoder API 快速入门:使用客户端库中的 Python 设置说明进行操作。 如需了解详情,请参阅 Transcoder API Python API 参考文档。
如需向 Transcoder API 进行身份验证,请设置应用默认凭据。 如需了解详情,请参阅为本地开发环境设置身份验证。
Ruby
在试用此示例之前,请按照 Transcoder API 快速入门:使用客户端库中的 Ruby 设置说明进行操作。 如需了解详情,请参阅 Transcoder API Ruby API 参考文档。
如需向 Transcoder API 进行身份验证,请设置应用默认凭据。 如需了解详情,请参阅为本地开发环境设置身份验证。
复制返回的 JOB_ID。您需要该 ID 才能获得作业的状态。
检查转码作业的状态
如需检查作业的状态,请使用 projects.locations.jobs.get 方法。 以下代码显示获取作业详细信息的示例并显示作业状态。
REST
在使用任何请求数据之前,请先进行以下替换:
JOB_ID:您创建的作业的 ID。PROJECT_ID:您的 Google Cloud 项目 ID。LOCATION:您的作业的位置。请使用其中一个受支持的区域。us-central1us-west1us-west2us-east1us-east4southamerica-east1northamerica-northeast1asia-east1asia-northeast1asia-northeast3asia-south1asia-southeast1australia-southeast1europe-west1europe-west2europe-west4me-west1me-central1me-central2
如需发送您的请求,请展开以下选项之一:
您应该收到类似以下内容的 JSON 响应:
{
  "name": "projects/PROJECT_NUMBER/locations/LOCATION/jobs/JOB_ID",
  "config": {
    "inputs": [
      {
        "key": "input0",
        "uri": "gs://STORAGE_BUCKET_NAME/STORAGE_INPUT_VIDEO"
      }
    ],
    "editList": [
      {
        "key": "atom0",
        "inputs": [
          "input0"
        ],
        "startTimeOffset": "0s"
      }
    ],
    "elementaryStreams": [
      {
        "videoStream": {
          "h264": {
            "widthPixels": 640,
            "heightPixels": 360,
            "frameRate": 30,
            "bitrateBps": 550000,
            "pixelFormat": "yuv420p",
            "rateControlMode": "vbr",
            "crfLevel": 21,
            "gopDuration": "3s",
            "vbvSizeBits": 550000,
            "vbvFullnessBits": 495000,
            "entropyCoder": "cabac",
            "bFrameCount": 3,
            "aqStrength": 1,
            "profile": "high",
            "preset": "veryfast"
          }
        },
        "key": "video-stream0"
      },
      {
        "videoStream": {
          "h264": {
            "widthPixels": 1280,
            "heightPixels": 720,
            "frameRate": 30,
            "bitrateBps": 2500000,
            "pixelFormat": "yuv420p",
            "rateControlMode": "vbr",
            "crfLevel": 21,
            "gopDuration": "3s",
            "vbvSizeBits": 2500000,
            "vbvFullnessBits": 2250000,
            "entropyCoder": "cabac",
            "bFrameCount": 3,
            "aqStrength": 1,
            "profile": "high",
            "preset": "veryfast"
          }
        },
        "key": "video-stream1"
      },
      {
        "audioStream": {
          "codec": "aac",
          "bitrateBps": 64000,
          "channelCount": 2,
          "channelLayout": [
            "fl",
            "fr"
          ],
          "sampleRateHertz": 48000
        },
        "key": "audio-stream0"
      }
    ],
    "muxStreams": [
      {
        "key": "sd",
        "fileName": "sd.mp4",
        "container": "mp4",
        "elementaryStreams": [
          "video-stream0",
          "audio-stream0"
        ]
      },
      {
        "key": "hd",
        "fileName": "hd.mp4",
        "container": "mp4",
        "elementaryStreams": [
          "video-stream1",
          "audio-stream0"
        ]
      },
      {
        "key": "media-sd",
        "fileName": "media-sd.ts",
        "container": "ts",
        "elementaryStreams": [
          "video-stream0",
          "audio-stream0"
        ]
      },
      {
        "key": "media-hd",
        "fileName": "media-hd.ts",
        "container": "ts",
        "elementaryStreams": [
          "video-stream1",
          "audio-stream0"
        ]
      },
      {
        "key": "video-only-sd",
        "fileName": "video-only-sd.m4s",
        "container": "fmp4",
        "elementaryStreams": [
          "video-stream0"
        ]
      },
      {
        "key": "video-only-hd",
        "fileName": "video-only-hd.m4s",
        "container": "fmp4",
        "elementaryStreams": [
          "video-stream1"
        ]
      },
      {
        "key": "audio-only",
        "fileName": "audio-only.m4s",
        "container": "fmp4",
        "elementaryStreams": [
          "audio-stream0"
        ]
      }
    ],
    "manifests": [
      {
        "fileName": "manifest.m3u8",
        "type": "HLS",
        "muxStreams": [
          "media-sd",
          "media-hd"
        ]
      },
      {
        "fileName": "manifest.mpd",
        "type": "DASH",
        "muxStreams": [
          "video-only-sd",
          "video-only-hd",
          "audio-only"
        ]
      }
    ],
    "output": {
      "uri": "gs://STORAGE_BUCKET_NAME/STORAGE_OUTPUT_FOLDER/"
    }
  },
  "state": "PENDING",
  "createTime": CREATE_TIME,
  "ttlAfterCompletionDays": 30
}
gcloud
- 对
gcloud命令进行以下替换: - JOB_ID:您创建的作业的 ID。
- LOCATION:您的作业的位置。请使用其中一个受支持的区域。显示位置
us-central1us-west1us-west2us-east1us-east4southamerica-east1northamerica-northeast1asia-east1asia-northeast1asia-northeast3asia-south1asia-southeast1australia-southeast1europe-west1europe-west2europe-west4me-west1me-central1me-central2
- 运行以下命令:
gcloud transcoder jobs describe JOB_ID --location=LOCATION
{
  "name": "projects/PROJECT_NUMBER/locations/LOCATION/jobs/JOB_ID",
  "config": {
    "inputs": [
      {
        "key": "input0",
        "uri": "gs://STORAGE_BUCKET_NAME/STORAGE_INPUT_VIDEO"
      }
    ],
    "editList": [
      {
        "key": "atom0",
        "inputs": [
          "input0"
        ],
        "startTimeOffset": "0s"
      }
    ],
    "elementaryStreams": [
      {
        "videoStream": {
          "h264": {
            "widthPixels": 640,
            "heightPixels": 360,
            "frameRate": 30,
            "bitrateBps": 550000,
            "pixelFormat": "yuv420p",
            "rateControlMode": "vbr",
            "crfLevel": 21,
            "gopDuration": "3s",
            "vbvSizeBits": 550000,
            "vbvFullnessBits": 495000,
            "entropyCoder": "cabac",
            "bFrameCount": 3,
            "aqStrength": 1,
            "profile": "high",
            "preset": "veryfast"
          }
        },
        "key": "video-stream0"
      },
      {
        "videoStream": {
          "h264": {
            "widthPixels": 1280,
            "heightPixels": 720,
            "frameRate": 30,
            "bitrateBps": 2500000,
            "pixelFormat": "yuv420p",
            "rateControlMode": "vbr",
            "crfLevel": 21,
            "gopDuration": "3s",
            "vbvSizeBits": 2500000,
            "vbvFullnessBits": 2250000,
            "entropyCoder": "cabac",
            "bFrameCount": 3,
            "aqStrength": 1,
            "profile": "high",
            "preset": "veryfast"
          }
        },
        "key": "video-stream1"
      },
      {
        "audioStream": {
          "codec": "aac",
          "bitrateBps": 64000,
          "channelCount": 2,
          "channelLayout": [
            "fl",
            "fr"
          ],
          "sampleRateHertz": 48000
        },
        "key": "audio-stream0"
      }
    ],
    "muxStreams": [
      {
        "key": "sd",
        "fileName": "sd.mp4",
        "container": "mp4",
        "elementaryStreams": [
          "video-stream0",
          "audio-stream0"
        ]
      },
      {
        "key": "hd",
        "fileName": "hd.mp4",
        "container": "mp4",
        "elementaryStreams": [
          "video-stream1",
          "audio-stream0"
        ]
      },
      {
        "key": "media-sd",
        "fileName": "media-sd.ts",
        "container": "ts",
        "elementaryStreams": [
          "video-stream0",
          "audio-stream0"
        ]
      },
      {
        "key": "media-hd",
        "fileName": "media-hd.ts",
        "container": "ts",
        "elementaryStreams": [
          "video-stream1",
          "audio-stream0"
        ]
      },
      {
        "key": "video-only-sd",
        "fileName": "video-only-sd.m4s",
        "container": "fmp4",
        "elementaryStreams": [
          "video-stream0"
        ]
      },
      {
        "key": "video-only-hd",
        "fileName": "video-only-hd.m4s",
        "container": "fmp4",
        "elementaryStreams": [
          "video-stream1"
        ]
      },
      {
        "key": "audio-only",
        "fileName": "audio-only.m4s",
        "container": "fmp4",
        "elementaryStreams": [
          "audio-stream0"
        ]
      }
    ],
    "manifests": [
      {
        "fileName": "manifest.m3u8",
        "type": "HLS",
        "muxStreams": [
          "media-sd",
          "media-hd"
        ]
      },
      {
        "fileName": "manifest.mpd",
        "type": "DASH",
        "muxStreams": [
          "video-only-sd",
          "video-only-hd",
          "audio-only"
        ]
      }
    ],
    "output": {
      "uri": "gs://STORAGE_BUCKET_NAME/STORAGE_OUTPUT_FOLDER/"
    }
  },
  "state": "PENDING",
  "createTime": CREATE_TIME,
  "ttlAfterCompletionDays": 30
}
C#
在试用此示例之前,请按照 Transcoder API 快速入门:使用客户端库中的 C# 设置说明进行操作。 如需了解详情,请参阅 Transcoder API C# API 参考文档。
如需向 Transcoder API 进行身份验证,请设置应用默认凭据。 如需了解详情,请参阅为本地开发环境设置身份验证。
Go
在试用此示例之前,请按照 Transcoder API 快速入门:使用客户端库中的 Go 设置说明进行操作。 如需了解详情,请参阅 Transcoder API Go API 参考文档。
如需向 Transcoder API 进行身份验证,请设置应用默认凭据。 如需了解详情,请参阅为本地开发环境设置身份验证。
Java
在试用此示例之前,请按照 Transcoder API 快速入门:使用客户端库中的 Java 设置说明进行操作。 如需了解详情,请参阅 Transcoder API Java API 参考文档。
如需向 Transcoder API 进行身份验证,请设置应用默认凭据。 如需了解详情,请参阅为本地开发环境设置身份验证。
Node.js
在试用此示例之前,请按照 Transcoder API 快速入门:使用客户端库中的 Node.js 设置说明进行操作。 如需了解详情,请参阅 Transcoder API Node.js API 参考文档。
如需向 Transcoder API 进行身份验证,请设置应用默认凭据。 如需了解详情,请参阅为本地开发环境设置身份验证。
PHP
在试用此示例之前,请按照 Transcoder API 快速入门:使用客户端库中的 PHP 设置说明进行操作。 如需了解详情,请参阅 Transcoder API PHP API 参考文档。
如需向 Transcoder API 进行身份验证,请设置应用默认凭据。 如需了解详情,请参阅为本地开发环境设置身份验证。
Python
在试用此示例之前,请按照 Transcoder API 快速入门:使用客户端库中的 Python 设置说明进行操作。 如需了解详情,请参阅 Transcoder API Python API 参考文档。
如需向 Transcoder API 进行身份验证,请设置应用默认凭据。 如需了解详情,请参阅为本地开发环境设置身份验证。
Ruby
在试用此示例之前,请按照 Transcoder API 快速入门:使用客户端库中的 Ruby 设置说明进行操作。 如需了解详情,请参阅 Transcoder API Ruby API 参考文档。
如需向 Transcoder API 进行身份验证,请设置应用默认凭据。 如需了解详情,请参阅为本地开发环境设置身份验证。
如果 state 为 SUCCEEDED,则表示作业已完成,并且您的视频输出现在可在 Cloud Storage 存储分区的已编码文件列表中找到。
播放视频
如需在 Shaka Player 中播放生成的媒体文件,请完成以下步骤:
- 请将 Cloud Storage 存储分区设为可公开读取。
- 如需在 Cloud Storage 存储分区上启用跨域资源共享 (CORS),请执行以下操作:
- 创建一个包含以下代码的 JSON 文件:
[ { "origin": ["https://shaka-player-demo.appspot.com/"], "responseHeader": ["Content-Type", "Range"], "method": ["GET", "HEAD"], "maxAgeSeconds": 3600 } ] -
将 JSON_FILE_NAME 替换为您在上一步中创建的 JSON 文件的名称,然后运行以下命令:
gcloud storage buckets update gs://STORAGE_BUCKET_NAME --cors-file=JSON_FILE_NAME.json
- 创建一个包含以下代码的 JSON 文件:
- 在 Cloud Storage 存储分区中,选择一个由转码作业生成的 MP4 文件或清单文件。在该文件的公开访问权限列中,点击复制网址。
- 导航到在线直播播放器 Shaka Player。
- 点击顶部导航栏中的自定义内容。
- 点击 + 按钮。
将文件的公开网址粘贴到清单网址框中。
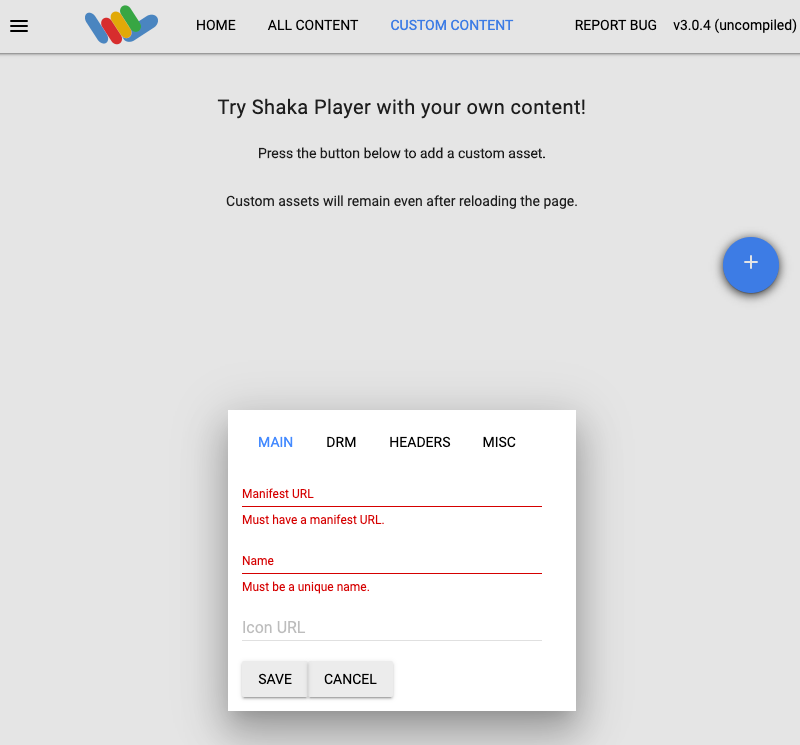
在名称框中输入一个名称。
点击保存。
点击播放。
清理
为避免因本页中使用的资源导致您的 Google Cloud 账号产生费用,请按照以下步骤操作。
删除存储桶
在 Google Cloud 控制台中,前往 Cloud Storage 浏览器页面。
选中所创建存储分区旁边的复选框。
点击删除。
在显示的弹出式窗口中,点击删除以永久删除存储分区及其内容。
删除作业
REST
在使用任何请求数据之前,请先进行以下替换:
JOB_ID:您创建的作业的 ID。PROJECT_ID:您的 Google Cloud 项目 ID。LOCATION:您的作业的位置。请使用其中一个受支持的区域。us-central1us-west1us-west2us-east1us-east4southamerica-east1northamerica-northeast1asia-east1asia-northeast1asia-northeast3asia-south1asia-southeast1australia-southeast1europe-west1europe-west2europe-west4me-west1me-central1me-central2
如需发送您的请求,请展开以下选项之一:
您应该收到类似以下内容的 JSON 响应:
{}
gcloud
- 对
gcloud命令进行以下替换: - JOB_ID:您创建的作业的 ID。
- LOCATION:您的作业的位置。请使用其中一个受支持的区域。显示位置
us-central1us-west1us-west2us-east1us-east4southamerica-east1northamerica-northeast1asia-east1asia-northeast1asia-northeast3asia-south1asia-southeast1australia-southeast1europe-west1europe-west2europe-west4me-west1me-central1me-central2
- 运行以下命令:
gcloud transcoder jobs delete JOB_ID --location=LOCATION
Deleted job [projects/PROJECT_ID/locations/LOCATION/jobs/JOB_ID].
C#
在试用此示例之前,请按照 Transcoder API 快速入门:使用客户端库中的 C# 设置说明进行操作。 如需了解详情,请参阅 Transcoder API C# API 参考文档。
如需向 Transcoder API 进行身份验证,请设置应用默认凭据。 如需了解详情,请参阅为本地开发环境设置身份验证。
Go
在试用此示例之前,请按照 Transcoder API 快速入门:使用客户端库中的 Go 设置说明进行操作。 如需了解详情,请参阅 Transcoder API Go API 参考文档。
如需向 Transcoder API 进行身份验证,请设置应用默认凭据。 如需了解详情,请参阅为本地开发环境设置身份验证。
Java
在试用此示例之前,请按照 Transcoder API 快速入门:使用客户端库中的 Java 设置说明进行操作。 如需了解详情,请参阅 Transcoder API Java API 参考文档。
如需向 Transcoder API 进行身份验证,请设置应用默认凭据。 如需了解详情,请参阅为本地开发环境设置身份验证。
Node.js
在试用此示例之前,请按照 Transcoder API 快速入门:使用客户端库中的 Node.js 设置说明进行操作。 如需了解详情,请参阅 Transcoder API Node.js API 参考文档。
如需向 Transcoder API 进行身份验证,请设置应用默认凭据。 如需了解详情,请参阅为本地开发环境设置身份验证。
PHP
在试用此示例之前,请按照 Transcoder API 快速入门:使用客户端库中的 PHP 设置说明进行操作。 如需了解详情,请参阅 Transcoder API PHP API 参考文档。
如需向 Transcoder API 进行身份验证,请设置应用默认凭据。 如需了解详情,请参阅为本地开发环境设置身份验证。
Python
在试用此示例之前,请按照 Transcoder API 快速入门:使用客户端库中的 Python 设置说明进行操作。 如需了解详情,请参阅 Transcoder API Python API 参考文档。
如需向 Transcoder API 进行身份验证,请设置应用默认凭据。 如需了解详情,请参阅为本地开发环境设置身份验证。
Ruby
在试用此示例之前,请按照 Transcoder API 快速入门:使用客户端库中的 Ruby 设置说明进行操作。 如需了解详情,请参阅 Transcoder API Ruby API 参考文档。
如需向 Transcoder API 进行身份验证,请设置应用默认凭据。 如需了解详情,请参阅为本地开发环境设置身份验证。
撤消您的凭据
-
Optional: Revoke the authentication credentials that you created, and delete the local credential file.
gcloud auth application-default revoke
-
Optional: Revoke credentials from the gcloud CLI.
gcloud auth revoke