Se hai un progetto basato su Gradle e utilizzi IntelliJ IDEA Community Edition, configura il progetto con il plug-in Gradle di App Engine.
Assicurati di sincronizzare il progetto con Gradle.
Se non hai un'applicazione, ma vuoi comunque provare queste procedure di deployment,
scarica l'app di esempio:
Clona l'app di esempio Hello World sulla tua macchina locale:
In IntelliJ, seleziona File > Apri per aprire il selettore di file.
Vai a /java-docs-samples/appengine-java8/.
Seleziona la directory /helloworld/.
Fai clic su OK.
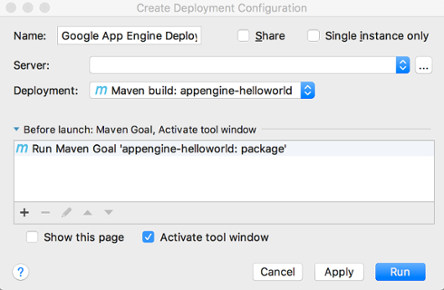
Creazione della configurazione del deployment
Scegli Strumenti > Cloud Code > App Engine >
Esegui il deployment su App Engine.
Conferma la configurazione del server:
Fai clic sui puntini di sospensione (…) accanto al campo Server.
Nella finestra di dialogo, verifica che nel campo Nome sia visualizzato
Google App Engine.
Fai clic su OK.
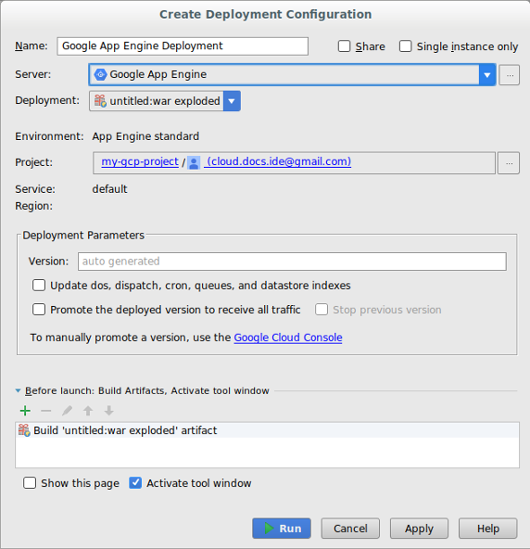
Seleziona l'origine Deployment.
Se utilizzi Community Edition, Cloud Code for IntelliJ supporta solo il deployment da un artefatto Maven o Gradle.
Seleziona un progetto nel campo Progetto.
La prima volta che configuri il deployment, ti verrà chiesto di accedere
all'account associato al progetto della console Google Cloud che
vuoi eseguire il deployment.
Compila gli altri campi in base alle necessità per configurare il deployment.
Fai clic su Esegui per creare ed eseguire il deployment della tua app.
Nella finestra Application Servers (Server delle applicazioni), fai clic sul nome del progetto per monitorare
l'avanzamento del deployment. Se la finestra non viene visualizzata, fai clic su
Visualizza > Finestre degli strumenti > Server delle applicazioni.
Al termine del deployment, puoi visualizzare l'URL della tua app nell'output della console.
Aggiorna le configurazioni dell'ambiente standard di App Engine
Dopo aver creato la configurazione di deployment iniziale, puoi apportare modifiche a queste configurazioni in base alle esigenze della tua applicazione.
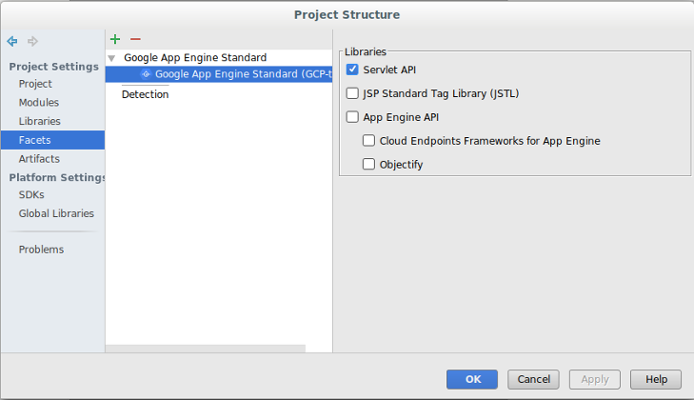
Seleziona File > Struttura del progetto.
Viene visualizzata la finestra di dialogo Struttura del progetto.
In Impostazioni progetto, seleziona Filtri.
Seleziona l'aspetto Ambiente standard di App Engine.
Seleziona le librerie da aggiungere al progetto.
Fai clic su OK.
Eliminazione del server
Se vuoi eliminare il server che hai configurato per il tuo progetto, puoi farlo nel seguente modo:
Per inviare un feedback o segnalare un problema nel tuo IDE IntelliJ, vai a
Strumenti > Cloud Code > Guida / Informazioni > Invia
feedback o segnala un problema per segnalare un problema su GitHub.
[[["Facile da capire","easyToUnderstand","thumb-up"],["Il problema è stato risolto","solvedMyProblem","thumb-up"],["Altra","otherUp","thumb-up"]],[["Difficile da capire","hardToUnderstand","thumb-down"],["Informazioni o codice di esempio errati","incorrectInformationOrSampleCode","thumb-down"],["Mancano le informazioni o gli esempi di cui ho bisogno","missingTheInformationSamplesINeed","thumb-down"],["Problema di traduzione","translationIssue","thumb-down"],["Altra","otherDown","thumb-down"]],["Ultimo aggiornamento 2025-09-04 UTC."],[[["\u003cp\u003eCloud Code supports deploying Java 8 applications to the App Engine standard environment within IntelliJ IDEA, but App Engine Java 8 support is ending, and new projects using it are not recommended.\u003c/p\u003e\n"],["\u003cp\u003eTo deploy to App Engine using Cloud Code, users must first create an App Engine app, set up Cloud Code, and add App Engine standard framework support.\u003c/p\u003e\n"],["\u003cp\u003eIntelliJ IDEA Community Edition only supports deploying Maven or Gradle-based projects to App Engine, and if you have a Gradle project you must configure it with the App Engine Gradle plugin.\u003c/p\u003e\n"],["\u003cp\u003eUsers can configure and modify App Engine deployment settings, such as selecting the project, server, and deployment source, through the Cloud Code interface in IntelliJ IDEA.\u003c/p\u003e\n"],["\u003cp\u003eUsers can easily remove an App Engine server configuration from their project via the IDE settings, under the Clouds section.\u003c/p\u003e\n"]]],[],null,["# Deploy to the App Engine Standard Environment in Cloud Code for IntelliJ\n\n| **Caution:** As of January 31, 2024, Java 8 support for App Engine has ended, and will be deprecated on January 31, 2026. As a result, Cloud Code disables App Engine by default. To enable App Engine in your IDE, navigate to **Settings** \\\u003e **Google\n| Cloud Code** \\\u003e **App Engine** . Due to the upcoming deprecation of App Engine, we don't recommend creating new App Engine projects. For more information about App Engine deprecations, see [Feature deprecations](/appengine/docs/standard/deprecations). For more information about the runtime support schedule for App Engine, see [Runtime support schedule](/appengine/docs/standard/lifecycle/support-schedule).\n\nThis document describes how to deploy an App Engine application to the\n[App Engine standard\nenvironment](/appengine/docs/standard)\nfrom within IntelliJ IDEA.\n| **Note:** The following IDEs support this feature:\n|\n| - IntelliJ IDEA - Ultimate\n| - IntelliJ IDEA - Community\n| **Note:** For the App Engine standard environment, only Java applications using [Java 8 runtime](https://cloud.google.com/appengine/docs/standard/java/runtime) are supported on Cloud Code.\n| **Note:** If you are using IntelliJ IDEA Community Edition, you can deploy Maven-based and Gradle-based projects to the App Engine standard environment.\n\nBefore you begin\n----------------\n\n- Follow the [Create an App](/code/docs/intellij/create-standard)\n guide to install and set up Cloud Code as well as\n create an App Engine app for the standard\n environment. Be sure to add\n [App Engine standard framework\n support](/code/docs/intellij/create-standard#framework).\n\n- If you have a Gradle-based project and are using IntelliJ IDEA Community\n Edition, configure your project with the [App Engine Gradle\n plugin](https://github.com/GoogleCloudPlatform/app-gradle-plugin#how-to-use).\n Be sure to sync your project with Gradle.\n\n If you don't have an application but still want to try these deployment\n procedures, download the sample app:\n 1. Clone the **Hello World** sample app to your local machine:\n\n git clone https://github.com/GoogleCloudPlatform/java-docs-samples\n\n 2. In IntelliJ, select **File** \\\u003e **Open** to open the file selector.\n\n 3. Navigate to `/java-docs-samples/appengine-java8/`.\n\n 4. Select the `/helloworld/` directory.\n\n 5. Click **OK**.\n\nCreating the deployment configuration\n-------------------------------------\n\n1. Choose **Tools** \\\u003e **Cloud Code** \\\u003e **App Engine** \\\u003e\n **Deploy to App Engine**.\n\n2. Confirm the server configuration:\n\n 1. Click the ellipsis (...) next to the **Server** field.\n\n 2. In the dialog, verify that the **Name** field displays\n **Google App Engine**.\n\n 3. Click **OK**.\n\n3. Select the **Deployment** source.\n\n If you're using Community Edition, Cloud Code for IntelliJ only supports\n deploying from a Maven or a Gradle artifact.\n4. Select a project in the **Project** field.\n\n The first time you configure the deployment, you will be prompted to sign in\n to the account associated with the Google Cloud console project that\n you want to deploy.\n\n5. Fill in other fields as needed to configure the deployment.\n\n6. Click **Run** to build and deploy your app.\n\n7. In the Application Servers window, click the name of your project to monitor\n its deployment progress. If the window is not displaying, click\n **View** \\\u003e **Tool Windows** \\\u003e **Application Servers**.\n\n After deployment completes, you can view your app's URL in the console\n output.\n\nUpdate the App Engine standard configurations\n---------------------------------------------\n\nAfter creating the initial deployment configuration, you can make changes to\nthose configurations as needed by your application.\n\n1. Select **File** \\\u003e **Project Structure**.\n\n The **Project Structure** dialog displays.\n2. Under **Project Settings** , select **Facets**.\n\n3. Select the App Engine standard facet.\n\n \u003cbr /\u003e\n\n4. Select the libraries you want to add to your project.\n\n5. Click **OK**.\n\nDeleting the server\n-------------------\n\nIf you ever want to delete the server you configured for your\nproject, you can do so as follows:\n\n1. Choose **File** \\\u003e **Settings** \\\u003e **Build, Execution, Deployment** \\\u003e\n **Clouds**.\n\n On macOS, this is **IntelliJ IDEA** \\\u003e **Preferences** \\\u003e\n **Build, Execution, Deployment** \\\u003e **Clouds**.\n2. Select your server (App Engine) and click the minus sign (-) at the\n top of the window to remove it.\n\n3. Click **OK**.\n\nWhat's next\n-----------\n\n- You can add your project to [Cloud Source Repositories](/code/docs/intellij/vcs) if you haven't done so already.\n\nGet support\n-----------\n\nTo submit feedback or report an issue in your IntelliJ IDE, go to\n**Tools** \\\u003e **Cloud Code** \\\u003e **Help / About** \\\u003e **Submit\nfeedback or report an issue** to report an issue on [GitHub](https://github.com/GoogleCloudPlatform/cloud-code-intellij/issues)."]]