Before You Begin (v3)

Set up

To enroll your Google Cloud Platform project (GCP Project) in data logging, follow these steps:

  1. Go to the GCP Console.
    If you don't already have a Google Cloud Project set up, you must create a project.
  2. Go to your project settings for Cloud Talent Solution in the GCP Dashboard. To view navigation, click the hamburger icon in the upper left-hand corner and scroll down to select Talent Solution under Artificial Intelligence.

    Select your project from the drop down.
  3. If you don't already have a billing account associated with this Google Cloud Project, you are prompted to first set up a billing account and then link it to this Google Cloud Project. Note that only a person who is the owner of the Google Cloud Project and the owner of the billing account can link them.
    1. Click Enable billing.

      The Enable billing for project dialog box appears.
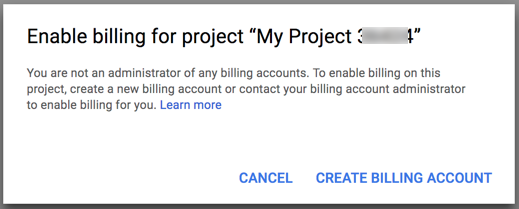
    2. Click CREATE BILLING ACCOUNT. See Create, Modify, or Close Your Billing Account.
  4. Enable API
    Click ENABLE.

  5. The dashboard page appears.
    Click the DATA LOGGING tab.

  6. The data logging opt-in page appears. Accepting the terms outlined on this page allows you to use the various API features. By not accepting these terms, you'll only be able to use deletion API requests.

    Click ENABLE.

    The confirmation page appears.
  7. Click CONTINUE on the confirmation page.


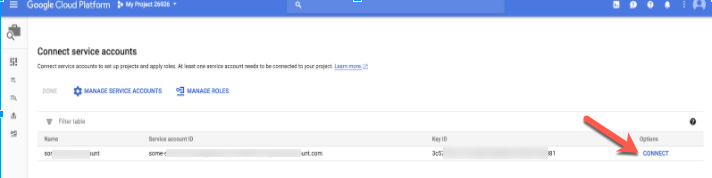
    The Connect service accounts view appears.

  8. Connect service accounts
    If you already have service accounts created for your Google Cloud project, you'll see a list of them here, otherwise, click MANAGE SERVICE ACCOUNTS. See Creating a service account for instructions.


    When creating the service account, also check the box Furnish a new private key. A new JSON credential file is automatically downloaded. Store this file in a specific location on the server, and follow the instructions to set the GOOGLE_APPLICATION_CREDENTIALS environment variable to point to this file. This is an essential step for authenticating requests to Cloud Talent Solution.

  9. After creating the service account, navigate back to the Cloud Talent Solution left-nav tab. The service account you've created now appears. Click CONNECT to link this account to Cloud Talent Solution.

  10. The account is now connected.
    Click DONE to proceed.

  11. You're now ready to begin integrating Cloud Talent Solution into your system.

  12. Set your project id to environment.

    LINUX OR MACOS

    export GOOGLE_CLOUD_PROJECT="your-project-id"

    WINDOWS

    With PowerShell:

    $env:GOOGLE_CLOUD_PROJECT="your-project-id"

    With command prompt:

    set GOOGLE_CLOUD_PROJECT="your-project-id"
  13. Next, go to the Create companies and jobs quickstart, to start integrating Cloud Talent Solution.

Install Client library

Java

For more on installing and creating a Cloud Talent Solution client, see Cloud Talent Solution Client Libraries.

If you are using Maven, add this to your pom.xml file:

  <dependency>
      <groupId>com.google.apis</groupId>
      <artifactId>google-api-services-jobs</artifactId>
      <version>LATEST</version>
  </dependency>
  

Python

For more on installing and creating a Cloud Talent Solution client, see Cloud Talent Solution Client Libraries.

pip install --upgrade google-api-python-client

Node.js

For more on installing and creating a Cloud Talent Solution client, see Cloud Talent Solution Client Libraries.

npm install --save googleapis

Go

For more on installing and creating a Cloud Talent Solution client, see Cloud Talent Solution Client Libraries.

go get google.golang.org/api/jobs/v3

Make a request

Java

For more on installing and creating a Cloud Talent Solution client, see Cloud Talent Solution Client Libraries.


private static final JsonFactory JSON_FACTORY = new GsonFactory();
private static final NetHttpTransport NET_HTTP_TRANSPORT = new NetHttpTransport();
private static final String DEFAULT_PROJECT_ID =
    "projects/" + System.getenv("GOOGLE_CLOUD_PROJECT");

private static CloudTalentSolution talentSolutionClient =
    createTalentSolutionClient(generateCredential());

private static CloudTalentSolution createTalentSolutionClient(GoogleCredentials credential) {
  String url = "https://jobs.googleapis.com";

  HttpRequestInitializer requestInitializer =
      request -> {
        new HttpCredentialsAdapter(credential).initialize(request);
        request.setConnectTimeout(60000); // 1 minute connect timeout
        request.setReadTimeout(60000); // 1 minute read timeout
      };

  return new CloudTalentSolution.Builder(NET_HTTP_TRANSPORT, JSON_FACTORY, requestInitializer)
      .setApplicationName("JobServiceClientSamples")
      .setRootUrl(url)
      .build();
}

private static GoogleCredentials generateCredential() {
  try {
    // Credentials could be downloaded after creating service account
    // set the `GOOGLE_APPLICATION_CREDENTIALS` environment variable, for example:
    // export GOOGLE_APPLICATION_CREDENTIALS=/path/to/your/key.json
    return GoogleCredentials.getApplicationDefault()
        .createScoped(Collections.singleton(CloudTalentSolutionScopes.JOBS));
  } catch (Exception e) {
    System.out.println("Error in generating credential");
    throw new RuntimeException(e);
  }
}

public static CloudTalentSolution getTalentSolutionClient() {
  return talentSolutionClient;
}

public static void main(String... args) throws Exception {
  try {
    ListCompaniesResponse listCompaniesResponse =
        talentSolutionClient.projects().companies().list(DEFAULT_PROJECT_ID).execute();
    System.out.println("Request Id is " + listCompaniesResponse.getMetadata().getRequestId());
    if (listCompaniesResponse.getCompanies() != null) {
      for (Company company : listCompaniesResponse.getCompanies()) {
        System.out.println(company.getName());
      }
    }
  } catch (IOException e) {
    System.out.println("Got exception while listing companies");
    throw e;
  }
}

Python

For more on installing and creating a Cloud Talent Solution client, see Cloud Talent Solution Client Libraries.

import os

from googleapiclient.discovery import build
from googleapiclient.errors import Error

client_service = build("jobs", "v3")


def run_sample():
    try:
        project_id = "projects/" + os.environ["GOOGLE_CLOUD_PROJECT"]
        response = (
            client_service.projects().companies().list(parent=project_id).execute()
        )
        print("Request Id: %s" % response.get("metadata").get("requestId"))
        print("Companies:")
        if response.get("companies") is not None:
            for company in response.get("companies"):
                print("%s" % company.get("name"))
        print("")

    except Error as e:
        print("Got exception while listing companies")
        raise e


if __name__ == "__main__":
    run_sample()

Go

For more on installing and creating a Cloud Talent Solution client, see Cloud Talent Solution Client Libraries.


// Command quickstart is an example of using the Google Cloud Talent Solution API.
package main

import (
	"context"
	"fmt"
	"log"
	"os"

	"golang.org/x/oauth2/google"
	talent "google.golang.org/api/jobs/v3"
)

func main() {
	projectID := os.Getenv("GOOGLE_CLOUD_PROJECT")
	parent := fmt.Sprintf("projects/%s", projectID)

	// Authorize the client using Application Default Credentials.
	// See https://g.co/dv/identity/protocols/application-default-credentials
	ctx := context.Background()
	client, err := google.DefaultClient(ctx, talent.CloudPlatformScope)
	if err != nil {
		log.Fatal(err)
	}

	// Create the jobs service client.
	ctsService, err := talent.New(client)
	if err != nil {
		log.Fatal(err)
	}

	// Make the RPC call.
	response, err := ctsService.Projects.Companies.List(parent).Do()
	if err != nil {
		log.Fatalf("Failed to list Companies: %v", err)
	}

	// Print the request id.
	fmt.Printf("Request ID: %q\n", response.Metadata.RequestId)

	// Print the returned companies.
	for _, company := range response.Companies {
		fmt.Printf("Company: %q\n", company.Name)
	}
}