在 Anthos Service Mesh 1.5 及更高版本中,默认情况下启用了自动双向 TLS(自动 mTLS)。通过自动 mTLS,客户端边车代理会自动检测服务器是否具有 Sidecar。客户端 Sidecar 会将 mTLS 发送到具有 Sidecar 的工作负载,并将纯文本流量发送到没有 Sidecar 的工作负载。但请注意,服务会接受纯文本和 mTLS 流量。在向 Pod 注入 Sidecar 代理时,我们还建议您将服务配置为仅接受 mTLS 流量。
借助 Anthos Service Mesh,您可以通过应用单个 YAML 文件在应用代码之外强制执行 mTLS。借助 Anthos Service Mesh,您可以灵活地将身份验证政策应用于整个服务网格、命名空间或单个工作负载。

费用
在本文档中,您将使用 Google Cloud 的以下收费组件:
您可使用价格计算器根据您的预计使用情况来估算费用。
完成本教程后,您可以删除所创建的资源以避免持续产生费用。如需了解详情,请参阅清理。
准备工作
确保您的 Cloud 项目已启用结算功能。 了解如何确认您的项目是否已启用结算功能。
在 GKE 集群上安装 Anthos Service Mesh 并部署入站流量网关。如果您需要为本教程设置集群,请参阅 Anthos Service Mesh 快速入门,该快速入门将引导您完成以下操作:
- 创建 GKE 集群。
- 使用集群内控制平面安装 Anthos Service Mesh。
- 部署入站流量网关。
- 从
anthos-service-mesh-packages代码库部署 Online Boutique 示例应用,该应用在microservices-demo代码库中原始清单集的基础上进行了修改。按照最佳做法,每项服务都会部署在具有唯一服务账号的单独命名空间中。
访问 Online Boutique
将
kubectl的当前上下文设置为在其中部署 Online Boutique 的集群:gcloud container clusters get-credentials CLUSTER_NAME \ --project=PROJECT_ID \ --zone=CLUSTER_LOCATION列出
frontend命名空间中的服务:kubectl get services -n frontend请注意,
frontend-external是LoadBalancer,它具有外部 IP 地址。示例应用包含作为负载均衡器的服务,因此可以在不使用 Anthos Service Mesh 的情况下在 GKE 上部署。使用
frontend-external服务的外部 IP 地址在浏览器中访问该应用:http://FRONTEND_EXTERNAL_IP/Anthos Service Mesh 可让您部署入站流量网关。您还可以使用入站流量网关的外部 IP 地址来访问 Online Boutique。获取网关的外部 IP。使用以下信息替换占位符:
- GATEWAY_SERVICE_NAME:入站流量网关服务的名称。如果您部署了示例网关而未进行修改,或者您已部署默认入站流量网关,则名称为
istio-ingressgateway。 - GATEWAY_NAMESPACE:部署入站流量网关的命名空间。如果您部署了默认入站流量网关,则命名空间为
istio-system。
kubectl get service GATEWAY_NAME -n GATEWAY_NAMESPACE- GATEWAY_SERVICE_NAME:入站流量网关服务的名称。如果您部署了示例网关而未进行修改,或者您已部署默认入站流量网关,则名称为
在浏览器中打开另一个标签页,并使用入站流量网关的外部 IP 地址访问应用:
http://INGRESS_GATEWAY_EXTERNAL_IP/运行以下命令,使用来自另一个 Pod 的纯文本 HTTP
curl服务frontend。由于服务位于不同的命名空间,因此您需要对frontend服务的 DNS 名称进行 curl 转换。kubectl exec \ $(kubectl get pod -l app=productcatalogservice -n product-catalog -o jsonpath={.items..metadata.name}) \ -c istio-proxy -n product-catalog -- \ curl http://frontend.frontend.svc.cluster.local:80/ -o /dev/null -s -w '%{http_code}\n'请求成功并显示
200状态,因为在默认情况下,TLS 和纯文本流量均可接受。
按命名空间启用双向 TLS
您可以应用使用 kubectl 的 PeerAuthentication 政策来强制执行 mTLS。
将以下身份验证政策保存为
mtls-namespace.yaml。cat <<EOF > mtls-namespace.yaml apiVersion: "security.istio.io/v1beta1" kind: "PeerAuthentication" metadata: name: "namespace-policy" spec: mtls: mode: STRICT EOFYAML 中的
mode: STRICT行将服务配置为仅接受 mTLS。mode的默认值为PERMISSIVE,用于将服务配置为接受纯文本和 mTLS。应用身份验证政策,将所有 Online Boutique 服务配置为仅接受 mTLS:
for ns in ad cart checkout currency email frontend loadgenerator \
     payment product-catalog recommendation shipping; do
kubectl apply -n $ns -f mtls-namespace.yaml
done
预期输出:
peerauthentication.security.istio.io/namespace-policy created
peerauthentication.security.istio.io/namespace-policy created
peerauthentication.security.istio.io/namespace-policy created
peerauthentication.security.istio.io/namespace-policy created
peerauthentication.security.istio.io/namespace-policy created
peerauthentication.security.istio.io/namespace-policy created
peerauthentication.security.istio.io/namespace-policy created
peerauthentication.security.istio.io/namespace-policy created
peerauthentication.security.istio.io/namespace-policy created
peerauthentication.security.istio.io/namespace-policy created
peerauthentication.security.istio.io/namespace-policy created
转到在浏览器中使用
frontend-external服务的外部 IP 地址访问 Online Boutique 的标签页:http://FRONTEND_EXTERNAL_IP/刷新页面。 浏览器会显示以下错误:

刷新页面会导致将纯文本发送到
frontend服务。由于STRICT身份验证政策的原因,边车代理会阻止对服务的请求。在浏览器中转到使用
istio-ingressgateway的外部 IP 地址访问 Online Boutique 的标签,然后刷新页面,页面会成功显示。当您使用入站流量网关访问 Online Boutique 时,请求会采用以下路径:
mTLS 身份验证流程:
- 浏览器将纯文本 HTTP 请求发送到服务器。
- 入站流量网关代理容器会拦截请求。
- 入站流量网关代理使用服务器端代理(在此示例中的前端服务)执行 TLS 握手。此握手包括交换证书。这些证书由 Anthos Service Mesh 预加载到代理容器中。
- 入站流量网关代理会对服务器证书执行安全命名检查,以确认是已获授权的身份正在运行服务器。
- 入站流量网关代理和服务器代理建立一个双向 TLS 连接,服务器代理将请求转发到服务器应用容器(前端服务)。
运行以下命令,使用来自另一个 Pod 的纯文本 HTTP
curl服务frontend。kubectl exec \ $(kubectl get pod -l app=productcatalogservice -n product-catalog -o jsonpath={.items..metadata.name}) \ -c istio-proxy -n product-catalog -- \ curl http://frontend.frontend.svc.cluster.local:80/ -o /dev/null -s -w '%{http_code}\n'由于所有 Online Boutique 服务都设置为
STRICTmTLS,并且边车代理会阻止对服务的请求,所以请求失败。预期输出:
000
command terminated with exit code 56
查看 mTLS 状态
您可以在 Google Cloud 控制台中查看 Anthos 安全功能的状态,包括身份验证政策。
在 Google Cloud 控制台中,前往 GKE Enterprise 安全页面。
从菜单栏的下拉列表中选择 Google Cloud 项目。
政策摘要显示应用安全的状态,包括 mTLS。
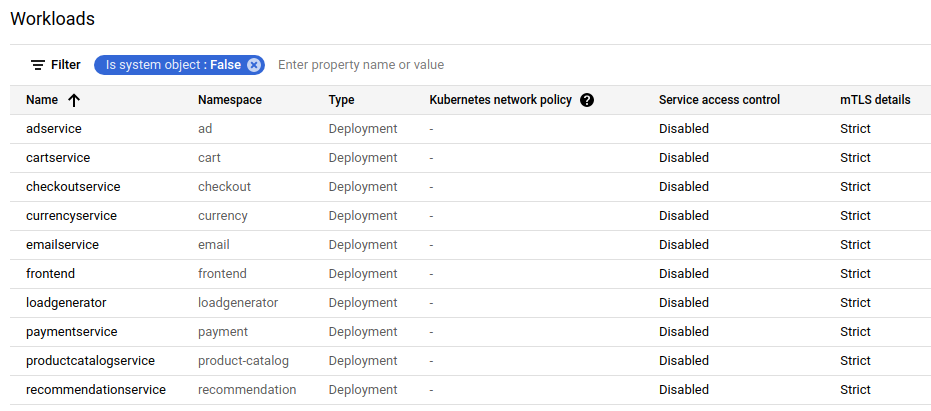
点击政策审核以查看每个集群和命名空间的工作负载政策状态。mTLS 状态卡片提供了概览。工作负载列表显示每个工作负载的 mTLS 状态。
查找和删除身份验证政策
如需服务网格中所有
PeerAuthentication警察的列表,请运行以下命令:kubectl get peerauthentication --all-namespaces输出类似于以下内容:
NAMESPACE         NAME               MODE     AGE
ad                namespace-policy   STRICT   17m
cart              namespace-policy   STRICT   17m
checkout          namespace-policy   STRICT   17m
currency          namespace-policy   STRICT   17m
email             namespace-policy   STRICT   17m
frontend          namespace-policy   STRICT   17m
loadgenerator     namespace-policy   STRICT   17m
payment           namespace-policy   STRICT   17m
product-catalog   namespace-policy   STRICT   17m
recommendation    namespace-policy   STRICT   17m
shipping          namespace-policy   STRICT   17m
从所有 Online Boutique 命名空间中删除身份验证政策:
for ns in ad cart checkout currency email frontend loadgenerator payment \
  product-catalog recommendation shipping; do
    kubectl delete peerauthentication -n $ns namespace-policy
done;
预期输出:
peerauthentication.security.istio.io "namespace-policy" deleted
peerauthentication.security.istio.io "namespace-policy" deleted
peerauthentication.security.istio.io "namespace-policy" deleted
peerauthentication.security.istio.io "namespace-policy" deleted
peerauthentication.security.istio.io "namespace-policy" deleted
peerauthentication.security.istio.io "namespace-policy" deleted
peerauthentication.security.istio.io "namespace-policy" deleted
peerauthentication.security.istio.io "namespace-policy" deleted
peerauthentication.security.istio.io "namespace-policy" deleted
peerauthentication.security.istio.io "namespace-policy" deleted
peerauthentication.security.istio.io "namespace-policy" deleted
使用
frontend-external服务的外部 IP 地址访问 Online Boutique,然后刷新页面。页面将按预期显示。运行以下命令,使用来自另一个 Pod 的纯文本 HTTP
curl服务frontend。kubectl exec \ $(kubectl get pod -l app=productcatalogservice -n product-catalog -o jsonpath={.items..metadata.name}) \ -c istio-proxy -n product-catalog -- \ curl http://frontend.frontend.svc.cluster.local:80/ -o /dev/null -s -w '%{http_code}\n'请求成功并显示
200状态,因为在默认情况下,TLS 和纯文本流量均可接受。
如果您刷新了 Google Cloud 控制台中显示工作负载列表的页面,则现在会显示 mTLS 状态为 Permissive。
为每个工作负载启用双向 TLS
要为特定工作负载设置 PeerAuthentication 政策,您必须配置 selector 部分并指定与所需工作负载匹配的标签。但是,Anthos Service Mesh 无法汇总到服务的出站 mTLS 流量的工作负载级政策。您需要配置目标规则来管理该行为。
将身份验证政策应用于特定工作负载。请注意以下政策如何使用标签和选择器来定位特定的
frontend部署。cat <<EOF | kubectl apply -n frontend -f - apiVersion: "security.istio.io/v1beta1" kind: "PeerAuthentication" metadata: name: "frontend" namespace: "frontend" spec: selector: matchLabels: app: frontend mtls: mode: STRICT EOF预期输出:
peerauthentication.security.istio.io/frontend created
配置匹配的目标规则。
cat <<EOF | kubectl apply -n frontend -f -
apiVersion: "networking.istio.io/v1alpha3"
kind: "DestinationRule"
metadata:
  name: "frontend"
spec:
  host: "frontend.demo.svc.cluster.local"
  trafficPolicy:
    tls:
      mode: ISTIO_MUTUAL
EOF
预期输出:
destinationrule.networking.istio.io/frontend created
使用
frontend-external服务的外部 IP 地址访问 Online Boutique,然后刷新页面。该页面无法显示,因为frontend service设置为STRICTmTLS,并且边车代理会阻止请求。运行以下命令,使用来自另一个 Pod 的纯文本 HTTP
curl服务frontend。kubectl exec \ $(kubectl get pod -l app=productcatalogservice -n product-catalog -o jsonpath={.items..metadata.name}) \ -c istio-proxy -n product-catalog -- \ curl http://frontend.frontend.svc.cluster.local:80/ -o /dev/null -s -w '%{http_code}\n'您的请求失败,状态代码为
56。如果您刷新了 Google Cloud 控制台中显示工作负载列表的页面,则现在会显示
frontend服务的 mTLS 状态为Strict且所有其他服务设置为Permissive。
删除身份验证政策:
kubectl delete peerauthentication -n frontend frontend预期输出:
peerauthentication.security.istio.io "frontend" deleted删除目标规则:
kubectl delete destinationrule -n frontend frontend预期输出:
destinationrule.networking.istio.io "frontend" deleted
强制执行网格级 mTLS
如需阻止网格中的所有服务接受明文流量,请设置 mTLS 模式设置为 STRICT 的网格级 PeerAuthentication 政策。网格级 PeerAuthentication 政策不应具有选择器,并且必须在根命名空间 istio-system 中应用。部署政策时,控制层面会自动预配 TLS 证书,以便工作负载可以相互进行身份验证。
强制执行网格级 mTLS:
kubectl apply -f - <<EOF
apiVersion: "security.istio.io/v1beta1"
kind: "PeerAuthentication"
metadata:
  name: "mesh-wide"
  namespace: "istio-system"
spec:
  mtls:
    mode: STRICT
EOF
预期输出:
peerauthentication.security.istio.io/mesh-wide created
使用
frontend-external服务的外部 IP 地址访问 Online Boutique,然后刷新页面。页面不会显示。运行以下命令,使用来自另一个 Pod 的纯文本 HTTP
curl服务frontend。kubectl exec \ $(kubectl get pod -l app=productcatalogservice -n product-catalog -o jsonpath={.items..metadata.name}) \ -c istio-proxy -n product-catalog -- \ curl http://frontend.frontend.svc.cluster.local:80/ -o /dev/null -s -w '%{http_code}\n'您的请求失败,状态代码为
56。删除
mesh-wide政策:kubectl delete peerauthentication -n istio-system mesh-wide预期输出:
peerauthentication.security.istio.io "mesh-wide" deleted如果您刷新了 Google Cloud 控制台中的页面,则会看到所有服务的
mTLS详细信息现在都显示Permissive。
清理
为避免因本教程中使用的资源导致您的 Google Cloud 账号产生费用,请删除包含这些资源的项目,或者保留项目但删除各个资源。
如果您想防止产生额外费用,请删除集群:
gcloud container clusters delete  CLUSTER_NAME  \
    --project=PROJECT_ID \
    --zone=CLUSTER_LOCATION
如果您希望保留集群并移除 Online Boutique 示例,请执行以下操作:
- 删除应用命名空间:
kubectl delete -f online-boutique/kubernetes-manifests/namespaces预期输出:
namespace "ad" deleted namespace "cart" deleted namespace "checkout" deleted namespace "currency" deleted namespace "email" deleted namespace "frontend" deleted namespace "loadgenerator" deleted namespace "payment" deleted namespace "product-catalog" deleted namespace "recommendation" deleted namespace "shipping" deleted- 删除服务条目:
kubectl delete -f online-boutique/istio-manifests/allow-egress-googleapis.yaml预期输出:
serviceentry.networking.istio.io "allow-egress-googleapis" deleted
serviceentry.networking.istio.io "allow-egress-google-metadata" deleted
后续步骤
- 如需查看有关如何配置
PeerAuthentication政策的一般指南,请参阅配置传输安全性。