Google Cloudでデータを保護するために使用する鍵。デフォルトでは、 Google Cloud は Google が管理する暗号鍵を使用して、保存されているデータを自動的に暗号化します。データを保護する鍵について特定のコンプライアンスや規制の要件がある場合、顧客管理の暗号鍵(CMEK)を使用して保存データの暗号化と復号を行うことができます。これらの暗号鍵は、ユーザーによって作成、管理、所有されます。
注: 設定した暗号鍵は、このソースで作成されるすべてのリソースに使用されます。
省略可: セキュリティ グループでインベントリをフィルタリングする
Migrate to Virtual Machines インベントリで、表示された EC2 インスタンスをフィルタできます。
複数のグループ名を指定できます。この場合、Migrate to Virtual Machines には、これらのセキュリティ グループに属するインスタンスが表示されます。
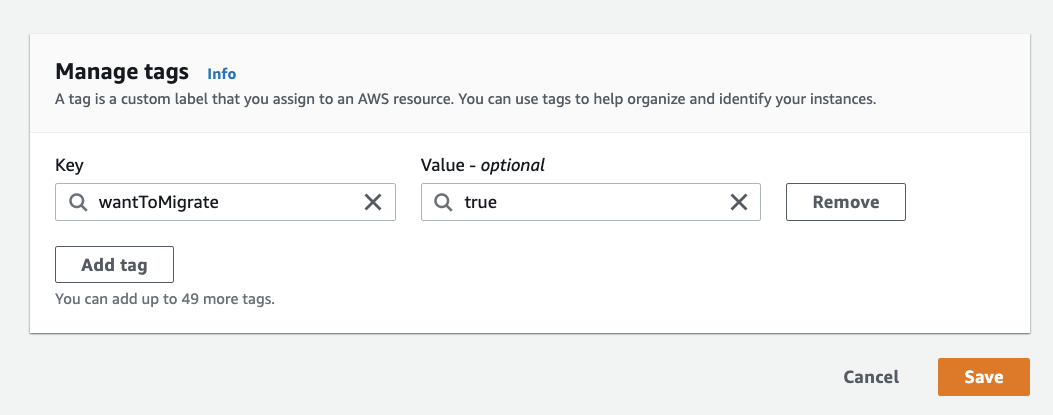
[[["わかりやすい","easyToUnderstand","thumb-up"],["問題の解決に役立った","solvedMyProblem","thumb-up"],["その他","otherUp","thumb-up"]],[["わかりにくい","hardToUnderstand","thumb-down"],["情報またはサンプルコードが不正確","incorrectInformationOrSampleCode","thumb-down"],["必要な情報 / サンプルがない","missingTheInformationSamplesINeed","thumb-down"],["翻訳に関する問題","translationIssue","thumb-down"],["その他","otherDown","thumb-down"]],["最終更新日 2025-09-04 UTC。"],[],[],null,["# Create an AWS source\n\nIntroduction\n------------\n\n[Migrate to Virtual Machines](/migrate/virtual-machines) lets you migrate your EC2\ninstances from your AWS account to Google Compute Engine instances.\n\nPrerequisites\n-------------\n\n- Review [Migrating VMs with Migrate to Virtual Machines: Getting started](/migrate/virtual-machines/docs/5.0/discover/migrating-vms-migrate-for-compute-engine-getting-started) documentation. This document provides insight into the overall structure of Migrate to Virtual Machines, including important terms, concepts, and reference information that help you migrate your workload efficiently and effectively.\n- Enable the **VM Migration API** on your host project using \u003chttps://console.cloud.google.com/apis/library/vmmigration.googleapis.com\u003e.\n- Review the [operating systems that support migrating VMs from AWS as a source](/migrate/virtual-machines/docs/5.0/discover/supported-os-versions#supported_operating_systems_aws_as_a_source) to Google Cloud.\n\nMigrate your workload from an AWS source\n----------------------------------------\n\nBefore initiating your migration with AWS as a source, set up\nyour AWS environment by completing the following tasks:\n\n1. [Create an AWS IAM policy](#create-an-iam-policy).\n2. [Create an IAM user](#create-an-iam-user) to be accessed by the Migrate to Virtual Machines service.\n3. [Optional: Tag EC2 instances](#tag-instances) intended for migration.\n4. [Create a source](#create_an_aws_source) using Google Cloud.\n\n### Create an AWS IAM policy\n\nBefore creating an IAM user, create a policy that describes the\npermissions for your intended workload. To create a policy, see the AWS\nIAM documentation for [Creating IAM policies](https://docs.aws.amazon.com/IAM/latest/UserGuide/access_policies_create.html).\n\nUse the provided JSON template to provide migration permissions for your\npolicy: \n\n {\n \"Version\": \"2012-10-17\",\n \"Statement\": [\n {\n \"Effect\": \"Allow\",\n \"Action\": [\n \"ec2:DescribeInstances\",\n \"ec2:DescribeVolumes\",\n \"ec2:DescribeInstanceTypes\",\n \"ec2:DescribeSnapshots\",\n \"ec2:CreateTags\",\n \"ec2:CreateSnapshots\",\n \"ec2:StopInstances\"\n ],\n \"Resource\": \"*\"\n },\n {\n \"Effect\": \"Allow\",\n \"Action\": [\n \"ebs:ListSnapshotBlocks\",\n \"ebs:ListChangedBlocks\",\n \"ebs:GetSnapshotBlock\",\n \"ec2:DeleteSnapshot\",\n \"ec2:DeleteTags\"\n ],\n \"Resource\": \"*\",\n \"Condition\": {\n \"StringEquals\": {\n \"aws:ResourceTag/m2vm-resource\": \"snapshot\"\n }\n }\n }\n ]\n }\n\nIf your EC2 instances use encrypted volumes with non-AWS managed keys, you must\nadd the following statement to the preceding policy to grant the created user\npermission to access the encryption key. \n\n {\n \"Effect\": \"Allow\",\n \"Action\": [\n \"kms:Decrypt\",\n \"kms:DescribeKey\"\n ],\n \"Resource\": \"\u003c\u003cKMS key ARN\u003e\u003e\"\n }\n\nFor more information about the permissions breakdown for the JSON template\nfields, see [permissions breakdown](/migrate/virtual-machines/docs/5.0/reference/roles-reference#permissions_to_configure_aws_as_a_source).\n\n### Create an IAM user\n\nTo migrate your AWS workload, create an IAM user for use by\nMigrate to Virtual Machines. The IAM user enables Migrate to Virtual Machines\nto interact with your account using the AWS public API.\n\nTo configure IAM user permissions to use AWS as source for your\nmigration, [create an API user in the AWS IAM](https://docs.aws.amazon.com/IAM/latest/UserGuide/id_users_create.html).\n| **Note:** Alternatively, you can configure an AWS source with temporary credentials using an AWS Security Token Service (STS) token. For more information, see [AwsSourceDetails](/migrate/virtual-machines/docs/5.0/reference/rest/v1/projects.locations.sources#awssourcedetails).\n\nDuring user creation, make sure you do the following:\n\n1. Create a user with **Programmatic access**.\n2. Attach the IAM policy you created in the previous section to your new user.\n3. Store the **Access key ID** and **Secret access key** generated during this step. You need them when creating your source using Migrate to Virtual Machines.\n\n### Optional: Tag the EC2 instances that you want to migrate\n\nRecommended: Tag the instances that you want to migrate. The tags\n`wantToMigrate` and `true` provided in the image are examples.\n\nFor more information about tagging EC2 instances, see the\n[AWS IAM documentation](https://docs.aws.amazon.com/IAM/latest/UserGuide/id_tags_users.html#id_tags_users_procs-console).\n\n### Create an AWS source\n\nAfter you have created an IAM user and have added that user to\nyour new IAM policy for Migrate to Virtual Machines, you must create\nan AWS source before you can begin your migration process.\n\nTo create an AWS source:\n\n1. In the Google Cloud console, go to the [Migrate to Virtual Machines](https://console.cloud.google.com/compute/mfce/dashboard) page.\n2. Select the **SOURCES** tab.\n3. Open the **ADD SOURCE** drop-down and select **+Add AWS Source**.\n4. Enter your source details on the **Create AWS source** panel.\n\n | **Caution:** You cannot edit the **GCP region** or **AWS region** fields after creating your source. **Access key ID** and **Secret access key** fields can be edited post-creation if necessary. Editing credentials post-creation may interrupt an ongoing replication cycle. We recommended you wait 24 hours before revoking your previous credentials.\n\n The following table describes the parameters for AWS source details.\n\n5. Press the **CREATE** button. A notice detailing your new source appears.\n\n6. Wait (up to 15 minutes but usually less) until the **Source status** is\n indicated as **Active**.\n\nCheck your inventory to verify that there are instances that correspond to the\ntags (and/or security groups) that you specified when you created your source.\n\nAs part of source creation, your project is automatically added as a target\nproject.\n\n#### Cloud sources limitations\n\nYou can host a maximum of 15 cloud sources (AWS sources, Azure sources, or both\nthe sources combined) on a host project at a time. For example, you can host 10\nAWS sources and 5 Azure sources on a host project at a time. Conversely, you\ncan host 7 AWS sources and 8 Azure sources on a host project at a time. If you\nwant to add a new cloud source to a project that already hosts 15 cloud\nsources, you must delete an existing source, and then add the new source. You\ncan also try using a different project to host the new cloud source if you\ndon't want to delete any existing sources.\n\n### Next steps: Start your migration\n\nAfter you've created an AWS source, you are ready to start your migration. The\nrest of the process for migrating your workload from an AWS source matches the\nprocess for other sources for Migrate to Virtual Machines.\n\nFor details on how to start your migration process, see\n**[Migrating individual VM](/migrate/virtual-machines/docs/5.0/migrate/migrating-vms)**.\n\nDifferences from using Azure as a source\n----------------------------------------\n\nThe usage is almost identical to the usage of Azure as a source."]]