您可以透過 Cloud Build 觸發條件,使用 Cloud Build 自動執行建構作業,並將內容部署至 Knative 服務。每當有新的修訂版本推送至 Git 存放區的特定分支版本時,系統就會自動建構及部署程式碼。
使用 Cloud Build 觸發條件建構容器時,部署到 Knative 服務後,服務的 Google Cloud 控制台會顯示來源存放區資訊。
事前準備
- 您必須擁有含
Dockerfile的 Git 存放區,或以 Google Cloud 的 Buildpacks 支援的語言 (Go、Node.js、Python、Java 或 .NET Core) 編寫程式碼。 -
Enable the Cloud Build and Cloud Source Repositories APIs.
Roles required to enable APIs
To enable APIs, you need the Service Usage Admin IAM role (
roles/serviceusage.serviceUsageAdmin), which contains theserviceusage.services.enablepermission. Learn how to grant roles.
透過 Knative 服務使用者介面設定持續部署
視您是在新服務還是現有服務上設定持續部署,程序會略有不同。按一下適當的分頁標籤,即可瞭解詳情。
新服務
前往 Google Cloud 控制台的 Knative Serving:
按一下「Create service」(建立服務)。
根據偏好設定填寫「服務設定」。
點選「下一步」。
選取「持續透過原始碼存放區部署新的修訂版本」。
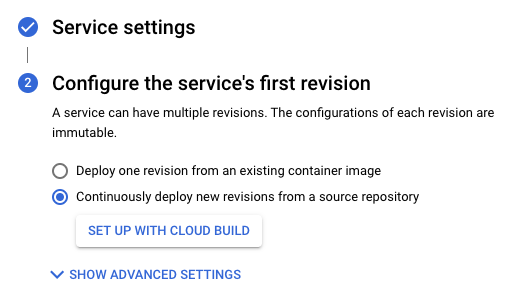
按一下「Set up with Cloud Build」(設定 Cloud Build)。
選取供應商和存放區。
- GitHub - 如果尚未進行驗證,請按一下「Authenticate」(驗證),然後按照操作說明操作。根據預設,系統會透過 Cloud Build GitHub 應用程式連結存放區。您也可以在 Cloud Source Repositories 中建立 GitHub 存放區的鏡像。如要這麼做,請按一下「進階選項」,然後勾選「使用 Cloud Source Repositories 建立 GitHub 存放區鏡像」瞭解詳情
- Bitbucket - 如果尚未驗證,請按一下「Authenticate」(驗證),然後按照操作說明操作。
- Cloud Source Repositories
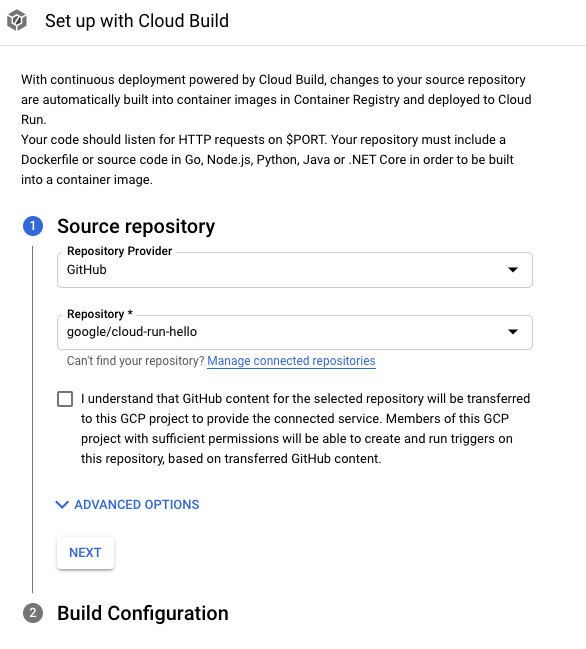
點選「下一步」。
在「建構設定」步驟中填寫選項:
- 分支:指出執行觸發程序時應使用的來源。您可以在這裡輸入regex。系統會自動驗證相符的分店,並顯示在輸入內容下方。請注意,如果系統只比對到一個分支,觸發程序會在建立後自動執行。
建構類型
如果存放區應使用 Docker 建構,且包含 Dockerfile,請選取「Dockerfile」Dockerfile。「來源位置」會指出 Dockerfile 的位置和名稱。這個目錄會做為 Docker 建構作業的結構定義。所有路徑都應與目前目錄相關。
否則請選取「Google Cloud Buildpacks」。使用建構包內容指定目錄,並使用進入點 (選用) 提供啟動伺服器的指令。範例:
gunicorn -p :8080 main:app(適用於 Python)、java -jar target/myjar.jar(適用於 Java)。留空即可使用預設行為。
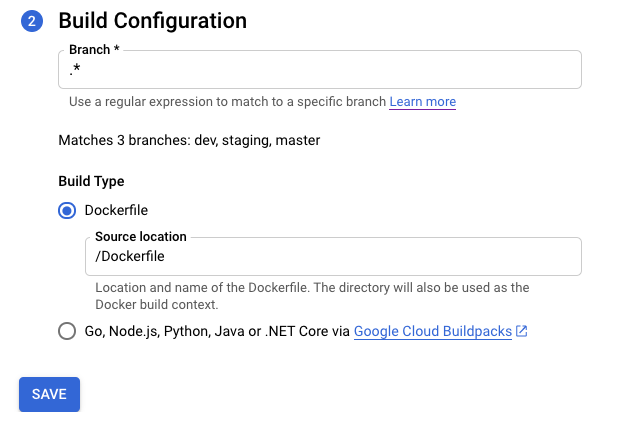
按一下 [儲存]。
確認所選設定。
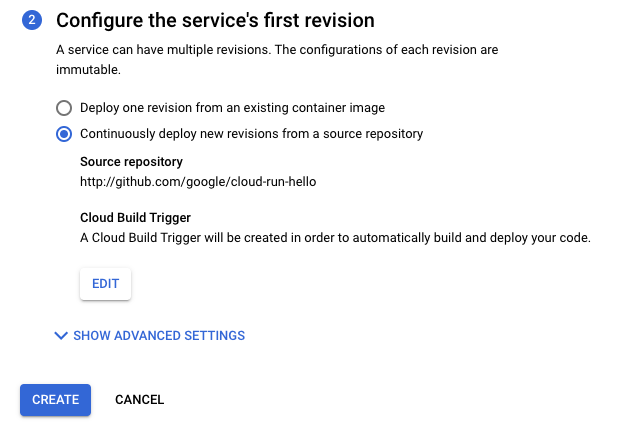
點選「建立」。
請注意,系統會將您重新導向至「服務詳細資料」頁面,您可以在該頁面追蹤持續部署設定的進度。
完成所有步驟後,請注意其他選項:
- 「編輯持續部署功能」按鈕。
- 建構記錄。
- 「修訂版本詳細資料」部分中的來源詳細資料。
現有服務
前往 Google Cloud 控制台的 Knative Serving:
在服務清單中找出所需服務,然後按一下。
按一下「設定持續部署」。
選取供應商和存放區。
- GitHub - 如果尚未進行驗證,請按一下「Authenticate」(驗證),然後按照操作說明操作。根據預設,系統會透過 Cloud Build GitHub 應用程式連結存放區。您也可以在 Cloud Source Repositories 中建立 GitHub 存放區的鏡像。如要這麼做,請按一下「進階選項」,然後勾選「使用 Cloud Source Repositories 建立 GitHub 存放區鏡像」瞭解詳情
- Bitbucket - 如果尚未驗證,請按一下「Authenticate」(驗證),然後按照操作說明操作。
- Cloud Source Repositories
點選「下一步」。
在「建構設定」步驟中填寫選項:
- 分支:指出執行觸發程序時應使用的來源。您可以在這裡輸入regex。系統會自動驗證相符的分店,並顯示在輸入內容下方。請注意,如果系統只比對到一個分支,觸發程序會在建立後自動執行。
建構類型
如果存放區應使用 Docker 建構,且包含 Dockerfile,請選取「Dockerfile」Dockerfile。「來源位置」會指出 Dockerfile 的位置和名稱。這個目錄會做為 Docker 建構作業的結構定義。所有路徑都應與目前目錄相關。
否則請選取「Google Cloud Buildpacks」。使用建構包內容指定目錄,並使用進入點 (選用) 提供啟動伺服器的指令。範例:
gunicorn -p :8080 main:app(適用於 Python)、java -jar target/myjar.jar(適用於 Java)。留空即可使用預設行為。
按一下 [儲存]。
頁面會重新載入,並顯示持續部署設定的進度。
完成所有步驟後,請注意其他選項:
- 「編輯持續部署功能」按鈕。
- 建構記錄。
- 「修訂版本詳細資料」部分中的來源詳細資料。
手動設定持續部署
如需使用手動程序而非 UI,請參閱手動設定持續部署。
將現有的 Cloud Build 觸發條件附加至 Knative serving 服務。
如果您已有 Cloud Build 觸發程序,可以將其附加至服務,並在「Service Details」(服務詳細資料) 頁面中,使用 Google Cloud 控制台功能:「Edit Continuous Deployment」(編輯持續部署) 按鈕和「Build History」(建構歷史記錄) 圖表。
如要這麼做,請新增以 gcb-trigger-id 為鍵的標籤,並以 Cloud Build 觸發條件的專屬 ID 做為值 (不是觸發條件名稱)。請參閱操作說明,瞭解如何設定標籤。