Puoi utilizzare Cloud Build per automatizzare le build e i deployment in Knative Serving utilizzando il trigger Cloud Build per creare ed eseguire automaticamente il deployment del codice ogni volta che vengono inviati nuovi commit a un determinato ramo di un repository Git.
Quando utilizzi un trigger Cloud Build per creare container, le informazioni sul repository di origine vengono visualizzate nella console Google Cloud per il tuo servizio dopo il deployment in Knative Serving.
Prima di iniziare
- Hai un repository Git con un
Dockerfileo la tua base di codice è scritta in uno dei linguaggi supportati dai buildpack Google Cloud: Go, Node.js, Python, Java o .NET Core. -
Enable the Cloud Build and Cloud Source Repositories APIs.
Roles required to enable APIs
To enable APIs, you need the Service Usage Admin IAM role (
roles/serviceusage.serviceUsageAdmin), which contains theserviceusage.services.enablepermission. Learn how to grant roles.
Configurazione del deployment continuo dall'interfaccia utente di Knative serving
La procedura varia leggermente a seconda che tu stia configurando il deployment continuo su un nuovo servizio o su un servizio esistente. Fai clic sulla scheda appropriata per saperne di più.
Nuovo servizio
Vai a Knative Serving nella console Google Cloud :
Fai clic su Crea servizio.
Compila la sezione Impostazioni servizio con le tue preferenze.
Fai clic su Avanti.
Seleziona Esegui il deployment continuo di nuove revisioni da un repository di codice sorgente.
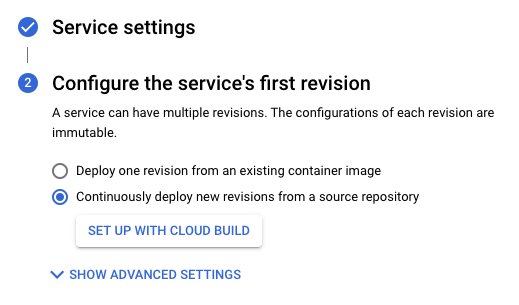
Fai clic su Configura con Cloud Build.
Seleziona il provider e il repository.
- GitHub: se non hai ancora eseguito l'autenticazione, fai clic su Autentica e segui le istruzioni. Per impostazione predefinita, la connessione di un repository viene eseguita tramite l'app Cloud Build GitHub. In alternativa, puoi eseguire il mirroring del tuo repository GitHub in Cloud Source Repositories. Per farlo, fai clic su Opzione avanzata e seleziona Esegui il mirroring del repository GitHub utilizzando Cloud Source Repositories Scopri di più
- Bitbucket: se non hai ancora eseguito l'autenticazione, fai clic su Autentica e segui le istruzioni.
- Cloud Source Repositories
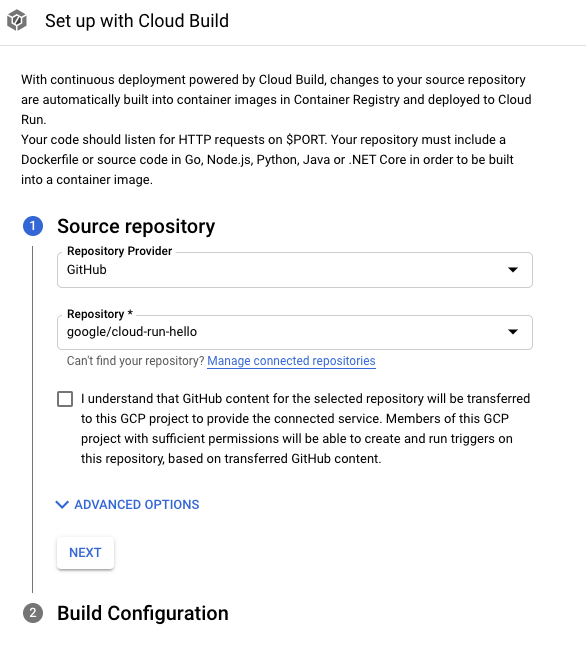
Fai clic su Avanti.
Compila le opzioni nel passaggio Configurazione build:
- Branch: indica l'origine da utilizzare quando viene eseguito il trigger. Puoi inserire l'regex qui. I rami corrispondenti vengono verificati automaticamente: puoi visualizzarli sotto l'input. Tieni presente che se viene trovata esattamente una corrispondenza, il trigger verrà eseguito automaticamente dopo la creazione.
Tipo di build
Se il repository deve essere creato utilizzando Docker e contiene un Dockerfile, seleziona Dockerfile. Posizione origine indica la posizione e il nome del Dockerfile. Questa directory verrà utilizzata come contesto della build Docker. Tutti i percorsi devono essere relativi alla directory corrente.
In caso contrario, seleziona Google Cloud Buildpacks. Utilizza Buildpack context per specificare la directory e Entrypoint (facoltativo) per fornire il comando per avviare il server. Esempio:
gunicorn -p :8080 main:appper Python,java -jar target/myjar.jarper Java. Lascia vuoto per utilizzare il comportamento predefinito.

Fai clic su Salva.
Verifica le impostazioni selezionate.

Fai clic su Crea.
Tieni presente che viene visualizzata la pagina Dettagli servizio, in cui puoi monitorare l'avanzamento della configurazione del deployment continuo.
Una volta completati tutti i passaggi, prendi nota delle opzioni aggiuntive:
- Pulsante Modifica il deployment continuo.
- Cronologia build.
- Dettagli dell'origine nella sezione Dettagli revisione.
Servizio esistente
Vai a Knative Serving nella console Google Cloud :
Individua il servizio nell'elenco dei servizi e fai clic su di esso.
Fai clic su Configura il deployment continuo.
Seleziona il provider e il repository.
- GitHub: se non hai ancora eseguito l'autenticazione, fai clic su Autentica e segui le istruzioni. Per impostazione predefinita, la connessione di un repository viene eseguita tramite l'app Cloud Build GitHub. In alternativa, puoi eseguire il mirroring del tuo repository GitHub in Cloud Source Repositories. Per farlo, fai clic su Opzione avanzata e seleziona Esegui il mirroring del repository GitHub utilizzando Cloud Source Repositories Scopri di più
- Bitbucket: se non hai ancora eseguito l'autenticazione, fai clic su Autentica e segui le istruzioni.
- Cloud Source Repositories
Fai clic su Avanti.
Compila le opzioni nel passaggio Configurazione build:
- Branch: indica l'origine da utilizzare quando viene eseguito il trigger. Puoi inserire l'regex qui. I rami corrispondenti vengono verificati automaticamente: puoi visualizzarli sotto l'input. Tieni presente che se viene trovata esattamente una corrispondenza, il trigger verrà eseguito automaticamente dopo la creazione.
Tipo di build
Se il repository deve essere creato utilizzando Docker e contiene un Dockerfile, seleziona Dockerfile. Posizione origine indica la posizione e il nome del Dockerfile. Questa directory verrà utilizzata come contesto della build Docker. Tutti i percorsi devono essere relativi alla directory corrente.
In caso contrario, seleziona Google Cloud Buildpacks. Utilizza Buildpack context per specificare la directory e Entrypoint (facoltativo) per fornire il comando per avviare il server. Esempio:
gunicorn -p :8080 main:appper Python,java -jar target/myjar.jarper Java. Lascia vuoto per utilizzare il comportamento predefinito.
Fai clic su Salva.
La pagina viene ricaricata e mostra lo stato di avanzamento della configurazione del deployment continuo.
Una volta completati tutti i passaggi, prendi nota delle opzioni aggiuntive:
- Pulsante Modifica il deployment continuo.
- Cronologia build.
- Dettagli dell'origine nella sezione Dettagli revisione.
Configurazione manuale del deployment continuo
Consulta la sezione Configurazione della distribuzione continua manuale se devi utilizzare una procedura manuale e non la UI.
Collega il trigger Cloud Build esistente al servizio Knative Serving.
Se hai già un trigger Cloud Build esistente, puoi collegarlo al servizio e sfruttare le funzionalità della console nella pagina Dettagli servizio: il pulsante Modifica deployment continuo e il grafico Cronologia build. Google Cloud
Per farlo, devi aggiungere un'etichetta con gcb-trigger-id come chiave e l'identificatore univoco del trigger Cloud Build come valore (non il nome del trigger). Consulta le istruzioni per configurare l'etichetta.