Puedes usar Cloud Build para automatizar las implementaciones y compilaciones en Knative serving con el activador de Cloud Build para compilar e implementar tu código de forma automática cada vez que se envíen confirmaciones nuevas a una rama específica de un repositorio de Git.
Cuando usas un activador de Cloud Build para compilar contenedores, la información del repositorio de código fuente se muestra en la Google Cloud consola para tu servicio después de la implementación en Knative serving.
Antes de comenzar
- Tienes un repositorio de Git con un
Dockerfileo tu base de código está escrita en uno de los lenguajes compatibles con los buildpacks de Google Cloud: Go, Node.js, Python, Java o .NET Core. -
Enable the Cloud Build and Cloud Source Repositories APIs.
Roles required to enable APIs
To enable APIs, you need the Service Usage Admin IAM role (
roles/serviceusage.serviceUsageAdmin), which contains theserviceusage.services.enablepermission. Learn how to grant roles.
Configura la implementación continua desde la interfaz de usuario de Knative serving
El procedimiento varía un poco en función de si configuras la implementación continua en un servicio nuevo o en uno existente. Haz clic en la pestaña correspondiente para obtener más información.
Servicio nuevo
Ve a Knative serving en la Google Cloud consola:
Haz clic en Crear servicio.
Completa la Configuración del servicio (Service settings) con tus preferencias.
Haz clic en Siguiente.
Selecciona Continuously deploy new revisions from a source repository.
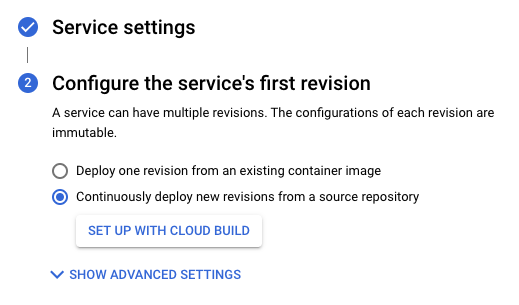
Haz clic en Configuración con Cloud Build (Set up with Cloud Build).
Selecciona el proveedor y el repositorio.
- GitHub: Si aún no estás autenticado, haz clic en Autenticar y sigue las instrucciones. De forma predeterminada, la conexión de un repositorio se realiza a través de la app de GitHub de Cloud Build. Como alternativa, puedes duplicar el repositorio de GitHub en Cloud Source Repositories. Para hacerlo, haz clic en Opciones avanzadas (Advanced options) y marca Duplicar el repositorio de GitHub con Cloud Source Repositories. Más información
- Bitbucket: Si aún no estás autenticado, haz clic en Autenticar y sigue las instrucciones.
- Cloud Source Repositories
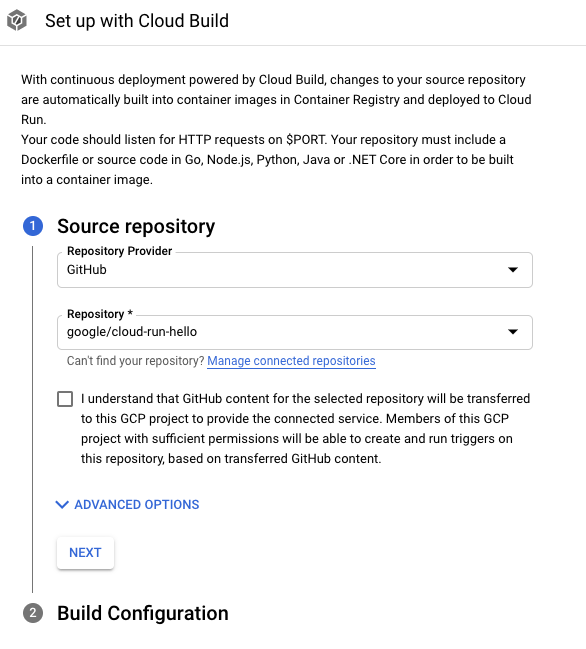
Haz clic en Siguiente (Next).
Completa las opciones del paso Configuración de compilación (Build Configuration):
- Rama (Branch): Indica qué fuente se debe usar cuando se ejecuta el activador. Puedes ingresar la regex aquí. Las ramas coincidentes se verifican de forma automática, y puedes verlas debajo de la entrada. Ten en cuenta que si solo coincide una rama, el activador se ejecutará de manera automática después de la creación.
Build Type
Si el repositorio se debe compilar con Docker y contiene un Dockerfile, selecciona Dockerfile. En Ubicación de origen (Source location), se indica la ubicación y el nombre del Dockerfile. El directorio se usará como el contexto de compilación de Docker. Todas las rutas de acceso deben estar relacionadas con el directorio actual.
De lo contrario, selecciona Google Cloud Buildpacks. Usa Buildpack context para especificar el directorio y Entrypoint (opcional) a fin de proporcionar el comando que inicia el servidor. Por ejemplo,
gunicorn -p :8080 main:apppara Python,java -jar target/myjar.jarpara Java. Déjalo en blanco para usar el comportamiento predeterminado.
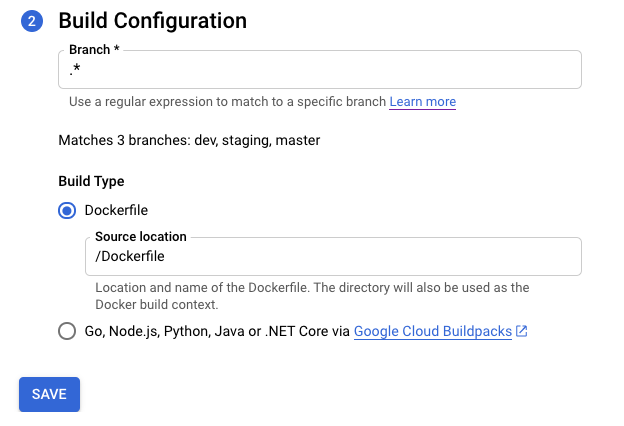
Haz clic en Guardar (Save).
Verifica la configuración seleccionada.

Haz clic en Crear (Create).
Ten en cuenta que se te redireccionará a la página Detalles del servicio, en la que podrás realizar un seguimiento del progreso de la configuración de la implementación continua.
Una vez que hayas completado todos los pasos, ten en cuenta las opciones adicionales:
- Botón Edit Continuous Deployment
- Historial de compilaciones
- Detalles de la fuente en la sección Revision Details.
Servicio existente
Ve a Knative serving en la Google Cloud consola:
Ubica el servicio en la lista de servicios y haz clic en él.
Haz clic en Configura la implementación continua.
Selecciona el proveedor y el repositorio.
- GitHub: Si aún no estás autenticado, haz clic en Autenticar y sigue las instrucciones. De forma predeterminada, la conexión de un repositorio se realiza a través de la app de GitHub de Cloud Build. Como alternativa, puedes duplicar el repositorio de GitHub en Cloud Source Repositories. Para hacerlo, haz clic en Opciones avanzadas (Advanced options) y marca Duplicar el repositorio de GitHub con Cloud Source Repositories. Más información
- Bitbucket: Si aún no estás autenticado, haz clic en Autenticar y sigue las instrucciones.
- Cloud Source Repositories
Haz clic en Siguiente (Next).
Completa las opciones del paso Configuración de compilación (Build Configuration):
- Rama (Branch): Indica qué fuente se debe usar cuando se ejecuta el activador. Puedes ingresar la regex aquí. Las ramas coincidentes se verifican de forma automática, y puedes verlas debajo de la entrada. Ten en cuenta que si solo coincide una rama, el activador se ejecutará de manera automática después de la creación.
Build Type
Si el repositorio se debe compilar con Docker y contiene un Dockerfile, selecciona Dockerfile. En Ubicación de origen (Source location), se indica la ubicación y el nombre del Dockerfile. El directorio se usará como el contexto de compilación de Docker. Todas las rutas de acceso deben estar relacionadas con el directorio actual.
De lo contrario, selecciona Google Cloud Buildpacks. Usa Buildpack context para especificar el directorio y Entrypoint (opcional) a fin de proporcionar el comando que inicia el servidor. Por ejemplo,
gunicorn -p :8080 main:apppara Python,java -jar target/myjar.jarpara Java. Déjalo en blanco para usar el comportamiento predeterminado.
Haz clic en Guardar (Save).
La página se vuelve a cargar y se muestra el progreso de la configuración de la implementación continua.
Una vez que hayas completado todos los pasos, ten en cuenta las opciones adicionales:
- Botón Edit Continuous Deployment
- Historial de compilaciones
- Detalles de la fuente en la sección Revision Details.
Configura la implementación continua de forma manual
Consulta Configura la implementación continua de forma manual si necesitas usar un procedimiento manual y no la IU.
Adjunta el activador de Cloud Build existente al servicio de Knative serving.
Si ya tienes un activador de Cloud Build existente, puedes vincularlo al servicio y aprovechar las funciones de la consola de Cloud en la página Detalles del servicio: el botón Editar implementación continua y el gráfico Historial de compilaciones. Google Cloud
Para hacerlo, debes agregar una etiqueta con gcb-trigger-id como clave y el identificador único del activador de Cloud Build como valor (no el nombre del activador). Consulta estas instrucciones para configurar la etiqueta.