OpenStack Cloud Provider für Kubernetes konfigurieren
Mit Sammlungen den Überblick behalten
Sie können Inhalte basierend auf Ihren Einstellungen speichern und kategorisieren.
In dieser Anleitung wird erläutert, wie Sie den OpenStack Cloud Provider for Kubernetes in Ihrem Bare Metal-Cluster konfigurieren. Der OpenStack Cloud Provider muss so konfiguriert sein, dass Kubernetes-Dienste mithilfe des OpenStack LBaaS verfügbar gemacht werden.
Vorbereitung
In diesem Leitfaden wird davon ausgegangen, dass Sie einen mit Google Distributed Cloud erstellten Cluster in Ihrer OpenStack-Umgebung ausführen. Die Einrichtung ähnelt der im Leitfaden Bare Metal-Cluster auf OpenStack bereitstellen. Folgen Sie dieser Anleitung, bevor Sie die folgenden Schritte ausführen.
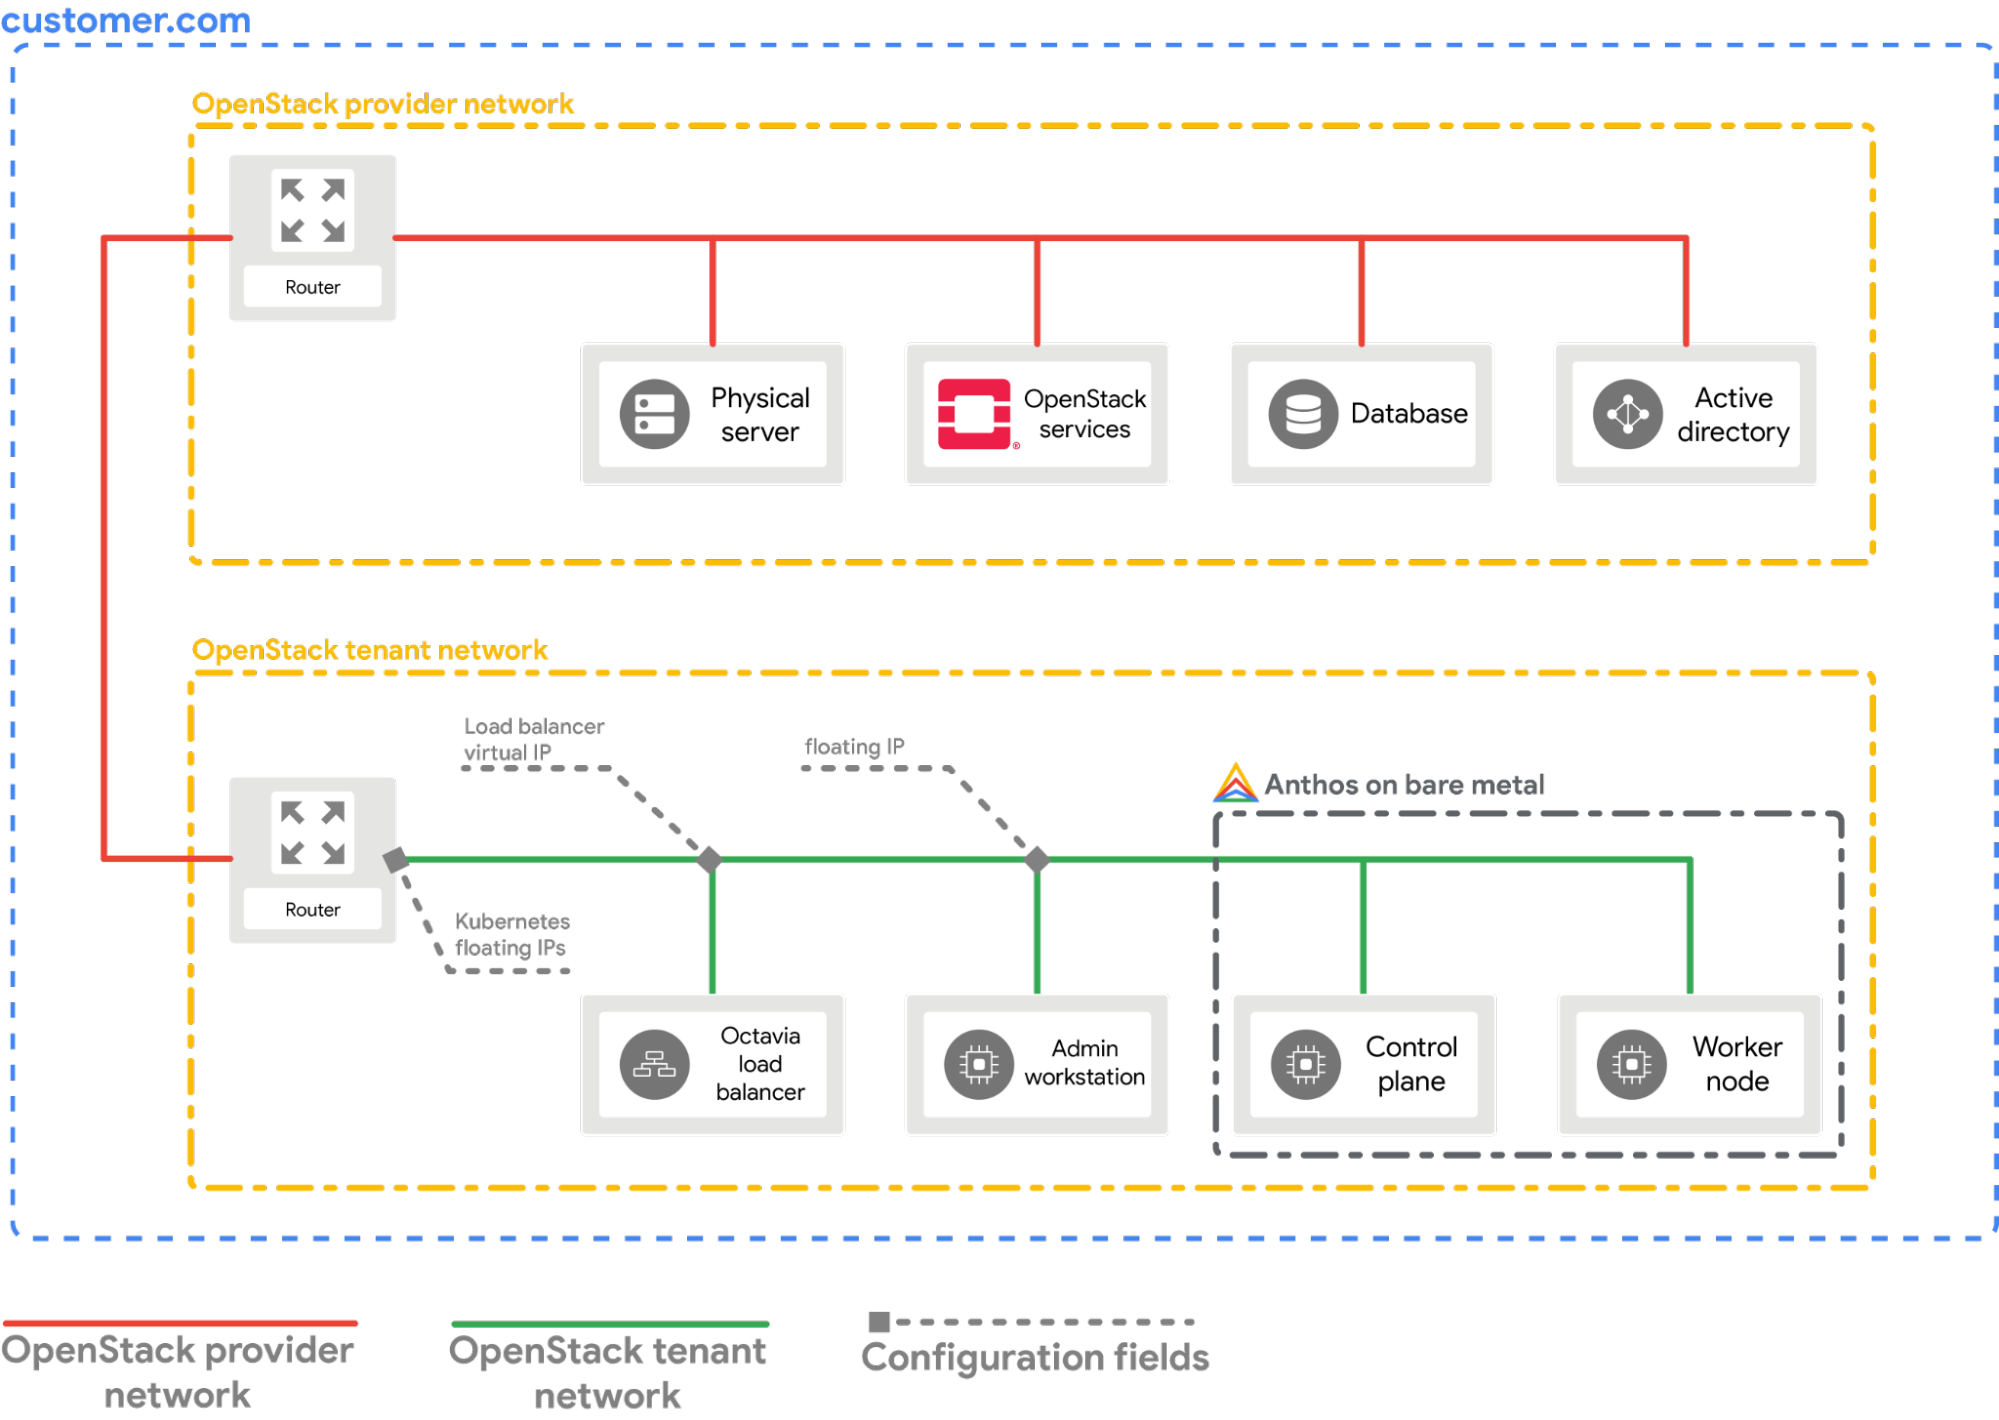
Anbieter konfigurieren
Im folgenden Abschnitt wird davon ausgegangen, dass Sie von einem Terminalfenster auf Ihrer lokalen Workstation aus beginnen.
Verwenden Sie als Quelle die OpenStack-Clientkonfigurationsdatei (openrc). Sie können sie über die OpenStack WebUI herunterladen.
sourcePATH_TO_OPENRC_FILE/openrc
Erstellen Sie die Konfigurationsdatei für den OpenStack Kubernetes Cloud Provider.
cat > cloud.conf << EOF
[Global]
auth-url=${OS_AUTH_URL}
username=${OS_USERNAME}
password=${OS_PASSWORD}
region=RegionOne
tenant-name=admin
domain-id=default
# this is for using a self-signed cert if your using a CA then comment this line
# and point to the CA certificate using the "ca-file" arg
tls-Insecure=true
[LoadBalancer]
use-octavia=true
# this is generally the public network on OpenStack
floating-network-id=PUBLIC_NETWORK_ID
# this should be private network subnet where vip is allocated for the ABM nodes
subnet-id=ABM_NETWORK_SUBNET_ID
[BlockStorage]
bs-version=v2
EOF
Dabei gilt:
OS_AUTH_URL, OS_USERNAME, OS_PASSWORD: Diese Variablen sollten bereits in der Umgebung festgelegt sein, indem Sie die Datei openrc als Quelle verwenden. Daher werden sie automatisch erfasst.
PUBLIC_NETWORK_ID: Dies ist das öffentlich zugängliche Netzwerk in Ihrer OpenStack-Bereitstellung, über das Floating-IP-Adressen zugewiesen werden. Aus diesem Netzwerk werden die LoadBalancer IPs für die Kubernetes-Dienste zugewiesen. Sie können diese IP-Adresse mit einem Einzeilenbefehl aus Ihrer OpenStack-Umgebung abrufen.
ABM_NETWORK_SUBNET_ID: Dies ist das Subnetz im privaten Netzwerk in Ihrer OpenStack-Bereitstellung, von dem IP-Adressen für die VMs zugewiesen werden, die Google Distributed Cloud nur als Software ausführen. Sie können diese IP-Adresse mit einem Befehl wie ID des öffentlichen Netzwerks in OpenStack abrufen aus Ihrer OpenStack-Umgebung abrufen.
Rufen Sie die öffentliche Floating-IP-Adresse der abm-ws-VM ab.
exportOPENSTACK_IPS=$(openstackfloatingiplist--tags=abm_ws_floatingip-fjson)exportFLOATING_IP=$(jq-c'.[]."Floating IP Address"' <<< $OPENSTACK_IPS|tr-d'"')
Kopieren Sie die Datei cloud.conf in die abm-ws-VM in OpenStack.
scp./cloud.confubuntu@$FLOATING_IP:~
Stellen Sie über SSH eine sichere Verbindung zur abm-ws-VM her und melden Sie sich als root-Nutzer an.
Der root-Nutzer gemäß der Konfiguration durch die Terraform-Skripts ist abm.
sshubuntu@$FLOATING_IP
sudo-uabm-i
Kopieren Sie die cloud.conf-Dateien in das $HOME-Verzeichnis des root-Nutzers.
cp/home/ubuntu/cloud.conf$HOME
Erstellen Sie ein Kubernetes Secret mit der Konfiguration.
# make sure the kubectl client is pointing towards your clusterexportKUBECONFIG=~/bmctl-workspace/CLUSTER_NAME/CLUSTER_NAME-kubeconfig
# store the provider configurations as a Kubernetes secret
kubectlcreatesecret-nkube-systemgenericcloud-config--from-file=cloud.conf
Installieren Sie den OpenStack Cloud Provider für Kubernetes.
# create the necessary roles for the OpenStack provider
kubectlapply-fhttps://raw.githubusercontent.com/kubernetes/cloud-provider-openstack/master/manifests/controller-manager/cloud-controller-manager-roles.yaml
# create the required role-bindings for the OpenStack provider
kubectlapply-fhttps://raw.githubusercontent.com/kubernetes/cloud-provider-openstack/master/manifests/controller-manager/cloud-controller-manager-role-bindings.yaml
# create the OpenStack controller manager
kubectlapply-fhttps://raw.githubusercontent.com/kubernetes/cloud-provider-openstack/master/manifests/controller-manager/openstack-cloud-controller-manager-ds.yaml
Versuchen Sie, über einen Browser auf den Dienst zuzugreifen.
# wait for the external IP to be assigned
kubectlgetserviceapi-server-lb
NAMETYPECLUSTER-IPEXTERNAL-IPPORT(S)AGE
api-server-lbLoadBalancer10.203.77.215172.29.249.15980:32378/TCP4m12s
Point-Of-Sales-Anwendung, die über die EXTERNAL-IP aufgerufen wird.
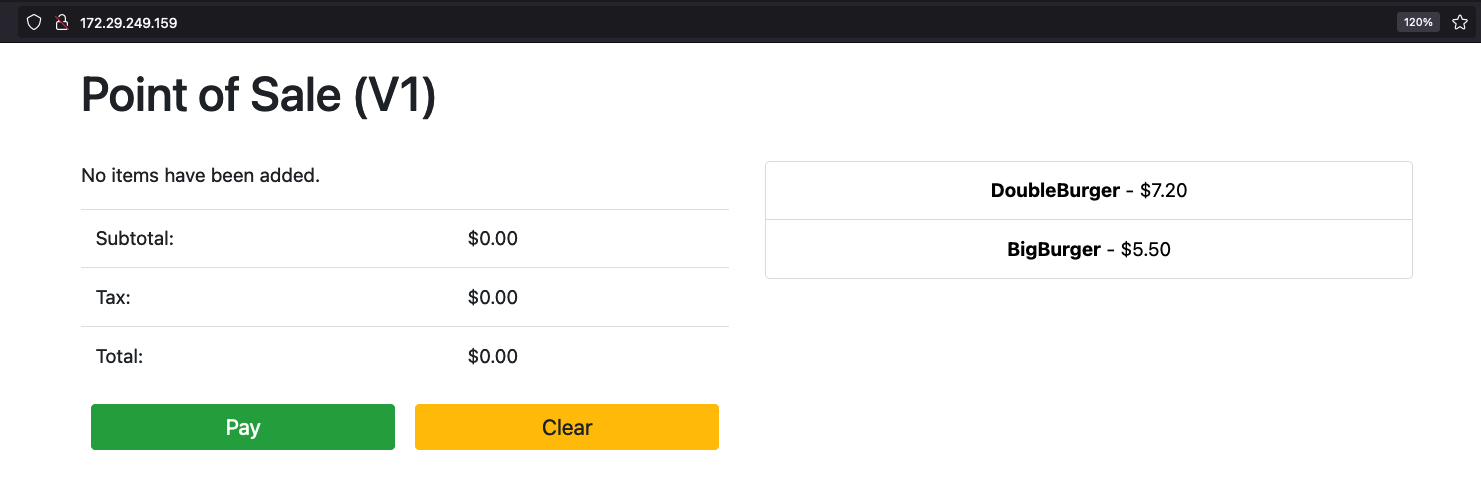
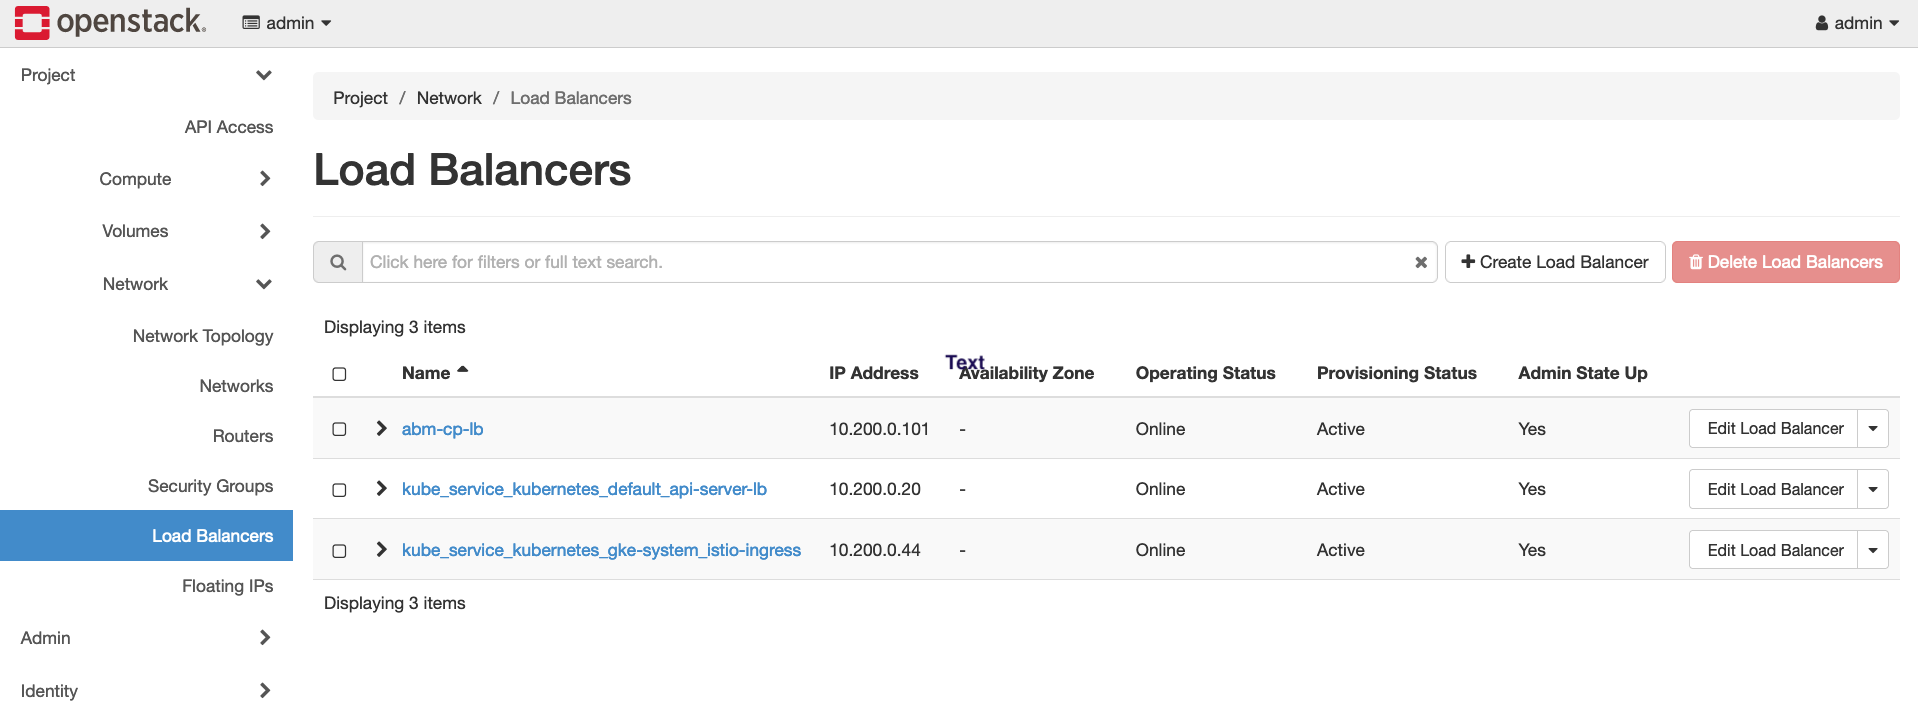
Sie sehen, dass in OpenStack ein neuer OpenStack-Load-Balancer erstellt wird, indem Sie die OpenStack WebUI aufrufen.
[[["Leicht verständlich","easyToUnderstand","thumb-up"],["Mein Problem wurde gelöst","solvedMyProblem","thumb-up"],["Sonstiges","otherUp","thumb-up"]],[["Schwer verständlich","hardToUnderstand","thumb-down"],["Informationen oder Beispielcode falsch","incorrectInformationOrSampleCode","thumb-down"],["Benötigte Informationen/Beispiele nicht gefunden","missingTheInformationSamplesINeed","thumb-down"],["Problem mit der Übersetzung","translationIssue","thumb-down"],["Sonstiges","otherDown","thumb-down"]],["Zuletzt aktualisiert: 2025-09-01 (UTC)."],[],[],null,["This guide explains how to configure the\n[OpenStack Cloud Provider for Kubernetes](https://github.com/kubernetes/cloud-provider-openstack)\nin your bare metal cluster. The OpenStack Cloud Provider must be\nconfigured to expose Kubernetes Services using the\n[OpenStack LBaaS](https://docs.openstack.org/mitaka/networking-guide/config-lbaas.html).\n\nPrerequisites\n\nThis guide assumes that you have a cluster created with Google Distributed Cloud\nrunning in your OpenStack environment with a setup\nsimilar to what is explained in the [Deploy a bare metal cluster on\nOpenStack](/kubernetes-engine/distributed-cloud/bare-metal/docs/installing/openstack-abm-install) guide. Follow that guide first before trying\nthese steps.\n\n| **Warning:** All the commands that follow assume that the environment for Google Distributed Cloud in OpenStack was setup using this [Terraform script](https://github.com/GoogleCloudPlatform/anthos-samples/tree/master/anthos-bm-openstack-terraform#terraform-example-to-create-openstack-vms-for-anthos). Therefore, the names, such as VM name, Network name, and Root user, used in the commands are what is used by the Terraform script. Adjust the commands according to your setup if you configured the OpenStack environment manually.\n\nConfigure the provider\n\nThe following section assumes that you are starting from a terminal window in\nyour local workstation.\n\n1. Source the OpenStack client configuration (`openrc`) file. You can download\n it from the OpenStack WebUI.\n\n source \u003cvar translate=\"no\"\u003ePATH_TO_OPENRC_FILE\u003c/var\u003e/openrc\n\n2. Create the configuration file for the OpenStack Kubernetes Cloud Provider.\n\n cat \u003e cloud.conf \u003c\u003c EOF\n [Global]\n auth-url=${OS_AUTH_URL}\n username=${OS_USERNAME}\n password=${OS_PASSWORD}\n region=RegionOne\n tenant-name=admin\n domain-id=default\n # this is for using a self-signed cert if your using a CA then comment this line\n # and point to the CA certificate using the \"ca-file\" arg\n tls-Insecure=true \n\n [LoadBalancer]\n use-octavia=true\n # this is generally the public network on OpenStack\n floating-network-id=\u003cvar translate=\"no\"\u003ePUBLIC_NETWORK_ID\u003c/var\u003e\n # this should be private network subnet where vip is allocated for the ABM nodes\n subnet-id=\u003cvar translate=\"no\"\u003eABM_NETWORK_SUBNET_ID\u003c/var\u003e\n\n [BlockStorage]\n bs-version=v2\n EOF\n\n Replace the following:\n - \u003cvar translate=\"no\"\u003e\u003ccode translate=\"no\" dir=\"ltr\"\u003eOS_AUTH_URL\u003c/code\u003e\u003c/var\u003e, \u003cvar translate=\"no\"\u003e\u003ccode translate=\"no\" dir=\"ltr\"\u003eOS_USERNAME\u003c/code\u003e\u003c/var\u003e, \u003cvar translate=\"no\"\u003e\u003ccode translate=\"no\" dir=\"ltr\"\u003eOS_PASSWORD\u003c/code\u003e\u003c/var\u003e: These variables should be already set in the environment by source-ing the `openrc` file. Thus, they will be automatically picked up.\n - \u003cvar translate=\"no\"\u003e\u003ccode translate=\"no\" dir=\"ltr\"\u003ePUBLIC_NETWORK_ID\u003c/code\u003e\u003c/var\u003e: This is the publicly accessible network in your OpenStack deployment from which **Floating IP addresses** are allocated. It is from this network the `LoadBalancer IPs` for the Kubernetes services will be assigned. You can use a [one-line command](https://github.com/GoogleCloudPlatform/anthos-samples/blob/master/anthos-bm-openstack-terraform/docs/openstack_cloud_provider.md#4-get-the-id-of-the-public-network-in-openstack) to fetch this IP from your OpenStack environment.\n - \u003cvar translate=\"no\"\u003e\u003ccode translate=\"no\" dir=\"ltr\"\u003eABM_NETWORK_SUBNET_ID\u003c/code\u003e\u003c/var\u003e: This is the subnet on the private network in your OpenStack deployment from which IPs are allocated for the VMs running Google Distributed Cloud software-only. You can use a command similar to [Get the ID of the public network in OpenStack](https://github.com/GoogleCloudPlatform/anthos-samples/blob/master/anthos-bm-openstack-terraform/docs/openstack_cloud_provider.md#5-get-the-id-of-the-subnetwork-connecting-the-anthos-on-bare-metal-vms-in-openstack) to fetch this IP from your OpenStack environment.\n\n | **Note:** Edit the `cloud.conf` file to meet your needs and environment. What is shown here is only an example. For more information about all configuration parameters, see the [OpenStack Cloud Provider docs](https://github.com/kubernetes/cloud-provider-openstack/blob/master/docs/openstack-cloud-controller-manager/using-openstack-cloud-controller-manager.md#config-openstack-cloud-controller-manager).\n3. Fetch the **public floating IP address** of the `abm-ws` VM.\n\n export OPENSTACK_IPS=$(openstack floating ip list --tags=abm_ws_floatingip -f json)\n export FLOATING_IP=$(jq -c '.[].\"Floating IP Address\"' \u003c\u003c\u003c $OPENSTACK_IPS | tr -d '\"')\n\n4. Copy the `cloud.conf` file into the `abm-ws` VM in OpenStack.\n\n scp ./cloud.conf ubuntu@$FLOATING_IP:~\n\n | **Note:** If you have public key authentication configured for your VM use the `\"-o IdentitiesOnly=yes -i \u003cPATH_TO_KEY\u003e\"` flags with the SCP/SSH commands.\n5. Use SSH to connect securely to the `abm-ws` VM and sign in as a `root` user.\n\n The `root` user as configured by the\n [Terraform scripts](https://github.com/GoogleCloudPlatform/anthos-samples/tree/master/anthos-bm-openstack-terraform#terraform-example-to-create-openstack-vms-for-anthos)\n is `abm`. \n\n ssh ubuntu@$FLOATING_IP\n sudo -u abm -i\n\n6. Copy the `cloud.conf` files into the `$HOME` directory of the `root` user.\n\n cp /home/ubuntu/cloud.conf $HOME\n\n7. Create a `Kubernetes Secret` with the configuration.\n\n # make sure the kubectl client is pointing towards your cluster\n export KUBECONFIG=~/bmctl-workspace/\u003cvar translate=\"no\"\u003eCLUSTER_NAME\u003c/var\u003e/\u003cvar translate=\"no\"\u003eCLUSTER_NAME\u003c/var\u003e-kubeconfig\n\n # store the provider configurations as a Kubernetes secret\n kubectl create secret -n kube-system generic cloud-config --from-file=cloud.conf\n\n8. Install the OpenStack Cloud Provider for Kubernetes.\n\n # create the necessary roles for the OpenStack provider\n kubectl apply -f https://raw.githubusercontent.com/kubernetes/cloud-provider-openstack/master/manifests/controller-manager/cloud-controller-manager-roles.yaml\n\n # create the required role-bindings for the OpenStack provider\n kubectl apply -f https://raw.githubusercontent.com/kubernetes/cloud-provider-openstack/master/manifests/controller-manager/cloud-controller-manager-role-bindings.yaml\n\n # create the OpenStack controller manager\n kubectl apply -f https://raw.githubusercontent.com/kubernetes/cloud-provider-openstack/master/manifests/controller-manager/openstack-cloud-controller-manager-ds.yaml\n\nValidate the OpenStack integration\n\n1. Deploy the sample\n [Point-Of-Sales application](https://github.com/GoogleCloudPlatform/point-of-sale).\n\n kubectl apply -f https://raw.githubusercontent.com/GoogleCloudPlatform/anthos-samples/master/anthos-bm-openstack-terraform/resources/point-of-sales.yaml\n\n2. Verify if the application pods are running.\n\n kubectl get pods\n\n Expected output: \n\n NAME READY STATUS RESTARTS AGE\n api-server-7db4777f7f-zflk5 1/1 Running 0 74s\n inventory-58c6fb5568-dqk2x 1/1 Running 0 74s\n payments-68d5d65d5c-5mjl6 1/1 Running 0 74s\n\n3. Exposed the application through a service of type `LoadBalancer`.\n\n kubectl apply -f https://raw.githubusercontent.com/GoogleCloudPlatform/anthos-samples/master/anthos-bm-openstack-terraform/resources/point-of-sales-service.yaml\n\n4. Try accessing the service from a browser.\n\n # wait for the external IP to be assigned\n kubectl get service api-server-lb\n\n NAME TYPE CLUSTER-IP EXTERNAL-IP PORT(S) AGE\n api-server-lb LoadBalancer 10.203.77.215 172.29.249.159 80:32378/TCP 4m12s\n\n Point-Of-Sales application accessed using the `EXTERNAL-IP`.\n\n You can notice a new **OpenStack Load Balancer** being created in OpenStack by\n visiting the OpenStack WebUI."]]