专用网络连接
本页介绍了如何配置集成连接器以私密方式连接到后端应用,并且假定您熟悉以下概念:Integration Connectors 支持连接到托管在私有网络上的后端。如需启用专用连接,您必须使用 Private Service Connect (PSC)。 PSC 支持以非公开方式连接到不同网络中的服务。
对于集成连接器,从网络的角度来看,您是服务提供方,集成连接器是服务使用方。作为服务提供方,您必须配置 PSC 服务连接,以便集成连接器可以使用该服务。服务附件准备就绪后,您可以配置连接以使用端点附件来使用服务附件。
端点连接
端点连接是集成连接器资源,可让连接通过 PSC 服务连接与您的后端应用建立连接。
下图显示了一个端点连接,该连接可让连接通过 PSC 服务连接与后端应用建立连接:
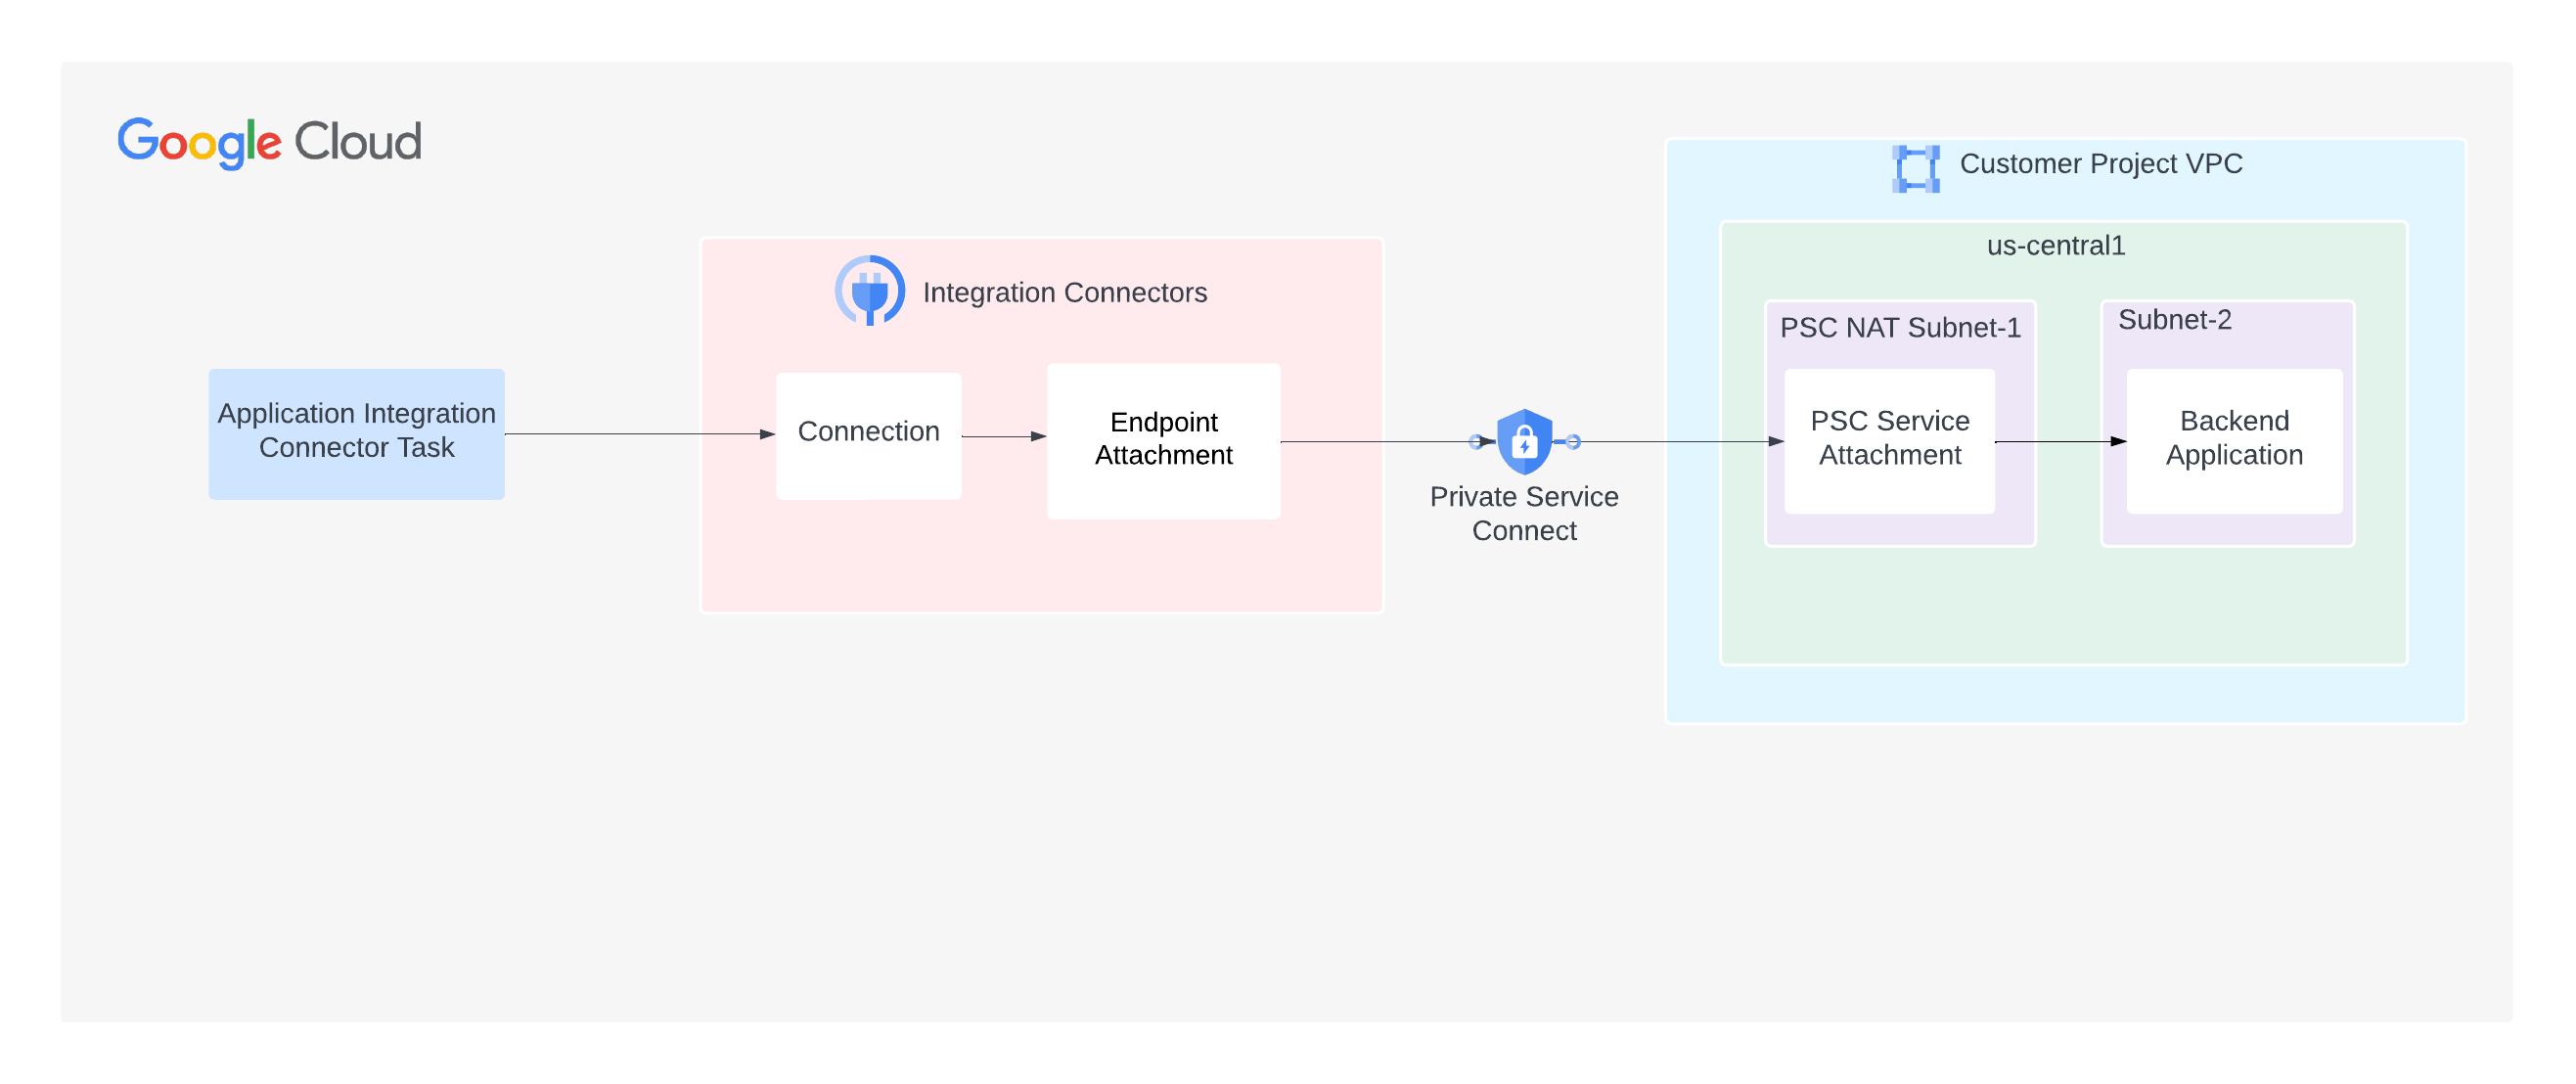
您可以将端点附件创建为 IP 地址或主机名。
将端点连接创建为 IP 地址
如需将端点附件创建为 IP 地址,您可以使用 Cloud 控制台或命令行 (gcloud)。控制台
如需通过 Cloud 控制台创建端点附件,请执行以下操作:
- 打开 Integration Connectors 的端点附件页面。
- 点击 + 创建 (+ Create)。系统随即会打开创建端点连接页面。
- 为以下字段输入值:
- 名称:端点连接的名称。该名称必须是唯一的。其他名称相同的端点连接不能存在,并且您以后无法更改该名称。 该名称必须以小写字母开头,后面最多可跟 63 个小写字母、数字或连字符,但不能以连字符结尾。长度下限为 2。
- 服务连接 ID:您已创建的 PSC 服务连接的名称。
- (可选)说明:输入端点附件的说明。
- (可选)标签:以键值对的形式输入资源标签。如需详细了解标签,请参阅什么是标签?
- (可选)启用端点全球访问权限:如果您想通过位于任何区域的连接将流量发送到后端,请选择此选项。
默认情况下,端点连接要求连接和后端都位于同一区域。因此,如果您为端点启用全球访问权限,则任何区域中的连接都可以将流量发送到您的后端。
- 点击创建。
IP 地址列用于指定端点附件的 IP 地址。在为专用连接配置连接器时,您必须使用此 IP 地址。
gcloud
如需从命令行创建端点连接,请执行以下操作:
- 获取 PSC 服务连接资源:
gcloud compute service-attachments list
该命令会返回服务附件的列表。例如:
  NAME       REGION   TARGET_SERVICE                                       CONNECTION_PREFERENCE
  demo-sa us-west1 k8s2-tcp-tgysilgj-apps-ingressgateway-fzdhwstg ACCEPT_AUTOMATIC
您将在后续步骤中需要此服务附件信息。
- 在运行 CreateEndpointAttachment API 之前,请先获取身份验证令牌:
TOKEN="$(gcloud auth print-access-token)"
- 使用 CreateEndpointAttachment API 创建端点连接。例如:
curl -X POST -H "Authorization: Bearer $TOKEN" \
       -H "Content-Type: application/json" \
       -d '{
      "name": "projects/PROJECT_ID/locations/LOCATION/endpointAttachments/ENDPOINT_ATTACHMENT_NAME",
      "serviceAttachment": "projects/demo/serviceAttachments/?SERVICE_ATTACHMENT_NAME"
    }' \
       https://connectors.googleapis.com/v1/projects/PROJECT_ID/locations/LOCATION/endpointAttachments?endpointAttachmentId=ENDPOINT_ATTACHMENT_NAME
其中:
- LOCATION 是服务连接的区域。例如
us-west1。 - PROJECT_ID 是您创建 PSC 服务连接的 Google Cloud 项目。
- ENDPOINT_ATTACHMENT_NAME 是端点连接的名称。该名称必须是唯一的。其他名称相同的端点连接不能存在,并且您以后无法更改该名称。该名称必须以小写字母开头,后面最多可跟 31 个小写字母、数字或连字符,但不能以连字符结尾。长度下限为 2。
- SERVICE_ATTACHMENT_NAME 是服务连接的名称。使用之前运行的
gcloud compute service-attachments list命令返回的 PSC 服务附件名称。
调用 API 后,集成连接器会启动一项长时间运行的操作,该操作可能需要一些时间才能完成。操作成功完成后,系统会创建端点附件。
- LOCATION 是服务连接的区域。例如
- 获取与您的 Google Cloud 项目关联的服务目录的项目 ID,然后在服务连接中将该项目 ID 列入许可名单。
- 使用 GetEndpointAttachment API 验证是否已创建端点连接。
例如:
curl -X GET -H "Authorization: Bearer $TOKEN" \
    https://connectors.googleapis.com/v1/projects/PROJECT_ID/locations/us-central1/endpointAttachments/ENDPOINT_ATTACHMENT_NAME
API 会返回类似于如下所示的响应:
{
    "name": "projects/demo-project/locations/us-central1/endpointAttachments/demo-ea",
    "createTime": "2023-04-17T04:34:59.569527046Z",
    "updateTime": "2023-04-17T04:37:25.189074195Z",
    "description": "demo endpoint attachment",
    "serviceAttachment": "projects/demo-project/regions/us-central1/serviceAttachments/demo-sa",
    "endpointIp": "10.0.0.0",
    "labels": {"team":"sre"},
  }
端点附件的 IP 地址可在
endpointIp字段中找到。在此示例响应中,IP 地址为10.0.0.0。在配置专用连接的连接器时,请使用此 IP 地址。
如果端点连接创建成功,新创建的连接会列在端点连接页面中,如下图所示:

到目前为止介绍的步骤展示了如何将端点附件创建为 IP 地址。不过,您也可以将端点连接创建为主机名,并使用该主机名配置连接器以实现专用连接。如需了解如何使用主机名创建端点附件,请参阅将端点附件创建为主机名。
将端点连接创建为主机名
如需将端点附件创建为主机名,请执行以下任务:
- 将端点连接创建为 IP 地址。如需了解详情,请参阅将端点附件创建为 IP 地址。
- 在您的任何 Google Cloud 项目中创建 Cloud DNS 专用代管区域。
在此 DNS 区域中,您必须添加要用于连接器配置的主机名,并将主机名映射到您在第 1 步中获得的端点附加 IP 地址。如需了解如何创建 Cloud DNS 专用代管区域,请参阅创建专用地区和添加记录。
- 在您的 Google Cloud 项目中创建一个集成连接器管理的区域,以供集成连接器使用。集成连接器托管的区域(对等互连区域)与 Cloud DNS 专用托管区域(在第 2 步中创建)通信以进行域名解析。
在创建托管区域之前,您必须授予以下角色和权限:
- 向创建集成连接器受管区域的用户授予
connectors.managedZones.create权限。connectors.managedZones.create权限可在roles/connectors.adminIAM 角色或roles/connectors.managedZonesAdminIAM 角色中使用。如需了解可供集成连接器使用的各种 IAM 角色及其对应的权限,请参阅 集成连接器的 IAM 角色和权限。 - 将
role/dns.peer角色授予集成连接器service-PROJECT_NUMBER@gcp-sa-connectorsiam.gserviceaccount.com服务账号。如果 Cloud DNS Google Cloud 项目不同于集成连接器 Google Cloud 项目,请向 Cloud DNS Google Cloud 项目中的集成连接器服务账号授予
roles/dns.peer角色。例如,假设您要在 Google Cloud 项目 12345 中创建集成连接器代管式区域,而 Cloud DNS 位于 Google Cloud 项目 67890 中。在这种情况下,您必须向 Google Cloud 项目 67890 中的service-12345@gcp-sa-connectors.iam.gserviceaccount.com服务账号授予roles/dns.peer角色。
如需创建由集成连接器管理的区域,您可以使用 Cloud 控制台或命令行 (gcloud)。
控制台
如需通过 Cloud 控制台创建由集成连接器管理的区域,请执行以下操作:
gcloud
如需从命令行创建由集成连接器管理的区域,请执行以下操作:
- 在运行 CreateManagedZone API 之前,请先获取身份验证令牌:
TOKEN="$(gcloud auth print-access-token)"
- 使用 CreateManagedZone API 创建托管地区。例如:
curl -X POST -H "Authorization: Bearer $TOKEN" \
  -H "Content-Type: application/json" \
  -d '{
    "description": "DESCRIPTION",
    "dns": "DNS_NAME",
    "target_project": "TARGET_PROJECT",
    "target_vpc": "TARGET_VPC"
  }' \
  https://connectors.googleapis.com/v1/projects/PROJECT_ID/locations/global/managedZones?managedZoneId=MANAGED_ZONE_NAME
其中:
- DESCRIPTION 是可选的代管式可用区的说明。
- DNS_NAME:您要为其创建代管(对等互连)区域的完整 Cloud DNS 名称。例如
server8.stage.user.private。 - TARGET_PROJECT 是包含专用 Cloud DNS 区域的 Google Cloud 项目的名称。
- TARGET_NETWORK 是维护专用 Cloud DNS 区域的 VPC 网络的名称。
- PROJECT_ID 是您用于集成连接器的 Google Cloud 项目。
- MANAGED_ZONE_NAME 是托管可用区的名称。该名称必须是唯一的。其他名称相同的代管式可用区不能存在,并且您以后无法更改该名称。该名称必须以小写字母开头,后面最多可跟 63 个小写字母、数字或连字符,但不能以连字符结尾。长度下限为 2。
调用 API 后,集成连接器会启动一项长时间运行的操作,该操作可能需要一些时间才能完成。操作成功完成后,系统会创建托管区域。
- 使用 GetManagedZone API 验证是否已创建托管区域。
例如:
curl -X GET -H "Authorization: Bearer $TOKEN" \
    https://connectors.googleapis.com/v1/projects/PROJECT_ID/locations/global/managedZones/MANAGED_ZONE_NAME
API 会返回类似于如下所示的响应:
{
    "name": "projects/demo-project/locations/global/managedZones/demo-mz",
    "createTime": "2023-04-17T04:34:59.569527046Z",
    "updateTime": "2023-04-17T04:37:25.189074195Z",
    "description": "demo managed zone",
    "dns": "api.private.service.com.",
    "targetVpc": "target-project-vpc",
    "targetProject": "target-project"
  }
- 向创建集成连接器受管区域的用户授予
如果成功创建了托管网域,新创建的托管网域会显示在托管网域页面中,如下图所示:

将“Integration Connectors”项目列入服务附件的许可名单
您可以创建 PSC 服务附件,使其仅接受来自指定 Google Cloud 项目的请求。不过,若要执行此操作,您需要知道与 Google Cloud 项目关联的服务目录的项目 ID。如需获取服务目录的项目 ID,您可以使用 List Connections API,如以下示例所示。
语法
curl -X GET \
    -H "authorization: Bearer $(gcloud auth print-access-token)" \
    -H "Content-Type: application/json" \
    "https://connectors.googleapis.com/v1/projects/CONNECTORS_PROJECT_ID/locations/-/connections"
请替换以下内容:
- CONNECTORS_PROJECT_ID:您创建关联时所用的 Google Cloud 项目的 ID。
示例
此示例会获取 connectors-test Google Cloud 项目的服务目录的项目 ID。
curl -X GET \
    -H "authorization: Bearer $(gcloud auth print-access-token)" \
    -H "Content-Type: application/json" \
    "https://connectors.googleapis.com/v1/projects/connectors-test/locations/-/connections"
在终端上运行此命令会显示类似如下所示的输出:
.....
{
  "connections": [
    {
      "name": "projects/connectors-test/locations/asia-northeast1/connections/big-query-iam-invalid-sa",
      "createTime": "2022-10-07T09:02:31.905048520Z",
      "updateTime": "2022-10-07T09:22:39.993778690Z",
      "connectorVersion": "projects/connectors-test/locations/global/providers/gcp/connectors/bigquery/versions/1",
      "status": {
        "state": "ACTIVE"
      },
      "configVariables": [
        {
          "key": "project_id",
          "stringValue": "connectors-test"
        },
        {
          "key": "dataset_id",
          "stringValue": "testDataset"
        }
      ],
      "authConfig": {},
      "serviceAccount": "564332356444-compute@developer.gserviceaccount.com",
      "serviceDirectory": "projects/abcdefghijk-tp/locations/asia-northeast1/namespaces/connectors/services/runtime",
      "nodeConfig": {
        "minNodeCount": 2,
        "maxNodeCount": 50
      }
    },
....
在示例输出结果中,对于 connectors-test Google Cloud 项目,服务目录的项目 ID 为 abcdefghijk-tp。
验证端点附加连接
如需验证端点附件连接,请执行以下操作:
- 在端点附件页面中,点击您创建的端点附件的名称。
- 在随即显示的端点附加详情页面中,查看连接状态字段。如果状态为
Accepted,则表示端点附件已正确设置,并且已建立 Private Service Connect 连接。如需了解其他状态,请参阅连接状态。
配置连接以使用端点连接
在集成连接器中,创建新连接或更新现有连接时,请在“目标”部分中选择端点连接作为目标类型,然后从端点连接列表中选择您创建的端点连接。
如果您创建了托管区域,请选择主机地址作为目标类型,并使用您在创建托管区域时创建的 A 记录。
可连接到各种类型的专用网络
虽然集成连接器中的专用连接始终是通过 PSC 服务附件建立的,但建立专用连接的步骤会因环境而略有不同。以下部分介绍了如何在各种环境中建立专用连接: