本頁面說明如何使用您的自訂網域 (如 example.com) 提供 API。
除了使用自己的網域名稱之外,另一種方法是使用 Google 管理的網域名稱。詳情請參閱使用 Google 所管理的網域。
事前準備
- 若您還沒有網域名稱,請先向網域名稱註冊商申請一個名稱,以便使用您的 API。
- 驗證網域擁有權。
- 使用您的網域名稱為 API 主機命名。
- 如果您將 SSL 與網域搭配使用,請取得並上傳您的 SSL 憑證。
- 部署 API 及可擴充服務 Proxy (ESP)。
將 API 專案設定為使用您的網域名稱
請按照相關分頁的操作說明執行。
Compute Engine
如需使用 Compute Engine 執行個體提供 API,建議在整個執行個體群組使用一個負載平衡器。您需要保留網域名稱的外部 IP 位址,並將該外部 IP 位址用於負載平衡器。
如要使用網域名稱提供 API:
- 您的專案至少需保留一個靜態外部 IP 位址:
- 為預留的 IP 位址指定名稱
- 在「Type」(類型) 部分,按一下 [Global] (全域)。
- 在「Attached to」(已附加至) 部分,按一下「None」(無)。稍後您可以將 IP 位址附加至負載平衡器。
- 進入您的網域供應商帳戶並編輯網域設定。您必須建立包含您 API 名稱的「A 記錄」,例如
myapi.example.com(其中資料欄位包含外部 IP 位址) - 建立一個執行個體群組,將執行您的 API 和可擴充服務 Proxy (ESP) 的執行個體列入其中:
- 為群組命名,並新增說明。
- 從「Zone」(區域) 清單中,按一下 API 執行個體使用的區域。
- 在「Instance definition」(執行個體定義) 清單中,按一下 [Select existing instances] (選取現有的執行個體)
- 在「VM Instances」(VM 執行個體) 欄位中,新增執行 API 的 VM 執行個體。
- 按一下 [建立]。
- 建立並設定 HTTP(S) 負載平衡器:
前往「建立新 HTTP(S) 負載平衡器」(Create a New HTTP(S) load balancer) 頁面
- 依序點選 [Define a Backend Service] (定義後端服務) > [Create or select a backend service] (建立或選取後端服務)。
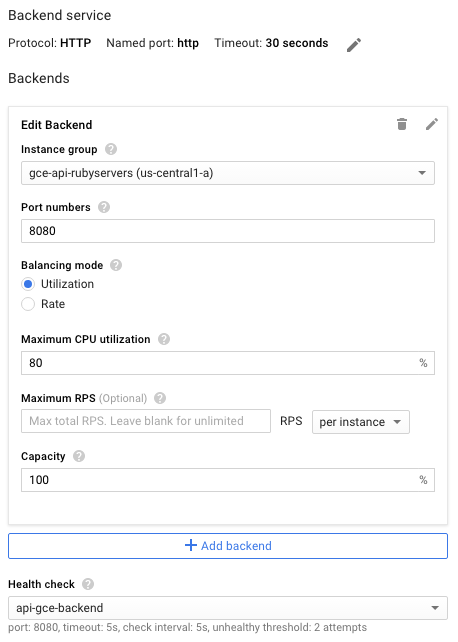
- 為這個後端服務設定命名並新增說明。
- 在「Protocol」欄位中,選取要透過該負載平衡器支援的通訊協定:HTTP 或 HTTPS。
- 在「Instance group」(執行個體群組) 清單中,按一下執行個體群組。
- 在「Port Numbers」(通訊埠編號) 欄位中,輸入
8080。 - 按一下 [Health check] (健康狀態檢查),設定健康狀態檢查:
- 輸入健康狀態檢查設定的名稱。
- 指派通訊埠
8080。 - 如要接受剩餘的預設值,請按一下 [Save] (儲存)。
- 暫時接受其餘設定的預設值。 之後您可以視需要變更,例如新增其他通訊埠。
- 您不需要在「Host and path rules」(主機與路徑規則) 中設定任何項目;您可以使用預設「Any unmatched」(任何不相符的項目)篩選器,將所有項目轉送至後端 API。也就是說,系統會使用上述步驟定義的通訊埠
8080(預設通訊埠),將所有傳入負載平衡器的流量導向 API。 - 按一下「前端設定」。
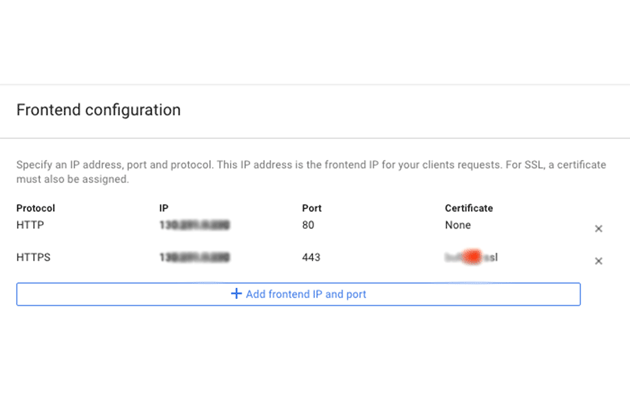
- 在「Protocol」欄位中,選取要透過該負載平衡器支援的通訊協定:HTTP 或 HTTPS。
- 在「IP」 清單中,按一下您之前建立的外部 IP 位址。
- 針對 HTTPS 通訊協定,您需要使用安全資料傳輸層 (SSL)。在「Certificate」(憑證) 清單中,按一下您想要的憑證。
- 或者,如果您想支援其他通訊協定,請按一下 [Add frontend IP and port] (新增前端 IP 與通訊埠),指定通訊協定、相同的外部 IP 位址和不同的通訊埠。
- 如要建立已完整設定的負載平衡器,請按一下「建立」。若無法使用「Create」按鈕,請檢查您剛剛設定的元件:每個設定元件旁都應出現一個勾號。若未出現勾號,表示您尚未完成該項設定。
- DNS 變更生效後,您就可以使用負載平衡器將要求傳送至您的 API。
GKE
若要透過 Google Kubernetes Engine (GKE) 網域提供 API,需將網域 DNS 設定設為回傳的外部 IP 位址,將 ESP 公告為服務。請注意,GKE 會自動執行負載平衡。
如要將 API 公告為服務:
- 若您尚未針對 API 後端設定 Kubernetes 服務,請先完成此步驟。使用與以下內容相似的內容,建立服務設定檔
service.yaml:apiVersion: v1 kind: Service metadata: name: echo spec: ports: - port: 80 targetPort: 8081 protocol: TCP selector: app: echo-app type: LoadBalancer - 根據您的後端標籤變更
selector標籤 (在此範例中是app: echo-app) - 確認
targetPort與您在 API 後端設定的 ESP 所使用的通訊埠一致。ESP 預設使用通訊埠8081。 - 部署 Kubernetes 服務:
kubectl apply -f service.yaml - 查看您公告服務所指派的外部 IP 位址:
kubectl get servicesEXTERNAL-IP位址:
NAME CLUSTER-IP EXTERNAL-IP PORT(S) AGE hello-node 10.X.XXX.202 10X.XXX.XX.123 8080/TCP 1m - 將產生的外部 IP 從臨時 IP 變更為靜態 IP。
- 從清單中選取外部 IP 位址。
- 在「Type」(類型) 清單中,按一下 [Static] (靜態)。
- 進入您的網域供應商帳戶並編輯網域設定。您必須建立包含您 API 名稱的「A 記錄」,例如
myapi.example.com,且其資料欄位中包含外部 IP 位址。