Cette page explique comment diffuser une API à partir d'un domaine personnalisé dont vous êtes le propriétaire, par exemple example.com.
À la place de votre propre nom de domaine, vous pouvez utiliser un nom de domaine géré par Google. Pour plus d'informations, consultez la section Utiliser un domaine géré par Google.
Avant de commencer
- Obtenez un nom de domaine auprès d'un service d'enregistrement de noms de domaine, si vous n'en possédez pas encore un pour votre API.
- Validez la propriété du domaine.
- Nommez le nom d'hôte de votre API avec votre nom de domaine.
- Si vous utilisez SSL avec votre domaine, obtenez et importez votre certificat SSL.
- Déployez l'API et Extensible Service Proxy (ESP).
Configurer le projet API pour utiliser votre nom de domaine
Suivez les instructions fournies dans l'onglet approprié.
Compute Engine
La méthode recommandée pour publier une API à partir d'instances Compute Engine consiste à utiliser un équilibreur de charge sur un groupe d'instances. Vous devez réserver une adresse IP externe pour le nom de domaine et utiliser cette adresse IP externe pour l'équilibreur de charge.
Pour publier l'API à partir d'un nom de domaine, procédez comme suit :
- Réservez au moins une adresse IP externe statique dans votre projet:
- Attribuez le nom de votre choix à l'adresse IP réservée.
- Pour le champ Type, cliquez sur Global.
- Pour le champ Associé à, cliquez sur Aucun. Vous associerez l'adresse IP à un équilibreur de charge ultérieurement.
- Accédez au compte de votre fournisseur de domaine et modifiez les paramètres du domaine. Vous devez créer un enregistrement A contenant le nom de l'API, par exemple
myapi.example.com, avec l'adresse IP externe dans son champ de données. - Créez un groupe d'instances comprenant les instances exécutant votre API et Extensible Service Proxy (ESP) :
- Attribuez le nom de votre choix au groupe et ajoutez une description.
- Dans la liste Zone, cliquez sur la zone utilisée par votre instance d'API.
- Dans la liste Définition d'instance, cliquez sur Sélectionner des instances existantes.
- Dans le champ Instances de VM, ajoutez l'instance de VM exécutant l'API.
- Cliquez sur Créer.
- Créez et configurez un équilibreur de charge HTTP(S) :
- Cliquez sur Définir un service backend > Créer ou sélectionner un service backend.
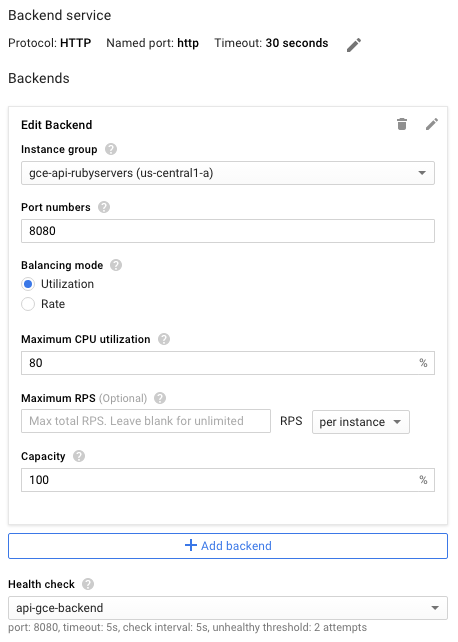
- Indiquez le nom et la description de votre choix pour cette configuration de service backend.
- Dans le champ Protocol, sélectionnez le protocole à utiliser via l'équilibreur de charge, HTTP ou HTTPS.
- Dans la liste Instance group (Groupe d'instances), cliquez sur votre groupe d'instances.
- Dans le champ Port Numbers (Numéros de port), entrez
8080. - Cliquez sur Health check (Vérification d'état) pour configurer les vérifications d'état :
- Saisissez un nom pour la configuration de la vérification de l'état.
- Attribuez le port
8080. - Pour accepter les valeurs par défaut restantes, cliquez sur Enregistrer.
- Pour l'instant, acceptez les valeurs par défaut pour le reste de la configuration. Vous pourrez toujours apporter des modifications plus tard si nécessaire, telles que des ports supplémentaires.
- Vous n'avez pas besoin de définir quoi que ce soit dans les règles d'hôte et de chemin d'accès ; vous pouvez tout transférer à votre API backend en utilisant les filtres Sans correspondance par défaut. Cela signifie que tout le trafic dans l'équilibreur de charge est dirigé vers l'API sur le port
8080(le port par défaut) comme défini dans les étapes précédentes. - Cliquez sur Configuration du frontend.
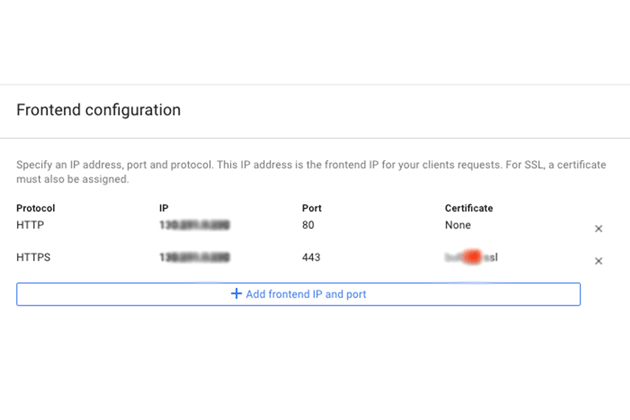
- Dans le champ Protocol, sélectionnez le protocole à utiliser via l'équilibreur de charge, HTTP ou HTTPS.
- Dans la liste IP, cliquez sur l'adresse IP externe que vous avez créée précédemment.
- Pour le protocole HTTPS, vous devez utiliser SSL. Dans la liste Certificate (Certificat), cliquez sur le certificat souhaité.
- Si vous souhaitez utiliser un autre protocole, cliquez sur Add frontend IP and port (Ajouter une adresse IP et un port frontend), puis spécifiez le protocole, la même adresse IP externe et un autre port.
- Pour créer l’équilibreur de charge entièrement configuré, cliquez sur Créer. Si le bouton Créer n'est pas activé, vérifiez les composants que vous venez de configurer. Une coche doit apparaître à côté de chacun des composants de configuration. S'il manque une coche, cela signifie que vous n'avez pas terminé la configuration.
- Une fois que vos modifications DNS se sont propagées, les requêtes sont envoyées à votre API à l'aide de l'équilibreur de charge.
GKE
Pour diffuser une API sur un domaine pour Google Kubernetes Engine (GKE), vous devez exposer ESP en tant que service, en utilisant l'adresse IP externe renvoyée pour les paramètres DNS de votre domaine. Sachez que GKE effectue automatiquement l’équilibrage de charge.
Pour exposer votre API en tant que service, procédez comme suit :
- Si vous n'en avez pas déjà un, configurez un service Kubernetes pour les backends d'API. Créez un fichier de configuration de service
service.yamlavec un contenu semblable à celui-ci :apiVersion: v1 kind: Service metadata: name: echo spec: ports: - port: 80 targetPort: 8081 protocol: TCP selector: app: echo-app type: LoadBalancer - Modifiez le libellé
selectorpour qu'il corresponde aux libellés de backend (app: echo-appdans cet exemple). - Assurez-vous que
targetPortcorrespond au port utilisé par ESP configuré dans vos backends d'API. ESP utilise le port8081par défaut. - Déployez le service Kubernetes :
kubectl apply -f service.yaml - Affichez l'adresse IP externe attribuée à votre service exposé :
kubectl get servicesEXTERNAL-IPsemblable à celle-ci:
NAME CLUSTER-IP EXTERNAL-IP PORT(S) AGE hello-node 10.X.XXX.202 10X.XXX.XX.123 8080/TCP 1m - Convertissez l'adresse IP externe générée, qui est éphémère, en adresse statique.
- Sélectionnez votre adresse IP externe dans la liste.
- Dans la liste Type, cliquez sur Statique.
- Accédez au compte de votre fournisseur de domaine et modifiez les paramètres du domaine. Vous devez créer un enregistrement A contenant le nom de l'API, par exemple
myapi.example.com, avec l'adresse IP externe dans son champ de données.