Devi avere un'unità organizzativa con almeno un dispositivo su cui è installato uno dei seguenti sistemi operativi:
ChromeOS
Apple® Mac® OS X® El Capitan (10.11) o versioni successive
Microsoft® Windows® 10 e 11
Linux® Debian® e Ubuntu®
Devi utilizzare Chrome 110 o versioni successive. Sebbene possa essere installata su qualsiasi browser basato su Chromium, la verifica dell'endpoint è supportata solo sul browser Chrome.
Attivare la verifica degli endpoint
Per raccogliere informazioni sui dispositivi che accedono alle risorse della tua organizzazione,
la verifica degli endpoint deve essere attivata per la tua unità organizzativa. Per impostazione predefinita, la verifica degli endpoint è attivata.
Per verificare se la verifica degli endpoint è attiva, segui questi passaggi:
Nella home page della Console di amministrazione, vai a Dispositivi.
Nel menu di navigazione, fai clic su Dispositivi mobili ed endpoint > Impostazioni > Impostazioni universali.
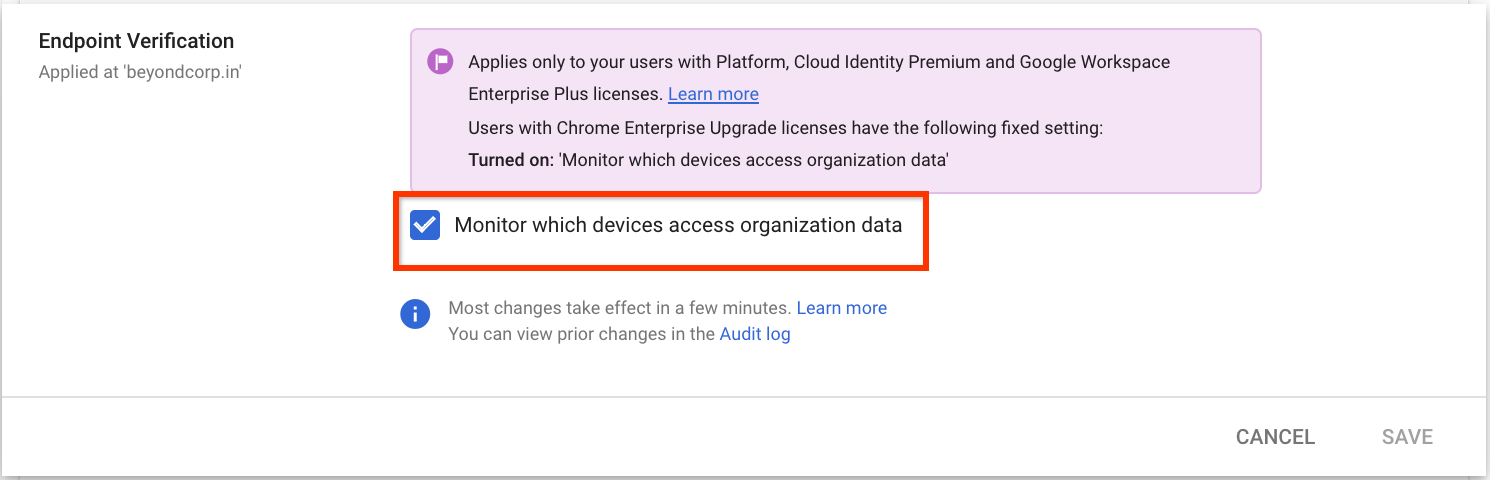
Fai clic su Accesso ai dati > Verifica endpoint.
Nel riquadro Unità organizzative, seleziona la tua unità organizzativa.
Assicurati che la casella di controllo Controlla quali dispositivi accedono ai dati dell'organizzazione sia selezionata.
Fai clic su Salva. Se hai configurato un'unità organizzativa secondaria, potresti essere in grado di ereditare o ignorare le impostazioni di un'unità organizzativa principale.
Installare Endpoint Verification sui dispositivi
Nella home page della Console di amministrazione, vai a Dispositivi.
Nel menu di navigazione, fai clic su Chrome > App ed estensioni > Utenti e browser.
Nel riquadro Unità organizzative, seleziona l'unità organizzativa per cui vuoi installare l'estensione di verifica dell'endpoint.
Passa il cursore del mouse sopra Aggiungi e fai clic su Aggiungi da Chrome Web Store.
Nel campo Cerca nel negozio, inserisci Verifica endpoint.
Fai clic su Verifica endpoint e poi su Seleziona.
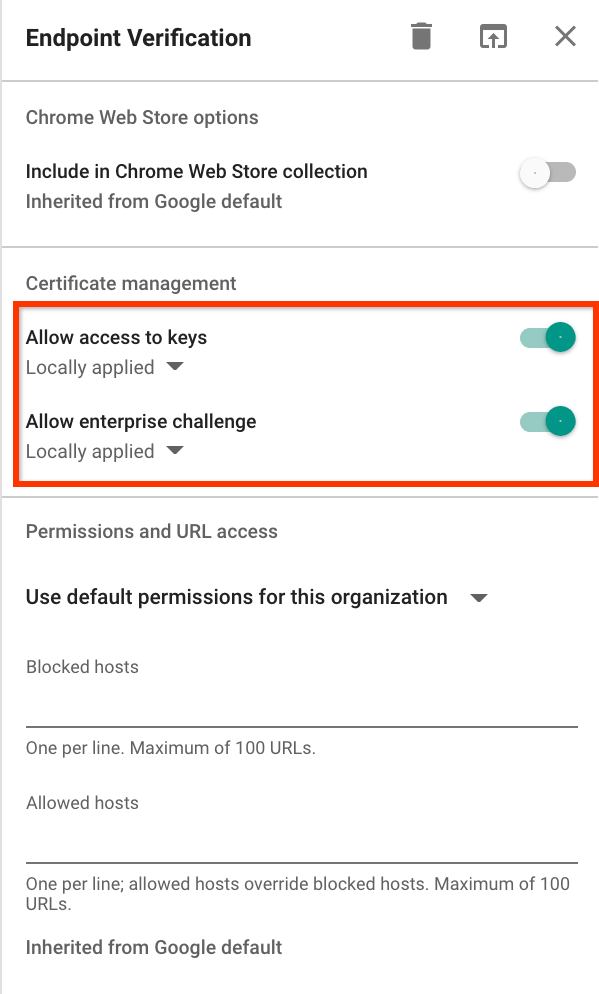
Nella finestra di dialogo Verifica endpoint, assicurati che le opzioni Consenti l'accesso alle chiavi
e Consenti richiesta di verifica per chiavi enterprise siano attive.
Consenti l'accesso alle chiavi: consente all'estensione Verifica endpoint di accedere ai certificati e alle chiavi del client su ChromeOS.
Consenti verifica aziendale: consente all'estensione Verifica endpoint di utilizzare la funzionalità Accesso verificato su ChromeOS. Per ulteriori informazioni, consulta la Panoramica di Accesso verificato di Chrome.
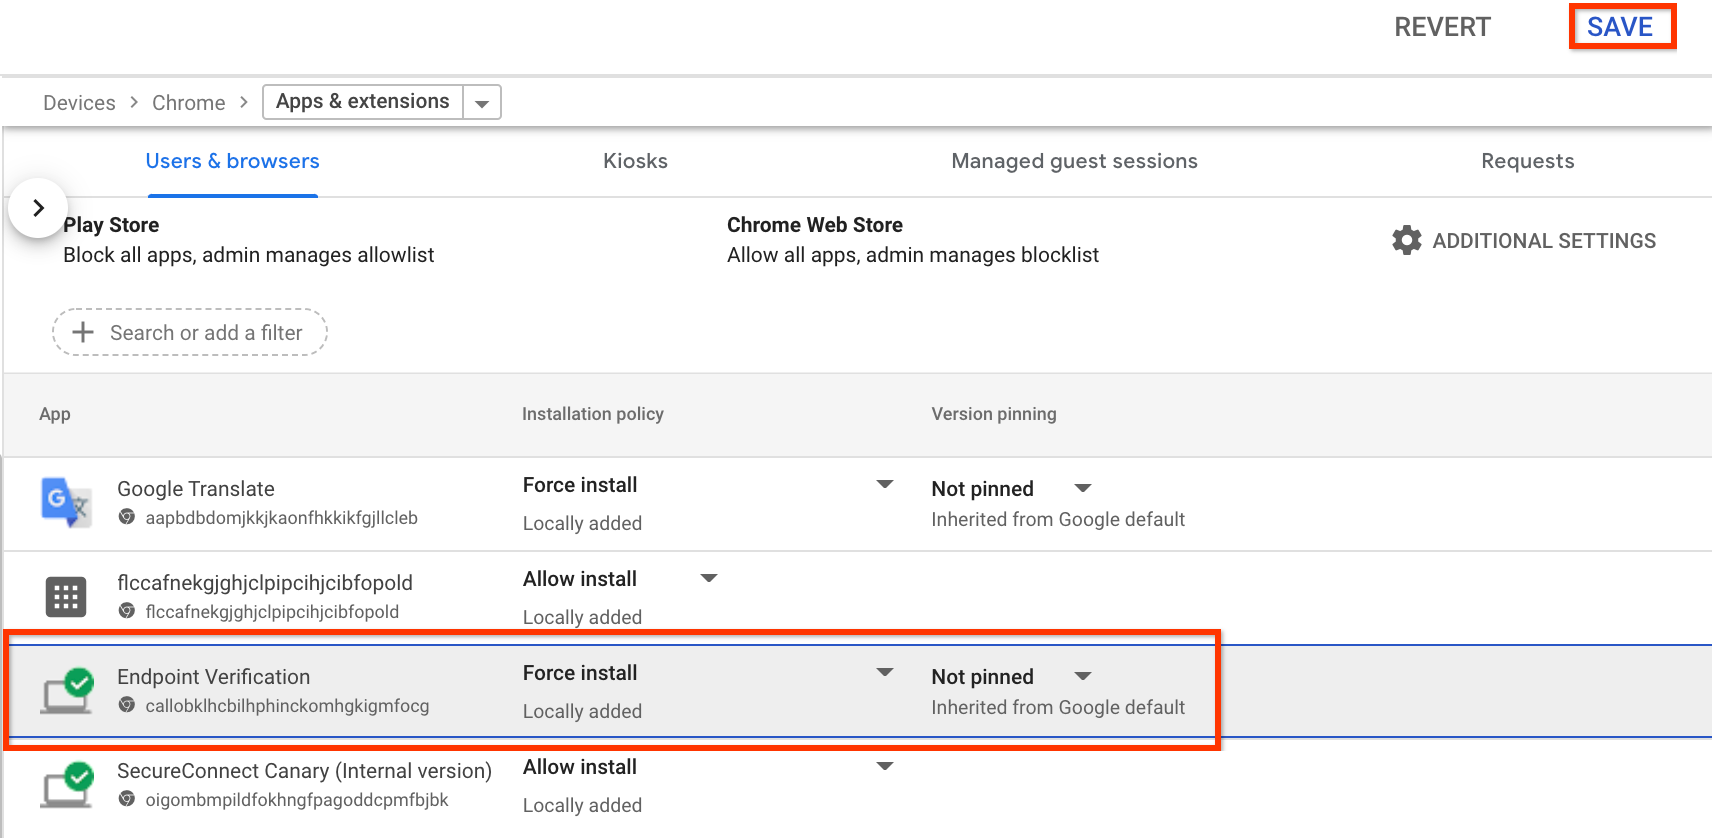
Fai clic sul menu a discesa Criterio di installazione per la verifica degli endpoint e seleziona
Forza installazione.
Fai clic su Salva.
Visualizzare le informazioni dei dispositivi
Nella home page della Console di amministrazione, vai a Dispositivi > Panoramica.
Viene visualizzato l'elenco dei dispositivi della tua organizzazione.
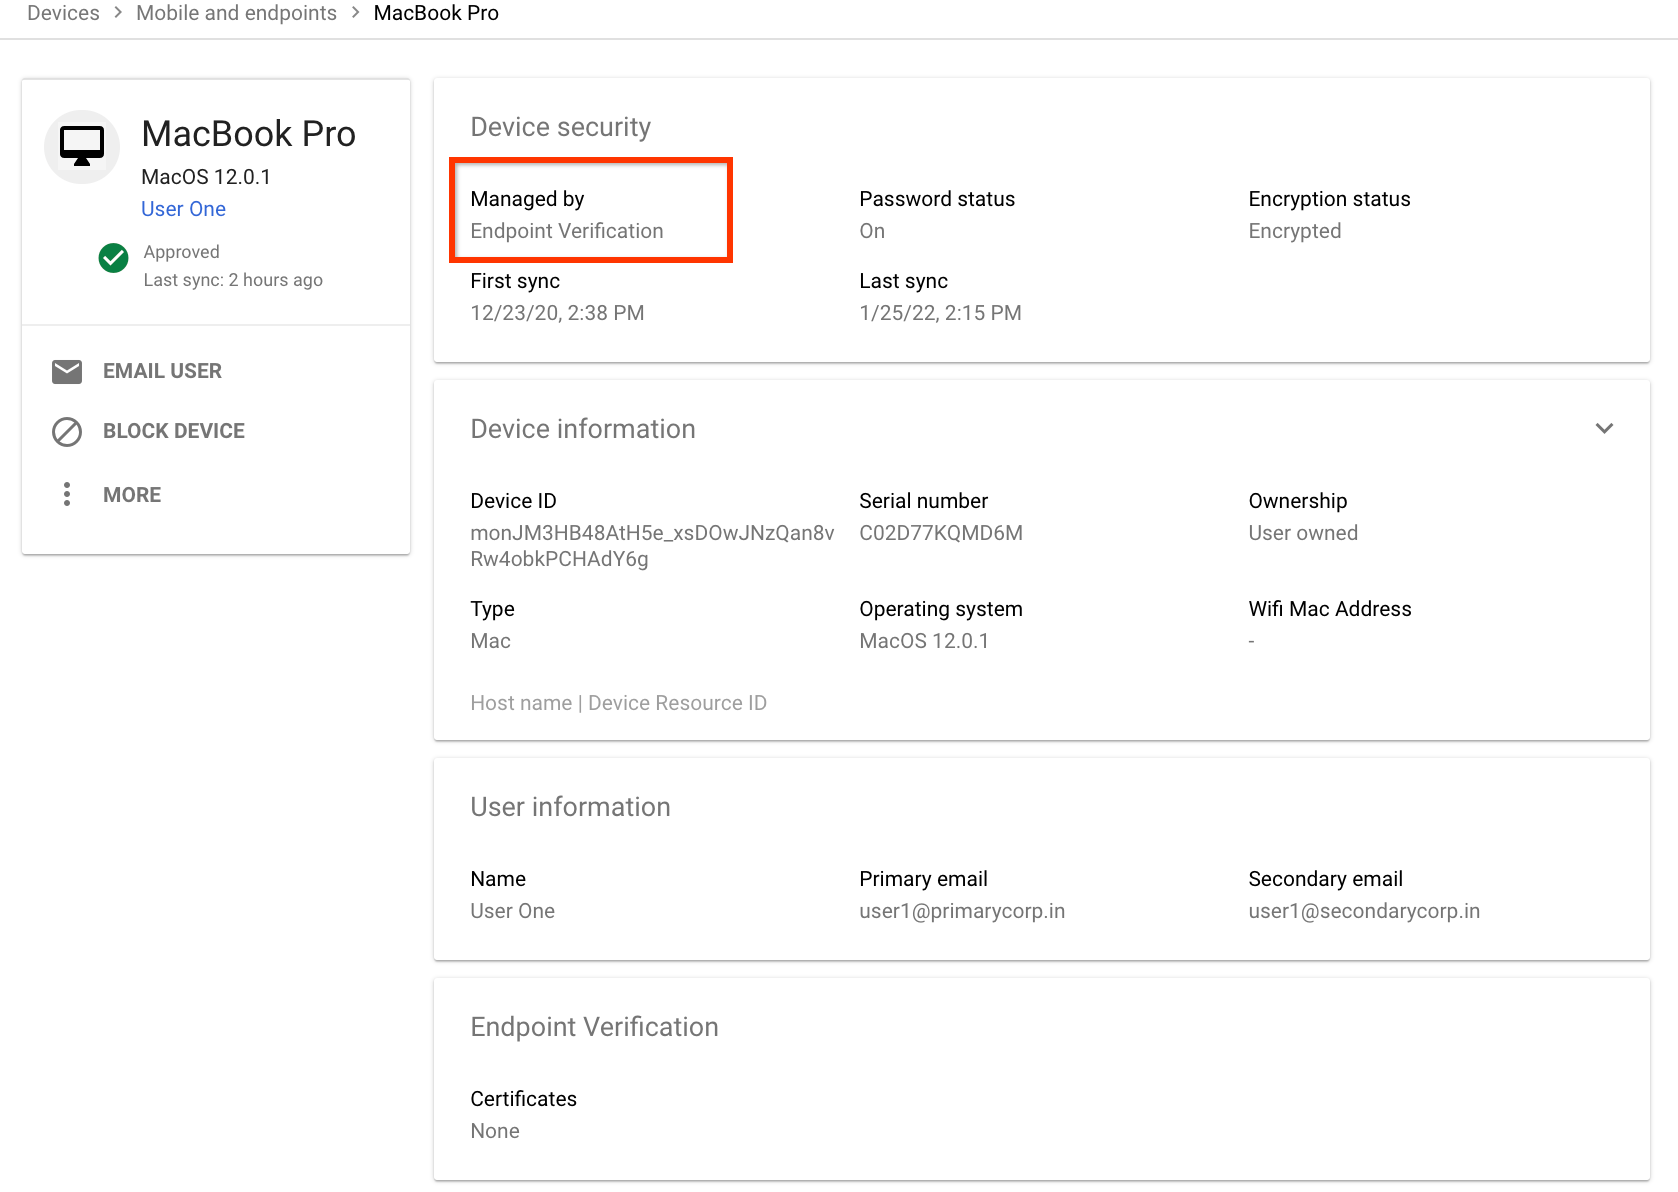
Per visualizzare ulteriori informazioni su un dispositivo specifico, fai clic sul dispositivo.
Le informazioni del dispositivo vengono visualizzate per quel dispositivo specifico.
I dettagli del dispositivo mostrano che è gestito da Endpoint Verification.
Esegui la pulizia
Se non vuoi che la verifica degli endpoint gestisca i tuoi dispositivi,
segui questi passaggi:
Nella home page della Console di amministrazione, vai a Dispositivi.
[[["Facile da capire","easyToUnderstand","thumb-up"],["Il problema è stato risolto","solvedMyProblem","thumb-up"],["Altra","otherUp","thumb-up"]],[["Difficile da capire","hardToUnderstand","thumb-down"],["Informazioni o codice di esempio errati","incorrectInformationOrSampleCode","thumb-down"],["Mancano le informazioni o gli esempi di cui ho bisogno","missingTheInformationSamplesINeed","thumb-down"],["Problema di traduzione","translationIssue","thumb-down"],["Altra","otherDown","thumb-down"]],["Ultimo aggiornamento 2025-09-04 UTC."],[[["\u003cp\u003eEndpoint Verification is used to understand the security posture of devices accessing your organization's resources and must be turned on for your organizational unit.\u003c/p\u003e\n"],["\u003cp\u003eTo set up Endpoint Verification, you must have a Google Workspace administrator account, an organization unit with supported devices, and use Chrome 110 or later.\u003c/p\u003e\n"],["\u003cp\u003eThe installation process for Endpoint Verification involves adding the extension from the Chrome Web Store within the Google Admin console, ensuring key access and enterprise challenge features are enabled, with a forced installation policy.\u003c/p\u003e\n"],["\u003cp\u003eYou can view device information managed by Endpoint Verification through the Devices overview in the Google Admin console, including specific details for individual devices.\u003c/p\u003e\n"],["\u003cp\u003eIf you no longer want Endpoint Verification to manage your devices, you must clear the "Monitor which devices access organization data" checkbox in the Google Admin Console settings.\u003c/p\u003e\n"]]],[],null,["# Set up Endpoint Verification on your devices\n============================================\n\nThis quickstart document guides you how to set up Endpoint Verification on your\ndevices to understand the security posture of your devices.\n\nBefore you begin\n----------------\n\n\n1. You must have a Google Workspace administrator account with the [Service Settings](https://support.google.com/a/answer/1219251) privilege.\n2. Log in to the **Google Admin console** by using your Google Workspace\n administrator account.\n\n [Log in to Google Admin console](https://admin.google.com/ac/devices/list)\n3. You must have an organization unit with at least one device running one of the following operating systems:\n\n - ChromeOS\n - Apple® Mac® OS X® El Capitan (10.11) or later\n - Microsoft® Windows® 10 and 11\n - Linux® Debian® and Ubuntu®\n4. You must use Chrome 110 or later. While you can install Endpoint Verification on any Chromium-based browser, it's supported only on Chrome browser.\n\n\u003cbr /\u003e\n\n\nTurn on Endpoint Verification\n-----------------------------\n\nTo collect information about the devices accessing the resources of your organization,\nEndpoint Verification must be turned on for your organizational unit. By default, Endpoint Verification\nis turned on.\n\nTo confirm if Endpoint Verification is turned on, do the following:\n\n1. From the Admin console Home page, go to **Devices**.\n\n [Go to Devices](https://admin.google.com/ac/devices/list)\n2. In the navigation menu, click **Mobile \\& endpoints \\\u003e Settings \\\u003e Universal settings**.\n3. Click **Data Access \\\u003e Endpoint Verification**.\n4. From the **Organizational Units** pane, select your organization unit.\n5. Ensure that the **Monitor which devices access organization data** checkbox is selected.\n6. Click **Save**. If you configured a child organizational unit, you might be able to inherit or override the settings of a parent organizational unit.\n\n\u003cbr /\u003e\n\n\nInstall Endpoint Verification on your devices\n---------------------------------------------\n\n1. From the Admin console Home page, go to **Devices**.\n\n [Go to Devices](https://admin.google.com/ac/devices/list)\n2. In the navigation menu, click **Chrome \\\u003e Apps \\& extensions \\\u003e Users \\& browsers**.\n3. From the **Organizational Units** pane, select your organization unit for which you want to install the Endpoint Verification extension.\n4. Hold the pointer over **Add** , and click **Add from Chrome Web Store**.\n\n5. In the **Search the store** field, enter **Endpoint Verification**.\n6. Click **Endpoint Verification** and then click **Select**.\n7. In the **Endpoint Verification** dialog, ensure that **Allow access to keys** and **Allow enterprise challenge** are enabled.\n - **Allow access to keys**: allows the Endpoint Verification extension to access client certificates and keys on ChromeOS.\n - **Allow enterprise challenge** : allows the Endpoint Verification extension to use the Verified Access feature on ChromeOS. For more information, see [Chrome Verified Access Overview](https://developers.google.com/chrome/verified-access/overview).\n\n8. Click the **Installation policy** drop-down for Endpoint Verification, and select\n **Force install**.\n\n9. Click **Save**.\n\n\u003cbr /\u003e\n\nView your devices information\n-----------------------------\n\n1. From the Admin console Home page, go to **Devices \\\u003e Overview** .\n\n [Go to Devices overview](https://admin.google.com/u/1/ac/dm)\n\n2. Click **Endpoints** .\n\n The list of devices in your organization is displayed.\n3.\n\n To get more information about a specific device, click the device.\n The device information is displayed for that specific device.\n\n\n The device details show that the device is managed by Endpoint Verification.\n\n \u003cbr /\u003e\n\nClean up\n--------\n\nIf you don't want Endpoint Verification to manage your devices,\ndo the following:\n\n1. From the Admin console Home page, go to **Devices**.\n\n [Go to Devices](https://admin.google.com/ac/devices/list)\n2. In the navigation menu, click **Mobile \\& endpoints \\\u003e Settings \\\u003e Universal settings**.\n3. Click **Data Access \\\u003e Endpoint Verification**.\n4. From the **Organizational Units** pane, select your organization unit.\n5. Clear the **Monitor which devices access organization data** checkbox.\n6. Click **Save**.\n\nWhat's next\n-----------\n\n- [Endpoint Verification overview](/endpoint-verification/docs/overview)\n\n- [Device attributes collected by Endpoint Verification](/endpoint-verification/docs/device-information)"]]