Restez organisé à l'aide des collections
Enregistrez et classez les contenus selon vos préférences.
Ce document explique comment les administrateurs peuvent déployer Endpoint Verification dans leur organisation pour évaluer et surveiller la posture de sécurité des appareils de leur organisation. En tant qu'administrateur, vous déployez Endpoint Verification à partir de la console d'administration Google.
Vous devez disposer d'une unité organisationnelle avec au moins un appareil exécutant l'un des systèmes d'exploitation suivants:
ChromeOS
Apple® Mac® OS X® El Capitan (10.11) ou version ultérieure
Microsoft® Windows® 10 et 11
Linux® Debian® et Ubuntu®
Vous devez utiliser Chrome 110 ou une version ultérieure. Bien que vous puissiez installer Endpoint Verification sur n'importe quel navigateur Chromium, il n'est compatible qu'avec le navigateur Chrome.
Activer la validation des points de terminaison
Pour collecter des informations sur les appareils accédant aux ressources de votre organisation, la validation des points de terminaison doit être activée pour votre unité organisationnelle. Par défaut, Endpoint Verification est activé.
Pour vérifier si la validation des points de terminaison est activée, procédez comme suit:
Sur la page d'accueil de la console d'administration, accédez à Appareils.
Dans le menu de navigation, cliquez sur Mobiles et points de terminaison > Paramètres > Paramètres universels.
Cliquez sur Accès aux données > Validation des points de terminaison.
Dans le volet Unités organisationnelles, sélectionnez votre unité organisationnelle.
Assurez-vous que la case Déterminer les appareils ayant accès aux données de l'organisation est cochée.
Cliquez sur Enregistrer. Si vous avez configuré une unité organisationnelle enfant, vous pourrez peut-être hériter des paramètres d'une unité organisationnelle parente ou les remplacer.
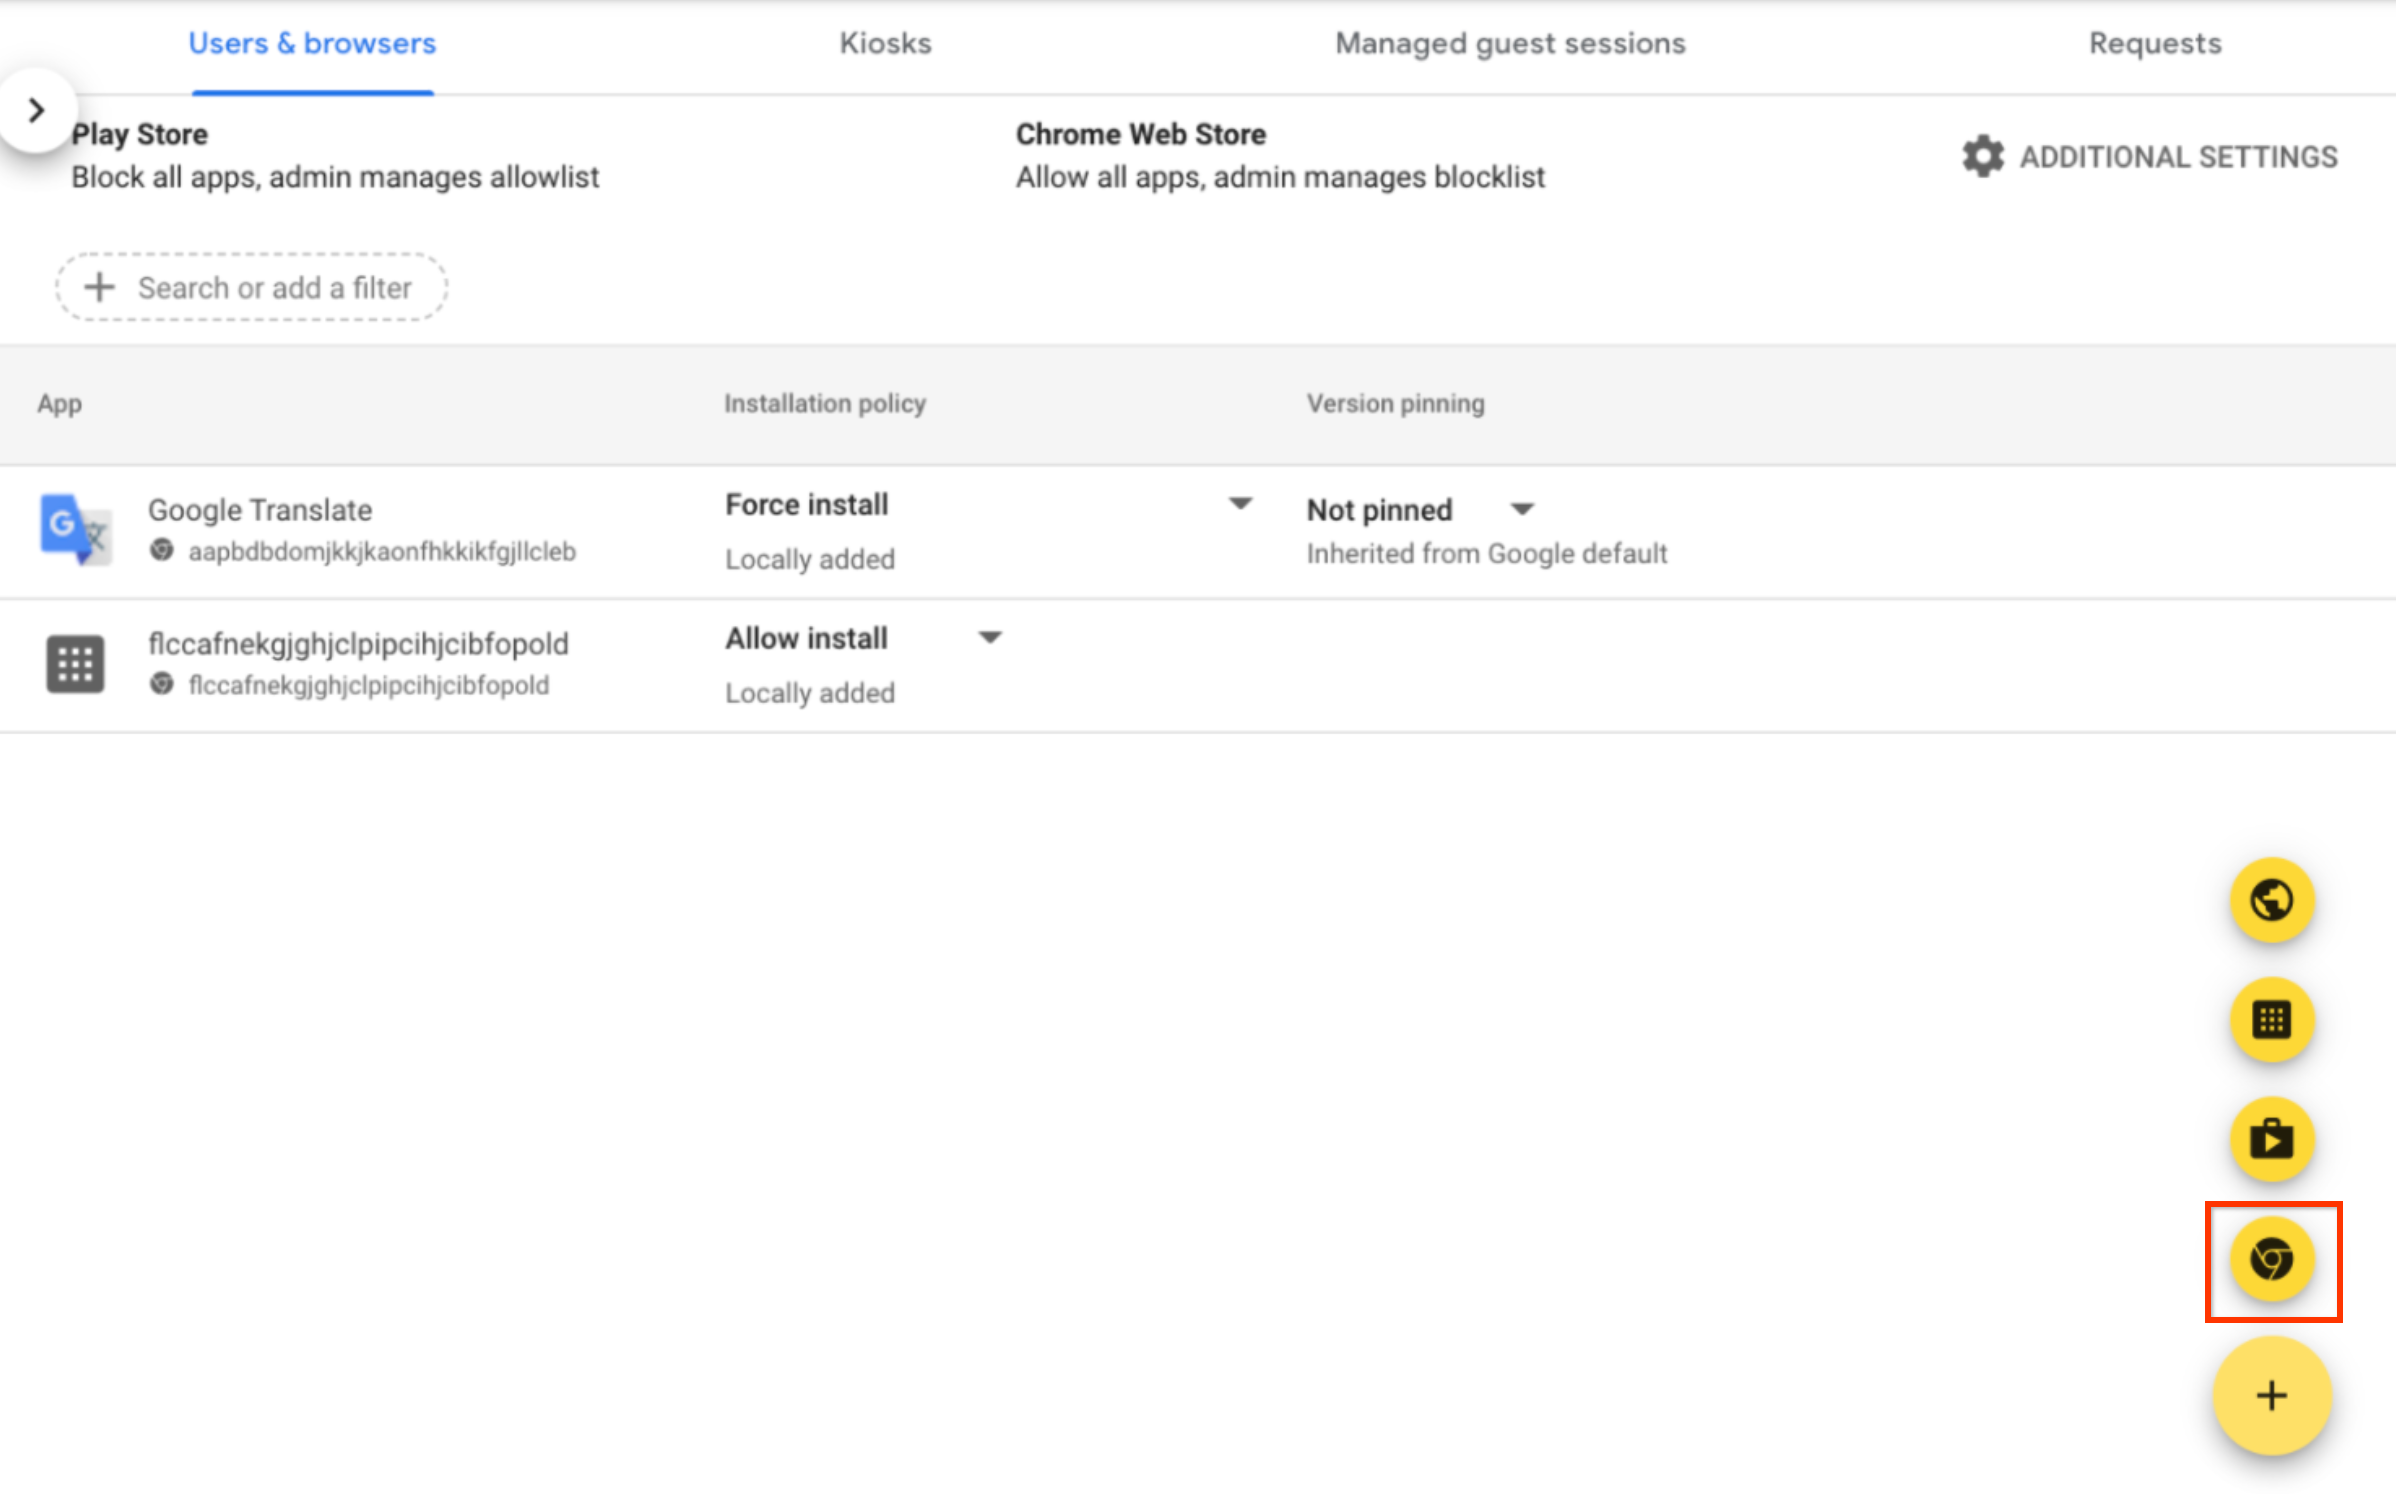
Installer Endpoint Verification sur vos appareils
Sur la page d'accueil de la console d'administration, accédez à Appareils.
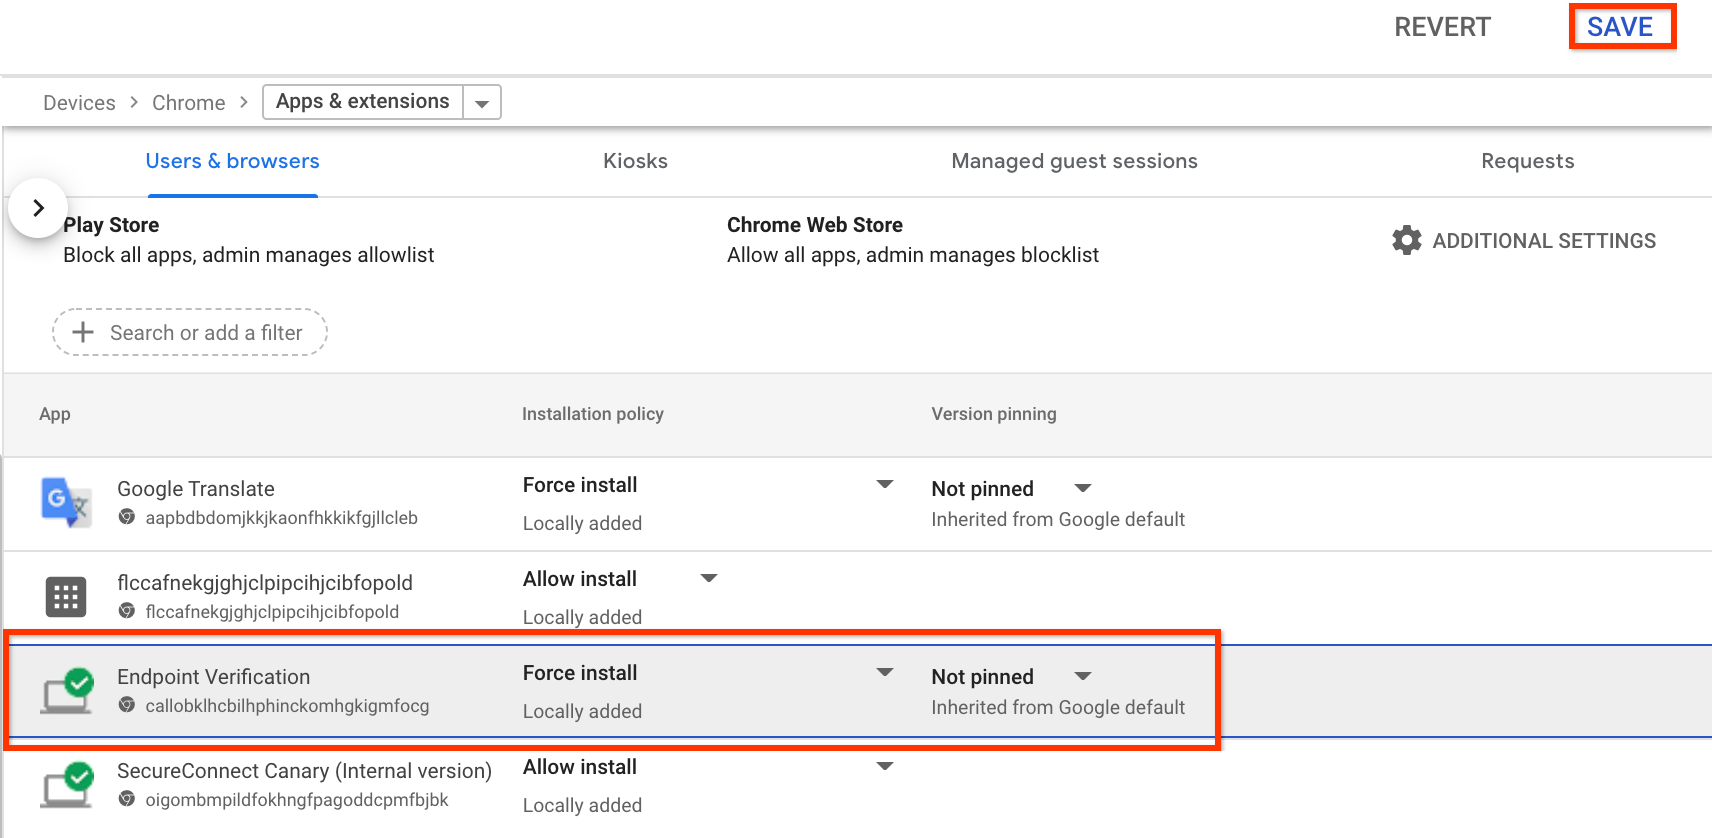
Dans le menu de navigation, cliquez sur Chrome > Applications et extensions > Utilisateurs et navigateurs.
Dans le volet Unités organisationnelles, sélectionnez l'unité organisationnelle pour laquelle vous souhaitez installer l'extension de validation des points de terminaison.
Pointez sur Ajouter, puis cliquez sur Ajouter à partir du Chrome Web Store.
Dans le champ Rechercher dans la boutique, saisissez Endpoint Verification.
Cliquez sur Validation des points de terminaison, puis sur Sélectionner.
Dans la boîte de dialogue Endpoint Verification (Validation des points de terminaison), assurez-vous que les options Allow access to keys (Autoriser l'accès aux clés) et Allow enterprise challenge (Autoriser la demande des clés d'entreprise) sont activées.
Autoriser l'accès aux clés: permet à l'extension Endpoint Verification d'accéder aux certificats client et aux clés sur ChromeOS.
Autoriser la demande d'entreprise: permet à l'extension Endpoint Verification d'utiliser la fonctionnalité d'accès validé sur ChromeOS. Pour en savoir plus, consultez la page Présentation de l'accès authentifié Chrome.
Cliquez sur la liste déroulante Règles d'installation pour Endpoint Verification, puis sélectionnez Forcer l'installation.
Collecter les attributs des appareils qui utilisent la version M92 ou antérieure de Chrome
Pour installer l'application d'assistance, vous pouvez utiliser les outils de gestion des appareils tels que Jamf sur les appareils Apple Mac et Active Directory sur les appareils Microsoft Windows.
Installez le fichier helper.dmg et extrayez EndpointVerification.pkg.
Pour déployer EndpointVerification.pkg, suivez les instructions de la section Déployer des packages Mac.
Une fois l'application affichée sur la page Applications, elle est prête à être déployée avec Blueprint.
Sauf indication contraire, le contenu de cette page est régi par une licence Creative Commons Attribution 4.0, et les échantillons de code sont régis par une licence Apache 2.0. Pour en savoir plus, consultez les Règles du site Google Developers. Java est une marque déposée d'Oracle et/ou de ses sociétés affiliées.
Dernière mise à jour le 2025/09/04 (UTC).
[[["Facile à comprendre","easyToUnderstand","thumb-up"],["J'ai pu résoudre mon problème","solvedMyProblem","thumb-up"],["Autre","otherUp","thumb-up"]],[["Difficile à comprendre","hardToUnderstand","thumb-down"],["Informations ou exemple de code incorrects","incorrectInformationOrSampleCode","thumb-down"],["Il n'y a pas l'information/les exemples dont j'ai besoin","missingTheInformationSamplesINeed","thumb-down"],["Problème de traduction","translationIssue","thumb-down"],["Autre","otherDown","thumb-down"]],["Dernière mise à jour le 2025/09/04 (UTC)."],[[["\u003cp\u003eAdministrators can deploy Endpoint Verification to monitor the security posture of devices within their organization via the Google Admin console.\u003c/p\u003e\n"],["\u003cp\u003eDeploying Endpoint Verification involves turning on the feature, installing it on devices, and optionally installing the helper app for specific device types or advanced features.\u003c/p\u003e\n"],["\u003cp\u003eEndpoint Verification supports devices running ChromeOS, macOS, Windows 10 & 11, and Linux (Debian & Ubuntu), using Chrome 110 or later.\u003c/p\u003e\n"],["\u003cp\u003eThe helper app is necessary for tasks like integrating with Chrome Enterprise Premium, CrowdStrike Falcon ZTA, certificate-based access for Google Cloud resources, or collecting device attributes on older versions of Chrome.\u003c/p\u003e\n"],["\u003cp\u003eEndpoint verification can be force installed through the chrome web store by an administrator.\u003c/p\u003e\n"]]],[],null,["# Deploy Endpoint Verification\n\nThis document shows how administrators can deploy Endpoint Verification to their\norganization to assess and monitor the security posture of the devices in\ntheir organization. As an administrator, you deploy Endpoint Verification from the\nGoogle Admin console.\n\nFor more information about Endpoint Verification, see\n[Endpoint Verification overview](/endpoint-verification/docs/overview).\n\nTo deploy Endpoint Verification, you complete the following process:\n\n1. Turn on Endpoint Verification.\n2. Install Endpoint Verification on your devices.\n3. If required for your device type, install the Endpoint Verification helper app.\n\nBefore you begin\n----------------\n\n\n1. You must have a Google Workspace administrator account with the [Service Settings](https://support.google.com/a/answer/1219251) privilege.\n2. Log in to the **Google Admin console** by using your Google Workspace\n administrator account.\n\n [Log in to Google Admin console](https://admin.google.com/ac/devices/list)\n3. You must have an organization unit with at least one device running one of the following operating systems:\n\n - ChromeOS\n - Apple® Mac® OS X® El Capitan (10.11) or later\n - Microsoft® Windows® 10 and 11\n - Linux® Debian® and Ubuntu®\n4. You must use Chrome 110 or later. While you can install Endpoint Verification on any Chromium-based browser, it's supported only on Chrome browser.\n\n\u003cbr /\u003e\n\n\nTurn on Endpoint Verification\n-----------------------------\n\nTo collect information about the devices accessing the resources of your organization,\nEndpoint Verification must be turned on for your organizational unit. By default, Endpoint Verification\nis turned on.\n\nTo confirm if Endpoint Verification is turned on, do the following:\n\n1. From the Admin console Home page, go to **Devices**.\n\n [Go to Devices](https://admin.google.com/ac/devices/list)\n2. In the navigation menu, click **Mobile \\& endpoints \\\u003e Settings \\\u003e Universal settings**.\n3. Click **Data Access \\\u003e Endpoint Verification**.\n4. From the **Organizational Units** pane, select your organization unit.\n5. Ensure that the **Monitor which devices access organization data** checkbox is selected.\n6. Click **Save**. If you configured a child organizational unit, you might be able to inherit or override the settings of a parent organizational unit.\n\n\u003cbr /\u003e\n\n\nInstall Endpoint Verification on your devices\n---------------------------------------------\n\n1. From the Admin console Home page, go to **Devices**.\n\n [Go to Devices](https://admin.google.com/ac/devices/list)\n2. In the navigation menu, click **Chrome \\\u003e Apps \\& extensions \\\u003e Users \\& browsers**.\n3. From the **Organizational Units** pane, select your organization unit for which you want to install the Endpoint Verification extension.\n4. Hold the pointer over **Add** , and click **Add from Chrome Web Store**.\n\n5. In the **Search the store** field, enter **Endpoint Verification**.\n6. Click **Endpoint Verification** and then click **Select**.\n7. In the **Endpoint Verification** dialog, ensure that **Allow access to keys** and **Allow enterprise challenge** are enabled.\n - **Allow access to keys**: allows the Endpoint Verification extension to access client certificates and keys on ChromeOS.\n - **Allow enterprise challenge** : allows the Endpoint Verification extension to use the Verified Access feature on ChromeOS. For more information, see [Chrome Verified Access Overview](https://developers.google.com/chrome/verified-access/overview).\n\n8. Click the **Installation policy** drop-down for Endpoint Verification, and select\n **Force install**.\n\n9. Click **Save**.\n\n\u003cbr /\u003e\n\nInstall the Endpoint Verification helper app\n--------------------------------------------\n\nIf you want to do any of the following tasks, install the Endpoint Verification\nhelper app on your organizational unit:\n\n- [Set up Chrome Enterprise Premium and CrowdStrike Falcon Zero Trust Assessment (Falcon ZTA) integration](/chrome-enterprise-premium/docs/setting-up-cs).\n- [Set up certificate-based access for Google Cloud resources](/chrome-enterprise-premium/docs/securing-resources-with-certificate-based-access).\n- Collect device attributes from the devices that are using Chrome version M92 or earlier.\n\nTo install the helper app, you can use the device management tools such as\nJamf on Apple Mac devices and Active Directory on Microsoft Windows devices. \n\n### Jamf\n\n1. [Download the `helper.dmg`](https://dl.google.com/dl/secureconnect/install/mac/EndpointVerification.dmg) file.\n2. Mount the `helper.dmg` file and extract `EndpointVerification.pkg`.\n3. To deploy `EndpointVerification.pkg`, follow the instructions in [Deploying Mac Packages](https://docs.jamf.com/jamf-now/documentation/Deploying_Mac_Packages.html). After the app appears in the **Apps** page, it's ready for deployment with Blueprint.\n4. To deploy the app to all devices, follow the instructions in [Deploying an App to All Devices in a Blueprint](https://docs.jamf.com/jamf-now/documentation/Deploying_an_App_to_All_Devices_in_a_Blueprint.html).\n\n### Active Directory\n\n1. [Download the `EndpointVerification.msi`](https://dl.google.com/dl/secureconnect/install/win/EndpointVerification_admin.msi) file and use this file when creating a distribution point.\n2. Follow the instructions in [Use Group Policy to remotely install software](https://docs.microsoft.com/en-us/troubleshoot/windows-server/group-policy/use-group-policy-to-install-software).\n\nWhat's next\n-----------\n\n- [Monitor device inventory](/endpoint-verification/docs/view-inventory)\n- [Create device-based access levels](/endpoint-verification/docs/creating-device-access-level)"]]