Mit Sammlungen den Überblick behalten
Sie können Inhalte basierend auf Ihren Einstellungen speichern und kategorisieren.
In diesem Dokument wird beschrieben, wie Administratoren die Endpunktprüfung in ihrer Organisation bereitstellen können, um den Sicherheitsstatus der Geräte in ihrer Organisation zu bewerten und zu überwachen. Als Administrator stellen Sie die Endpunktprüfung über die Admin-Konsole bereit.
Sie benötigen eine Organisationseinheit mit mindestens einem Gerät, auf dem eines der folgenden Betriebssysteme ausgeführt wird:
ChromeOS
Apple® Mac® OS X® El Capitan 10.11 oder höher
Microsoft® Windows® 10 und 11
Linux Debian® und Ubuntu®
Sie müssen Chrome 110 oder höher verwenden. Sie können die Endpunktprüfung in jedem Chromium-basierten Browser installieren, sie wird jedoch nur im Chrome-Browser unterstützt.
Endpunktprüfung aktivieren
Damit Informationen zu den Geräten erfasst werden können, die auf die Ressourcen Ihrer Organisation zugreifen, muss die Endpunktprüfung für Ihre Organisationseinheit aktiviert sein. Die Endpunktprüfung ist standardmäßig aktiviert.
So prüfen Sie, ob die Endpunktprüfung aktiviert ist:
Gehen Sie auf der Startseite der Admin-Konsole zu Geräte.
Klicken Sie im Navigationsmenü auf Mobilgeräte und Endpunkte > Einstellungen > Universelle Einstellungen.
Klicken Sie auf Datenzugriff > Endpunktprüfung.
Wählen Sie im Bereich Organisationseinheiten Ihre Organisationseinheit aus.
Achten Sie darauf, dass das Kästchen Überwachen, welche Geräte auf Daten der Organisation zugreifen ausgewählt ist.
Klicken Sie auf Speichern. Wenn Sie eine untergeordnete Organisationseinheit konfiguriert haben, besteht unter Umständen die Möglichkeit, die Einstellungen der übergeordneten Organisationseinheit zu übernehmen oder zu überschreiben.
Endpunktprüfung auf Ihren Geräten installieren
Gehen Sie auf der Startseite der Admin-Konsole zu Geräte.
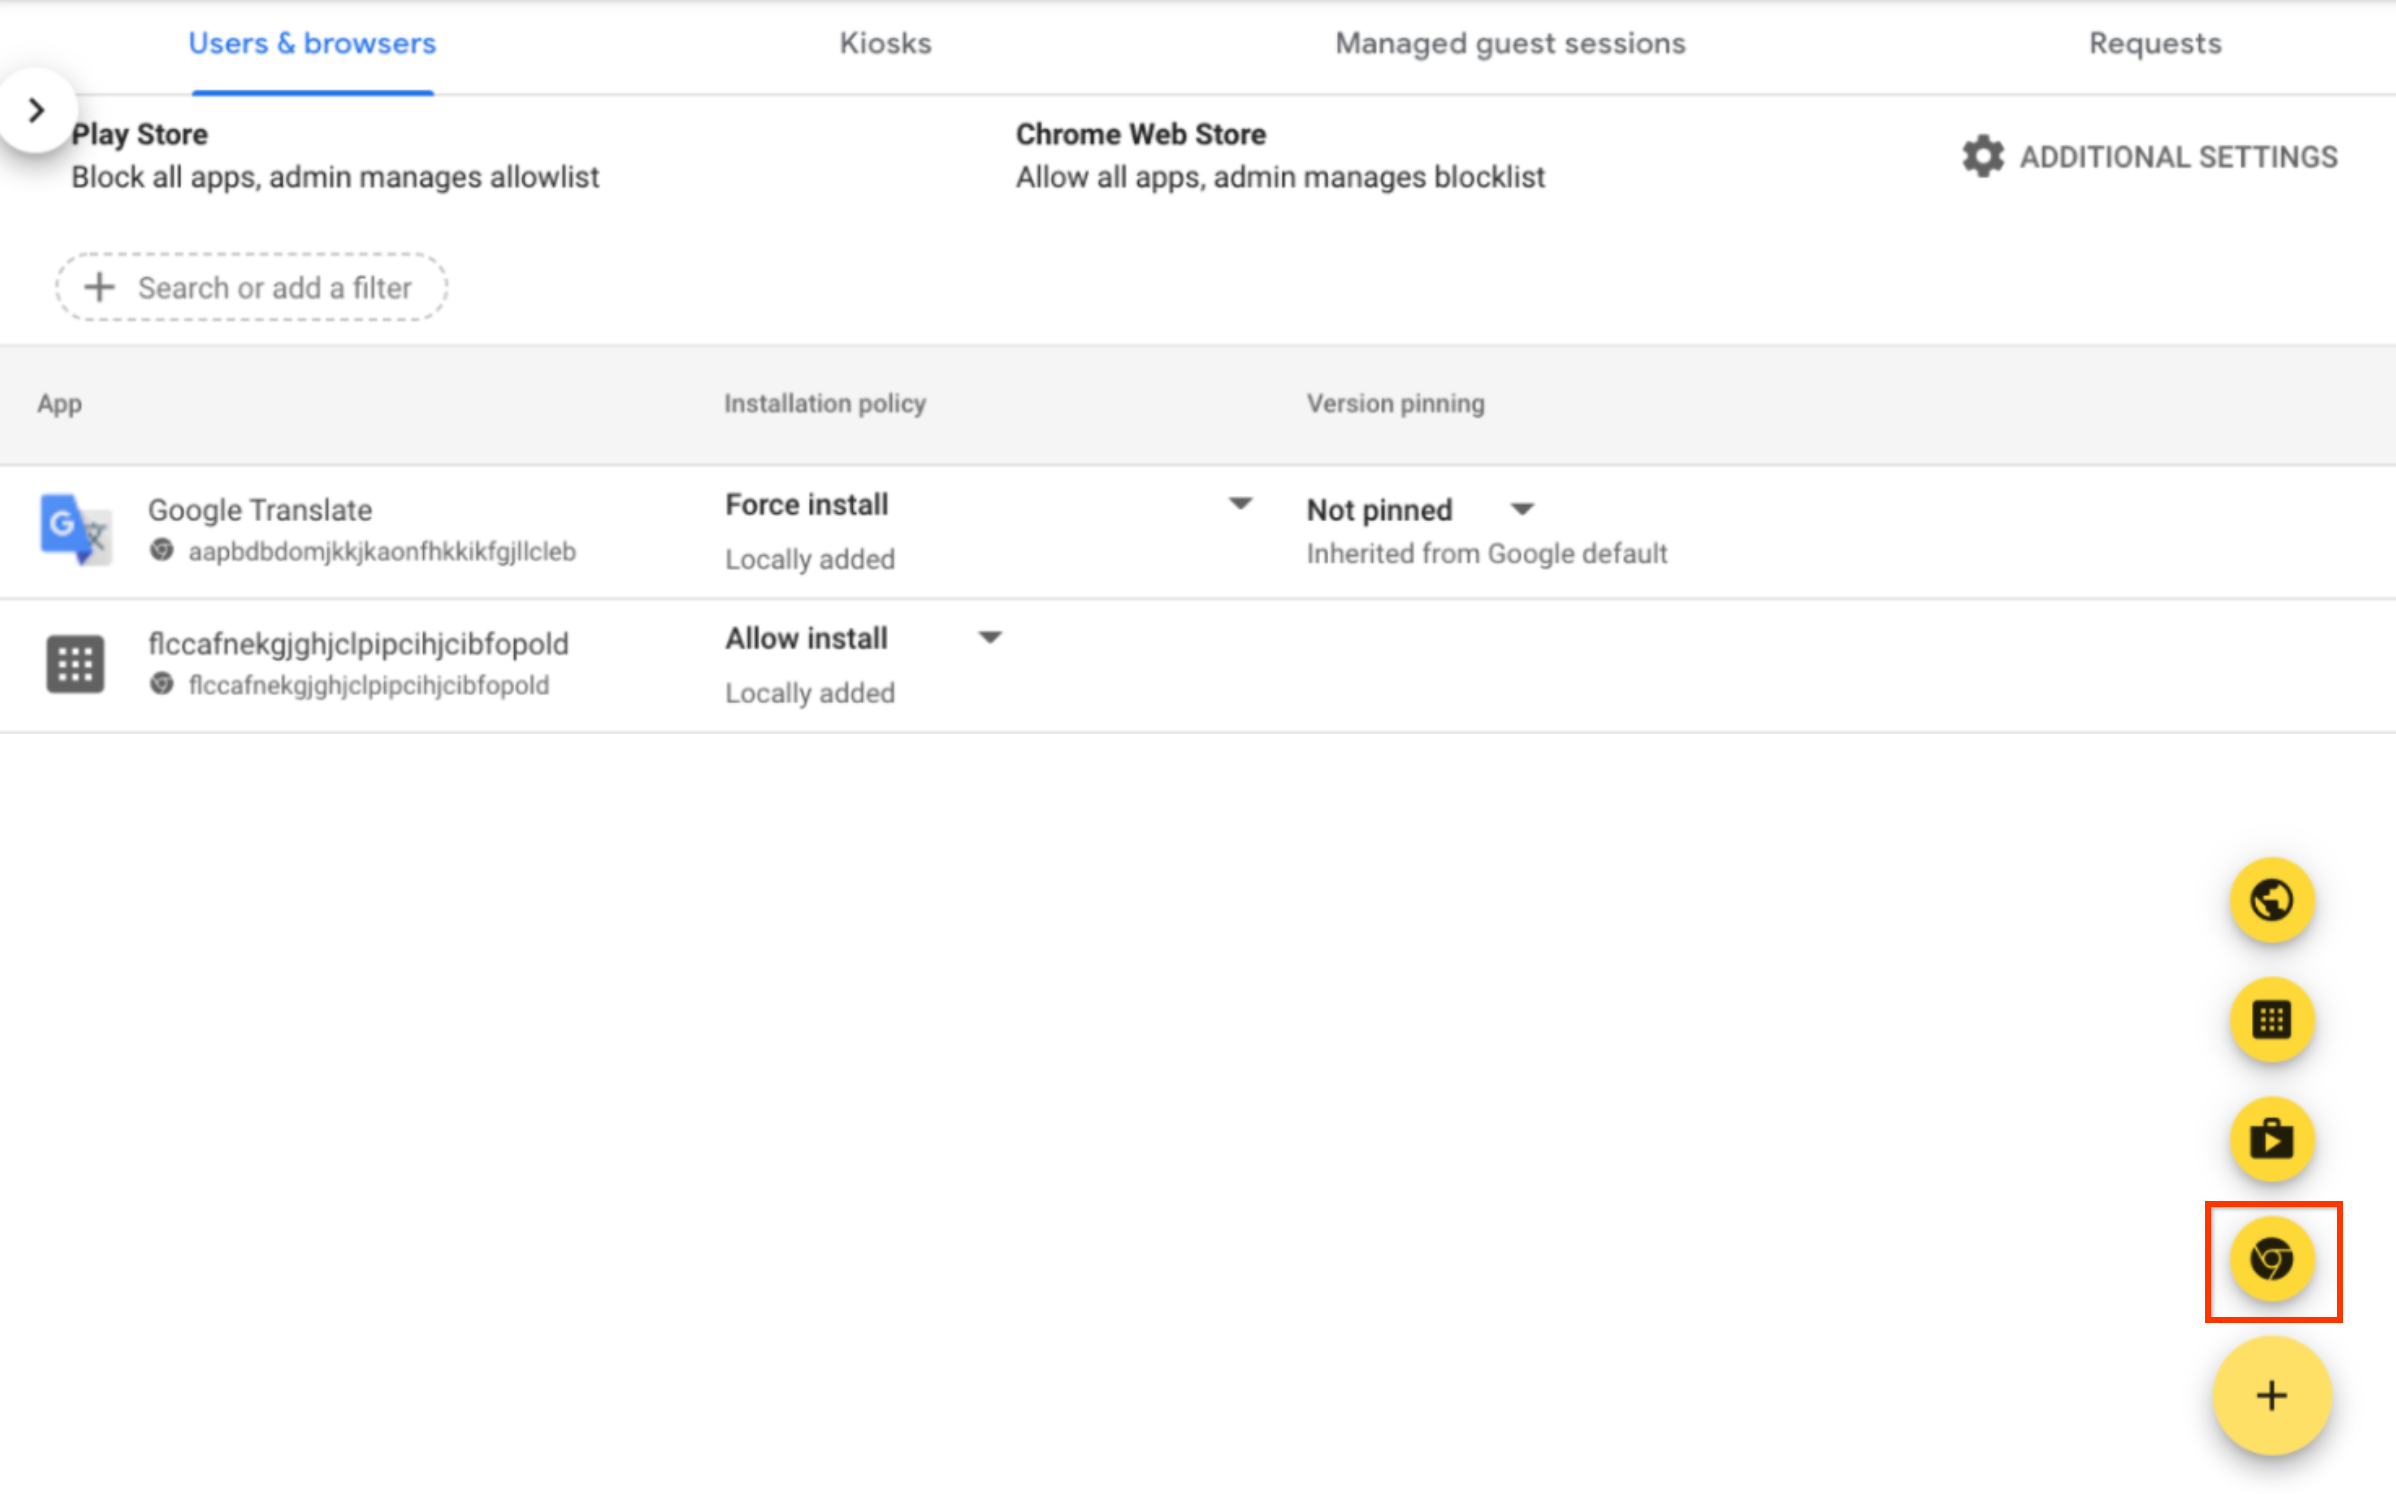
Klicken Sie im Navigationsmenü auf Chrome > Apps und Erweiterungen > Nutzer und Browser.
Wählen Sie im Bereich Organisationseinheiten die Organisationseinheit aus, für die Sie die Endpunktprüfungs-Erweiterung installieren möchten.
Bewegen Sie den Mauszeiger auf Hinzufügen und klicken Sie auf Aus dem Chrome Web Store hinzufügen.
Geben Sie im Feld Händler durchsuchen den Wert für die Endpunktprüfung ein.
Klicken Sie auf Endpunktprüfung und dann auf Auswählen.
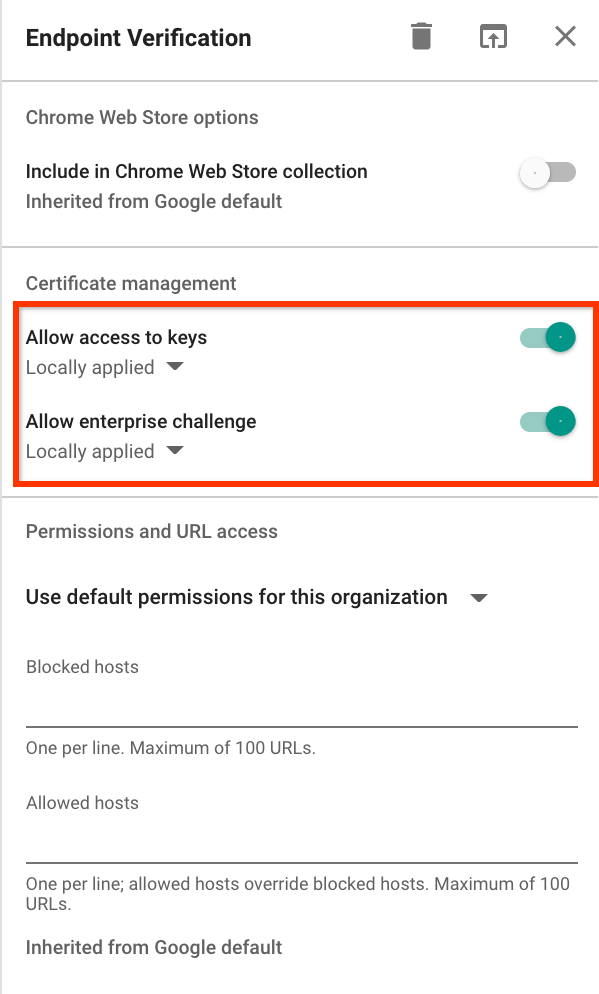
Achten Sie im Dialogfeld Endpunktprüfung darauf, dass Zugriff auf Schlüssel zulassen und Bestätigung von Enterprise-Schlüsseln zulassen aktiviert sind.
Zugriff auf Schlüssel zulassen: Ermöglicht der Erweiterung „Endpunktprüfung“ den Zugriff auf Clientzertifikate und ‑schlüssel unter ChromeOS.
Unternehmens-Challenge zulassen: Ermöglicht der Erweiterung „Endpunktprüfung“, die Funktion „Bestätigter Zugriff“ in ChromeOS zu verwenden. Weitere Informationen finden Sie unter Übersicht über den bestätigten Zugriff in Chrome.
Klicken Sie auf das Drop-down-Menü Installationsrichtlinie für die Endpunktprüfung und wählen Sie Installation erzwingen aus.
Klicken Sie auf Speichern.
Hilfs-App für die Endpunktprüfung installieren
Wenn Sie eine der folgenden Aufgaben ausführen möchten, installieren Sie die Hilfsanwendung für die Endpunktprüfung in Ihrer Organisationseinheit:
Stellen Sie die Datei helper.dmg bereit und extrahieren Sie EndpointVerification.pkg.
Wenn Sie EndpointVerification.pkg bereitstellen möchten, folgen Sie der Anleitung unter Mac-Pakete bereitstellen.
Sobald die App auf der Seite Apps angezeigt wird, kann sie mit Blueprint bereitgestellt werden.
[[["Leicht verständlich","easyToUnderstand","thumb-up"],["Mein Problem wurde gelöst","solvedMyProblem","thumb-up"],["Sonstiges","otherUp","thumb-up"]],[["Schwer verständlich","hardToUnderstand","thumb-down"],["Informationen oder Beispielcode falsch","incorrectInformationOrSampleCode","thumb-down"],["Benötigte Informationen/Beispiele nicht gefunden","missingTheInformationSamplesINeed","thumb-down"],["Problem mit der Übersetzung","translationIssue","thumb-down"],["Sonstiges","otherDown","thumb-down"]],["Zuletzt aktualisiert: 2025-09-09 (UTC)."],[[["\u003cp\u003eAdministrators can deploy Endpoint Verification to monitor the security posture of devices within their organization via the Google Admin console.\u003c/p\u003e\n"],["\u003cp\u003eDeploying Endpoint Verification involves turning on the feature, installing it on devices, and optionally installing the helper app for specific device types or advanced features.\u003c/p\u003e\n"],["\u003cp\u003eEndpoint Verification supports devices running ChromeOS, macOS, Windows 10 & 11, and Linux (Debian & Ubuntu), using Chrome 110 or later.\u003c/p\u003e\n"],["\u003cp\u003eThe helper app is necessary for tasks like integrating with Chrome Enterprise Premium, CrowdStrike Falcon ZTA, certificate-based access for Google Cloud resources, or collecting device attributes on older versions of Chrome.\u003c/p\u003e\n"],["\u003cp\u003eEndpoint verification can be force installed through the chrome web store by an administrator.\u003c/p\u003e\n"]]],[],null,["# Deploy Endpoint Verification\n\nThis document shows how administrators can deploy Endpoint Verification to their\norganization to assess and monitor the security posture of the devices in\ntheir organization. As an administrator, you deploy Endpoint Verification from the\nGoogle Admin console.\n\nFor more information about Endpoint Verification, see\n[Endpoint Verification overview](/endpoint-verification/docs/overview).\n\nTo deploy Endpoint Verification, you complete the following process:\n\n1. Turn on Endpoint Verification.\n2. Install Endpoint Verification on your devices.\n3. If required for your device type, install the Endpoint Verification helper app.\n\nBefore you begin\n----------------\n\n\n1. You must have a Google Workspace administrator account with the [Service Settings](https://support.google.com/a/answer/1219251) privilege.\n2. Log in to the **Google Admin console** by using your Google Workspace\n administrator account.\n\n [Log in to Google Admin console](https://admin.google.com/ac/devices/list)\n3. You must have an organization unit with at least one device running one of the following operating systems:\n\n - ChromeOS\n - Apple® Mac® OS X® El Capitan (10.11) or later\n - Microsoft® Windows® 10 and 11\n - Linux® Debian® and Ubuntu®\n4. You must use Chrome 110 or later. While you can install Endpoint Verification on any Chromium-based browser, it's supported only on Chrome browser.\n\n\u003cbr /\u003e\n\n\nTurn on Endpoint Verification\n-----------------------------\n\nTo collect information about the devices accessing the resources of your organization,\nEndpoint Verification must be turned on for your organizational unit. By default, Endpoint Verification\nis turned on.\n\nTo confirm if Endpoint Verification is turned on, do the following:\n\n1. From the Admin console Home page, go to **Devices**.\n\n [Go to Devices](https://admin.google.com/ac/devices/list)\n2. In the navigation menu, click **Mobile \\& endpoints \\\u003e Settings \\\u003e Universal settings**.\n3. Click **Data Access \\\u003e Endpoint Verification**.\n4. From the **Organizational Units** pane, select your organization unit.\n5. Ensure that the **Monitor which devices access organization data** checkbox is selected.\n6. Click **Save**. If you configured a child organizational unit, you might be able to inherit or override the settings of a parent organizational unit.\n\n\u003cbr /\u003e\n\n\nInstall Endpoint Verification on your devices\n---------------------------------------------\n\n1. From the Admin console Home page, go to **Devices**.\n\n [Go to Devices](https://admin.google.com/ac/devices/list)\n2. In the navigation menu, click **Chrome \\\u003e Apps \\& extensions \\\u003e Users \\& browsers**.\n3. From the **Organizational Units** pane, select your organization unit for which you want to install the Endpoint Verification extension.\n4. Hold the pointer over **Add** , and click **Add from Chrome Web Store**.\n\n5. In the **Search the store** field, enter **Endpoint Verification**.\n6. Click **Endpoint Verification** and then click **Select**.\n7. In the **Endpoint Verification** dialog, ensure that **Allow access to keys** and **Allow enterprise challenge** are enabled.\n - **Allow access to keys**: allows the Endpoint Verification extension to access client certificates and keys on ChromeOS.\n - **Allow enterprise challenge** : allows the Endpoint Verification extension to use the Verified Access feature on ChromeOS. For more information, see [Chrome Verified Access Overview](https://developers.google.com/chrome/verified-access/overview).\n\n8. Click the **Installation policy** drop-down for Endpoint Verification, and select\n **Force install**.\n\n9. Click **Save**.\n\n\u003cbr /\u003e\n\nInstall the Endpoint Verification helper app\n--------------------------------------------\n\nIf you want to do any of the following tasks, install the Endpoint Verification\nhelper app on your organizational unit:\n\n- [Set up Chrome Enterprise Premium and CrowdStrike Falcon Zero Trust Assessment (Falcon ZTA) integration](/chrome-enterprise-premium/docs/setting-up-cs).\n- [Set up certificate-based access for Google Cloud resources](/chrome-enterprise-premium/docs/securing-resources-with-certificate-based-access).\n- Collect device attributes from the devices that are using Chrome version M92 or earlier.\n\nTo install the helper app, you can use the device management tools such as\nJamf on Apple Mac devices and Active Directory on Microsoft Windows devices. \n\n### Jamf\n\n1. [Download the `helper.dmg`](https://dl.google.com/dl/secureconnect/install/mac/EndpointVerification.dmg) file.\n2. Mount the `helper.dmg` file and extract `EndpointVerification.pkg`.\n3. To deploy `EndpointVerification.pkg`, follow the instructions in [Deploying Mac Packages](https://docs.jamf.com/jamf-now/documentation/Deploying_Mac_Packages.html). After the app appears in the **Apps** page, it's ready for deployment with Blueprint.\n4. To deploy the app to all devices, follow the instructions in [Deploying an App to All Devices in a Blueprint](https://docs.jamf.com/jamf-now/documentation/Deploying_an_App_to_All_Devices_in_a_Blueprint.html).\n\n### Active Directory\n\n1. [Download the `EndpointVerification.msi`](https://dl.google.com/dl/secureconnect/install/win/EndpointVerification_admin.msi) file and use this file when creating a distribution point.\n2. Follow the instructions in [Use Group Policy to remotely install software](https://docs.microsoft.com/en-us/troubleshoot/windows-server/group-policy/use-group-policy-to-install-software).\n\nWhat's next\n-----------\n\n- [Monitor device inventory](/endpoint-verification/docs/view-inventory)\n- [Create device-based access levels](/endpoint-verification/docs/creating-device-access-level)"]]