Mantenha tudo organizado com as coleções
Salve e categorize o conteúdo com base nas suas preferências.
Este documento mostra como os administradores podem implementar a validação de pontos finais na respetiva organização para avaliar e monitorizar a postura de segurança dos dispositivos na respetiva organização. Enquanto administrador, implementa a Validação de pontos finais a partir da consola do administrador Google.
Tem de ter uma unidade organizacional com, pelo menos, um dispositivo com um dos seguintes sistemas operativos:
ChromeOS
Apple® Mac® OS X® El Capitan (10.11) ou posterior
Microsoft® Windows® 10 e 11
Linux® Debian® e Ubuntu®
Tem de usar o Chrome 110 ou posterior. Embora possa instalar a validação de pontos finais em qualquer navegador baseado no Chromium, esta só é suportada no navegador Chrome.
Ative a validação de pontos finais
Para recolher informações sobre os dispositivos que acedem aos recursos da sua organização,
a validação de pontos finais tem de estar ativada para a sua unidade organizacional. Por predefinição, a validação de pontos finais
está ativada.
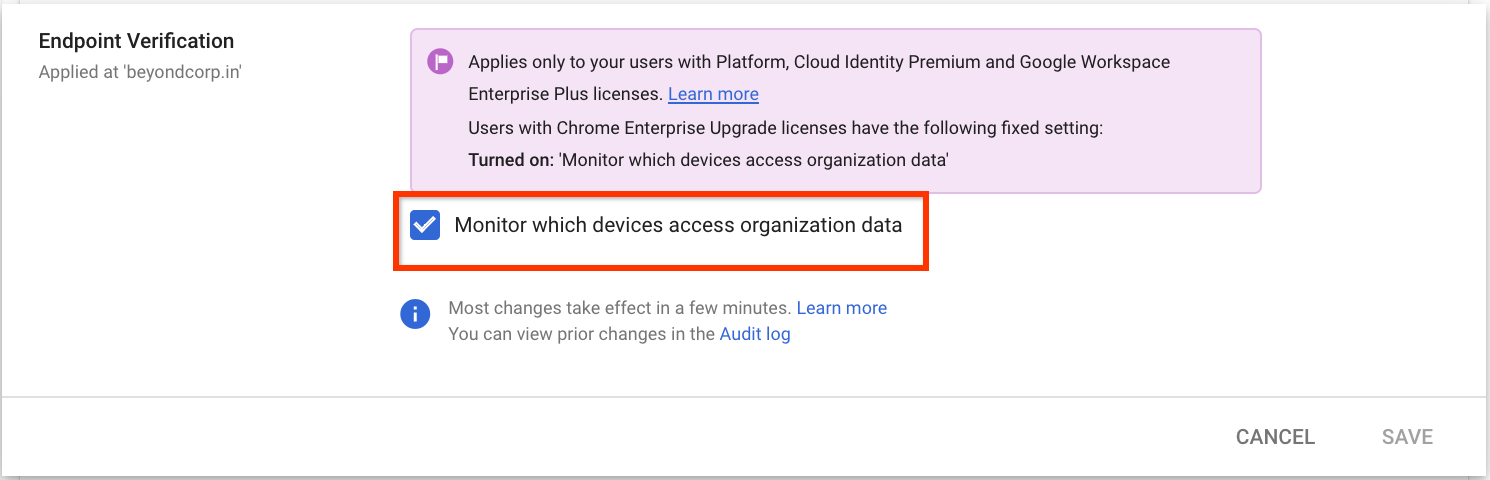
Para confirmar se a Validação de pontos finais está ativada, faça o seguinte:
Na página inicial da Consola do administrador, aceda a Dispositivos.
No menu de navegação, clique em Dispositivos móveis e pontos finais > Definições > Definições universais.
Clique em Acesso aos dados > Validação de pontos finais.
No painel Unidades organizacionais, selecione a sua unidade organizacional.
Certifique-se de que a caixa de verificação Monitorizar os dispositivos com acesso aos dados da organização
está selecionada.
Clique em Guardar. Se configurou uma unidade organizacional secundária, pode
conseguir herdar ou substituir as definições de uma unidade organizacional principal.
Instale a validação de pontos finais nos seus dispositivos
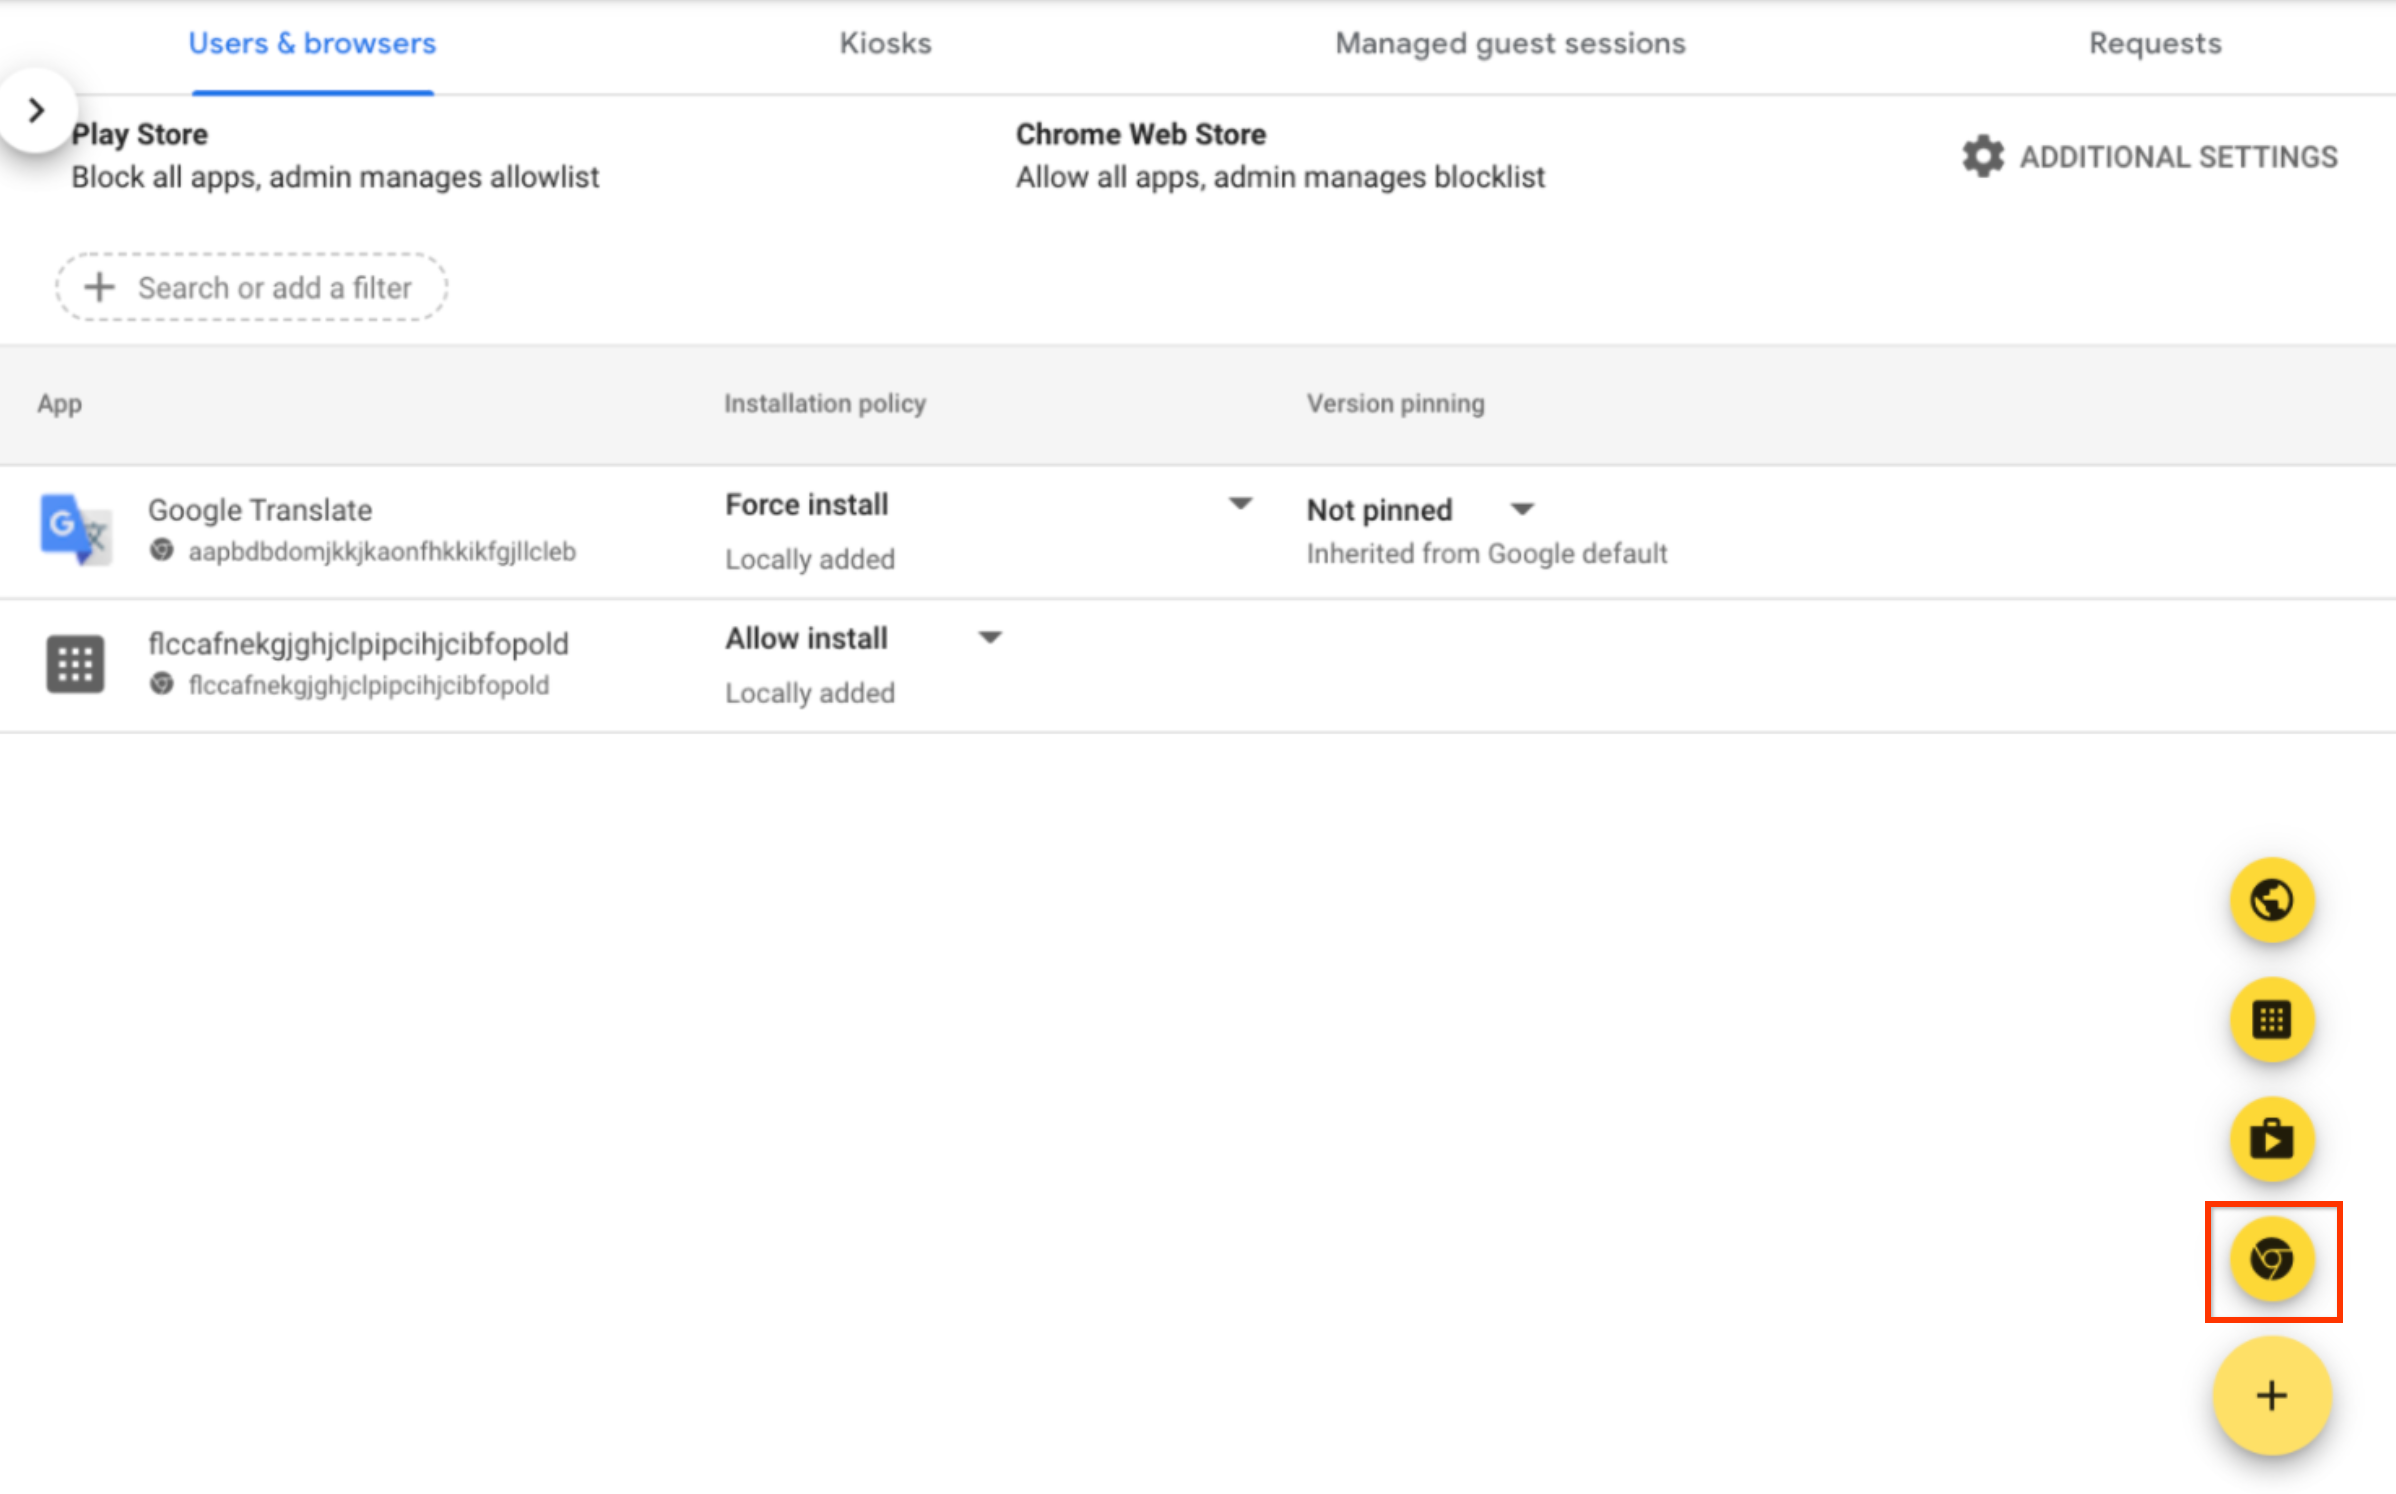
Na página inicial da Consola do administrador, aceda a Dispositivos.
No menu de navegação, clique em Chrome > Apps e extensões > Utilizadores e navegadores.
No painel Unidades organizacionais, selecione a unidade organizacional para a qual quer instalar a extensão de validação de pontos finais.
Mantenha o ponteiro sobre Adicionar e clique em Adicionar a partir da Web Store do Chrome.
No campo Pesquisar na loja, introduza Validação de pontos finais.
Clique em Validação de pontos finais e, de seguida, em Selecionar.
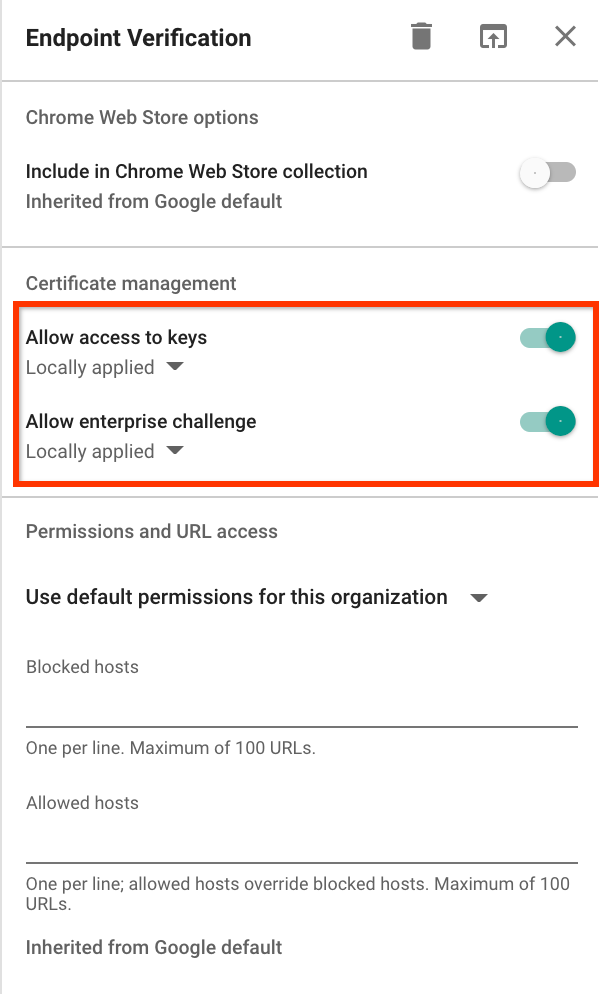
Na caixa de diálogo Validação de pontos finais, certifique-se de que as opções Permitir acesso às chaves
e Permitir desafio empresarial estão ativadas.
Permitir acesso às chaves: permite que a extensão de validação de pontos finais aceda aos
certificados de cliente e às chaves no ChromeOS.
Permitir desafio empresarial: permite que a extensão de validação de pontos finais use a funcionalidade de acesso validado no ChromeOS. Para mais informações, consulte o artigo Vista geral do acesso validado do Chrome.
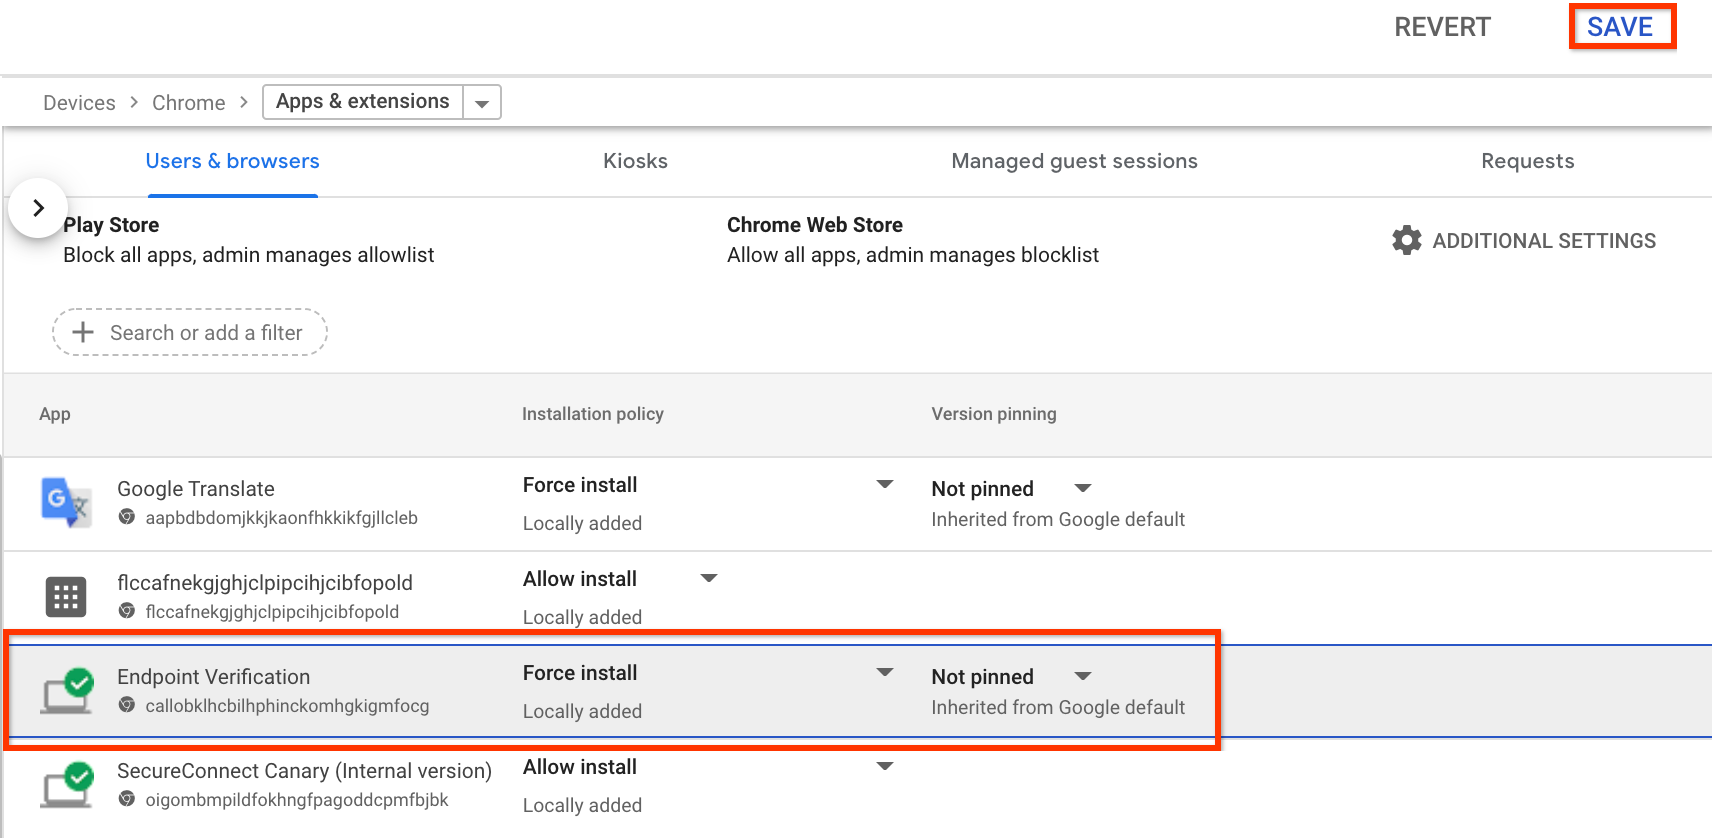
Clique no menu pendente Política de instalação para a validação de pontos finais e selecione
Forçar instalação.
Clique em Guardar.
Instale a app auxiliar da validação de pontos finais
Se quiser realizar qualquer uma das seguintes tarefas, instale a app auxiliar
de validação de pontos finais na sua unidade organizacional:
Recolher atributos do dispositivo dos dispositivos que estão a usar a versão M92 ou anterior do Chrome.
Para instalar a app auxiliar, pode usar as ferramentas de gestão de dispositivos, como o Jamf em dispositivos Apple Mac e o Active Directory em dispositivos Microsoft Windows.
Monte o ficheiro helper.dmg e extraia EndpointVerification.pkg.
Para implementar o EndpointVerification.pkg, siga as instruções em Implementar pacotes Mac.
Depois de a app aparecer na página Apps, está pronta para implementação com o Blueprint.
[[["Fácil de entender","easyToUnderstand","thumb-up"],["Meu problema foi resolvido","solvedMyProblem","thumb-up"],["Outro","otherUp","thumb-up"]],[["Difícil de entender","hardToUnderstand","thumb-down"],["Informações incorretas ou exemplo de código","incorrectInformationOrSampleCode","thumb-down"],["Não contém as informações/amostras de que eu preciso","missingTheInformationSamplesINeed","thumb-down"],["Problema na tradução","translationIssue","thumb-down"],["Outro","otherDown","thumb-down"]],["Última atualização 2025-08-21 UTC."],[[["\u003cp\u003eAdministrators can deploy Endpoint Verification to monitor the security posture of devices within their organization via the Google Admin console.\u003c/p\u003e\n"],["\u003cp\u003eDeploying Endpoint Verification involves turning on the feature, installing it on devices, and optionally installing the helper app for specific device types or advanced features.\u003c/p\u003e\n"],["\u003cp\u003eEndpoint Verification supports devices running ChromeOS, macOS, Windows 10 & 11, and Linux (Debian & Ubuntu), using Chrome 110 or later.\u003c/p\u003e\n"],["\u003cp\u003eThe helper app is necessary for tasks like integrating with Chrome Enterprise Premium, CrowdStrike Falcon ZTA, certificate-based access for Google Cloud resources, or collecting device attributes on older versions of Chrome.\u003c/p\u003e\n"],["\u003cp\u003eEndpoint verification can be force installed through the chrome web store by an administrator.\u003c/p\u003e\n"]]],[],null,["# Deploy Endpoint Verification\n\nThis document shows how administrators can deploy Endpoint Verification to their\norganization to assess and monitor the security posture of the devices in\ntheir organization. As an administrator, you deploy Endpoint Verification from the\nGoogle Admin console.\n\nFor more information about Endpoint Verification, see\n[Endpoint Verification overview](/endpoint-verification/docs/overview).\n\nTo deploy Endpoint Verification, you complete the following process:\n\n1. Turn on Endpoint Verification.\n2. Install Endpoint Verification on your devices.\n3. If required for your device type, install the Endpoint Verification helper app.\n\nBefore you begin\n----------------\n\n\n1. You must have a Google Workspace administrator account with the [Service Settings](https://support.google.com/a/answer/1219251) privilege.\n2. Log in to the **Google Admin console** by using your Google Workspace\n administrator account.\n\n [Log in to Google Admin console](https://admin.google.com/ac/devices/list)\n3. You must have an organization unit with at least one device running one of the following operating systems:\n\n - ChromeOS\n - Apple® Mac® OS X® El Capitan (10.11) or later\n - Microsoft® Windows® 10 and 11\n - Linux® Debian® and Ubuntu®\n4. You must use Chrome 110 or later. While you can install Endpoint Verification on any Chromium-based browser, it's supported only on Chrome browser.\n\n\u003cbr /\u003e\n\n\nTurn on Endpoint Verification\n-----------------------------\n\nTo collect information about the devices accessing the resources of your organization,\nEndpoint Verification must be turned on for your organizational unit. By default, Endpoint Verification\nis turned on.\n\nTo confirm if Endpoint Verification is turned on, do the following:\n\n1. From the Admin console Home page, go to **Devices**.\n\n [Go to Devices](https://admin.google.com/ac/devices/list)\n2. In the navigation menu, click **Mobile \\& endpoints \\\u003e Settings \\\u003e Universal settings**.\n3. Click **Data Access \\\u003e Endpoint Verification**.\n4. From the **Organizational Units** pane, select your organization unit.\n5. Ensure that the **Monitor which devices access organization data** checkbox is selected.\n6. Click **Save**. If you configured a child organizational unit, you might be able to inherit or override the settings of a parent organizational unit.\n\n\u003cbr /\u003e\n\n\nInstall Endpoint Verification on your devices\n---------------------------------------------\n\n1. From the Admin console Home page, go to **Devices**.\n\n [Go to Devices](https://admin.google.com/ac/devices/list)\n2. In the navigation menu, click **Chrome \\\u003e Apps \\& extensions \\\u003e Users \\& browsers**.\n3. From the **Organizational Units** pane, select your organization unit for which you want to install the Endpoint Verification extension.\n4. Hold the pointer over **Add** , and click **Add from Chrome Web Store**.\n\n5. In the **Search the store** field, enter **Endpoint Verification**.\n6. Click **Endpoint Verification** and then click **Select**.\n7. In the **Endpoint Verification** dialog, ensure that **Allow access to keys** and **Allow enterprise challenge** are enabled.\n - **Allow access to keys**: allows the Endpoint Verification extension to access client certificates and keys on ChromeOS.\n - **Allow enterprise challenge** : allows the Endpoint Verification extension to use the Verified Access feature on ChromeOS. For more information, see [Chrome Verified Access Overview](https://developers.google.com/chrome/verified-access/overview).\n\n8. Click the **Installation policy** drop-down for Endpoint Verification, and select\n **Force install**.\n\n9. Click **Save**.\n\n\u003cbr /\u003e\n\nInstall the Endpoint Verification helper app\n--------------------------------------------\n\nIf you want to do any of the following tasks, install the Endpoint Verification\nhelper app on your organizational unit:\n\n- [Set up Chrome Enterprise Premium and CrowdStrike Falcon Zero Trust Assessment (Falcon ZTA) integration](/chrome-enterprise-premium/docs/setting-up-cs).\n- [Set up certificate-based access for Google Cloud resources](/chrome-enterprise-premium/docs/securing-resources-with-certificate-based-access).\n- Collect device attributes from the devices that are using Chrome version M92 or earlier.\n\nTo install the helper app, you can use the device management tools such as\nJamf on Apple Mac devices and Active Directory on Microsoft Windows devices. \n\n### Jamf\n\n1. [Download the `helper.dmg`](https://dl.google.com/dl/secureconnect/install/mac/EndpointVerification.dmg) file.\n2. Mount the `helper.dmg` file and extract `EndpointVerification.pkg`.\n3. To deploy `EndpointVerification.pkg`, follow the instructions in [Deploying Mac Packages](https://docs.jamf.com/jamf-now/documentation/Deploying_Mac_Packages.html). After the app appears in the **Apps** page, it's ready for deployment with Blueprint.\n4. To deploy the app to all devices, follow the instructions in [Deploying an App to All Devices in a Blueprint](https://docs.jamf.com/jamf-now/documentation/Deploying_an_App_to_All_Devices_in_a_Blueprint.html).\n\n### Active Directory\n\n1. [Download the `EndpointVerification.msi`](https://dl.google.com/dl/secureconnect/install/win/EndpointVerification_admin.msi) file and use this file when creating a distribution point.\n2. Follow the instructions in [Use Group Policy to remotely install software](https://docs.microsoft.com/en-us/troubleshoot/windows-server/group-policy/use-group-policy-to-install-software).\n\nWhat's next\n-----------\n\n- [Monitor device inventory](/endpoint-verification/docs/view-inventory)\n- [Create device-based access levels](/endpoint-verification/docs/creating-device-access-level)"]]