이 주제에서는 민감한 정보 보호 검사 작업을 만드는 방법과 작업 트리거를 만들어 반복 검사 작업을 예약하는 방법을 자세히 설명합니다. Sensitive Data Protection UI를 사용하여 새 작업 트리거를 만드는 방법을 빠르게 둘러보려면 빠른 시작: 민감한 정보 보호 작업 트리거 만들기를 참고하세요.
검사 작업 및 작업 트리거 정보
민감한 정보 보호가 민감한 정보를 식별하는 검사 스캔을 수행할 때 각 스캔은 작업으로 실행됩니다. 민감한 정보 보호는 사용자가 Google Cloud Cloud Storage 버킷, BigQuery 테이블, Datastore 종류, 외부 데이터를 비롯한 스토리지 저장소의 검사를 명령할 때마다 작업 리소스를 만들고 실행합니다.
작업 트리거를 만들어 민감한 정보 보호 검사 스캔 작업을 예약합니다. 작업 트리거는 주기적으로 민감한 정보 보호 작업 생성을 자동화하며 요청 시 실행될 수도 있습니다.
민감한 정보 보호의 작업 및 작업 트리거에 대한 자세한 내용은 작업 및 작업 트리거 개념 페이지를 참조하세요.
새 검사 작업 만들기
새 민감한 정보 보호 검사 작업을 만들려면 다음 안내를 따르세요.
콘솔
Google Cloud 콘솔의 민감한 정보 보호 섹션에서 작업 또는 작업 트리거 만들기 페이지로 이동합니다.
작업 또는 작업 트리거 만들기 페이지는 다음 섹션으로 구성되어 있습니다.
입력 데이터 선택
이름
작업의 이름을 입력합니다. 문자, 숫자, 하이픈을 사용할 수 있습니다. 작업 이름 지정은 선택사항입니다. 이름을 입력하지 않으면 Sensitive Data Protection이 작업에 고유 번호 식별자를 부여합니다.
위치
스토리지 유형 메뉴에서 스캔할 데이터를 저장할 저장소 종류를 선택합니다.
- Cloud Storage: 스캔할 버킷의 URL을 입력하거나 위치 유형 메뉴에서 포함/제외를 선택한 다음 찾아보기를 클릭하여 스캔할 버킷 또는 하위 폴더로 이동합니다. 재귀적으로 폴더 스캔 체크박스를 선택하여 지정된 디렉터리와 포함된 모든 디렉터리를 스캔합니다. 지정된 디렉터리만 스캔하고 포함된 하위 디렉터리는 스캔하지 않으려면 이 체크박스를 선택하지 마세요.
- BigQuery: 스캔할 프로젝트, 데이터 세트, 테이블의 식별자를 입력하세요.
- Datastore: 스캔할 프로젝트, 네임스페이스(선택사항), 종류의 식별자를 입력하세요.
- 하이브리드: 필수 라벨, 선택적 라벨, 테이블 형식 데이터 처리 옵션을 추가할 수 있습니다. 자세한 내용은 제공할 수 있는 메타데이터 유형을 참조하세요.
샘플링
샘플링은 데이터가 매우 많은 경우 리소스를 절약할 수 있는 선택적인 방법입니다.
샘플링에서는 선택된 데이터를 모두 스캔할지 아니면 특정 비율을 지정하여 데이터를 일부만 스캔할지 선택할 수 있습니다. 샘플링은 스캔하는 스토리지 저장소 유형에 따라 다르게 작동합니다.
- BigQuery의 경우에는 스캔에 포함하도록 지정한 파일 비율에 따라 선택된 전체 행의 일부를 샘플링할 수 있습니다.
- Cloud Storage의 경우 파일별로 스캔할 최대 바이트 크기에 지정된 크기를 초과하는 파일이 있으면, 민감한 정보 보호가 최대 파일 크기까지만 파일을 스캔하고, 다음 파일로 이동합니다.
샘플링을 사용하려면 첫 번째 메뉴에서 다음 옵션 중 하나를 선택합니다.
- 위에서부터 샘플링 시작: Sensitive Data Protection이 데이터의 시작 부분에서 부분 스캔을 시작합니다. BigQuery의 경우 첫 번째 행에서 스캔을 시작합니다. Cloud Storage의 경우 각 파일의 시작 부분에서 스캔을 시작하고, 민감한 정보 보호가 지정된 최대 파일 크기까지 스캔했으면 스캔을 중지합니다.
- 임의 위치에서 샘플링 시작: Sensitive Data Protection이 데이터 내의 무작위 위치에서 부분 스캔을 시작합니다. BigQuery의 경우 무작위 행에서 스캔을 시작합니다. Cloud Storage의 경우 이 설정은 지정된 최대 크기를 초과하는 파일에만 적용됩니다. 민감한 정보 보호는 전체 파일 중에서 최대 파일 크기 미만의 파일을 스캔하고, 최대 파일 크기 이상의 파일은 최대값까지만 스캔합니다.
부분 스캔을 수행하려면 스캔하려는 데이터의 비율도 선택해야 합니다. 슬라이더를 사용하여 비율을 설정하세요.
또한 날짜를 기준으로 스캔할 파일 또는 레코드 범위를 좁힐 수 있습니다. 자세한 내용은 이 주제 뒷부분에 있는 일정을 참조하세요.
고급 구성
Cloud Storage 버킷 또는 BigQuery 테이블 스캔을 위한 작업을 만들 때 고급 구성을 지정하여 검색 범위를 좁힐 수 있습니다. 구성 가능한 옵션은 다음과 같습니다.
- 파일(Cloud Storage만 해당): 텍스트, 바이너리, 이미지 파일이 포함된 스캔 대상 파일 유형입니다.
- 식별 필드(BigQuery만 해당): 테이블 내의 고유한 행 식별자입니다.
- Cloud Storage의 경우 파일별로 스캔할 최대 바이트 크기에 지정된 크기를 초과하는 파일이 있으면, 민감한 정보 보호가 최대 파일 크기까지만 파일을 스캔하고, 다음 파일로 이동합니다.
샘플링을 사용하려면 스캔할 데이터의 비율을 선택합니다. 슬라이더를 사용하여 비율을 설정하세요. 그런 다음 첫 번째 메뉴에서 다음 옵션 중 하나를 선택합니다.
- 위에서부터 샘플링 시작: Sensitive Data Protection이 데이터의 시작 부분에서 부분 스캔을 시작합니다. BigQuery의 경우 첫 번째 행에서 스캔을 시작합니다. Cloud Storage의 경우 각 파일의 시작 부분에서 스캔을 시작하고, 민감한 정보 보호가 지정된 최대 파일 크기(위 참조)까지 스캔했으면 스캔을 중지합니다.
- 임의 위치에서 샘플링 시작: Sensitive Data Protection이 데이터 내의 무작위 위치에서 부분 스캔을 시작합니다. BigQuery의 경우 무작위 행에서 스캔을 시작합니다. Cloud Storage의 경우 이 설정은 지정된 최대 크기를 초과하는 파일에만 적용됩니다. 민감한 정보 보호는 전체 파일 중에서 최대 파일 크기 미만의 파일을 스캔하고, 최대 파일 크기 이상의 파일은 최댓값까지만 스캔합니다.
파일
Cloud Storage에 저장된 파일의 경우, 파일에서 스캔에 포함할 유형을 지정할 수 있습니다.
바이너리, 텍스트, 이미지, CSV, TSV, Microsoft Word, Microsoft Excel, Microsoft PowerPoint, PDF, Apache Avro 파일 중에서 선택할 수 있습니다. Cloud DLP가 Cloud Storage 버킷에서 스캔할 수 있는 파일 확장자의 전체 목록은 FileType을 참고하세요.
바이너리를 선택하면 민감한 정보 보호가 인식되지 않는 유형의 파일을 스캔합니다.
식별 필드
BigQuery 테이블의 경우 식별 필드 필드에서 결과에 테이블의 기본 키 열 값을 포함하도록 민감한 정보 보호에 지시할 수 있습니다. 이렇게 하면 발견 항목을 발견 항목이 포함된 테이블 행에 다시 연결할 수 있습니다.
테이블 내 각 행을 고유하게 식별하는 열의 이름을 입력합니다. 필요한 경우 점 표기법을 사용하여 중첩된 필드를 지정합니다. 필드는 원하는 만큼 추가할 수 있습니다.
또한 BigQuery에 저장 작업을 사용 설정하여 BigQuery로 결과를 내보내야 합니다. 결과를 BigQuery로 내보내면 각 결과에 식별 필드의 각 값이 포함됩니다. 자세한 내용은 identifyingFields을 참조하세요.
감지 구성
감지 구성 섹션에서는 스캔할 민감한 정보 유형을 지정합니다. 이 섹션을 완료하는 것은 선택사항입니다. 이 섹션을 건너뛰면 민감한 정보 보호에서 infoType의 기본값 집합에 대한 데이터를 스캔합니다.
템플릿
선택적으로 민감한 정보 보호 템플릿을 사용하여 이전에 지정한 구성 정보를 재사용할 수 있습니다.
사용할 템플릿을 이미 만든 경우 템플릿 이름 필드를 클릭하여 기존 검사 템플릿 목록을 확인합니다. 사용하려는 템플릿 이름을 선택하거나 입력합니다.
템플릿 만들기에 대한 자세한 내용은 민감한 정보 보호 검사 템플릿 만들기를 참고하세요.
InfoType
InfoType 감지기는 특정 유형의 민감한 정보를 찾습니다. 예를 들어 민감한 정보 보호에 기본 제공되는 US_SOCIAL_SECURITY_NUMBER infoType 감지기는 미국 사회 보장 번호를 찾습니다. 기본 제공 infoType 감지기 외에 자체 커스텀 infoType 감지기도 만들 수 있습니다.
InfoTypes에서 스캔할 데이터 유형에 해당하는 infoType 감지기를 선택합니다. 이 섹션을 비워 두지 않는 것이 좋습니다. 이렇게 하면 Sensitive Data Protection이 필요하지 않은 infoType이 포함될 수 있는 기본 infoType 집합으로 데이터를 스캔합니다. 각 감지기에 대한 자세한 내용은 InfoType 감지기 참조를 참고하세요.
이 섹션에서 기본 제공 및 맞춤 infoType을 관리하는 방법에 관한 자세한 내용은 Google Cloud 콘솔을 통해 infoType 관리를 참고하세요.
검사 규칙 세트
검사 규칙 집합을 사용하면 컨텍스트 규칙에 따라 기본 제공 및 커스텀 infoType 감지기를 맞춤설정할 수 있습니다. 검사 규칙의 두 가지 유형은 다음과 같습니다.
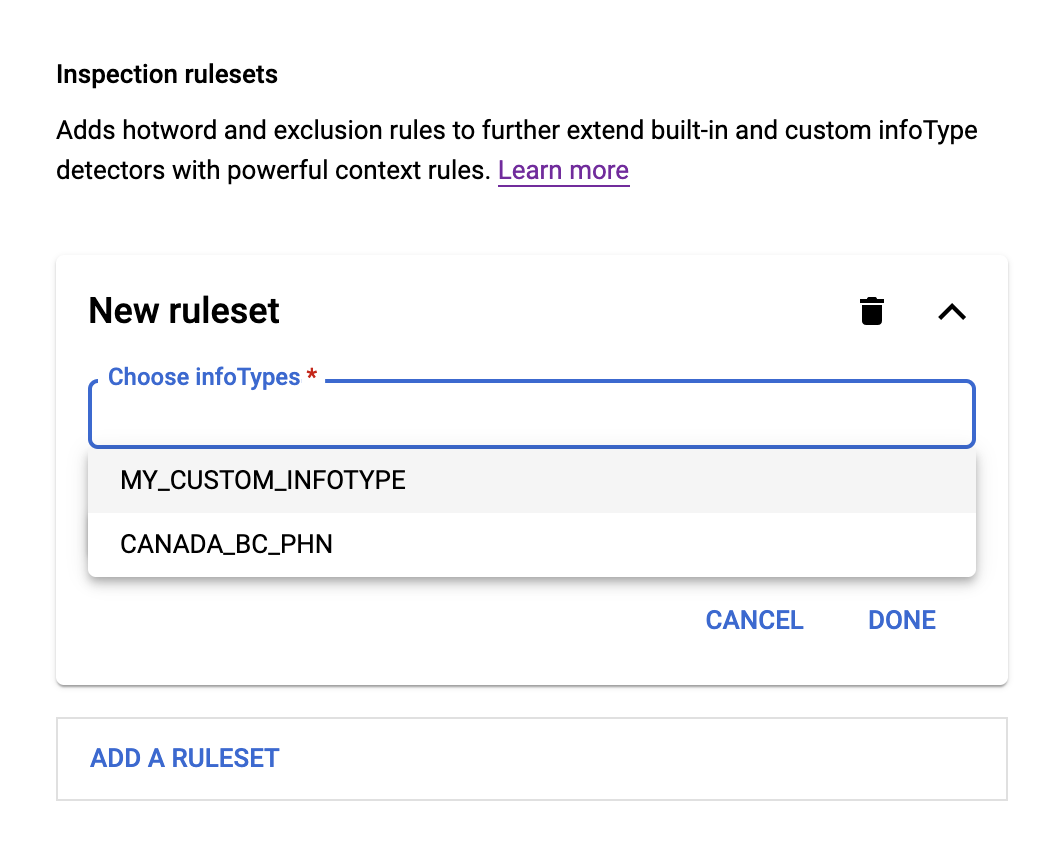
새 규칙 세트를 추가하려면 먼저 InfoTypes 섹션에서 기본 제공 또는 커스텀 infoType 감지기를 하나 이상 지정합니다. 규칙 집합에서 수정할 infoType 감지기입니다. 그런 후 다음 작업을 수행합니다.
- Choose infoTypes(infoType 선택) 필드를 클릭합니다. 이전에 지정한 infoType이 메뉴의 필드 아래에 표시됩니다(예: 아래 그림 참고).
- 메뉴에서 infoType을 선택한 다음 규칙 추가를 클릭합니다. 핫워드 규칙 및 제외 규칙이라는 두 가지 옵션이 있는 메뉴가 표시됩니다.
핫워드 규칙의 경우 핫워드 규칙을 선택합니다. 그런 후 다음 작업을 수행합니다.
- 핫워드 필드에 Sensitive Data Protection에서 찾아야 하는 정규 표현식을 입력합니다.
- 핫워드 근접성 메뉴에서 입력한 핫워드가 선택한 infoType 앞에 있는지 아니면 뒤에 있는지 선택합니다.
- infoType과의 핫워드 간격에 핫워드와 선택한 infoType 사이의 대략적인 글자 수를 입력합니다.
- 신뢰도 수준 조정에서 일치 항목에 고정된 가능성 수준을 할당할지 또는 기본 가능성 수준을 일정 금액만큼 늘리거나 줄일지 선택합니다.
제외 규칙의 경우 제외 규칙을 선택합니다. 그런 후 다음 작업을 수행합니다.
- 제외 필드에 Sensitive Data Protection에서 찾아야 하는 정규 표현식 (정규식)을 입력합니다.
- 일치 유형 메뉴에서 다음 중 하나를 선택합니다.
- 전체 일치: 발견 항목이 정규식과 완전히 일치해야 합니다.
- 부분 일치: 발견 항목의 하위 문자열이 정규식과 일치할 수 있습니다.
- 역검색: 검색 결과가 정규식과 일치하지 않습니다.
핫워드 또는 제외 규칙 및 규칙 세트를 추가하여 검사 결과를 더욱 세분화할 수 있습니다.
신뢰도 기준
Sensitive Data Protection에서 민감한 정보의 잠재적인 일치 항목을 감지할 때마다 일치 항목에 '가능성 거의 없음'부터 '가능성 매우 높음'까지 가능성 값을 할당합니다. 여기에서 가능성 값을 설정하면 Sensitive Data Protection은 해당 가능성 값 이상에 해당하는 데이터만 일치하도록 지정합니다.
기본값인 '가능성 있음'은 대부분의 용도에 적합합니다. 일반적으로 결과가 너무 많이 검색되면 슬라이더를 위로 이동합니다. 일치 항목 결과가 너무 적으면 슬라이더를 아래로 이동합니다.
완료되었으면 계속을 클릭합니다.
작업 추가
작업 추가 단계에서 작업 완료 후 민감한 정보 보호를 수행할 작업을 하나 이상 선택합니다.
다음 작업을 구성할 수 있습니다.
BigQuery에 저장: 민감한 정보 보호 작업 결과를 BigQuery 테이블에 저장합니다. 결과를 보거나 분석하기 전에 먼저 작업이 완료되었는지 확인합니다.
스캔이 실행될 때마다 민감한 정보 보호는 스캔발견 항목을 지정된 BigQuery 테이블에 저장합니다. 내보낸 발견 항목에는 각 발견 항목의 위치 및 일치 가능성에 관한 세부정보가 포함됩니다. 각 발견 항목에 infoType 감지기와 일치하는 문자열을 포함하려면 인용 포함 옵션을 사용 설정하세요.
테이블 ID를 지정하지 않으면 스캔이 처음 실행될 때 BigQuery가 새 테이블에 기본 이름을 할당합니다. 기존 테이블을 지정하면 Sensitive Data Protection이 스캔 발견 항목을 테이블에 추가합니다.
BigQuery에 발견 항목을 저장하지 않으면 발견 항목의 개수 및 infoType에 대한 통계만 스캔 결과에 포함됩니다.
데이터가 BigQuery 테이블에 기록되면 결제 및 할당량 사용량이 대상 테이블이 포함된 프로젝트에 적용됩니다.
Pub/Sub에 게시: 민감한 정보 보호 작업의 이름이 속성으로 포함된 알림을 Pub/Sub 채널에 게시합니다. 알림 메시지를 전송할 주제를 하나 이상 지정할 수 있습니다. 스캔 작업을 실행하는 민감한 정보 보호 서비스 계정에 주제에 대한 게시 액세스 권한이 있는지 확인합니다.
Security Command Center에 게시: 작업 결과 요약을 Security Command Center에 게시합니다. 자세한 내용은 Sensitive Data Protection 스캔 결과를 Security Command Center로 보내기를 참고하세요.
Dataplex에 게시: Google Cloud의 메타데이터 관리 서비스인 Dataplex로 작업 결과를 전송합니다.
이메일로 알림: 작업이 완료되면 이메일을 보냅니다. 이메일은 IAM 프로젝트 소유자 및 기술 필수 연락처로 전송됩니다.
Cloud Monitoring에 게시: Google Cloud 관측 가능성의 Cloud Monitoring에 검사 결과를 전송합니다.
익명화된 사본 만들기: 검사된 데이터의 발견 항목을 익명화하고 익명화된 콘텐츠를 새 파일에 작성합니다. 그러면 비즈니스 프로세스에서 민감한 정보가 포함된 데이터 대신 익명화된 사본을 사용할 수 있습니다. 자세한 내용은 Google Cloud 콘솔에서 민감한 정보 보호를 사용하여 Cloud Storage 데이터의 익명화된 사본 만들기를 참조하세요.
자세한 내용은 작업을 참조하세요.
작업 선택을 마쳤으면 계속을 클릭합니다.
검토
검토 섹션에는 방금 지정한 작업 설정이 JSON 형식으로 요약되어 있습니다.
만들기를 클릭하여 작업을 만들고(일정을 지정하지 않은 경우) 작업을 한 번 실행합니다. 상태 및 기타 정보가 포함된 작업 정보 페이지가 나타납니다. 작업이 현재 실행 중이면 취소 버튼을 클릭하여 작업을 중지할 수 있습니다. 삭제를 클릭하여 작업을 삭제할 수도 있습니다.
기본 Sensitive Data Protection 페이지로 돌아가려면 Google Cloud 콘솔에서 뒤로 화살표를 클릭합니다.
C#
Sensitive Data Protection의 클라이언트 라이브러리를 설치하고 사용하는 방법은 Sensitive Data Protection 클라이언트 라이브러리를 참조하세요.
Sensitive Data Protection에 인증하려면 애플리케이션 기본 사용자 인증 정보를 설정합니다. 자세한 내용은 로컬 개발 환경의 인증 설정을 참조하세요.
Go
민감한 정보 보호의 클라이언트 라이브러리를 설치하고 사용하는 방법은 민감한 정보 보호 클라이언트 라이브러리를 참조하세요.
Sensitive Data Protection에 인증하려면 애플리케이션 기본 사용자 인증 정보를 설정합니다. 자세한 내용은 로컬 개발 환경의 인증 설정을 참조하세요.
Java
민감한 정보 보호의 클라이언트 라이브러리를 설치하고 사용하는 방법은 민감한 정보 보호 클라이언트 라이브러리를 참조하세요.
Sensitive Data Protection에 인증하려면 애플리케이션 기본 사용자 인증 정보를 설정합니다. 자세한 내용은 로컬 개발 환경의 인증 설정을 참조하세요.
Node.js
민감한 정보 보호의 클라이언트 라이브러리를 설치하고 사용하는 방법은 민감한 정보 보호 클라이언트 라이브러리를 참조하세요.
Sensitive Data Protection에 인증하려면 애플리케이션 기본 사용자 인증 정보를 설정합니다. 자세한 내용은 로컬 개발 환경의 인증 설정을 참조하세요.
PHP
민감한 정보 보호의 클라이언트 라이브러리를 설치하고 사용하는 방법은 민감한 정보 보호 클라이언트 라이브러리를 참조하세요.
Sensitive Data Protection에 인증하려면 애플리케이션 기본 사용자 인증 정보를 설정합니다. 자세한 내용은 로컬 개발 환경의 인증 설정을 참조하세요.
Python
민감한 정보 보호의 클라이언트 라이브러리를 설치하고 사용하는 방법은 민감한 정보 보호 클라이언트 라이브러리를 참조하세요.
Sensitive Data Protection에 인증하려면 애플리케이션 기본 사용자 인증 정보를 설정합니다. 자세한 내용은 로컬 개발 환경의 인증 설정을 참조하세요.
REST
작업은 DLP API에서 DlpJobs 리소스로 표현됩니다. DlpJob 리소스의 projects.dlpJobs.create 메서드를 사용하여 새 작업을 만들 수 있습니다.
이 샘플 JSON은 지정된 민감한 정보 보호 REST 엔드포인트에 대한 POST 요청으로 전송할 수 있습니다. 이 JSON 예시는 민감한 정보 보호에서 작업을 만드는 방법을 보여줍니다. 작업은 Datastore 검사 스캔입니다.
아래에 포함된 API 탐색기를 사용하여 빠르게 시도해 볼 수 있습니다. API 탐색기에서 생성된 것이라도, 요청이 성공하면 작업이 생성됩니다. JSON을 사용하여 DLP API로 요청을 전송하는 데 대한 일반적인 정보는 JSON 빠른 시작을 참조하세요.
JSON 입력:
{
  "inspectJob": {
    "storageConfig": {
      "bigQueryOptions": {
        "tableReference": {
          "projectId": "bigquery-public-data",
          "datasetId": "san_francisco_sfpd_incidents",
          "tableId": "sfpd_incidents"
        }
      },
      "timespanConfig": {
        "startTime": "2020-01-01T00:00:01Z",
        "endTime": "2020-01-31T23:59:59Z",
        "timestampField": {
          "name": "timestamp"
        }
      }
    },
    "inspectConfig": {
      "infoTypes": [
        {
          "name": "PERSON_NAME"
        },
        {
          "name": "STREET_ADDRESS"
        }
      ],
      "excludeInfoTypes": false,
      "includeQuote": true,
      "minLikelihood": "LIKELY"
    },
    "actions": [
      {
        "saveFindings": {
          "outputConfig": {
            "table": {
              "projectId": "[PROJECT-ID]",
              "datasetId": "[DATASET-ID]"
            }
          }
        }
      }
    ]
  }
}
JSON 출력:
다음 출력은 작업이 성공적으로 만들어졌음을 나타냅니다.
{
  "name": "projects/[PROJECT-ID]/dlpJobs/[JOB-ID]",
  "type": "INSPECT_JOB",
  "state": "PENDING",
  "inspectDetails": {
    "requestedOptions": {
      "snapshotInspectTemplate": {},
      "jobConfig": {
        "storageConfig": {
          "bigQueryOptions": {
            "tableReference": {
              "projectId": "bigquery-public-data",
              "datasetId": "san_francisco_sfpd_incidents",
              "tableId": "sfpd_incidents"
            }
          },
          "timespanConfig": {
            "startTime": "2020-01-01T00:00:01Z",
            "endTime": "2020-01-31T23:59:59Z",
            "timestampField": {
              "name": "timestamp"
            }
          }
        },
        "inspectConfig": {
          "infoTypes": [
            {
              "name": "PERSON_NAME"
            },
            {
              "name": "STREET_ADDRESS"
            }
          ],
          "minLikelihood": "LIKELY",
          "limits": {},
          "includeQuote": true
        },
        "actions": [
          {
            "saveFindings": {
              "outputConfig": {
                "table": {
                  "projectId": "[PROJECT-ID]",
                  "datasetId": "[DATASET-ID]",
                  "tableId": "[TABLE-ID]"
                }
              }
            }
          }
        ]
      }
    },
    "result": {}
  },
  "createTime": "2020-07-10T07:26:33.643Z"
}
새 작업 트리거 만들기
새 민감한 정보 보호 작업 트리거를 만들려면 다음 단계를 따르세요.
콘솔
Google Cloud 콘솔의 민감한 정보 보호 섹션에서 작업 또는 작업 트리거 만들기 페이지로 이동합니다.
작업 또는 작업 트리거 만들기 페이지는 다음 섹션으로 구성되어 있습니다.
입력 데이터 선택
이름
작업 트리거의 이름을 입력합니다. 문자, 숫자, 하이픈을 사용할 수 있습니다. 작업 트리거 이름 지정은 선택사항입니다. 이름을 입력하지 않으면 Sensitive Data Protection이 작업 트리거에 고유 번호 식별자를 부여합니다.
위치
스토리지 유형 메뉴에서 스캔할 데이터를 저장할 저장소 종류를 선택합니다.
- Cloud Storage: 스캔할 버킷의 URL을 입력하거나 위치 유형 메뉴에서 포함/제외를 선택한 다음 찾아보기를 클릭하여 스캔할 버킷 또는 하위 폴더로 이동합니다. 재귀적으로 폴더 스캔 체크박스를 선택하여 지정된 디렉터리와 포함된 모든 디렉터리를 스캔합니다. 지정된 디렉터리만 스캔하고 포함된 하위 디렉터리는 스캔하지 않으려면 이 체크박스를 선택하지 마세요.
- BigQuery: 스캔할 프로젝트, 데이터 세트, 테이블의 식별자를 입력하세요.
- Datastore: 스캔할 프로젝트, 네임스페이스(선택사항), 종류의 식별자를 입력하세요.
샘플링
샘플링은 데이터가 매우 많은 경우 리소스를 절약할 수 있는 선택적인 방법입니다.
샘플링에서는 선택된 데이터를 모두 스캔할지 아니면 특정 비율을 지정하여 데이터를 일부만 스캔할지 선택할 수 있습니다. 샘플링은 스캔하는 스토리지 저장소 유형에 따라 다르게 작동합니다.
- BigQuery의 경우에는 스캔에 포함하도록 지정한 파일 비율에 따라 선택된 전체 행의 일부를 샘플링할 수 있습니다.
- Cloud Storage의 경우 파일별로 스캔할 최대 바이트 크기에 지정된 크기를 초과하는 파일이 있으면, 민감한 정보 보호가 최대 파일 크기까지만 파일을 스캔하고, 다음 파일로 이동합니다.
샘플링을 사용하려면 첫 번째 메뉴에서 다음 옵션 중 하나를 선택합니다.
- 위에서부터 샘플링 시작: Sensitive Data Protection이 데이터의 시작 부분에서 부분 스캔을 시작합니다. BigQuery의 경우 첫 번째 행에서 스캔을 시작합니다. Cloud Storage의 경우 각 파일의 시작 부분에서 스캔을 시작하고, 민감한 정보 보호가 지정된 최대 파일 크기(위 참조)까지 스캔했으면 스캔을 중지합니다.
- 임의 위치에서 샘플링 시작: Sensitive Data Protection이 데이터 내의 무작위 위치에서 부분 스캔을 시작합니다. BigQuery의 경우 무작위 행에서 스캔을 시작합니다. Cloud Storage의 경우 이 설정은 지정된 최대 크기를 초과하는 파일에만 적용됩니다. 민감한 정보 보호는 전체 파일 중에서 최대 파일 크기 미만의 파일을 스캔하고, 최대 파일 크기 이상의 파일은 최댓값까지만 스캔합니다.
부분 스캔을 수행하려면 스캔하려는 데이터의 비율도 선택해야 합니다. 슬라이더를 사용하여 비율을 설정하세요.
고급 구성
Cloud Storage 버킷 또는 BigQuery 테이블 스캔을 위한 작업 트리거를 만들 때 고급 구성을 지정하여 검색 범위를 좁힐 수 있습니다. 구성 가능한 옵션은 다음과 같습니다.
- 파일(Cloud Storage만 해당): 텍스트, 바이너리, 이미지 파일이 포함된 스캔 대상 파일 유형입니다.
- 식별 필드(BigQuery만 해당): 테이블 내의 고유한 행 식별자입니다.
- Cloud Storage의 경우 파일별로 스캔할 최대 바이트 크기에 지정된 크기를 초과하는 파일이 있으면, 민감한 정보 보호가 최대 파일 크기까지만 파일을 스캔하고, 다음 파일로 이동합니다.
샘플링을 사용하려면 스캔할 데이터의 비율을 선택합니다. 슬라이더를 사용하여 비율을 설정하세요. 그런 다음 첫 번째 메뉴에서 다음 옵션 중 하나를 선택합니다.
- 위에서부터 샘플링 시작: Sensitive Data Protection이 데이터의 시작 부분에서 부분 스캔을 시작합니다. BigQuery의 경우 첫 번째 행에서 스캔을 시작합니다. Cloud Storage의 경우 각 파일의 시작 부분에서 스캔을 시작하고, 민감한 정보 보호가 지정된 최대 파일 크기(위 참조)까지 스캔했으면 스캔을 중지합니다.
- 임의 위치에서 샘플링 시작: Sensitive Data Protection이 데이터 내의 무작위 위치에서 부분 스캔을 시작합니다. BigQuery의 경우 무작위 행에서 스캔을 시작합니다. Cloud Storage의 경우 이 설정은 지정된 최대 크기를 초과하는 파일에만 적용됩니다. 민감한 정보 보호는 전체 파일 중에서 최대 파일 크기 미만의 파일을 스캔하고, 최대 파일 크기 이상의 파일은 최대값까지만 스캔합니다.
파일
Cloud Storage에 저장된 파일의 경우, 파일에서 스캔에 포함할 유형을 지정할 수 있습니다.
바이너리, 텍스트, 이미지, Microsoft Word, Microsoft Excel, Microsoft PowerPoint, PDF, Apache Avro 파일 중에서 선택할 수 있습니다. Cloud DLP가 Cloud Storage 버킷에서 스캔할 수 있는 파일 확장자의 전체 목록은 FileType을 참조하세요.
바이너리를 선택하면 민감한 정보 보호가 인식되지 않는 유형의 파일을 스캔합니다.
식별 필드
BigQuery 테이블의 경우 식별 필드 필드에서 결과에 테이블의 기본 키 열 값을 포함하도록 민감한 정보 보호에 지시할 수 있습니다. 이렇게 하면 발견 항목을 발견 항목이 포함된 테이블 행에 다시 연결할 수 있습니다.
테이블 내 각 행을 고유하게 식별하는 열의 이름을 입력합니다. 필요한 경우 점 표기법을 사용하여 중첩된 필드를 지정합니다. 필드는 원하는 만큼 추가할 수 있습니다.
또한 BigQuery에 저장 작업을 사용 설정하여 BigQuery로 결과를 내보내야 합니다. 결과를 BigQuery로 내보내면 각 결과에 식별 필드의 각 값이 포함됩니다. 자세한 내용은 identifyingFields을 참조하세요.
감지 구성
감지 구성 섹션에서는 스캔할 민감한 정보 유형을 지정합니다. 이 섹션을 완료하는 것은 선택사항입니다. 이 섹션을 건너뛰면 민감한 정보 보호에서 infoType의 기본값 집합에 대한 데이터를 스캔합니다.
템플릿
선택적으로 민감한 정보 보호 템플릿을 사용하여 이전에 지정한 구성 정보를 재사용할 수 있습니다.
사용할 템플릿을 이미 만든 경우 템플릿 이름 필드를 클릭하여 기존 검사 템플릿 목록을 확인합니다. 사용하려는 템플릿 이름을 선택하거나 입력합니다.
템플릿 만들기에 대한 자세한 내용은 민감한 정보 보호 검사 템플릿 만들기를 참고하세요.
InfoType
InfoType 감지기는 특정 유형의 민감한 정보를 찾습니다. 예를 들어 민감한 정보 보호에 기본 제공되는 US_SOCIAL_SECURITY_NUMBER infoType 감지기는 미국 사회 보장 번호를 찾습니다. 기본 제공 infoType 감지기 외에 고유 한 커스텀 infoType 감지기도 만들 수 있습니다.
InfoTypes에서 스캔할 데이터 유형에 해당하는 infoType 감지기를 선택합니다. 또한 모든 기본 infoType을 스캔하려면 이 필드를 비워둘 수 있습니다. 각 감지기에 대한 자세한 내용은 InfoType 감지기 참조를 확인하세요.
또한 커스텀 infoType 섹션에 커스텀 infoType 감지기를 추가하고 검사 규칙 세트 섹션에서 기본 제공 infoType 감지기와 커스텀 infoType 감지기를 모두 맞춤설정할 수 있습니다.
커스텀 infoType
검사 규칙 세트
검사 규칙 집합을 사용하면 컨텍스트 규칙에 따라 기본 제공 및 커스텀 infoType 감지기를 맞춤설정할 수 있습니다. 검사 규칙의 두 가지 유형은 다음과 같습니다.
새 규칙 세트를 추가하려면 먼저 InfoTypes 섹션에서 기본 제공 또는 커스텀 infoType 감지기를 하나 이상 지정합니다. 규칙 집합에서 수정할 infoType 감지기입니다. 그런 후 다음 작업을 수행합니다.
- Choose infoTypes(infoType 선택) 필드를 클릭합니다. 이전에 지정한 infoType이 메뉴의 필드 아래에 표시됩니다(예: 아래 그림 참고).
- 메뉴에서 infoType을 선택한 다음 규칙 추가를 클릭합니다. 핫워드 규칙 및 제외 규칙이라는 두 가지 옵션이 있는 메뉴가 표시됩니다.
핫워드 규칙의 경우 핫워드 규칙을 선택합니다. 그런 후 다음 작업을 수행합니다.
- 핫워드 필드에 Sensitive Data Protection에서 찾아야 하는 정규 표현식을 입력합니다.
- 핫워드 근접성 메뉴에서 입력한 핫워드가 선택한 infoType 앞에 있는지 아니면 뒤에 있는지 선택합니다.
- infoType과의 핫워드 간격에 핫워드와 선택한 infoType 사이의 대략적인 글자 수를 입력합니다.
- 신뢰도 수준 조정에서 일치 항목에 고정된 가능성 수준을 할당할지 또는 기본 가능성 수준을 일정 금액만큼 늘리거나 줄일지 선택합니다.
제외 규칙의 경우 제외 규칙을 선택합니다. 그런 후 다음 작업을 수행합니다.
- 제외 필드에 Sensitive Data Protection에서 찾아야 하는 정규 표현식 (정규식)을 입력합니다.
- 일치 유형 메뉴에서 다음 중 하나를 선택합니다.
- 전체 일치: 발견 항목이 정규식과 완전히 일치해야 합니다.
- 부분 일치: 발견 항목의 하위 문자열이 정규식과 일치할 수 있습니다.
- 역검색: 검색 결과가 정규식과 일치하지 않습니다.
핫워드 또는 제외 규칙 및 규칙 세트를 추가하여 검사 결과를 더욱 세분화할 수 있습니다.
신뢰도 기준
Sensitive Data Protection에서 민감한 정보의 잠재적인 일치 항목을 감지할 때마다 일치 항목에 '가능성 거의 없음'부터 '가능성 매우 높음'까지 가능성 값을 할당합니다. 여기에서 가능성 값을 설정하면 Sensitive Data Protection은 해당 가능성 값 이상에 해당하는 데이터만 일치하도록 지정합니다.
기본값인 '가능성 있음'은 대부분의 용도에 적합합니다. 일반적으로 결과가 너무 많이 검색되면 슬라이더를 위로 이동합니다. 일치 항목 결과가 너무 적으면 슬라이더를 아래로 이동합니다.
완료되었으면 계속을 클릭합니다.
작업 추가
작업 추가 단계에서 작업 완료 후 민감한 정보 보호를 수행할 작업을 하나 이상 선택합니다.
다음 작업을 구성할 수 있습니다.
BigQuery에 저장: 민감한 정보 보호 작업 결과를 BigQuery 테이블에 저장합니다. 결과를 보거나 분석하기 전에 먼저 작업이 완료되었는지 확인합니다.
스캔이 실행될 때마다 민감한 정보 보호는 스캔발견 항목을 지정된 BigQuery 테이블에 저장합니다. 내보낸 발견 항목에는 각 발견 항목의 위치 및 일치 가능성에 관한 세부정보가 포함됩니다. 각 발견 항목에 infoType 감지기와 일치하는 문자열을 포함하려면 인용 포함 옵션을 사용 설정하세요.
테이블 ID를 지정하지 않으면 스캔이 처음 실행될 때 BigQuery가 새 테이블에 기본 이름을 할당합니다. 기존 테이블을 지정하면 Sensitive Data Protection이 스캔 발견 항목을 테이블에 추가합니다.
BigQuery에 발견 항목을 저장하지 않으면 발견 항목의 개수 및 infoType에 대한 통계만 스캔 결과에 포함됩니다.
데이터가 BigQuery 테이블에 기록되면 결제 및 할당량 사용량이 대상 테이블이 포함된 프로젝트에 적용됩니다.
Pub/Sub에 게시: 민감한 정보 보호 작업의 이름이 속성으로 포함된 알림을 Pub/Sub 채널에 게시합니다. 알림 메시지를 전송할 주제를 하나 이상 지정할 수 있습니다. 스캔 작업을 실행하는 민감한 정보 보호 서비스 계정에 주제에 대한 게시 액세스 권한이 있는지 확인합니다.
Security Command Center에 게시: 작업 결과 요약을 Security Command Center에 게시합니다. 자세한 내용은 Sensitive Data Protection 스캔 결과를 Security Command Center로 보내기를 참고하세요.
Dataplex에 게시: Google Cloud의 메타데이터 관리 서비스인 Dataplex로 작업 결과를 전송합니다.
이메일로 알림: 작업이 완료되면 이메일을 보냅니다. 이메일은 IAM 프로젝트 소유자 및 기술 필수 연락처로 전송됩니다.
Cloud Monitoring에 게시: Google Cloud 관측 가능성의 Cloud Monitoring에 검사 결과를 전송합니다.
익명화된 사본 만들기: 검사된 데이터의 발견 항목을 익명화하고 익명화된 콘텐츠를 새 파일에 작성합니다. 그러면 비즈니스 프로세스에서 민감한 정보가 포함된 데이터 대신 익명화된 사본을 사용할 수 있습니다. 자세한 내용은 Google Cloud 콘솔에서 민감한 정보 보호를 사용하여 Cloud Storage 데이터의 익명화된 사본 만들기를 참조하세요.
자세한 내용은 작업을 참조하세요.
작업 선택을 마쳤으면 계속을 클릭합니다.
일정
일정 섹션에서 다음 두 가지를 수행할 수 있습니다.
- 시간 범위 지정: 이 옵션은 스캔할 파일 또는 행을 날짜로 제한합니다. 시작 시간을 클릭하여 포함할 가장 빠른 타임스탬프를 지정합니다. 모든 파일을 지정하려면 이 값을 비워 둡니다. 종료 시간을 클릭하여 포함할 가장 늦은 파일 타임스탬프를 지정합니다. 타임스탬프 상한값을 지정하지 않으려면 이 값을 비워 둡니다.
주기적인 일정으로 작업을 실행하는 트리거 만들기: 이 옵션은 작업을 주기적인 일정에 따라 실행되는 작업 트리거로 전환합니다. 일정을 지정하지 않으면 즉시 시작되고 한 번 실행되는 단일 작업을 만듭니다. 정기적으로 실행되는 작업 트리거를 만들려면 이 옵션을 설정해야 합니다.
기본값은 최솟값이기도 한 24시간입니다. 최대 값은 60일입니다.
민감한 정보 보호에서 새 파일이나 행만 스캔하도록 하려면 새 콘텐츠만 스캔 제한을 선택합니다. BigQuery 검사의 경우 3시간 이상 된 행만 스캔에 포함됩니다. 이 작업과 관련된 알려진 문제를 참고하세요.
검토
검토 섹션에는 방금 지정한 작업 설정이 JSON 형식으로 요약되어 있습니다.
만들기를 클릭하여 작업 트리거를 만듭니다(일정을 지정한 경우). 상태 및 기타 정보가 포함된 작업 트리거의 정보 페이지가 나타납니다. 작업이 현재 실행 중이면 취소 버튼을 클릭하여 작업을 중지할 수 있습니다. 삭제를 클릭하여 작업 트리거를 삭제할 수도 있습니다.
기본 Sensitive Data Protection 페이지로 돌아가려면 Google Cloud 콘솔에서 뒤로 화살표를 클릭합니다.
C#
Sensitive Data Protection의 클라이언트 라이브러리를 설치하고 사용하는 방법은 Sensitive Data Protection 클라이언트 라이브러리를 참조하세요.
Sensitive Data Protection에 인증하려면 애플리케이션 기본 사용자 인증 정보를 설정합니다. 자세한 내용은 로컬 개발 환경의 인증 설정을 참조하세요.
Go
민감한 정보 보호의 클라이언트 라이브러리를 설치하고 사용하는 방법은 민감한 정보 보호 클라이언트 라이브러리를 참조하세요.
Sensitive Data Protection에 인증하려면 애플리케이션 기본 사용자 인증 정보를 설정합니다. 자세한 내용은 로컬 개발 환경의 인증 설정을 참조하세요.
Java
민감한 정보 보호의 클라이언트 라이브러리를 설치하고 사용하는 방법은 민감한 정보 보호 클라이언트 라이브러리를 참조하세요.
Sensitive Data Protection에 인증하려면 애플리케이션 기본 사용자 인증 정보를 설정합니다. 자세한 내용은 로컬 개발 환경의 인증 설정을 참조하세요.
Node.js
민감한 정보 보호의 클라이언트 라이브러리를 설치하고 사용하는 방법은 민감한 정보 보호 클라이언트 라이브러리를 참조하세요.
Sensitive Data Protection에 인증하려면 애플리케이션 기본 사용자 인증 정보를 설정합니다. 자세한 내용은 로컬 개발 환경의 인증 설정을 참조하세요.
PHP
민감한 정보 보호의 클라이언트 라이브러리를 설치하고 사용하는 방법은 민감한 정보 보호 클라이언트 라이브러리를 참조하세요.
Sensitive Data Protection에 인증하려면 애플리케이션 기본 사용자 인증 정보를 설정합니다. 자세한 내용은 로컬 개발 환경의 인증 설정을 참조하세요.
Python
민감한 정보 보호의 클라이언트 라이브러리를 설치하고 사용하는 방법은 민감한 정보 보호 클라이언트 라이브러리를 참조하세요.
Sensitive Data Protection에 인증하려면 애플리케이션 기본 사용자 인증 정보를 설정합니다. 자세한 내용은 로컬 개발 환경의 인증 설정을 참조하세요.
REST
작업 트리거는 DLP API에서 JobTrigger 리소스로 표시됩니다. JobTrigger 리소스의 projects.jobTriggers.create 메서드를 사용하여 새 작업 트리거를 만들 수 있습니다.
이 샘플 JSON은 지정된 민감한 정보 보호 REST 엔드포인트에 대한 POST 요청으로 전송할 수 있습니다. 이 JSON 예시는 민감한 정보 보호에서 작업 트리거를 만드는 방법을 보여줍니다. 여기서 트리거되는 작업은 Datastore 검사 스캔입니다. 생성되는 작업 트리거는 86,400초(또는 24시간)마다 실행됩니다.
아래에 포함된 API 탐색기를 사용하여 빠르게 시도해 볼 수 있습니다. API 탐색기에서 생성된 것이라도, 요청이 성공하면 새로운 일정의 작업 트리거가 생성됩니다. JSON을 사용하여 DLP API로 요청을 전송하는 데 대한 일반적인 정보는 JSON 빠른 시작을 참조하세요.
JSON 입력:
{
  "jobTrigger":{
    "displayName":"JobTrigger1",
    "description":"Starts an inspection of a Datastore kind",
    "triggers":[
      {
        "schedule":{
          "recurrencePeriodDuration":"86400s"
        }
      }
    ],
    "status":"HEALTHY",
    "inspectJob":{
      "storageConfig":{
        "datastoreOptions":{
          "kind":{
            "name":"Example-Kind"
          },
          "partitionId":{
            "projectId":"[PROJECT_ID]",
            "namespaceId":"[NAMESPACE_ID]"
          }
        }
      },
      "inspectConfig":{
        "infoTypes":[
          {
            "name":"PHONE_NUMBER"
          }
        ],
        "excludeInfoTypes":false,
        "includeQuote":true,
        "minLikelihood":"LIKELY"
      },
      "actions":[
        {
          "saveFindings":{
            "outputConfig":{
              "table":{
                "projectId":"[PROJECT_ID]",
                "datasetId":"[BIGQUERY_DATASET_NAME]",
                "tableId":"[BIGQUERY_TABLE_NAME]"
              }
            }
          }
        }
      ]
    }
  }
}
JSON 출력:
다음 출력은 작업 트리거가 성공적으로 만들어졌음을 나타냅니다.
{
  "name":"projects/[PROJECT_ID]/jobTriggers/[JOB_TRIGGER_NAME]",
  "displayName":"JobTrigger1",
  "description":"Starts an inspection of a Datastore kind",
  "inspectJob":{
    "storageConfig":{
      "datastoreOptions":{
        "partitionId":{
          "projectId":"[PROJECT_ID]",
          "namespaceId":"[NAMESPACE_ID]"
        },
        "kind":{
          "name":"Example-Kind"
        }
      }
    },
    "inspectConfig":{
      "infoTypes":[
        {
          "name":"PHONE_NUMBER"
        }
      ],
      "minLikelihood":"LIKELY",
      "limits":{

      },
      "includeQuote":true
    },
    "actions":[
      {
        "saveFindings":{
          "outputConfig":{
            "table":{
              "projectId":"[PROJECT_ID]",
              "datasetId":"[BIGQUERY_DATASET_NAME]",
              "tableId":"[BIGQUERY_TABLE_NAME]"
            }
          }
        }
      }
    ]
  },
  "triggers":[
    {
      "schedule":{
        "recurrencePeriodDuration":"86400s"
      }
    }
  ],
  "createTime":"2018-11-30T01:52:41.171857Z",
  "updateTime":"2018-11-30T01:52:41.171857Z",
  "status":"HEALTHY"
}
모든 작업 나열
현재 프로젝트의 모든 작업을 나열하는 방법은 다음과 같습니다.
콘솔
Google Cloud 콘솔에서 민감한 정보 보호 페이지로 이동합니다.
검사 탭을 클릭한 다음 작업 검사 하위 탭을 클릭합니다.
Console에 작업 식별자, 상태, 생성 시간, 종료 시간을 포함한 현재 프로젝트의 모든 작업 목록이 표시됩니다. 결과 요약을 포함한 모든 작업에 대한 자세한 정보는 식별자를 클릭하여 확인할 수 있습니다.
C#
민감한 정보 보호의 클라이언트 라이브러리를 설치하고 사용하는 방법은 민감한 정보 보호 클라이언트 라이브러리를 참조하세요.
Sensitive Data Protection에 인증하려면 애플리케이션 기본 사용자 인증 정보를 설정합니다. 자세한 내용은 로컬 개발 환경의 인증 설정을 참조하세요.
Go
민감한 정보 보호의 클라이언트 라이브러리를 설치하고 사용하는 방법은 민감한 정보 보호 클라이언트 라이브러리를 참조하세요.
Sensitive Data Protection에 인증하려면 애플리케이션 기본 사용자 인증 정보를 설정합니다. 자세한 내용은 로컬 개발 환경의 인증 설정을 참조하세요.
Java
민감한 정보 보호의 클라이언트 라이브러리를 설치하고 사용하는 방법은 민감한 정보 보호 클라이언트 라이브러리를 참조하세요.
Sensitive Data Protection에 인증하려면 애플리케이션 기본 사용자 인증 정보를 설정합니다. 자세한 내용은 로컬 개발 환경의 인증 설정을 참조하세요.
Node.js
민감한 정보 보호의 클라이언트 라이브러리를 설치하고 사용하는 방법은 민감한 정보 보호 클라이언트 라이브러리를 참조하세요.
Sensitive Data Protection에 인증하려면 애플리케이션 기본 사용자 인증 정보를 설정합니다. 자세한 내용은 로컬 개발 환경의 인증 설정을 참조하세요.
PHP
민감한 정보 보호의 클라이언트 라이브러리를 설치하고 사용하는 방법은 민감한 정보 보호 클라이언트 라이브러리를 참조하세요.
Sensitive Data Protection에 인증하려면 애플리케이션 기본 사용자 인증 정보를 설정합니다. 자세한 내용은 로컬 개발 환경의 인증 설정을 참조하세요.
Python
민감한 정보 보호의 클라이언트 라이브러리를 설치하고 사용하는 방법은 민감한 정보 보호 클라이언트 라이브러리를 참조하세요.
Sensitive Data Protection에 인증하려면 애플리케이션 기본 사용자 인증 정보를 설정합니다. 자세한 내용은 로컬 개발 환경의 인증 설정을 참조하세요.
REST
DlpJob 리소스에는 모든 작업을 나열하는 데 사용할 수 있는 projects.dlpJobs.list 메서드가 있습니다.
프로젝트에 현재 정의된 모든 작업을 나열하려면 다음과 같이 dlpJobs 엔드포인트에 GET 요청을 보냅니다.
URL:
GET https://dlp.googleapis.com/v2/projects/[PROJECT-ID]/dlpJobs?key={YOUR_API_KEY}
다음 JSON 출력은 반환된 작업 중 하나를 나열합니다. 작업 구조는 DlpJob 리소스의 구조를 반영합니다.
JSON 출력:
{
  "jobs":[
    {
      "name":"projects/[PROJECT-ID]/dlpJobs/i-5270277269264714623",
      "type":"INSPECT_JOB",
      "state":"DONE",
      "inspectDetails":{
        "requestedOptions":{
          "snapshotInspectTemplate":{
          },
          "jobConfig":{
            "storageConfig":{
              "cloudStorageOptions":{
                "fileSet":{
                  "url":"[CLOUD-STORAGE-URL]"
                },
                "fileTypes":[
                  "FILE_TYPE_UNSPECIFIED"
                ],
                "filesLimitPercent":100
              },
              "timespanConfig":{
                "startTime":"2019-09-08T22:43:16.623Z",
                "enableAutoPopulationOfTimespanConfig":true
              }
            },
            "inspectConfig":{
              "infoTypes":[
                {
                  "name":"US_SOCIAL_SECURITY_NUMBER"
                },
                {
                  "name":"CANADA_SOCIAL_INSURANCE_NUMBER"
                }
              ],
              "minLikelihood":"LIKELY",
              "limits":{
              },
              "includeQuote":true
            },
            "actions":[
              {
                "saveFindings":{
                  "outputConfig":{
                    "table":{
                      "projectId":"[PROJECT-ID]",
                      "datasetId":"[DATASET-ID]",
                      "tableId":"[TABLE-ID]"
                    }
                  }
                }
              }
            ]
          }
        },
        "result":{
          ...
        }
      },
      "createTime":"2019-09-09T22:43:16.918Z",
      "startTime":"2019-09-09T22:43:16.918Z",
      "endTime":"2019-09-09T22:43:53.091Z",
      "jobTriggerName":"projects/[PROJECT-ID]/jobTriggers/sample-trigger2"
    },
    ...
아래에 포함된 API 탐색기를 사용하여 빠르게 시도해 볼 수 있습니다. JSON을 사용하여 DLP API로 요청을 전송하는 데 대한 일반적인 정보는 JSON 빠른 시작을 참조하세요.
모든 작업 트리거 나열
현재 프로젝트의 모든 작업 트리거를 나열하려면 다음 안내를 따르세요.
콘솔
Google Cloud 콘솔에서 민감한 정보 보호 페이지로 이동합니다.
검사 탭의 작업 트리거 하위 탭에서 Console에 현재 프로젝트의 모든 작업 트리거 목록이 표시됩니다.
C#
민감한 정보 보호의 클라이언트 라이브러리를 설치하고 사용하는 방법은 민감한 정보 보호 클라이언트 라이브러리를 참조하세요.
Sensitive Data Protection에 인증하려면 애플리케이션 기본 사용자 인증 정보를 설정합니다. 자세한 내용은 로컬 개발 환경의 인증 설정을 참조하세요.
Go
민감한 정보 보호의 클라이언트 라이브러리를 설치하고 사용하는 방법은 민감한 정보 보호 클라이언트 라이브러리를 참조하세요.
Sensitive Data Protection에 인증하려면 애플리케이션 기본 사용자 인증 정보를 설정합니다. 자세한 내용은 로컬 개발 환경의 인증 설정을 참조하세요.
Java
민감한 정보 보호의 클라이언트 라이브러리를 설치하고 사용하는 방법은 민감한 정보 보호 클라이언트 라이브러리를 참조하세요.
Sensitive Data Protection에 인증하려면 애플리케이션 기본 사용자 인증 정보를 설정합니다. 자세한 내용은 로컬 개발 환경의 인증 설정을 참조하세요.
Node.js
민감한 정보 보호의 클라이언트 라이브러리를 설치하고 사용하는 방법은 민감한 정보 보호 클라이언트 라이브러리를 참조하세요.
Sensitive Data Protection에 인증하려면 애플리케이션 기본 사용자 인증 정보를 설정합니다. 자세한 내용은 로컬 개발 환경의 인증 설정을 참조하세요.
PHP
민감한 정보 보호의 클라이언트 라이브러리를 설치하고 사용하는 방법은 민감한 정보 보호 클라이언트 라이브러리를 참조하세요.
Sensitive Data Protection에 인증하려면 애플리케이션 기본 사용자 인증 정보를 설정합니다. 자세한 내용은 로컬 개발 환경의 인증 설정을 참조하세요.
Python
민감한 정보 보호의 클라이언트 라이브러리를 설치하고 사용하는 방법은 민감한 정보 보호 클라이언트 라이브러리를 참조하세요.
Sensitive Data Protection에 인증하려면 애플리케이션 기본 사용자 인증 정보를 설정합니다. 자세한 내용은 로컬 개발 환경의 인증 설정을 참조하세요.
REST
JobTrigger 리소스에는 모든 작업 트리거를 나열하는 데 사용할 수 있는 projects.jobTriggers.list 메서드가 있습니다.
프로젝트에 현재 정의된 모든 작업 트리거를 나열하려면 다음과 같이 jobTriggers 엔드포인트에 GET 요청을 보냅니다.
URL:
GET https://dlp.googleapis.com/v2/projects/[PROJECT-ID]/jobTriggers?key={YOUR_API_KEY}
다음 JSON 출력은 이전 섹션에서 만든 작업 트리거를 나열합니다. 작업 트리거의 구조는 JobTrigger 리소스의 구조를 반영합니다.
JSON 출력:
{
  "jobTriggers":[
    {
      "name":"projects/[PROJECT_ID]/jobTriggers/[JOB_TRIGGER_NAME]",
      "displayName":"JobTrigger1",
      "description":"Starts an inspection of a Datastore kind",
      "inspectJob":{
        "storageConfig":{
          "datastoreOptions":{
            "partitionId":{
              "projectId":"[PROJECT_ID]",
              "namespaceId":"[NAMESPACE_ID]"
            },
            "kind":{
              "name":"Example-Kind"
            }
          }
        },
        "inspectConfig":{
          "infoTypes":[
            {
              "name":"PHONE_NUMBER"
            }
          ],
          "minLikelihood":"LIKELY",
          "limits":{

          },
          "includeQuote":true
        },
        "actions":[
          {
            "saveFindings":{
              "outputConfig":{
                "table":{
                  "projectId":"[PROJECT_ID]",
                  "datasetId":"[BIGQUERY_DATASET_NAME]",
                  "tableId":"[BIGQUERY_TABLE_NAME]"
                }
              }
            }
          }
        ]
      },
      "triggers":[
        {
          "schedule":{
            "recurrencePeriodDuration":"86400s"
          }
        }
      ],
      "createTime":"2018-11-30T01:52:41.171857Z",
      "updateTime":"2018-11-30T01:52:41.171857Z",
      "status":"HEALTHY"
    },

    ...

],
  "nextPageToken":"KkwKCQjivJ2UpPreAgo_Kj1wcm9qZWN0cy92ZWx2ZXR5LXN0dWR5LTE5NjEwMS9qb2JUcmlnZ2Vycy8xNTA5NzEyOTczMDI0MDc1NzY0"
}
아래에 포함된 API 탐색기를 사용하여 빠르게 시도해 볼 수 있습니다. JSON을 사용하여 DLP API로 요청을 전송하는 데 대한 일반적인 정보는 JSON 빠른 시작을 참조하세요.
작업 삭제
프로젝트에서 결과가 포함된 작업을 삭제하려면 다음 작업을 수행하세요. 이 작업은 외부(예: BigQuery)에 저장된 모든 결과를 변경하지 않습니다.
콘솔
Google Cloud 콘솔에서 민감한 정보 보호 페이지로 이동합니다.
검사 탭을 클릭한 다음 작업 검사 하위 탭을 클릭합니다. Google Cloud 콘솔에 현재 프로젝트의 모든 작업 목록이 표시됩니다.
삭제할 작업 트리거의 액션 열에서 작업 더보기 메뉴(세로로 정렬된 세 개의 점으로 표시됨) 를 클릭한 다음 삭제를 클릭합니다.
또는 작업 목록에서 삭제할 작업의 식별자를 클릭합니다. 작업의 세부정보 페이지에서 삭제를 클릭합니다.
C#
민감한 정보 보호의 클라이언트 라이브러리를 설치하고 사용하는 방법은 민감한 정보 보호 클라이언트 라이브러리를 참조하세요.
Sensitive Data Protection에 인증하려면 애플리케이션 기본 사용자 인증 정보를 설정합니다. 자세한 내용은 로컬 개발 환경의 인증 설정을 참조하세요.
Go
민감한 정보 보호의 클라이언트 라이브러리를 설치하고 사용하는 방법은 민감한 정보 보호 클라이언트 라이브러리를 참조하세요.
Sensitive Data Protection에 인증하려면 애플리케이션 기본 사용자 인증 정보를 설정합니다. 자세한 내용은 로컬 개발 환경의 인증 설정을 참조하세요.
Java
민감한 정보 보호의 클라이언트 라이브러리를 설치하고 사용하는 방법은 민감한 정보 보호 클라이언트 라이브러리를 참조하세요.
Sensitive Data Protection에 인증하려면 애플리케이션 기본 사용자 인증 정보를 설정합니다. 자세한 내용은 로컬 개발 환경의 인증 설정을 참조하세요.
Node.js
민감한 정보 보호의 클라이언트 라이브러리를 설치하고 사용하는 방법은 민감한 정보 보호 클라이언트 라이브러리를 참조하세요.
Sensitive Data Protection에 인증하려면 애플리케이션 기본 사용자 인증 정보를 설정합니다. 자세한 내용은 로컬 개발 환경의 인증 설정을 참조하세요.
PHP
민감한 정보 보호의 클라이언트 라이브러리를 설치하고 사용하는 방법은 민감한 정보 보호 클라이언트 라이브러리를 참조하세요.
Sensitive Data Protection에 인증하려면 애플리케이션 기본 사용자 인증 정보를 설정합니다. 자세한 내용은 로컬 개발 환경의 인증 설정을 참조하세요.
Python
민감한 정보 보호의 클라이언트 라이브러리를 설치하고 사용하는 방법은 민감한 정보 보호 클라이언트 라이브러리를 참조하세요.
Sensitive Data Protection에 인증하려면 애플리케이션 기본 사용자 인증 정보를 설정합니다. 자세한 내용은 로컬 개발 환경의 인증 설정을 참조하세요.
REST
현재 프로젝트에서 작업을 삭제하려면 다음과 같이 dlpJobs 엔드포인트에 DELETE 요청을 보냅니다. [JOB-IDENTIFIER] 필드를 i-로 시작하는 작업 식별자로 바꿉니다.
URL:
DELETE https://dlp.googleapis.com/v2/projects/[PROJECT-ID]/dlpJobs/[JOB-IDENTIFIER]?key={YOUR_API_KEY}
요청이 성공하면 DLP API는 성공 응답을 반환합니다. 작업이 성공적으로 삭제되었는지 확인하려면 모든 작업을 나열합니다.
아래에 포함된 API 탐색기를 사용하여 빠르게 시도해 볼 수 있습니다. JSON을 사용하여 DLP API로 요청을 전송하는 데 대한 일반적인 정보는 JSON 빠른 시작을 참조하세요.
작업 트리거 삭제
콘솔
Google Cloud 콘솔에서 민감한 정보 보호 페이지로 이동합니다.
검사 탭의 작업 트리거 하위 탭에서 Console에 현재 프로젝트의 모든 작업 트리거 목록이 표시됩니다.
삭제할 작업 트리거의 액션 열에서 작업 더보기 메뉴(세로로 정렬된 세 개의 점으로 표시됨) 를 클릭한 다음 삭제를 클릭합니다.
또는 작업 트리거 목록에서 삭제하려는 작업 트리거 이름을 클릭합니다. 작업 트리거의 세부정보 페이지에서 삭제를 클릭합니다.
C#
민감한 정보 보호의 클라이언트 라이브러리를 설치하고 사용하는 방법은 민감한 정보 보호 클라이언트 라이브러리를 참조하세요.
Sensitive Data Protection에 인증하려면 애플리케이션 기본 사용자 인증 정보를 설정합니다. 자세한 내용은 로컬 개발 환경의 인증 설정을 참조하세요.
Go
민감한 정보 보호의 클라이언트 라이브러리를 설치하고 사용하는 방법은 민감한 정보 보호 클라이언트 라이브러리를 참조하세요.
Sensitive Data Protection에 인증하려면 애플리케이션 기본 사용자 인증 정보를 설정합니다. 자세한 내용은 로컬 개발 환경의 인증 설정을 참조하세요.
Java
민감한 정보 보호의 클라이언트 라이브러리를 설치하고 사용하는 방법은 민감한 정보 보호 클라이언트 라이브러리를 참조하세요.
Sensitive Data Protection에 인증하려면 애플리케이션 기본 사용자 인증 정보를 설정합니다. 자세한 내용은 로컬 개발 환경의 인증 설정을 참조하세요.
Node.js
민감한 정보 보호의 클라이언트 라이브러리를 설치하고 사용하는 방법은 민감한 정보 보호 클라이언트 라이브러리를 참조하세요.
Sensitive Data Protection에 인증하려면 애플리케이션 기본 사용자 인증 정보를 설정합니다. 자세한 내용은 로컬 개발 환경의 인증 설정을 참조하세요.
PHP
민감한 정보 보호의 클라이언트 라이브러리를 설치하고 사용하는 방법은 민감한 정보 보호 클라이언트 라이브러리를 참조하세요.
Sensitive Data Protection에 인증하려면 애플리케이션 기본 사용자 인증 정보를 설정합니다. 자세한 내용은 로컬 개발 환경의 인증 설정을 참조하세요.
Python
민감한 정보 보호의 클라이언트 라이브러리를 설치하고 사용하는 방법은 민감한 정보 보호 클라이언트 라이브러리를 참조하세요.
Sensitive Data Protection에 인증하려면 애플리케이션 기본 사용자 인증 정보를 설정합니다. 자세한 내용은 로컬 개발 환경의 인증 설정을 참조하세요.
REST
현재 프로젝트에서 작업을 삭제하려면 다음과 같이 jobTriggers 엔드포인트에 DELETE 요청을 보냅니다. [JOB-TRIGGER-NAME] 필드를 작업 트리거의 이름으로 바꿉니다.
URL:
DELETE https://dlp.googleapis.com/v2/projects/[PROJECT-ID]/jobTriggers/[JOB-TRIGGER-NAME]?key={YOUR_API_KEY}
요청이 성공하면 DLP API는 성공 응답을 반환합니다. 작업 트리거가 성공적으로 삭제되었는지 확인하려면 모든 작업 트리거를 나열합니다.
아래에 포함된 API 탐색기를 사용하여 빠르게 시도해 볼 수 있습니다. JSON을 사용하여 DLP API로 요청을 전송하는 데 대한 일반적인 정보는 JSON 빠른 시작을 참조하세요.
작업 가져오기
프로젝트에서 결과가 포함된 작업을 가져오려면 다음 작업을 수행하세요. 이 작업은 외부(예: BigQuery)에 저장된 모든 결과를 변경하지 않습니다.
C#
민감한 정보 보호의 클라이언트 라이브러리를 설치하고 사용하는 방법은 민감한 정보 보호 클라이언트 라이브러리를 참조하세요.
Sensitive Data Protection에 인증하려면 애플리케이션 기본 사용자 인증 정보를 설정합니다. 자세한 내용은 로컬 개발 환경의 인증 설정을 참조하세요.
Go
민감한 정보 보호의 클라이언트 라이브러리를 설치하고 사용하는 방법은 민감한 정보 보호 클라이언트 라이브러리를 참조하세요.
Sensitive Data Protection에 인증하려면 애플리케이션 기본 사용자 인증 정보를 설정합니다. 자세한 내용은 로컬 개발 환경의 인증 설정을 참조하세요.
Java
민감한 정보 보호의 클라이언트 라이브러리를 설치하고 사용하는 방법은 민감한 정보 보호 클라이언트 라이브러리를 참조하세요.
Sensitive Data Protection에 인증하려면 애플리케이션 기본 사용자 인증 정보를 설정합니다. 자세한 내용은 로컬 개발 환경의 인증 설정을 참조하세요.
Node.js
민감한 정보 보호의 클라이언트 라이브러리를 설치하고 사용하는 방법은 민감한 정보 보호 클라이언트 라이브러리를 참조하세요.
Sensitive Data Protection에 인증하려면 애플리케이션 기본 사용자 인증 정보를 설정합니다. 자세한 내용은 로컬 개발 환경의 인증 설정을 참조하세요.
PHP
민감한 정보 보호의 클라이언트 라이브러리를 설치하고 사용하는 방법은 민감한 정보 보호 클라이언트 라이브러리를 참조하세요.
Sensitive Data Protection에 인증하려면 애플리케이션 기본 사용자 인증 정보를 설정합니다. 자세한 내용은 로컬 개발 환경의 인증 설정을 참조하세요.
Python
민감한 정보 보호의 클라이언트 라이브러리를 설치하고 사용하는 방법은 민감한 정보 보호 클라이언트 라이브러리를 참조하세요.
Sensitive Data Protection에 인증하려면 애플리케이션 기본 사용자 인증 정보를 설정합니다. 자세한 내용은 로컬 개발 환경의 인증 설정을 참조하세요.
REST
현재 프로젝트에서 작업을 가져오려면 여기 나온 것처럼 GET 요청을 dlpJobs 엔드포인트로 보냅니다. [JOB-IDENTIFIER] 필드를 i-로 시작하는 작업 식별자로 바꿉니다.
URL:
GET https://dlp.googleapis.com/v2/projects/[PROJECT-ID]/dlpJobs/[JOB-IDENTIFIER]?key={YOUR_API_KEY}
요청이 성공하면 DLP API는 성공 응답을 반환합니다.
아래에 포함된 API 탐색기를 사용하여 빠르게 시도해 볼 수 있습니다. JSON을 사용하여 DLP API로 요청을 전송하는 데 대한 일반적인 정보는 JSON 빠른 시작을 참조하세요.
작업 트리거 즉시 강제 실행
작업 트리거가 생성된 후 활성화하여 테스트할 수 있도록 트리거를 즉시 강제 실행할 수 있습니다. 이렇게 하려면 다음 명령어를 실행합니다.
curl --request POST \
    -H "Content-Type: application/json" \
    -H "Accept: application/json" \
    -H "Authorization: Bearer $(gcloud auth print-access-token)" \
    -H "X-Goog-User-Project: PROJECT_ID" \
    'https://dlp.googleapis.com/v2/JOB_TRIGGER_NAME:activate'
다음을 바꿉니다.
- PROJECT_ID: 요청과 연결된 액세스 요금을 청구할 프로젝트의 ID Google Cloud입니다.
- JOB_TRIGGER_NAME: 작업 트리거의 전체 리소스 이름(예:
projects/my-project/locations/global/jobTriggers/123456789)
기존 작업 트리거 업데이트
작업 트리거 만들기, 나열, 삭제 외에 기존 작업 트리거 업데이트도 수행할 수 있습니다. 기존 작업 트리거의 구성을 변경하려면 다음 안내를 따르세요.
콘솔
Google Cloud 콘솔에서 민감한 정보 보호 페이지로 이동합니다.
검사 탭을 클릭한 후 작업 트리거 하위 탭을 클릭합니다.
Console에 현재 프로젝트의 모든 작업 트리거 목록이 표시됩니다.
삭제하려는 작업 트리거의 작업 열에서 더보기 more_vert를 클릭한 후 세부정보 보기를 클릭합니다.
작업 트리거의 세부정보 페이지에서 수정을 클릭합니다.
트리거 편집 페이지에서 입력 데이터의 위치, 템플릿, infoType, 가능성과 같은 감지 세부정보, 모든 스캔 후 작업, 작업 트리거의 일정을 변경할 수 있습니다. 변경이 완료되었으면 저장을 클릭합니다.
C#
민감한 정보 보호의 클라이언트 라이브러리를 설치하고 사용하는 방법은 민감한 정보 보호 클라이언트 라이브러리를 참조하세요.
Sensitive Data Protection에 인증하려면 애플리케이션 기본 사용자 인증 정보를 설정합니다. 자세한 내용은 로컬 개발 환경의 인증 설정을 참조하세요.
Go
민감한 정보 보호의 클라이언트 라이브러리를 설치하고 사용하는 방법은 민감한 정보 보호 클라이언트 라이브러리를 참조하세요.
Sensitive Data Protection에 인증하려면 애플리케이션 기본 사용자 인증 정보를 설정합니다. 자세한 내용은 로컬 개발 환경의 인증 설정을 참조하세요.
Java
민감한 정보 보호의 클라이언트 라이브러리를 설치하고 사용하는 방법은 민감한 정보 보호 클라이언트 라이브러리를 참조하세요.
Sensitive Data Protection에 인증하려면 애플리케이션 기본 사용자 인증 정보를 설정합니다. 자세한 내용은 로컬 개발 환경의 인증 설정을 참조하세요.
Node.js
민감한 정보 보호의 클라이언트 라이브러리를 설치하고 사용하는 방법은 민감한 정보 보호 클라이언트 라이브러리를 참조하세요.
Sensitive Data Protection에 인증하려면 애플리케이션 기본 사용자 인증 정보를 설정합니다. 자세한 내용은 로컬 개발 환경의 인증 설정을 참조하세요.
PHP
민감한 정보 보호의 클라이언트 라이브러리를 설치하고 사용하는 방법은 민감한 정보 보호 클라이언트 라이브러리를 참조하세요.
Sensitive Data Protection에 인증하려면 애플리케이션 기본 사용자 인증 정보를 설정합니다. 자세한 내용은 로컬 개발 환경의 인증 설정을 참조하세요.
Python
민감한 정보 보호의 클라이언트 라이브러리를 설치하고 사용하는 방법은 민감한 정보 보호 클라이언트 라이브러리를 참조하세요.
Sensitive Data Protection에 인증하려면 애플리케이션 기본 사용자 인증 정보를 설정합니다. 자세한 내용은 로컬 개발 환경의 인증 설정을 참조하세요.
REST
projects.jobTriggers.patch 메서드를 사용하여 새 JobTrigger 값을 DLP API에 보내고 이러한 값을 지정된 작업 트리거 내에서 업데이트할 수 있습니다.
예를 들어 다음과 같은 간단한 작업 트리거가 있다고 가정해 보겠습니다. 이 JSON은 작업 트리거를 나타내며, 현재 프로젝트의 작업 트리거 엔드포인트에 GET 요청을 보낸 후 반환되었습니다.
JSON 출력:
{
  "name":"projects/[PROJECT_ID]/jobTriggers/[JOB_TRIGGER_NAME]",
  "inspectJob":{
    "storageConfig":{
      "cloudStorageOptions":{
        "fileSet":{
          "url":"gs://dlptesting/*"
        },
        "fileTypes":[
          "FILE_TYPE_UNSPECIFIED"
        ],
        "filesLimitPercent":100
      },
      "timespanConfig":{
        "enableAutoPopulationOfTimespanConfig":true
      }
    },
    "inspectConfig":{
      "infoTypes":[
        {
          "name":"US_SOCIAL_SECURITY_NUMBER"
        }
      ],
      "minLikelihood":"POSSIBLE",
      "limits":{

      }
    },
    "actions":[
      {
        "jobNotificationEmails":{

        }
      }
    ]
  },
  "triggers":[
    {
      "schedule":{
        "recurrencePeriodDuration":"86400s"
      }
    }
  ],
  "createTime":"2019-03-06T21:19:45.774841Z",
  "updateTime":"2019-03-06T21:19:45.774841Z",
  "status":"HEALTHY"
}
다음 JSON은 지정된 엔드포인트에 PATCH 요청으로 전송되었을 때, 지정된 작업 트리거를 스캔할 새 infoType 및 새로운 최솟값 가능성으로 업데이트합니다. 또한 updateMask 속성을 지정해야 하며, 해당 값은 FieldMask 형식이어야 합니다.
JSON 입력:
PATCH https://dlp.googleapis.com/v2/projects/[PROJECT_ID]/jobTriggers/[JOB_TRIGGER_NAME]?key={YOUR_API_KEY}

{
  "jobTrigger":{
    "inspectJob":{
      "inspectConfig":{
        "infoTypes":[
          {
            "name":"US_INDIVIDUAL_TAXPAYER_IDENTIFICATION_NUMBER"
          }
        ],
        "minLikelihood":"LIKELY"
      }
    }
  },
  "updateMask":"inspectJob(inspectConfig(infoTypes,minLikelihood))"
}
이 JSON을 지정된 URL로 보내면 업데이트된 작업 트리거를 나타내는 다음 결과가 반환됩니다. 원래 infoType과 가능성 값이 새 값으로 바뀌었습니다.
JSON 출력:
{
  "name":"projects/[PROJECT_ID]/jobTriggers/[JOB_TRIGGER_NAME]",
  "inspectJob":{
    "storageConfig":{
      "cloudStorageOptions":{
        "fileSet":{
          "url":"gs://dlptesting/*"
        },
        "fileTypes":[
          "FILE_TYPE_UNSPECIFIED"
        ],
        "filesLimitPercent":100
      },
      "timespanConfig":{
        "enableAutoPopulationOfTimespanConfig":true
      }
    },
    "inspectConfig":{
      "infoTypes":[
        {
          "name":"US_INDIVIDUAL_TAXPAYER_IDENTIFICATION_NUMBER"
        }
      ],
      "minLikelihood":"LIKELY",
      "limits":{

      }
    },
    "actions":[
      {
        "jobNotificationEmails":{

        }
      }
    ]
  },
  "triggers":[
    {
      "schedule":{
        "recurrencePeriodDuration":"86400s"
      }
    }
  ],
  "createTime":"2019-03-06T21:19:45.774841Z",
  "updateTime":"2019-03-06T21:27:01.650183Z",
  "lastRunTime":"1970-01-01T00:00:00Z",
  "status":"HEALTHY"
}
아래에 포함된 API 탐색기를 사용하여 빠르게 시도해 볼 수 있습니다. JSON을 사용하여 DLP API로 요청을 전송하는 데 대한 일반적인 정보는 JSON 빠른 시작을 참조하세요.
작업 지연 시간
작업 및 작업 트리거에 대한 서비스 수준 목표(SLO)가 보장되지 않습니다. 지연 시간은 스캔할 데이터 양, 스캔하는 스토리지 저장소, 스캔하는 infoType 유형 및 개수, 작업이 처리되는 리전, 사용 가능한 컴퓨팅 리소스를 포함한 여러 요인의 영향을 받습니다. 따라서 검사 작업의 지연 시간을 미리 확인할 수 없습니다.
작업 지연 시간을 줄이는 데 도움이 되는 방법은 다음과 같습니다.
- 작업 또는 작업 트리거에 샘플링을 사용할 수 있으면 사용 설정하세요.
필요하지 않은 infoType은 사용 설정하지 않습니다. 특정 시나리오에서는 infoType이 유용할 수 있지만 이러한 infoType이 포함되지 않은 요청보다 훨씬 느리게 실행될 수 있습니다.
PERSON_NAMEFEMALE_NAMEMALE_NAMEFIRST_NAMELAST_NAMEDATE_OF_BIRTHLOCATIONSTREET_ADDRESSORGANIZATION_NAME
항상 infoType을 명시적으로 지정하세요. 비어 있는 infoType 목록을 사용하지 마세요.
가능하면 다른 처리 리전을 사용합니다.
이러한 방법을 시도한 후에도 작업에 지연 시간이 발생하는 경우 작업 대신 content.inspect 또는 content.deidentify 요청을 사용하는 것이 좋습니다. 이러한 방법에는 서비스수준계약이 적용됩니다. 자세한 내용은 민감한 정보 보호 서비스수준계약을 참조하세요.
새 콘텐츠만 스캔
Cloud Storage 또는 BigQuery에 저장된 파일의 기간 날짜를 자동으로 설정하도록 작업 트리거를 구성할 수 있습니다. TimespanConfig 객체를 자동으로 채우도록 설정하면 민감한 정보 보호는 트리거가 마지막으로 실행된 이후 추가되었거나 수정된 데이터만 스캔합니다.
...
  timespan_config {
        enable_auto_population_of_timespan_config: true
      }
...
BigQuery 검사의 경우 3시간 이상 된 행만 스캔에 포함됩니다. 이 작업과 관련된 알려진 문제를 참고하세요.
파일 업로드 시 작업 트리거
Google Cloud 에는 민감한 정보 보호에 기본 제공되는 작업 트리거 지원 외에도 민감한 정보 보호 작업을 통합하거나 트리거하는 데 사용할 수 있는 다양한 구성요소가 있습니다. 예를 들어 Cloud Run 함수를 사용하여 Cloud Storage에 파일이 업로드될 때마다 민감한 정보 보호 스캔을 트리거할 수 있습니다.
이 작업을 설정하는 방법에 대한 자세한 내용은 Cloud Storage에 업로드되는 데이터 분류 자동화를 참조하세요.
검사된 데이터가 없는 성공한 작업
데이터가 스캔되지 않았더라도 작업이 완료될 수 있습니다. 다음과 같은 시나리오의 예로 인해 이 문제가 발생할 수 있습니다.
- 이 작업은 존재하지만 비어 있는 특정 데이터 애셋(예: 파일)을 검사하도록 구성됩니다.
- 작업이 존재하지 않거나 더 이상 존재하지 않는 데이터 애셋을 검사하도록 구성되어 있습니다.
- 작업이 비어 있는 Cloud Storage 버킷을 검사하도록 구성되어 있습니다.
- 작업이 버킷을 검사하도록 구성되고 재귀 스캔은 사용 중지됩니다. 최상위 버킷에는 파일이 포함된 폴더만 포함됩니다.
- 작업이 버킷의 특정 파일 형식만 검사하도록 구성되었지만 버킷에 해당 유형의 파일이 없습니다.
- 작업이 새 콘텐츠만 검사하도록 구성되었지만 작업이 마지막으로 실행된 후 업데이트가 없었습니다.
Google Cloud 콘솔의 작업 세부정보 페이지에서 스캔된 바이트 수 필드는 작업에서 검사한 데이터의 양을 지정합니다. DLP API에서 processedBytes 필드는 검사된 데이터의 양을 지정합니다.
다음 단계
- 스토리지에서 익명화된 데이터 사본 만들기 자세히 알아보기