This tutorial shows you how to use Dataflow SQL to join a stream of data from Pub/Sub with data from a BigQuery table.
Objectives
In this tutorial, you:
- Write a Dataflow SQL query that joins Pub/Sub streaming data with BigQuery table data.
- Deploy a Dataflow job from the Dataflow SQL UI.
Costs
In this document, you use the following billable components of Google Cloud Platform:
- Dataflow
- Cloud Storage
- Pub/Sub
- Data Catalog
To generate a cost estimate based on your projected usage,
use the pricing calculator.
Before you begin
- Sign in to your Google Cloud Platform account. If you're new to Google Cloud, create an account to evaluate how our products perform in real-world scenarios. New customers also get $300 in free credits to run, test, and deploy workloads.
-
In the Google Cloud console, on the project selector page, select or create a Google Cloud project.
Roles required to select or create a project
- Select a project: Selecting a project doesn't require a specific IAM role—you can select any project that you've been granted a role on.
-
Create a project: To create a project, you need the Project Creator
(
roles/resourcemanager.projectCreator), which contains theresourcemanager.projects.createpermission. Learn how to grant roles.
-
Verify that billing is enabled for your Google Cloud project.
-
Enable the Cloud Dataflow, Compute Engine, Logging, Cloud Storage, Cloud Storage JSON, BigQuery, Cloud Pub/Sub, Cloud Resource Manager and Data Catalog. APIs.
Roles required to enable APIs
To enable APIs, you need the Service Usage Admin IAM role (
roles/serviceusage.serviceUsageAdmin), which contains theserviceusage.services.enablepermission. Learn how to grant roles. -
Create a service account:
-
Ensure that you have the Create Service Accounts IAM role
(
roles/iam.serviceAccountCreator). Learn how to grant roles. -
In the Google Cloud console, go to the Create service account page.
Go to Create service account - Select your project.
-
In the Service account name field, enter a name. The Google Cloud console fills in the Service account ID field based on this name.
In the Service account description field, enter a description. For example,
Service account for quickstart. - Click Create and continue.
-
Grant the Project > Owner role to the service account.
To grant the role, find the Select a role list, then select Project > Owner.
- Click Continue.
-
Click Done to finish creating the service account.
Do not close your browser window. You will use it in the next step.
-
Ensure that you have the Create Service Accounts IAM role
(
-
Create a service account key:
- In the Google Cloud console, click the email address for the service account that you created.
- Click Keys.
- Click Add key, and then click Create new key.
- Click Create. A JSON key file is downloaded to your computer.
- Click Close.
-
Set the environment variable
GOOGLE_APPLICATION_CREDENTIALSto the path of the JSON file that contains your credentials. This variable applies only to your current shell session, so if you open a new session, set the variable again. -
In the Google Cloud console, on the project selector page, select or create a Google Cloud project.
Roles required to select or create a project
- Select a project: Selecting a project doesn't require a specific IAM role—you can select any project that you've been granted a role on.
-
Create a project: To create a project, you need the Project Creator
(
roles/resourcemanager.projectCreator), which contains theresourcemanager.projects.createpermission. Learn how to grant roles.
-
Verify that billing is enabled for your Google Cloud project.
-
Enable the Cloud Dataflow, Compute Engine, Logging, Cloud Storage, Cloud Storage JSON, BigQuery, Cloud Pub/Sub, Cloud Resource Manager and Data Catalog. APIs.
Roles required to enable APIs
To enable APIs, you need the Service Usage Admin IAM role (
roles/serviceusage.serviceUsageAdmin), which contains theserviceusage.services.enablepermission. Learn how to grant roles. -
Create a service account:
-
Ensure that you have the Create Service Accounts IAM role
(
roles/iam.serviceAccountCreator). Learn how to grant roles. -
In the Google Cloud console, go to the Create service account page.
Go to Create service account - Select your project.
-
In the Service account name field, enter a name. The Google Cloud console fills in the Service account ID field based on this name.
In the Service account description field, enter a description. For example,
Service account for quickstart. - Click Create and continue.
-
Grant the Project > Owner role to the service account.
To grant the role, find the Select a role list, then select Project > Owner.
- Click Continue.
-
Click Done to finish creating the service account.
Do not close your browser window. You will use it in the next step.
-
Ensure that you have the Create Service Accounts IAM role
(
-
Create a service account key:
- In the Google Cloud console, click the email address for the service account that you created.
- Click Keys.
- Click Add key, and then click Create new key.
- Click Create. A JSON key file is downloaded to your computer.
- Click Close.
-
Set the environment variable
GOOGLE_APPLICATION_CREDENTIALSto the path of the JSON file that contains your credentials. This variable applies only to your current shell session, so if you open a new session, set the variable again. - Install and initialize the gcloud CLI. Choose one of the
installation options.
You might need to set the
projectproperty to the project that you are using for this walkthrough. - Go to the Dataflow SQL web UI in the Google Cloud console. This
opens your most recently accessed project. To switch to a different
project, click the name of the project at the top of the
Dataflow SQL web UI, and search for the project you want to use.
Go to the Dataflow SQL web UI
Create example sources
If you would like to follow the example provided in this tutorial, create the following sources and use them in the steps of the tutorial.
- A Pub/Sub topic called
transactions- A stream of transaction data that arrives via a subscription to the Pub/Sub topic. The data for each transaction includes information like the product purchased, the sale price, and the city and state in which the purchase occurred. After you create the Pub/Sub topic, you create a script that publishes messages to your topic. You will run this script in a later section of this tutorial. - A BigQuery table called
us_state_salesregions- A table that provides a mapping of states to sales regions. Before you create this table, you need to create a BigQuery dataset.
Create a BigQuery dataset and table
- In the BigQuery web UI,
create a BigQuery dataset. A BigQuery dataset is
a top-level container used to contain your tables. BigQuery
tables must belong to a dataset.
- In the Explorer panel, open the actions for
your project. In the menu, click Create dataset. In the
following screenshot, the project ID is
dataflow-sql.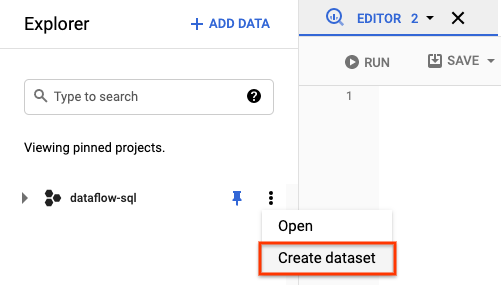
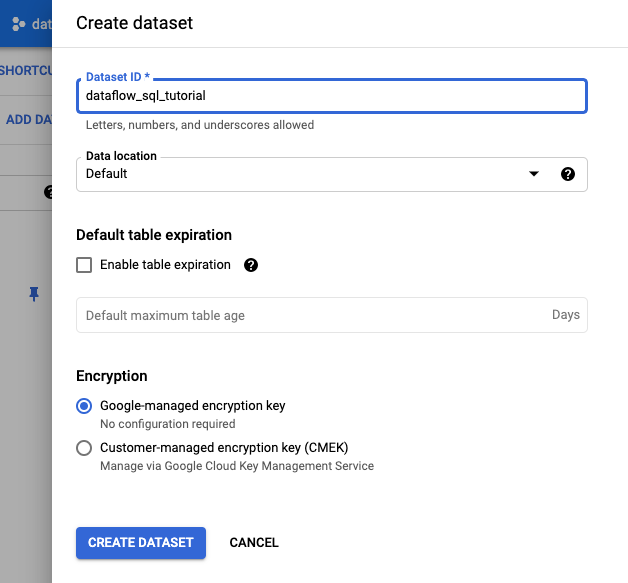
- In the Create dataset panel that opens, for
Dataset ID, enter
dataflow_sql_tutorial. - For Data location, select an option from the menu.
- Click Create dataset.
- In the Explorer panel, open the actions for
your project. In the menu, click Create dataset. In the
following screenshot, the project ID is
- Create a BigQuery table.
- Create a text file and name it
us_state_salesregions.csv. - Copy and paste the following data into
us_state_salesregions.csv. In the next steps you will load this data into your BigQuery table.state_id,state_code,state_name,sales_region 1,MO,Missouri,Region_1 2,SC,South Carolina,Region_1 3,IN,Indiana,Region_1 6,DE,Delaware,Region_2 15,VT,Vermont,Region_2 16,DC,District of Columbia,Region_2 19,CT,Connecticut,Region_2 20,ME,Maine,Region_2 35,PA,Pennsylvania,Region_2 38,NJ,New Jersey,Region_2 47,MA,Massachusetts,Region_2 54,RI,Rhode Island,Region_2 55,NY,New York,Region_2 60,MD,Maryland,Region_2 66,NH,New Hampshire,Region_2 4,CA,California,Region_3 8,AK,Alaska,Region_3 37,WA,Washington,Region_3 61,OR,Oregon,Region_3 33,HI,Hawaii,Region_4 59,AS,American Samoa,Region_4 65,GU,Guam,Region_4 5,IA,Iowa,Region_5 32,NV,Nevada,Region_5 11,PR,Puerto Rico,Region_6 17,CO,Colorado,Region_6 18,MS,Mississippi,Region_6 41,AL,Alabama,Region_6 42,AR,Arkansas,Region_6 43,FL,Florida,Region_6 44,NM,New Mexico,Region_6 46,GA,Georgia,Region_6 48,KS,Kansas,Region_6 52,AZ,Arizona,Region_6 56,TN,Tennessee,Region_6 58,TX,Texas,Region_6 63,LA,Louisiana,Region_6 7,ID,Idaho,Region_7 12,IL,Illinois,Region_7 13,ND,North Dakota,Region_7 31,MN,Minnesota,Region_7 34,MT,Montana,Region_7 36,SD,South Dakota,Region_7 50,MI,Michigan,Region_7 51,UT,Utah,Region_7 64,WY,Wyoming,Region_7 9,NE,Nebraska,Region_8 10,VA,Virginia,Region_8 14,OK,Oklahoma,Region_8 39,NC,North Carolina,Region_8 40,WV,West Virginia,Region_8 45,KY,Kentucky,Region_8 53,WI,Wisconsin,Region_8 57,OH,Ohio,Region_8 49,VI,United States Virgin Islands,Region_9 62,MP,Commonwealth of the Northern Mariana Islands,Region_9
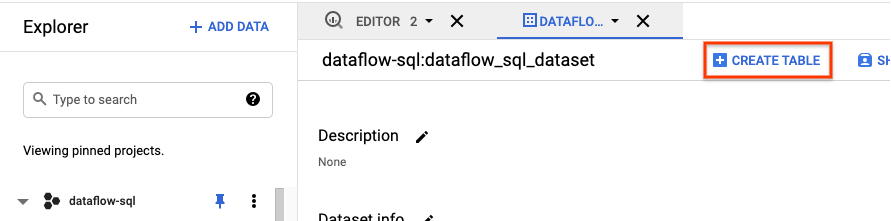
- In the Explorer panel of the BigQuery UI, expand
your project to see the
dataflow_sql_tutorialdataset. - Open the actions menu for the
dataflow_sql_tutorialdataset, and click Open. - Click Create table.
- In the Create table panel that opens:
- For Create table from, select Upload.
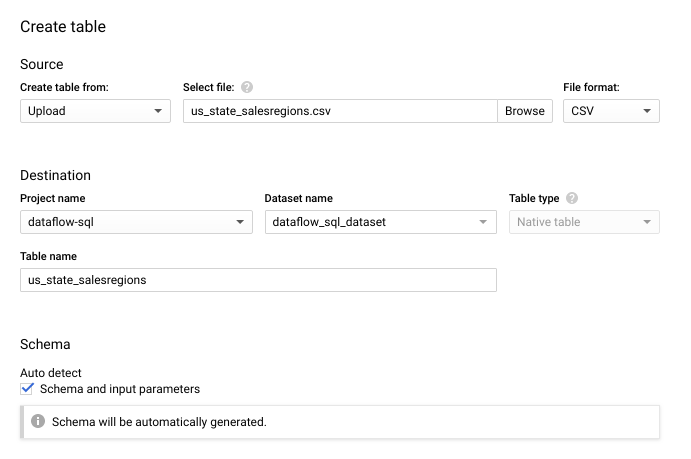
- For Select file, click Browse, and choose your
us_state_salesregions.csvfile. - For Table, enter
us_state_salesregions. - Under Schema, select Auto detect.
- Click Advanced options to expand the Advanced options section.
- For Header rows to skip, enter
1, and then click Create table.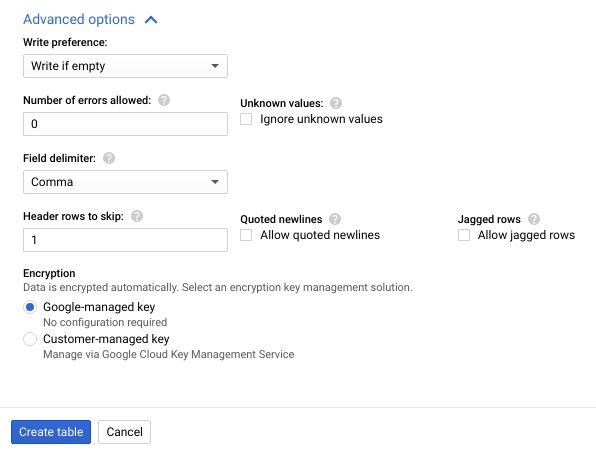
- For Create table from, select Upload.
- In the Explorer panel,
click
us_state_salesregions. Under Schema, you can view the schema that was auto-generated. Under Preview, you can see the table data.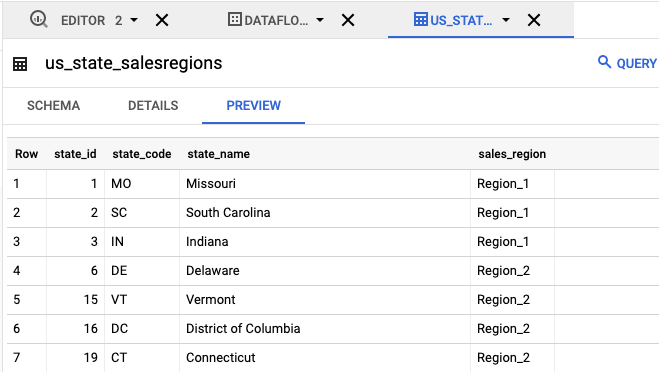
- Create a text file and name it
Assign a schema to your Pub/Sub topic
Assigning a schema lets you run SQL queries on your Pub/Sub topic data. Currently, Dataflow SQL expects messages in Pub/Sub topics to be serialized in JSON format.
To assign a schema to the
example Pub/Sub topic transactions:
Create a text file and name it
transactions_schema.yaml. Copy and paste the following schema text intotransactions_schema.yaml.- column: event_timestamp description: Pub/Sub event timestamp mode: REQUIRED type: TIMESTAMP - column: tr_time_str description: Transaction time string mode: NULLABLE type: STRING - column: first_name description: First name mode: NULLABLE type: STRING - column: last_name description: Last name mode: NULLABLE type: STRING - column: city description: City mode: NULLABLE type: STRING - column: state description: State mode: NULLABLE type: STRING - column: product description: Product mode: NULLABLE type: STRING - column: amount description: Amount of transaction mode: NULLABLE type: FLOATAssign the schema using the Google Cloud CLI.
a. Update the gcloud CLI with the following command. Ensure that the gcloud CLI version is 242.0.0 or higher.
gcloud components update
b. Run the following command in a command-line window. Replace project-id with your project ID, and path-to-file with the path to your
transactions_schema.yamlfile.gcloud data-catalog entries update \ --lookup-entry='pubsub.topic.`project-id`.transactions' \ --schema-from-file=path-to-file/transactions_schema.yaml
For more information about the command's parameters and allowed schema file formats, see the documentation page for gcloud data-catalog entries update.
c. Confirm that your schema was successfully assigned to the
transactionsPub/Sub topic. Replace project-id with your project ID.gcloud data-catalog entries lookup 'pubsub.topic.`project-id`.transactions'
Find Pub/Sub sources
The Dataflow SQL UI provides a way to find Pub/Sub data source objects for any project you have access to, so you don't have to remember their full names.
For the example in this tutorial, navigate to the Dataflow SQL editor and search for the transactions Pub/Sub
topic that you created:
Navigate to the SQL Workspace.
In the Dataflow SQL Editor panel, in the search bar, search for
projectid=project-id
transactions
. Replace project-id with your project ID.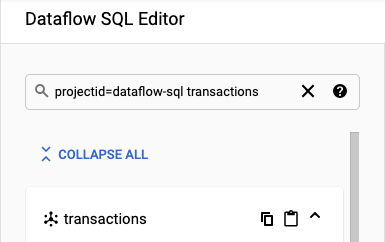
View the schema
- In the Dataflow SQL Editor panel of the Dataflow SQL UI, click
transactions or search for a Pub/Sub topic by typing
projectid=project-id system=cloud_pubsub, and select the topic. Under Schema, you can view the schema that you assigned to the Pub/Sub topic.

Create a SQL query
The Dataflow SQL UI lets you create SQL queries to run your Dataflow jobs.
The following SQL query is a data enrichment query. It adds an additional field,
sales_region, to the Pub/Sub stream of events (transactions),
using a BigQuery table (us_state_salesregions) that maps states
to sales regions.
Copy and paste the following SQL query into the Query editor. Replace project-id with your project ID.
SELECT tr.*, sr.sales_region
FROM pubsub.topic.`project-id`.transactions as tr
  INNER JOIN bigquery.table.`project-id`.dataflow_sql_tutorial.us_state_salesregions AS sr
  ON tr.state = sr.state_code
When you enter a query in the Dataflow SQL UI, the query validator verifies the query syntax. A green check mark icon is displayed if the query is valid. If the query is invalid, a red exclamation point icon is displayed. If your query syntax is invalid, clicking on the validator icon provides information about what you need to fix.
The following screenshot shows the valid query in the Query editor. The validator displays a green check mark.

Create a Dataflow job to run your SQL query
To run your SQL query, create a Dataflow job from the Dataflow SQL UI.
In the Query editor, click Create job.
In the Create Dataflow job panel that opens:
- For Destination, select BigQuery.
- For Dataset ID, select
dataflow_sql_tutorial. - For Table name, enter
sales.
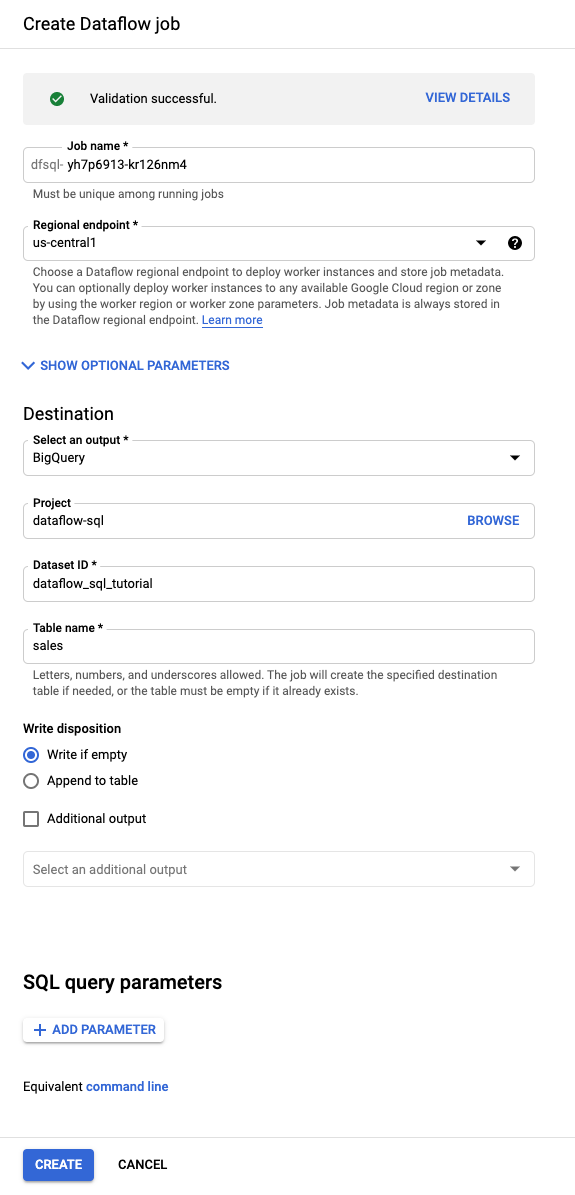
Optional: Dataflow automatically chooses the settings that are optimal for your Dataflow SQL job, but you can expand the Optional parameters menu to manually specify the following pipeline options:
- Maximum number of workers
- Zone
- Service account email
- Machine type
- Additional experiments
- Worker IP address configuration
- Network
- Subnetwork
Click Create. Your Dataflow job takes a few minutes to start running.
View the Dataflow job
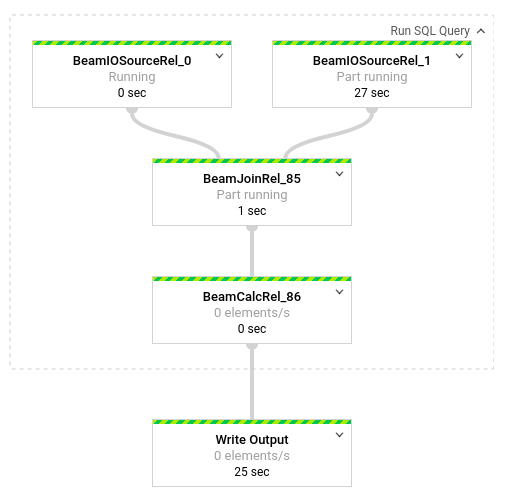
Dataflow turns your SQL query into an Apache Beam pipeline. Click View job to open the Dataflow web UI, where you can see a graphical representation of your pipeline.

To see a breakdown of the transformations occurring in the pipeline, click the boxes. For example, if you click the first box in the graphical representation, labeled Run SQL Query, a graphic appears that shows the operations taking place behind the scenes.
The first two boxes represent the two inputs you joined: the
Pub/Sub topic, transactions, and the BigQuery
table, us_state_salesregions.
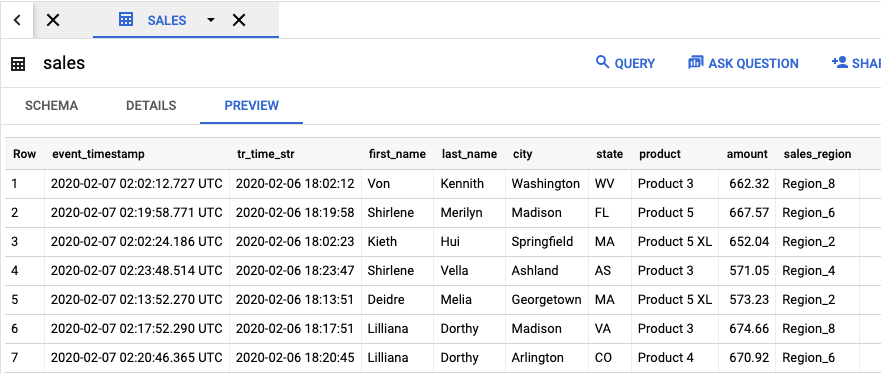
To view the output table that contains the job results, go to the
BigQuery UI.
In the Explorer panel, in your project, click
the dataflow_sql_tutorial dataset that you created. Then, click the output table,
sales. The Preview tab displays the contents of the output table.
View past jobs and edit your queries
The Dataflow UI stores past jobs and queries in the Dataflow Jobs page.
You can use the job history list to see previous SQL queries. For example, you want to modify your query to aggregate sales by sales region every 15 seconds. Use the Jobs page to access the running job that you started earlier in the tutorial, copy the SQL query, and run another job with a modified query.
From the Dataflow Jobs page, click the job you want to edit.
On the Job details page, in the Job info panel, under Pipeline options, locate the SQL query. Find the row for queryString.
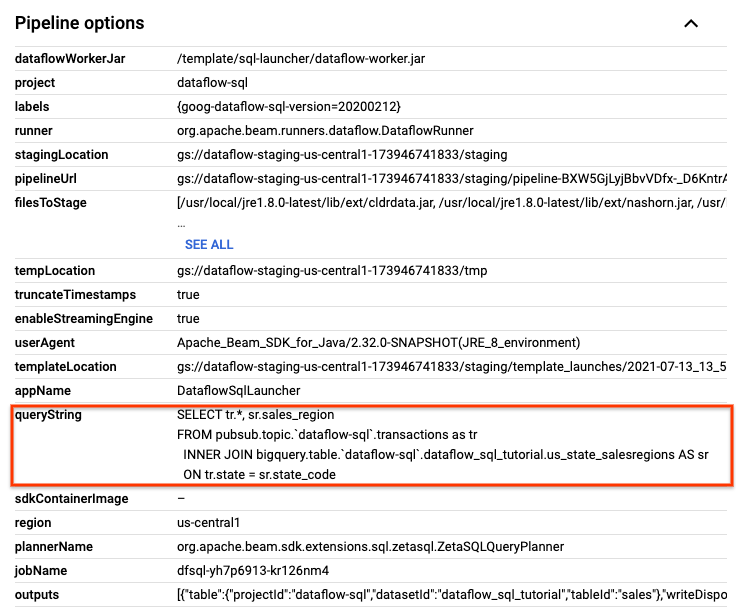
Copy and paste the following SQL query into the Dataflow SQL Editor in the SQL Workspace to add tumbling windows. Replace project-id with your project ID.
 SELECT
   sr.sales_region,
   TUMBLE_START("INTERVAL 15 SECOND") AS period_start,
   SUM(tr.amount) as amount
 FROM pubsub.topic.`project-id`.transactions AS tr
   INNER JOIN bigquery.table.`project-id`.dataflow_sql_tutorial.us_state_salesregions AS sr
   ON tr.state = sr.state_code
 GROUP BY
   sr.sales_region,
   TUMBLE(tr.event_timestamp, "INTERVAL 15 SECOND")
Click Create job to create a new job with the modified query.
Clean up
To avoid incurring charges to your Cloud Billing account for the resources used in this tutorial:
Stop your
transactions_injector.pypublishing script if it is still running.Stop your running Dataflow jobs. Go to the Dataflow web UI in the Google Cloud console.
For each job you created from following this walkthrough, do the following steps:
Click the name of the job.
On the Job details page, click Stop. The Stop Job dialog appears with your options for how to stop your job.
Select Cancel.
Click Stop job. The service halts all data ingestion and processing as soon as possible. Because Cancel immediately halts processing, you might lose any "in-flight" data. Stopping a job might take a few minutes.
Delete your BigQuery dataset. Go to the BigQuery web UI in the Google Cloud console.
In the Explorer panel, in the Resources section, click the dataflow_sql_tutorial dataset you created.
In the details panel, click Delete. A confirmation dialog opens.
In the Delete dataset dialog box, confirm the delete command by typing
delete, and then click Delete.
Delete your Pub/Sub topic. Go to the Pub/Sub topics page in the Google Cloud console.
Select the
transactionstopic.Click Delete to permanently delete the topic. A confirmation dialog opens.
In the Delete topic dialog box, confirm the delete command by typing
delete, and then click Delete.Go to the Pub/Sub subscriptions page.
Select any remaining subscriptions to
transactions. If your jobs are not running anymore, there might not be any subscriptions.Click Delete to permanently delete the subscriptions. In the confirmation dialog, click Delete.
Delete the Dataflow staging bucket in Cloud Storage. Go to the Cloud Storage Buckets page in the Google Cloud console.
Select the Dataflow staging bucket.
Click Delete to delete the bucket. A confirmation dialog opens.
In the Delete bucket dialog box, confirm the delete command by typing
DELETE, and then click Delete.
What's next
- See an introduction to Dataflow SQL.
- Learn about streaming pipeline basics.
- Explore the Dataflow SQL reference.
- Watch the streaming analytics demo given at Cloud Next 2019.