本页介绍了如何在单个工作区中管理多个 Cloud Functions 配置,以及如何使用 Cloud Code 重新排列 Cloud Run Functions Explorer。
准备工作
本指南要求您已设置好工作区(列有至少一个配置的 launch.json 文件)。如需通过示例快速上手,请参阅创建和部署函数快速入门。
在单个工作区中管理多个配置
如需向 launch.json 文件添加新的 Cloud Functions 函数配置,请按以下步骤操作:
点击 Cloud Code,然后展开 Cloud Functions 探索器。
在 Cloud Run 函数浏览器中,右键点击 WORKSPACE,然后点击 Add new cloud function configuration(添加新的 Cloud Functions 函数配置)。
按照提示操作并执行以下操作:
- 输入函数名称
- 选择 Cloud Run functions 环境
- 输入入口点(用于调用此函数的方法的名称)
- 输入测试输入
或者,您也可以手动将这些值输入
launch.json文件中:{ "configurations": [ { "name": "Deploy Cloud Function", "type": "cloudcode.cloudfunctions", "request": "launch", "functionName": "hello-world-get", "gen": "GEN_2", "entryPoint": "helloGet" } ] }您的 Cloud Run functions 工作区对应于
launch.json文件中列出的第一个配置。工作区名称反映了launch.json文件中列出的第一个配置的functionName:{ "configurations": [ { "name": "Deploy Cloud Function", "type": "cloudcode.cloudfunctions", "request": "launch", "functionName": "hello-world-pub-sub", "gen": "GEN_2", "entryPoint": "helloPubSub" }, { "name": "Deploy Cloud Function", "type": "cloudcode.cloudfunctions", "request": "launch", "functionName": "hello-world-get", "gen": "GEN_2", "entryPoint": "helloGet" } ] }(可选)如需从
launch.json文件部署其他配置,请将要部署的配置移至launch.json文件顶部,然后点击刷新 刷新 Cloud Functions 浏览器。
将 Cloud Run Functions Explorer 重新排列到 IDE 的文件资源管理器中
您可以通过执行以下操作,将 Cloud Run functions Explorer 重新排列到 Cloud Shell 的文件资源管理器中:
将 Cloud Run functions Explorer 拖动到 Cloud Shell 的文件资源管理器中:
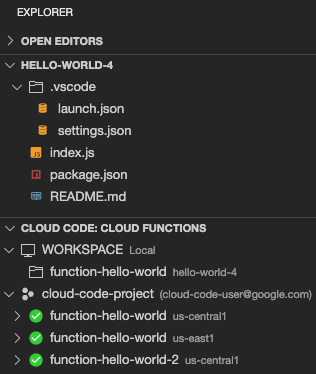
这种排列方式会在文件资源管理器下显示 Cloud Run Functions Explorer,以便您在与项目文件相同的窗格中查看已部署的函数和 Cloud Run Functions 工作区。
(可选)如需撤消此排列方式,请将 Cloud Code: Cloud Functions 探索器的标题拖回 Cloud Code 探索器。