Gérer les fonctions dans un espace de travail Shell
Restez organisé à l'aide des collections
Enregistrez et classez les contenus selon vos préférences.
Cette page explique comment gérer plusieurs configurations de fonctions Cloud dans un même espace de travail et comment réorganiser l'explorateur de fonctions Cloud Run avec Cloud Code.
Avant de commencer
Ce guide nécessite un espace de travail déjà configuré (un fichier launch.json avec au moins une configuration listée). Pour commencer avec un exemple, consultez le guide de démarrage rapide Créer et déployer une fonction.
Gérer plusieurs configurations dans un même espace de travail
Pour ajouter une configuration de fonction Cloud à votre fichier launch.json, procédez comme suit:
Cliquez sur Cloud Code, puis développez l'explorateur Cloud Functions.
Dans l'explorateur des fonctions Cloud Run, effectuez un clic droit sur WORKSPACE (ESPACE DE TRAVAIL), puis cliquez sur Add new cloud function configuration (Ajouter une configuration de fonction cloud).
Suivez les instructions à l'écran, puis effectuez les actions suivantes:
Saisir un nom de fonction
Sélectionner un environnement de fonctions Cloud Run
Saisissez un point d'entrée (nom de la méthode à appeler pour cette fonction).
Saisissez l'entrée de test
Vous pouvez également saisir manuellement ces valeurs dans votre fichier launch.json:
Votre espace de travail de fonctions Cloud Run correspond à la première configuration listée dans votre fichier launch.json. Le nom de l'espace de travail reflète l'functionName de la première configuration listée dans votre fichier launch.json:
(Facultatif) Pour déployer une autre configuration à partir de votre fichier launch.json, déplacez la configuration que vous souhaitez déployer en haut du fichier launch.json, puis cliquez sur ActualiserActualiser l'explorateur Cloud Functions.
Réorganiser l'explorateur de fonctions Cloud Run dans l'explorateur de fichiers de votre IDE
Vous pouvez réorganiser l'explorateur de fonctions Cloud Run dans l'explorateur de fichiers de Cloud Shell en procédant comme suit:
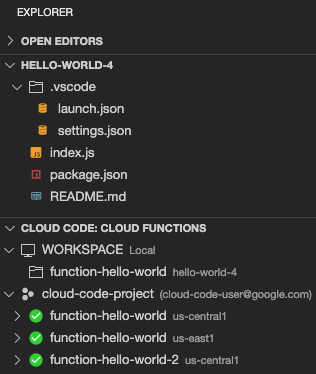
Faites glisser l'explorateur de fonctions Cloud Run dans l'explorateur de fichiers de Cloud Shell:
Cette disposition affiche l'explorateur de fonctions Cloud Run sous l'explorateur de fichiers afin que vous puissiez afficher vos fonctions déployées et vos espaces de travail de fonctions Cloud Run dans le même volet que vos fichiers de projet.
(Facultatif) Pour annuler cette disposition, faites glisser l'en-tête de l'explorateur Cloud Code: Cloud Functions vers l'explorateur Cloud Code.
Sauf indication contraire, le contenu de cette page est régi par une licence Creative Commons Attribution 4.0, et les échantillons de code sont régis par une licence Apache 2.0. Pour en savoir plus, consultez les Règles du site Google Developers. Java est une marque déposée d'Oracle et/ou de ses sociétés affiliées.
Dernière mise à jour le 2025/09/08 (UTC).
[[["Facile à comprendre","easyToUnderstand","thumb-up"],["J'ai pu résoudre mon problème","solvedMyProblem","thumb-up"],["Autre","otherUp","thumb-up"]],[["Difficile à comprendre","hardToUnderstand","thumb-down"],["Informations ou exemple de code incorrects","incorrectInformationOrSampleCode","thumb-down"],["Il n'y a pas l'information/les exemples dont j'ai besoin","missingTheInformationSamplesINeed","thumb-down"],["Problème de traduction","translationIssue","thumb-down"],["Autre","otherDown","thumb-down"]],["Dernière mise à jour le 2025/09/08 (UTC)."],[[["\u003cp\u003eThis page explains how to manage multiple Cloud Functions configurations within a single workspace using Cloud Code.\u003c/p\u003e\n"],["\u003cp\u003eNew Cloud Function configurations can be added to the \u003ccode\u003elaunch.json\u003c/code\u003e file either by using the Cloud Functions Explorer interface or by manually editing the file.\u003c/p\u003e\n"],["\u003cp\u003eThe Cloud Run functions workspace displayed is determined by the first configuration listed within your \u003ccode\u003elaunch.json\u003c/code\u003e file.\u003c/p\u003e\n"],["\u003cp\u003eUsers have the option to rearrange the Cloud Run functions Explorer to be integrated into the file explorer of their IDE, allowing for simultaneous viewing of functions and project files.\u003c/p\u003e\n"],["\u003cp\u003eIt also offers the ability to set what configuration to deploy by moving it to the top of the \u003ccode\u003elaunch.json\u003c/code\u003e file and then refreshing the explorer.\u003c/p\u003e\n"]]],[],null,["# Manage functions in Shell workspace\n\nThis page shows you how to manage multiple\n[Cloud Functions](https://cloud.google.com/functions/) configurations in a\nsingle workspace and how to rearrange your Cloud Run functions Explorer with\nCloud Code.\n\nBefore you begin\n----------------\n\nThis guide requires a workspace already setup (a `launch.json` file with at\nleast one configuration listed). To get started with a sample, see the\n[Create and deploy a function](/code/docs/shell/create-deploy-function)\nquickstart.\n\nManage multiple configurations in a single workspace\n----------------------------------------------------\n\nTo add a new Cloud Function configuration to your `launch.json` file, follow\nthese steps:\n\n1. Click **Cloud Code** and then expand the **Cloud Functions** Explorer.\n\n2. In the Cloud Run functions Explorer,\n right-click **WORKSPACE** and click\n **Add new cloud function configuration**.\n\n3. Follow the prompts and perform the following actions:\n\n 1. Enter a function name\n 2. Select a Cloud Run functions environment\n 3. Enter an entry point (the name of the method to call for this function)\n 4. Enter the test input\n\n Alternatively, you can manually enter these values into your `launch.json`\n file: \n\n {\n \"configurations\": [\n {\n \"name\": \"Deploy Cloud Function\",\n \"type\": \"cloudcode.cloudfunctions\",\n \"request\": \"launch\",\n \"functionName\": \"hello-world-get\",\n \"gen\": \"GEN_2\",\n \"entryPoint\": \"helloGet\"\n }\n ]\n }\n\n Your Cloud Run functions workspace corresponds to the first\n configuration listed in your `launch.json` file. The workspace name reflects\n the `functionName` of the first configuration listed in your `launch.json`\n file: \n\n {\n \"configurations\": [\n {\n \"name\": \"Deploy Cloud Function\",\n \"type\": \"cloudcode.cloudfunctions\",\n \"request\": \"launch\",\n \"functionName\": \"hello-world-pub-sub\",\n \"gen\": \"GEN_2\",\n \"entryPoint\": \"helloPubSub\"\n },\n {\n \"name\": \"Deploy Cloud Function\",\n \"type\": \"cloudcode.cloudfunctions\",\n \"request\": \"launch\",\n \"functionName\": \"hello-world-get\",\n \"gen\": \"GEN_2\",\n \"entryPoint\": \"helloGet\"\n }\n ]\n }\n\n4. (Optional) To deploy another configuration from your `launch.json` file, move\n the configuration you want to deploy to the top of the `launch.json` file and\n click refresh\n **Refresh Cloud Functions Explorer**.\n\nRearrange Cloud Run functions Explorer into your IDE's file Explorer\n--------------------------------------------------------------------\n\nYou can rearrange your Cloud Run functions Explorer into\n\nCloud Shell's file Explorer by performing the following:\n\n1. Drag your Cloud Run functions Explorer into\n\n Cloud Shell's file Explorer:\n\n\n This arrangement displays your Cloud Run functions Explorer under the\n file Explorer so that you can view your deployed functions and\n Cloud Run functions workspace(s) in the same pane as your project files.\n2. (Optional) To undo this arrangement, drag the\n **Cloud Code: Cloud Functions** Explorer's heading back to the **Cloud Code**\n Explorer."]]