Gestire i secret con Secret Manager in Cloud Code for IntelliJ
Mantieni tutto organizzato con le raccolte
Salva e classifica i contenuti in base alle tue preferenze.
Con l'integrazione di Secret Manager di Cloud Code, puoi creare, visualizzare, aggiornare e utilizzare i secret all'interno dell'IDE e senza doverli inserire nel codebase.
Questa pagina descrive come accedere a Secret Manager all'interno dell'IDE e come
iniziare a creare e gestire i secret.
Abilitazione di Secret Manager
Quando gestisci i secret con Cloud Code, questi vengono archiviati in modo sicuro
in Secret Manager e possono essere recuperati in modo programmatico quando ne hai bisogno. Devi solo abilitare l'API Secret Manager e disporre delle autorizzazioni
giuste per gestire i secret:
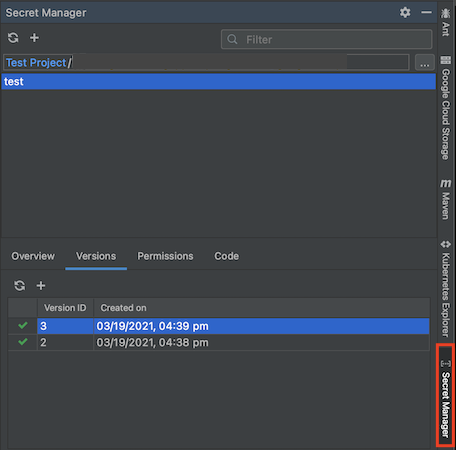
Per avviare Secret Manager, fai clic sulla scheda Secret Manager nella
barra laterale destra di Cloud Code.
Se non hai abilitato l'API Secret Manager, Cloud Code ti chiede di abilitarla nel riquadro Secret Manager facendo clic su Abilita API.
Il segreto deve trovarsi nello stesso progetto del codice dell'applicazione. Assicurati di aver selezionato il progetto corretto o di cambiarlo utilizzando il selettore di progetti nel riquadro di Secret Manager.
Creazione e visualizzazione dei secret
Creazione di secret
Puoi creare un secret con uno dei seguenti metodi:
Utilizzo del riquadro Secret Manager
Vai al riquadro Secret Manager.
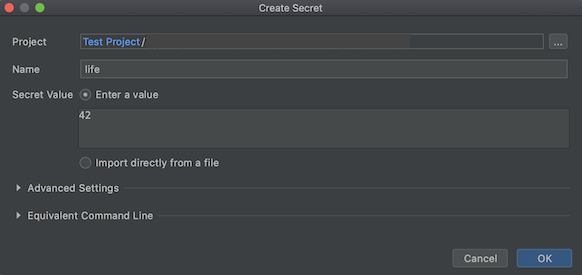
Fai clic sull'icona Aggiungi.
Viene visualizzata la finestra di dialogo Crea secret, in cui puoi impostare il progetto, il nome e il valore del secret, nonché scegliere una regione in cui archiviare il secret e le etichette per organizzare i secret.
Utilizzo dell'editor
Apri un file contenente il testo che vuoi archiviare come secret nell'editor.
Evidenzia e fai clic con il tasto destro del mouse su questo testo.
Dal menu, seleziona la voce di menu Create Secret in Secret Manager....
Viene aperta la finestra di dialogo Crea secret con il valore del secret compilato con
il testo evidenziato. Qui puoi personalizzare il progetto, il nome, il valore, la regione e le etichette del secret.
Utilizzo di Esplora progetti
In Esplora progetti, fai clic con il tasto destro del mouse senza evidenziare alcun testo.
Dal menu, seleziona la voce di menu Create Secret in Secret Manager....
Si apre la finestra di dialogo Crea segreto. Scegli il progetto, il nome, il valore, la regione e le etichette del secret qui e fai clic su Ok al termine.
Creazione di nuove versioni dei secret
Se hai un secret esistente e vuoi aggiornarlo, puoi farlo
andando alla scheda Versioni del riquadro di Secret Manager:
Fai clic sull'icona Aggiungi nella scheda Versioni.
Viene visualizzata una finestra di dialogo Aggiungi nuova versione in cui puoi impostare il valore del secret esistente utilizzando il campo Valore del secret o importando un file.
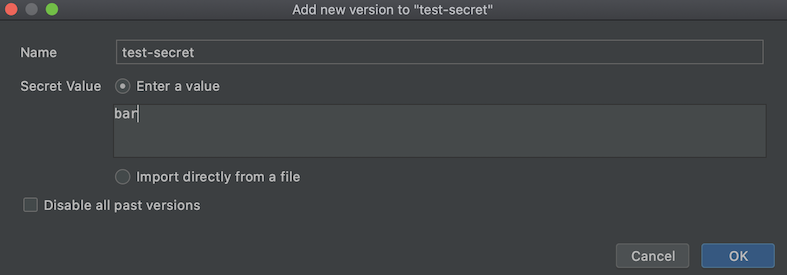
Se preferisci rimuovere tutte le versioni precedenti del segreto e conservare solo
la nuova versione in fase di creazione, scegli Disattiva tutte le versioni precedenti.
Dopo aver fatto clic su Ok e aver aggiunto la versione, puoi visualizzare la versione più recente del secret e, se applicabile, tutte le versioni del secret elencate nella scheda Versioni.
Visualizzare i secret
Per visualizzare i secret, nel riquadro di Secret Manager, seleziona un secret dall'elenco
visualizzato nella sezione Nome secret. I suoi dettagli, come nome, policy di replica, timestamp di creazione e ID risorsa, sono elencati nella scheda Panoramica.
Puoi anche fare clic con il tasto destro del mouse sul secret e scegliere Apri nella console Cloud per visualizzare e gestire il secret nel browser.
Visualizzazione delle versioni dei secret
Per visualizzare le versioni di un secret, seleziona un secret dall'elenco visualizzato nella
sezione Nome secret e seleziona la scheda Versioni.
Fai clic con il tasto destro del mouse sulla versione del secret su cui vuoi intervenire e scegli tra le opzioni disponibili: visualizzare il valore del secret, copiare l'ID versione, attivare o disattivare la versione ed eliminare la versione selezionata.
Accedere ai secret dalla tua applicazione
Una volta creato il segreto, puoi includerlo nel codice e configurare
l'autenticazione.
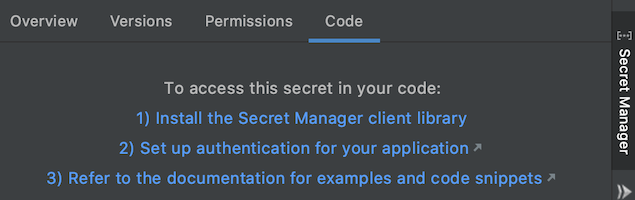
Per accedere al segreto appena creato dalla tua applicazione:
Installa la libreria client di Secret Manager.
Vai a Strumenti > Cloud Code > Aggiungi librerie cloud e gestisci
API Cloud e seleziona Secret Manager > API Secret Manager dall'albero
di Explorer API Google Cloud. Segui le istruzioni specifiche per la lingua
indicate nella sezione Installare la libreria client.
Infine, per completare la configurazione dell'autenticazione, devi seguire la
guida all'autenticazione delle librerie client:
Sviluppo locale: se esegui lo sviluppo su un cluster locale (come minikube, Docker Desktop) o un emulatore locale, devi completare i passaggi illustrati nella sezione Sviluppo locale pertinente al tuo flusso di lavoro.
Sviluppo remoto: se utilizzi un cluster GKE o un servizio Cloud Run nella tua applicazione,
devi completare i passaggi illustrati nella
sezione Sviluppo remoto
pertinente al tuo flusso di lavoro, incluse le istruzioni specifiche di Secret Manager
per configurare i ruoli richiesti nel tuo account di servizio.
Assistenza
Per inviare un feedback o segnalare un problema nel tuo IDE IntelliJ, vai a
Strumenti > Cloud Code > Guida / Informazioni > Invia
feedback o segnala un problema per segnalare un problema su GitHub.
[[["Facile da capire","easyToUnderstand","thumb-up"],["Il problema è stato risolto","solvedMyProblem","thumb-up"],["Altra","otherUp","thumb-up"]],[["Difficile da capire","hardToUnderstand","thumb-down"],["Informazioni o codice di esempio errati","incorrectInformationOrSampleCode","thumb-down"],["Mancano le informazioni o gli esempi di cui ho bisogno","missingTheInformationSamplesINeed","thumb-down"],["Problema di traduzione","translationIssue","thumb-down"],["Altra","otherDown","thumb-down"]],["Ultimo aggiornamento 2025-09-04 UTC."],[[["\u003cp\u003eCloud Code's Secret Manager integration allows you to manage secrets directly within your IDE without storing them in your codebase.\u003c/p\u003e\n"],["\u003cp\u003eYou can create secrets using the Secret Manager panel, the editor, or the project explorer, specifying project, name, value, region, and labels.\u003c/p\u003e\n"],["\u003cp\u003eExisting secrets can be updated by creating new versions in the Versions tab, where you can choose to disable all previous versions.\u003c/p\u003e\n"],["\u003cp\u003eSecrets and their versions can be viewed within the Secret Manager panel, with options to view details, open in the Cloud console, or take actions on specific versions.\u003c/p\u003e\n"],["\u003cp\u003eTo access secrets in your application, install the Secret Manager client library and follow the appropriate authentication setup for local or remote development.\u003c/p\u003e\n"]]],[],null,["# Manage secrets with Secret Manager in Cloud Code for IntelliJ\n\nWith Cloud Code's Secret Manager integration, you\ncan create, view, update, and use secrets within your IDE and without having\nthem in your codebase.\n\nThis page describes how to access Secret Manager within your IDE and how\nyou can get started creating and managing secrets.\n\nEnabling Secret Manager\n-----------------------\n\nWhen managing secrets with Cloud Code, secrets are securely stored\nin Secret Manager and can be programmatically fetched when you need\nthem. All you need is the Secret Manager API enabled and the right\npermissions to manage secrets:\n\n1. To launch Secret Manager, click on the Secret Manager tab in the\n right Cloud Code sidebar.\n\n2. If you haven't enabled the Secret Manager API, Cloud Code prompts\n you to enable it within the Secret Manager panel by clicking **Enable API**.\n\n Your secret also needs to be in the same project as your application code; ensure\n you have the right project selected or switch using the project selector in the\n Secret Manager panel.\n\nCreating and viewing secrets\n----------------------------\n\n### Creating secrets\n\nYou can create a secret with one of the following methods:\n\n#### Using the Secret Manager panel\n\n1. Navigate to the Secret Manager panel.\n\n2. Click the **Add** icon.\n\n This launches a Create Secret dialog where you can set your secret's project,\n name, and value, as well as choose a region to store your secret and labels to\n organize your secrets.\n\n#### Using the editor\n\n1. Open a file containing text you would like to store as a secret in the editor.\n2. Highlight and right-click this text.\n\n From the menu, select the `Create Secret in Secret Manager...` menu item.\n This opens the Create Secret dialog with the secret value filled in with\n the highlighted text. You can customize the secret's project,\n name, value, region, and labels here.\n\n#### Using the project explorer\n\n1. In the project explorer, without highlighting any text, right-click.\n2. From the menu, select the `Create Secret in Secret Manager...` menu item. This opens the Create Secret dialog. Choose your secret's project, name, value, region, and labels here, and click **OK** when done.\n\n### Creating new versions of secrets\n\nIf you have an existing secret and would like to update it, you can do so by\nnavigating to the **Versions** tab of the Secret Manager panel:\n\n1. Click the **Add** icon within the **Versions** tab.\n\n This launches a Add new version dialog where you can set the value of your\n existing secret either using the Secret value field or by importing a file.\n\n2. If you'd prefer to remove all previous versions of your secret and keep just\n the new version being created, choose **Disable all past versions**.\n\n3. Once you click **OK** and your version is added, you can see your latest secret\n version, and if applicable, all the versions of your secret listed under\n the **Versions** tab.\n\n### Viewing secrets\n\nTo view secrets, within the Secret Manager panel, select a secret from the list\ndisplayed in the Secret Name section. Its details such as name, replication\npolicy, creation timestamp, and resource ID are listed in the **Overview** tab.\n\nYou can also right-click the secret and choose **Open in Cloud console** to view and\nmanage the secret in your browser.\n\n### Viewing secret versions\n\nTo view versions of a secret, select a secret from the list displayed in the\nSecret Name section and select the **Versions** tab.\n\nRight-click the secret version you'd like to take action on and choose from\nthe available options; viewing the secret value, copying the version ID,\nenabling or disabling the version, and destroying the selected version.\n\nAccessing secrets from your application\n---------------------------------------\n\nOnce your secret is created, you can include it in your code and set up\nauthentication.\n\nTo access your newly created secret from your application, follow these steps:\n\n1. Install the Secret Manager client library.\n\n Navigate to **Tools** \\\u003e **Cloud Code** \\\u003e **Add Cloud Libraries and Manage\n Cloud APIs** and select **Secret Manager** \\\u003e **Secret Manager API** from the\n Google Cloud APIs explorer tree. Follow the language-specific instructions\n laid out in the Install Client Library section.\n2. Customize and include the [relevant code snippet](/secret-manager/docs/access-secret-version)\n in your application's code.\n\n3. Finally, to complete your authentication setup, you need to follow the\n Client libraries authentication guide:\n\n - **Local development** : If you're developing on a local cluster (like minikube, Docker Desktop) or a local emulator, you should complete the steps illustrated in the [Local development section](/code/docs/intellij/client-libraries#local_development) relevant to your workflow.\n - **Remote development** : If you're using a GKE cluster or a Cloud Run service in your application, you should complete the steps illustrated in the [Remote development section](/code/docs/intellij/client-libraries#remote_development) relevant to your workflow, including the Secret Manager-specific instructions for setting up the required roles on your service account.\n\nGet support\n-----------\n\nTo submit feedback or report an issue in your IntelliJ IDE, go to **Tools** \\\u003e **Cloud Code** \\\u003e **Help / About** \\\u003e **Submit\nfeedback or report an issue** to report an issue on [GitHub](https://github.com/GoogleCloudPlatform/cloud-code-intellij/issues)."]]