Si vous avez un projet Gradle et que vous utilisez IntelliJ IDEA Community Edition, configurez votre projet avec le plug-in Gradle pour App Engine.
Veillez à synchroniser votre projet avec Gradle.
Si vous ne possédez pas d'application mais souhaitez tout de même essayer les procédures de déploiement, téléchargez l'exemple d'application :
Clonez l'exemple d'application Hello World sur votre ordinateur.
Cliquez sur les points de suspension (...) en regard du champ Server (Serveur).
Dans la boîte de dialogue, vérifiez que le champ Name (Nom) affiche Google App Engine.
Cliquez sur OK.
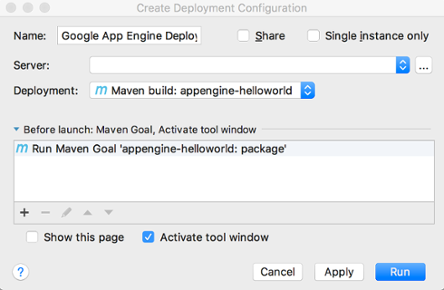
Sélectionnez la source du déploiement dans le champ Deployment.
Si vous utilisez Community Edition, Cloud Code pour IntelliJ ne prend en charge que le déploiement à partir d'un artefact Maven ou Gradle.
Sélectionnez un projet dans le champ Project.
La première fois que vous configurez le déploiement, vous êtes invité à vous connecter au compte associé au projet de la console Google Cloud que vous souhaitez déployer.
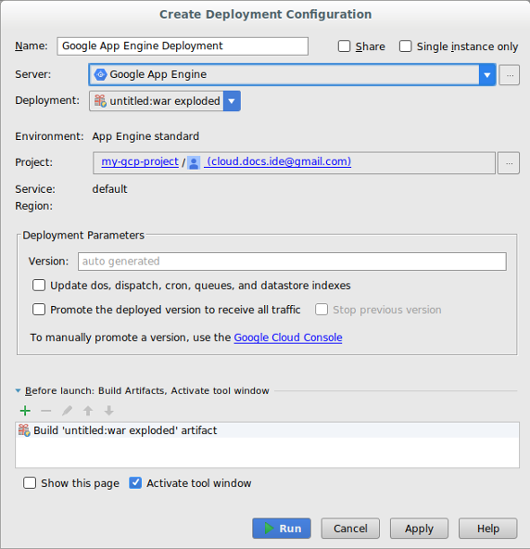
Renseignez les autres champs nécessaires pour configurer le déploiement.
Cliquez sur Run (Exécuter) pour créer et déployer votre application.
Dans la fenêtre Application Servers (Serveurs d'applications), cliquez sur le nom de votre projet pour surveiller la progression de son déploiement. Si la fenêtre ne s'affiche pas, cliquez sur Display > Tools Windows > Application Servers (Affichage > Fenêtres d'outils > Serveurs d'applications).
Une fois le déploiement terminé, vous pouvez afficher l'URL de votre application dans le résultat de la console.
Mettre à jour les configurations standards App Engine
Après avoir créé la configuration de déploiement initiale, vous pouvez modifier cette configuration selon les besoins de votre application.
Sélectionnez File > Project Structure (Fichier > Structure du projet).
La boîte de dialogue Project Structure (Structure du projet) s’affiche.
Sous Project Settings (Paramètres du projet), sélectionnez Facets (Attributs).
Sélectionnez l'attribut Google App Engine Standard.
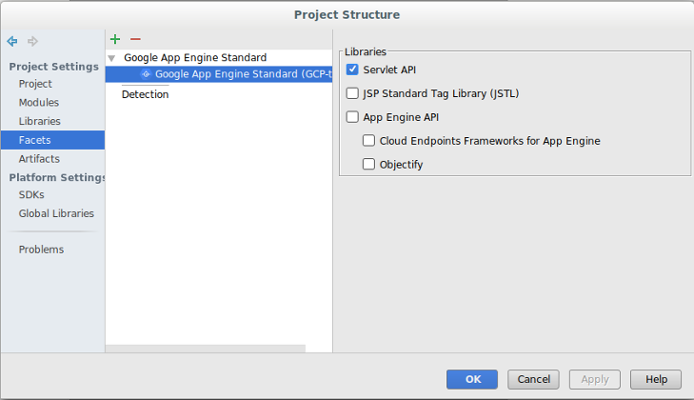
Sélectionnez les bibliothèques que vous souhaitez ajouter à votre projet.
Cliquez sur OK.
Supprimer le serveur
Si vous souhaitez supprimer le serveur que vous avez configuré pour votre projet, procédez comme suit :
Pour envoyer des commentaires ou signaler un problème dans votre IDE IntelliJ, accédez à Outils > Cloud Code > Aide / À propos > Envoyer des commentaires ou signaler un problème pour signaler un problème sur GitHub.
Sauf indication contraire, le contenu de cette page est régi par une licence Creative Commons Attribution 4.0, et les échantillons de code sont régis par une licence Apache 2.0. Pour en savoir plus, consultez les Règles du site Google Developers. Java est une marque déposée d'Oracle et/ou de ses sociétés affiliées.
Dernière mise à jour le 2025/09/01 (UTC).
[[["Facile à comprendre","easyToUnderstand","thumb-up"],["J'ai pu résoudre mon problème","solvedMyProblem","thumb-up"],["Autre","otherUp","thumb-up"]],[["Difficile à comprendre","hardToUnderstand","thumb-down"],["Informations ou exemple de code incorrects","incorrectInformationOrSampleCode","thumb-down"],["Il n'y a pas l'information/les exemples dont j'ai besoin","missingTheInformationSamplesINeed","thumb-down"],["Problème de traduction","translationIssue","thumb-down"],["Autre","otherDown","thumb-down"]],["Dernière mise à jour le 2025/09/01 (UTC)."],[[["\u003cp\u003eCloud Code supports deploying Java 8 applications to the App Engine standard environment within IntelliJ IDEA, but App Engine Java 8 support is ending, and new projects using it are not recommended.\u003c/p\u003e\n"],["\u003cp\u003eTo deploy to App Engine using Cloud Code, users must first create an App Engine app, set up Cloud Code, and add App Engine standard framework support.\u003c/p\u003e\n"],["\u003cp\u003eIntelliJ IDEA Community Edition only supports deploying Maven or Gradle-based projects to App Engine, and if you have a Gradle project you must configure it with the App Engine Gradle plugin.\u003c/p\u003e\n"],["\u003cp\u003eUsers can configure and modify App Engine deployment settings, such as selecting the project, server, and deployment source, through the Cloud Code interface in IntelliJ IDEA.\u003c/p\u003e\n"],["\u003cp\u003eUsers can easily remove an App Engine server configuration from their project via the IDE settings, under the Clouds section.\u003c/p\u003e\n"]]],[],null,["# Deploy to the App Engine Standard Environment in Cloud Code for IntelliJ\n\n| **Caution:** As of January 31, 2024, Java 8 support for App Engine has ended, and will be deprecated on January 31, 2026. As a result, Cloud Code disables App Engine by default. To enable App Engine in your IDE, navigate to **Settings** \\\u003e **Google\n| Cloud Code** \\\u003e **App Engine** . Due to the upcoming deprecation of App Engine, we don't recommend creating new App Engine projects. For more information about App Engine deprecations, see [Feature deprecations](/appengine/docs/standard/deprecations). For more information about the runtime support schedule for App Engine, see [Runtime support schedule](/appengine/docs/standard/lifecycle/support-schedule).\n\nThis document describes how to deploy an App Engine application to the\n[App Engine standard\nenvironment](/appengine/docs/standard)\nfrom within IntelliJ IDEA.\n| **Note:** The following IDEs support this feature:\n|\n| - IntelliJ IDEA - Ultimate\n| - IntelliJ IDEA - Community\n| **Note:** For the App Engine standard environment, only Java applications using [Java 8 runtime](https://cloud.google.com/appengine/docs/standard/java/runtime) are supported on Cloud Code.\n| **Note:** If you are using IntelliJ IDEA Community Edition, you can deploy Maven-based and Gradle-based projects to the App Engine standard environment.\n\nBefore you begin\n----------------\n\n- Follow the [Create an App](/code/docs/intellij/create-standard)\n guide to install and set up Cloud Code as well as\n create an App Engine app for the standard\n environment. Be sure to add\n [App Engine standard framework\n support](/code/docs/intellij/create-standard#framework).\n\n- If you have a Gradle-based project and are using IntelliJ IDEA Community\n Edition, configure your project with the [App Engine Gradle\n plugin](https://github.com/GoogleCloudPlatform/app-gradle-plugin#how-to-use).\n Be sure to sync your project with Gradle.\n\n If you don't have an application but still want to try these deployment\n procedures, download the sample app:\n 1. Clone the **Hello World** sample app to your local machine:\n\n git clone https://github.com/GoogleCloudPlatform/java-docs-samples\n\n 2. In IntelliJ, select **File** \\\u003e **Open** to open the file selector.\n\n 3. Navigate to `/java-docs-samples/appengine-java8/`.\n\n 4. Select the `/helloworld/` directory.\n\n 5. Click **OK**.\n\nCreating the deployment configuration\n-------------------------------------\n\n1. Choose **Tools** \\\u003e **Cloud Code** \\\u003e **App Engine** \\\u003e\n **Deploy to App Engine**.\n\n2. Confirm the server configuration:\n\n 1. Click the ellipsis (...) next to the **Server** field.\n\n 2. In the dialog, verify that the **Name** field displays\n **Google App Engine**.\n\n 3. Click **OK**.\n\n3. Select the **Deployment** source.\n\n If you're using Community Edition, Cloud Code for IntelliJ only supports\n deploying from a Maven or a Gradle artifact.\n4. Select a project in the **Project** field.\n\n The first time you configure the deployment, you will be prompted to sign in\n to the account associated with the Google Cloud console project that\n you want to deploy.\n\n5. Fill in other fields as needed to configure the deployment.\n\n6. Click **Run** to build and deploy your app.\n\n7. In the Application Servers window, click the name of your project to monitor\n its deployment progress. If the window is not displaying, click\n **View** \\\u003e **Tool Windows** \\\u003e **Application Servers**.\n\n After deployment completes, you can view your app's URL in the console\n output.\n\nUpdate the App Engine standard configurations\n---------------------------------------------\n\nAfter creating the initial deployment configuration, you can make changes to\nthose configurations as needed by your application.\n\n1. Select **File** \\\u003e **Project Structure**.\n\n The **Project Structure** dialog displays.\n2. Under **Project Settings** , select **Facets**.\n\n3. Select the App Engine standard facet.\n\n \u003cbr /\u003e\n\n4. Select the libraries you want to add to your project.\n\n5. Click **OK**.\n\nDeleting the server\n-------------------\n\nIf you ever want to delete the server you configured for your\nproject, you can do so as follows:\n\n1. Choose **File** \\\u003e **Settings** \\\u003e **Build, Execution, Deployment** \\\u003e\n **Clouds**.\n\n On macOS, this is **IntelliJ IDEA** \\\u003e **Preferences** \\\u003e\n **Build, Execution, Deployment** \\\u003e **Clouds**.\n2. Select your server (App Engine) and click the minus sign (-) at the\n top of the window to remove it.\n\n3. Click **OK**.\n\nWhat's next\n-----------\n\n- You can add your project to [Cloud Source Repositories](/code/docs/intellij/vcs) if you haven't done so already.\n\nGet support\n-----------\n\nTo submit feedback or report an issue in your IntelliJ IDE, go to\n**Tools** \\\u003e **Cloud Code** \\\u003e **Help / About** \\\u003e **Submit\nfeedback or report an issue** to report an issue on [GitHub](https://github.com/GoogleCloudPlatform/cloud-code-intellij/issues)."]]