使用 Cloud Build 建構及推送 Docker 映像檔
瞭解如何開始使用 Cloud Build,建構 Docker 映像檔並推送至 Artifact Registry。Artifact Registry:讓您在單一位置集中管理私人套件和 Docker 容器映像檔。
您會先使用 Dockerfile (Docker 設定檔) 建構映像檔,然後使用 Cloud Build 設定檔建構相同的映像檔。
如要直接在 Cloud Shell 編輯器中按照逐步指南操作,請按一下「Guide me」(逐步引導):
事前準備
- Sign in to your Google Cloud account. If you're new to Google Cloud, create an account to evaluate how our products perform in real-world scenarios. New customers also get $300 in free credits to run, test, and deploy workloads.
-
In the Google Cloud console, on the project selector page, select or create a Google Cloud project.
Roles required to select or create a project
- Select a project: Selecting a project doesn't require a specific IAM role—you can select any project that you've been granted a role on.
-
Create a project: To create a project, you need the Project Creator
(
roles/resourcemanager.projectCreator), which contains theresourcemanager.projects.createpermission. Learn how to grant roles.
-
Verify that billing is enabled for your Google Cloud project.
-
Enable the Cloud Build, Compute Engine and Artifact Registry APIs.
Roles required to enable APIs
To enable APIs, you need the Service Usage Admin IAM role (
roles/serviceusage.serviceUsageAdmin), which contains theserviceusage.services.enablepermission. Learn how to grant roles. -
Install the Google Cloud CLI.
-
如果您使用外部識別資訊提供者 (IdP),請先 使用聯合身分登入 gcloud CLI。
-
如要初始化 gcloud CLI,請執行下列指令:
gcloud init -
Make sure that you have the following role or roles on the project: Artifact Registry Administrator, Cloud Build Editor, Logs Viewer, Service Account User, Service Usage Admin, Storage Bucket Viewer, Storage Object Creator
Check for the roles
-
In the Google Cloud console, go to the IAM page.
Go to IAM - Select the project.
-
In the Principal column, find all rows that identify you or a group that you're included in. To learn which groups you're included in, contact your administrator.
- For all rows that specify or include you, check the Role column to see whether the list of roles includes the required roles.
Grant the roles
-
In the Google Cloud console, go to the IAM page.
前往 IAM - 選取專案。
- 按一下 「授予存取權」。
-
在「New principals」(新增主體) 欄位中,輸入您的使用者 ID。 這通常是 Google 帳戶的電子郵件地址。
- 在「Select a role」(選取角色) 清單中,選取角色。
- 如要授予其他角色,請按一下 「新增其他角色」,然後新增每個其他角色。
- 按一下 [Save]。
開啟終端機視窗。
建立名為
quickstart-docker的新目錄,然後前往該目錄:mkdir quickstart-docker cd quickstart-docker建立名為
quickstart.sh的檔案,並在當中加入下列內容:建立名為
Dockerfile的檔案,並在當中加入下列內容:在終端機視窗中,執行下列指令以便執行
quickstart.sh:chmod +x quickstart.sh在
us-west2位置中新建名為quickstart-docker-repo的 Docker 存放區,並將說明設為「Docker repository」(Docker 存放區):gcloud artifacts repositories create quickstart-docker-repo --repository-format=docker \ --location=us-west2 --description="Docker repository"確認存放區是否已成功建立:
gcloud artifacts repositories list顯示的存放區清單中會列出
quickstart-docker-repo。執行下列指令來取得專案 ID: Google Cloud
gcloud config get-value project在含有
quickstart.sh和Dockerfile的目錄中執行下列指令:gcloud builds submit --region=us-west2 --tag us-west2-docker.pkg.dev/PROJECT_ID/quickstart-docker-repo/quickstart-image:tag1在含有
quickstart.sh和Dockerfile的同一個目錄中,建立名為cloudbuild.yaml的檔案,其中含有下列內容。這個檔案是您的建構設定檔。在建構階段,Cloud Build 會將$PROJECT_ID自動取代為您的專案 ID。執行下列指令來展開建構作業:
gcloud builds submit --region=us-west2 --config cloudbuild.yaml在 Google Cloud 控制台中開啟 Cloud Build 頁面。
如有需要,請選取專案並按一下「開啟」。
畫面會顯示「Build history」(建構歷史記錄) 頁面:

如有需要,請在「Region」(區域) 下拉式選單中選取「
us-west2」,即可查看該區域中的建構作業。清單中會列出兩個建構,分別是您在本快速入門導覽課程中執行的建構。
按一下其中一個建構。
畫面中會顯示「Build details」(建構作業詳細資料) 頁面。
如要查看建構作業的構件,請按一下「Build Summary」(建構作業摘要) 下方的「Build Artifacts」(建構作業構件)。
畫面會顯示類似以下的輸出:
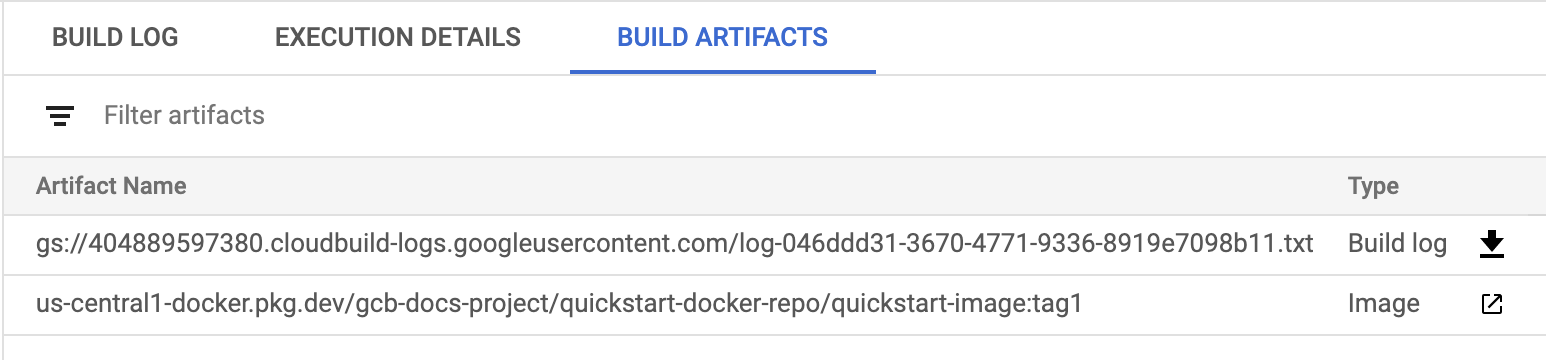
您可以在這個頁面中下載建構作業記錄檔,以及查看 Artifact Registry 中的映像檔詳細資料。
在 Google Cloud 控制台中開啟 Artifact Registry 頁面。
選取您的專案並按一下 [Open] (開啟)。
選取「quickstart-docker-repo」。
點選「刪除」。
- 瞭解如何執行 Docker 映像檔。
- 瞭解如何建立基本的建構設定檔。
- 瞭解如何使用 Cloud Build 執行部署作業。
- 瞭解如何建構 Node.js 應用程式。
- 瞭解如何建構 Java 應用程式。
- 瞭解如何建構 Go 應用程式。
準備要建立的來源檔案
您需要一些範例原始碼,才能封裝到容器映像檔中。在本節中,您將建立殼層指令碼和
Dockerfile。Dockerfile是文字文件,內含 Docker 建構映像檔的操作說明。在 Artifact Registry 中建立 Docker 存放區
使用 Dockerfile 建立映像檔
Cloud Build 允許您使用
Dockerfile建構 Docker 映像檔,您不需要有單獨的 Cloud Build 設定檔。如要使用
Dockerfile建構:建構完成後,畫面會顯示類似以下的輸出:
DONE
------------------------------------------------------------------------------------------------------------------------------------
ID                                    CREATE_TIME                DURATION  SOURCE   IMAGES     STATUS
545cb89c-f7a4-4652-8f63-579ac974be2e  2020-11-05T18:16:04+00:00  16S       gs://gcb-docs-project_cloudbuild/source/1604600163.528729-b70741b0f2d0449d8635aa22893258fe.tgz  us-west2-docker.pkg.dev/gcb-docs-project/quickstart-docker-repo/quickstart-image:tag1  SUCCESS
您已成功使用
Dockerfile建立名為quickstart-image的 Docker 映像檔,並推送至 Artifact Registry。透過建構設定檔建立映像檔
您會在本節中使用 Cloud Build 設定檔建構同上的 Docker 映像檔。建構設定檔會根據您的規格,指示 Cloud Build 執行工作。
建構完成時,畫面會顯示類似以下的輸出:
DONE
------------------------------------------------------------------------------------------------------------------------------------
ID                                    CREATE_TIME                DURATION  SOURCE          IMAGES          STATUS
046ddd31-3670-4771-9336-8919e7098b11  2020-11-05T18:24:02+00:00  15S       gs://gcb-docs-project_cloudbuild/source/1604600641.576884-8153be22c94d438aa86c78abf11403eb.tgz  us-west2-docker.pkg.dev/gcb-docs-project/quickstart-docker-repo/quickstart-image:tag1  SUCCESS
您已成功透過建構設定檔建立
quickstart-image,並將映像檔推送至 Artifact Registry。查看建構作業詳細資料
清除所用資源
如要避免系統向您的 Google Cloud 帳戶收取本頁所用資源的費用,請按照下列步驟操作。
您已成功刪除在本快速入門導覽課程中建立的存放區。
後續步驟
-