This page describes how to use AutoML Tables to export your custom model to Cloud Storage, download the model to your server, and then use Docker to make the model available for predictions.
The exported model can run only on x86 architecture CPUs that support Advanced Vector Extensions (AVX) instruction sets.
Introduction
The steps for exporting your model are:
Before you begin
Before you can complete this task, you must have completed the following tasks:
- Set up your project as described in Before you begin.
- Train the model that you want to download.
- Install and initialize the Google Cloud CLI on the server you will use to run the exported model.
- Install Docker on your server.
Pull the AutoML Tables model server Docker image:
sudo docker pull gcr.io/cloud-automl-tables-public/model_server
Exporting a model
You cannot export a model that was created before August 23, 2019.
Console
Go to the AutoML Tables page in the Google Cloud console.
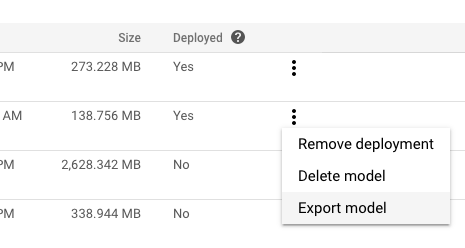
Select the Models tab in the left navigation pane.
In the More actions menu for the model you want to export, click Export model.
Select or create a Cloud Storage folder in the desired location.
The bucket must meet the bucket requirements.
You cannot export a model to a top-level bucket. You must use at least one level of folder.
Click Export.
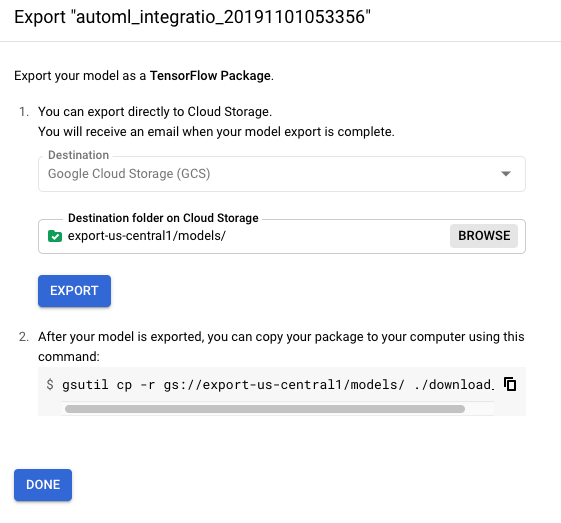
You will download the exported model to your server in the next section.
REST
You use the models.export method to export a model to Cloud Storage.Before using any of the request data, make the following replacements:
-
endpoint:
automl.googleapis.comfor the global location, andeu-automl.googleapis.comfor the EU region. - project-id: your Google Cloud project ID.
- location: the location for the resource:
us-central1for Global oreufor the European Union. -
model-id: the ID of the model you want to deploy. For example,
TBL543. - gcs-destination : your destination folder in
Cloud Storage. For example,
gs://export-bucket/exports.You cannot export a model to a top-level bucket. You must use at least one level of folder.
HTTP method and URL:
POST https://endpoint/v1beta1/projects/project-id/locations/location/models/model-id:export
Request JSON body:
{
  "outputConfig": {
    "modelFormat": "tf_saved_model",
    "gcsDestination": {
      "outputUriPrefix": "gcs-destination"
    }
  }
}
To send your request, choose one of these options:
curl
Save the request body in a file named request.json,
and execute the following command:
curl -X POST \
     -H "Authorization: Bearer $(gcloud auth print-access-token)" \
     -H "x-goog-user-project: project-id" \
     -H "Content-Type: application/json; charset=utf-8" \
     -d @request.json \
     "https://endpoint/v1beta1/projects/project-id/locations/location/models/model-id:export"
PowerShell
Save the request body in a file named request.json,
and execute the following command:
$cred = gcloud auth print-access-token
$headers = @{ "Authorization" = "Bearer $cred"; "x-goog-user-project" = "project-id" }

Invoke-WebRequest `
    -Method POST `
    -Headers $headers `
    -ContentType: "application/json; charset=utf-8" `
    -InFile request.json `
    -Uri "https://endpoint/v1beta1/projects/project-id/locations/location/models/model-id:export" | Select-Object -Expand Content
You should receive a JSON response similar to the following:
{
  "name": "projects/292381/locations/us-central1/operations/TBL543",
  "metadata": {
    "@type": "type.googleapis.com/google.cloud.automl.v1beta1.OperationMetadata",
    "createTime": "2019-12-30T18:23:47.728373Z",
    "updateTime": "2019-12-30T18:23:47.728373Z",
    "worksOn": [
      "projects/292381/locations/us-central1/models/TBL543"
    ],
    "exportModelDetails": {
      "outputInfo": {
        "gcsOutputDirectory": "gs://export-bucket/exports/model-export/tbl/tf_saved_model-automl_integration_test_model-2019-12-30T18:23:47.461Z/"
      }
    },
    "state": "RUNNING"
  }
}
Exporting a model is a long-running operation. You can poll for the operation status or wait for the operation to return. Learn more.
Run the model server
In this task, you will download your exported model from Cloud Storage and start the Docker container, so your model is ready to receive prediction requests.
Your model must be run inside a Docker container.
To run the model server:
On the machine where you will run the model, change to the directory where you want to save the exported model.
Download the exported model:
gsutil cp -r gcs-destination/* .
Where gcs-destination is the path to the location of the exported model in Cloud Storage. For example:
gsutil cp -r gs://export-us-central1/models/* .
The model is copied to your current directory, under the following path:
./model-export/tbl/tf_saved_model-<model-name>-<export-timestamp>Rename the directory that contains the timestamp.
mv model-export/tbl/tf_saved_model-<model-name>-<export-timestamp> model-export/tbl/<new-dir-name>The timestamp format makes the directory invalid for Docker.
Start the Docker container, using the directory name you just created:
docker run -v `pwd`/model-export/tbl/new_folder_name:/models/default/0000001 -p 8080:8080 -it gcr.io/cloud-automl-tables-public/model_server
You can stop the model server at any time by using Ctrl-C.
Updating the model server docker container
Because you download the model server Docker container when you export the model, you must explicitly update the model server to get updates and bug fixes. You should update the model server periodically, using the following command:
docker pull gcr.io/cloud-automl-tables-public/model_server
Getting predictions from your exported model
The model server in the AutoML Tables image container handles prediction requests and returns prediction results.
Batch prediction is not available for exported models.
Prediction data format
You provide the data (payload field) for your prediction request the following
JSON format:
{ "instances": [ { "column_name_1": value, "column_name_2": value, … } , … ] }
The JSON data types required depend on the AutoML Tables data type of the column. See Row object format for details.
The following example shows a request with three columns: a categorical column, a numeric array, and a struct. The request includes two rows.
{
  "instances": [
    {
      "categorical_col": "mouse",
      "num_array_col": [
        1,
        2,
        3
      ],
      "struct_col": {
        "foo": "piano",
        "bar": "2019-05-17T23:56:09.05Z"
      }
    },
    {
      "categorical_col": "dog",
      "num_array_col": [
        5,
        6,
        7
      ],
      "struct_col": {
        "foo": "guitar",
        "bar": "2019-06-17T23:56:09.05Z"
      }
    }
  ]
}
Making the prediction request
Put your request data into a text file, for example,
tmp/request.json.The number of rows of data in the prediction request, called the mini-batch size, affects the prediction latency and throughput. The larger the mini- batch size, the higher the latency and throughput. For reduced latency, use a smaller mini-batch size. For increased throughput, increase the mini-batch size. The most commonly used mini-batch sizes are 1, 32, 64, 128, 256, 512, and 1024.
Request the prediction:
curl -X POST --data @/tmp/request.json http://localhost:8080/predict
Prediction results format
The format of your results depends on the type of your model.
Classification model results
Prediction results for classification models (binary and multi-class) return a probability score for each potential value of the target column. You must determine how you want to use the scores. For example, to get a binary classification from the provided scores, you would identify a threshold value. If there are two classes, "A" and "B", you should classify the example as "A" if the score for "A" is greater than the chosen threshold, and "B" otherwise. For imbalanced datasets, the threshold might approach 100% or 0%.
The results payload for a classification model look similar to this example:
{
  "predictions": [
    {
      "scores": [
        0.539999994635582,
        0.2599999845027924,
        0.2000000208627896
      ],
      "classes": [
        "apple",
        "orange",
        "grape"
      ]
    },
    {
      "scores": [
        0.23999999463558197,
        0.35999998450279236,
        0.40000002086278963
      ],
      "classes": [
        "apple",
        "orange",
        "grape"
      ]
    }
  ]
}
Regression model results
A predicted value is returned for each valid row of the prediction request. Prediction intervals are not returned for exported models.
The results payload for a regression model look similar to this example:
{
  "predictions": [
    3982.3662109375,
    3982.3662109375
  ]
}