Application Integration에 지원되는 커넥터를 참조하세요.
Vertex AI 태스크를 사용하여 GenAI 삽입
이 샘플 통합에는 Google Cloud Vertex AI 모델과 상호작용하기 위한 하위 통합으로 사용할 흐름이 포함되어 있습니다. 다음 코드 샘플을 사용하기 전에 모든 기본 요건을 충족하는지 확인합니다.
코드 샘플
{
  "triggerConfigs": [
    {
      "label": "API Trigger",
      "startTasks": [
        {
          "taskId": "1"
        }
      ],
      "properties": {
        "Trigger name": "vertex-ai-task_API_1"
      },
      "triggerType": "API",
      "triggerNumber": "1",
      "triggerId": "api_trigger/vertex-ai-task_API_1",
      "description": "As inputs, we are only adding TextPrompt and ModelId. You can set Model ID for different Google models, such as text-bison, chat-bison, etc.",
      "position": {
        "x": -210
      }
    }
  ],
  "taskConfigs": [
    {
      "task": "Vertex AI - Predict",
      "taskId": "4",
      "parameters": {
        "request": {
          "key": "request",
          "value": {
            "stringValue": "$`Task_4_request`$"
          }
        },
        "projectsId": {
          "key": "projectsId",
          "value": {
            "stringValue": "$ProjectId$"
          }
        },
        "endpoint": {
          "key": "endpoint",
          "value": {
            "stringValue": "$endpoint$"
          }
        },
        "locationsId": {
          "key": "locationsId",
          "value": {
            "stringValue": "$Region$"
          }
        },
        "response": {
          "key": "response",
          "value": {
            "stringArray": {
              "stringValues": [
                "$`Task_4_response`$"
              ]
            }
          }
        },
        "taskTemplateId": {
          "key": "taskTemplateId",
          "value": {
            "stringValue": "2b5513a2-f3f4-4ac6-918e-8ea55b53cbb8"
          }
        }
      },
      "nextTasks": [
        {
          "taskId": "3"
        }
      ],
      "taskExecutionStrategy": "WHEN_ALL_SUCCEED",
      "displayName": "Vertex AI - Predict (Preview)",
      "description": "This is the actual Vertex AI API call with the variables we\u0027ve previously setup. Notice that under authentication, you need to have a Service Account with Vertex AI Predict IAM permissions.",
      "taskTemplate": "Vertex AI - Predict",
      "externalTaskType": "NORMAL_TASK",
      "position": {
        "x": -208,
        "y": 256
      }
    },
    {
      "task": "FieldMappingTask",
      "taskId": "1",
      "parameters": {
        "FieldMappingConfigTaskParameterKey": {
          "key": "FieldMappingConfigTaskParameterKey",
          "value": {
            "jsonValue": "{\n  \"@type\": \"type.googleapis.com/enterprise.crm.eventbus.proto.FieldMappingConfig\",\n  \"mappedFields\": [{\n    \"inputField\": {\n      \"fieldType\": \"STRING_VALUE\",\n      \"transformExpression\": {\n        \"initialValue\": {\n          \"baseFunction\": {\n            \"functionType\": {\n              \"baseFunction\": {\n                \"functionName\": \"GET_PROJECT_ID\"\n              }\n            }\n          }\n        }\n      }\n    },\n    \"outputField\": {\n      \"referenceKey\": \"$ProjectId$\",\n      \"fieldType\": \"STRING_VALUE\",\n      \"cardinality\": \"OPTIONAL\"\n    }\n  }, {\n    \"inputField\": {\n      \"fieldType\": \"STRING_VALUE\",\n      \"transformExpression\": {\n        \"initialValue\": {\n          \"baseFunction\": {\n            \"functionType\": {\n              \"baseFunction\": {\n                \"functionName\": \"GET_REGION\"\n              }\n            }\n          }\n        }\n      }\n    },\n    \"outputField\": {\n      \"referenceKey\": \"$Region$\",\n      \"fieldType\": \"STRING_VALUE\",\n      \"cardinality\": \"OPTIONAL\"\n    }\n  }, {\n    \"inputField\": {\n      \"fieldType\": \"STRING_VALUE\",\n      \"transformExpression\": {\n        \"initialValue\": {\n          \"referenceValue\": \"$endpoint$\"\n        },\n        \"transformationFunctions\": [{\n          \"functionType\": {\n            \"stringFunction\": {\n              \"functionName\": \"CONCAT\"\n            }\n          },\n          \"parameters\": [{\n            \"initialValue\": {\n              \"referenceValue\": \"$ModelId$\"\n            }\n          }]\n        }]\n      }\n    },\n    \"outputField\": {\n      \"referenceKey\": \"$endpoint$\",\n      \"fieldType\": \"STRING_VALUE\",\n      \"cardinality\": \"OPTIONAL\"\n    }\n  }, {\n    \"inputField\": {\n      \"fieldType\": \"JSON_VALUE\",\n      \"transformExpression\": {\n        \"initialValue\": {\n          \"referenceValue\": \"$PalmPromptRequest$\"\n        },\n        \"transformationFunctions\": [{\n          \"functionType\": {\n            \"jsonFunction\": {\n              \"functionName\": \"RESOLVE_TEMPLATE\"\n            }\n          }\n        }]\n      }\n    },\n    \"outputField\": {\n      \"referenceKey\": \"$`Task_4_request`$\",\n      \"fieldType\": \"JSON_VALUE\",\n      \"cardinality\": \"OPTIONAL\"\n    }\n  }]\n}"
          }
        }
      },
      "nextTasks": [
        {
          "taskId": "4"
        }
      ],
      "taskExecutionStrategy": "WHEN_ALL_SUCCEED",
      "displayName": "Set Prompt Parameters",
      "description": "In here, we are setting the required variables for the Vertex AI task. The actual payload is set using the resolve_template function from a pre-defined Local Variable called PalmPromptRequest.",
      "externalTaskType": "NORMAL_TASK",
      "position": {
        "x": -210,
        "y": 126
      }
    },
    {
      "task": "FieldMappingTask",
      "taskId": "3",
      "parameters": {
        "FieldMappingConfigTaskParameterKey": {
          "key": "FieldMappingConfigTaskParameterKey",
          "value": {
            "jsonValue": "{\n  \"@type\": \"type.googleapis.com/enterprise.crm.eventbus.proto.FieldMappingConfig\",\n  \"mappedFields\": [{\n    \"inputField\": {\n      \"fieldType\": \"JSON_VALUE\",\n      \"transformExpression\": {\n        \"initialValue\": {\n          \"referenceValue\": \"$`Task_4_response`.predictions$\"\n        },\n        \"transformationFunctions\": [{\n          \"functionType\": {\n            \"jsonFunction\": {\n              \"functionName\": \"GET_ELEMENT\"\n            }\n          },\n          \"parameters\": [{\n            \"initialValue\": {\n              \"literalValue\": {\n                \"intValue\": \"0\"\n              }\n            }\n          }]\n        }, {\n          \"functionType\": {\n            \"jsonFunction\": {\n              \"functionName\": \"GET_PROPERTY\"\n            }\n          },\n          \"parameters\": [{\n            \"initialValue\": {\n              \"literalValue\": {\n                \"stringValue\": \"content\"\n              }\n            }\n          }]\n        }]\n      }\n    },\n    \"outputField\": {\n      \"referenceKey\": \"$Content$\",\n      \"fieldType\": \"STRING_VALUE\",\n      \"cardinality\": \"OPTIONAL\"\n    }\n  }]\n}"
          }
        }
      },
      "taskExecutionStrategy": "WHEN_ALL_SUCCEED",
      "displayName": "Map Prompt Response",
      "description": "Finally, we are mapping just the content of the Vertex AI task output as the final integration Output. ",
      "externalTaskType": "NORMAL_TASK",
      "position": {
        "x": -210,
        "y": 378
      }
    }
  ],
  "integrationParameters": [
    {
      "key": "TextPrompt",
      "dataType": "STRING_VALUE",
      "displayName": "TextPrompt",
      "inputOutputType": "IN"
    },
    {
      "key": "Region",
      "dataType": "STRING_VALUE",
      "defaultValue": {
        "stringValue": "us-central1"
      },
      "displayName": "Region"
    },
    {
      "key": "ProjectId",
      "dataType": "STRING_VALUE",
      "displayName": "ProjectId"
    },
    {
      "key": "`Task_4_request`",
      "dataType": "JSON_VALUE",
      "defaultValue": {
        "jsonValue": "{\n}"
      },
      "displayName": "`Task_4_request`",
      "isTransient": true,
      "producer": "1_4",
      "jsonSchema": "{\n  \"$schema\": \"http://json-schema.org/draft-07/schema#\",\n  \"type\": \"object\",\n  \"properties\": {\n    \"instances\": {\n      \"type\": \"array\"\n    },\n    \"parameters\": {\n      \"type\": \"object\"\n    }\n  }\n}"
    },
    {
      "key": "`Task_4_response`",
      "dataType": "JSON_VALUE",
      "displayName": "`Task_4_response`",
      "isTransient": true,
      "producer": "1_4",
      "jsonSchema": "{\n  \"$schema\": \"http://json-schema.org/draft-07/schema#\",\n  \"type\": \"object\",\n  \"properties\": {\n    \"deployedModelId\": {\n      \"type\": \"string\"\n    },\n    \"modelVersionId\": {\n      \"type\": \"string\"\n    },\n    \"model\": {\n      \"type\": \"string\"\n    },\n    \"predictions\": {\n      \"type\": \"array\"\n    },\n    \"modelDisplayName\": {\n      \"type\": \"string\"\n    }\n  }\n}"
    },
    {
      "key": "ModelId",
      "dataType": "STRING_VALUE",
      "defaultValue": {
        "stringValue": "text-bison@001"
      },
      "displayName": "ModelId",
      "inputOutputType": "IN"
    },
    {
      "key": "endpoint",
      "dataType": "STRING_VALUE",
      "defaultValue": {
        "stringValue": "publishers/google/models/"
      },
      "displayName": "endpoint"
    },
    {
      "key": "PalmPromptRequest",
      "dataType": "JSON_VALUE",
      "defaultValue": {
        "jsonValue": "{\n  \"instances\": [{\n    \"prompt\": \"$TextPrompt$\"\n  }],\n  \"parameters\": {\n    \"temperature\": 0.2,\n    \"maxOutputTokens\": 768.0,\n    \"topP\": 0.8,\n    \"topK\": 40.0\n  }\n}"
      },
      "displayName": "PalmPromptRequest",
      "jsonSchema": "{\n  \"$schema\": \"http://json-schema.org/draft-04/schema#\",\n  \"type\": \"object\",\n  \"properties\": {\n    \"instances\": {\n      \"type\": \"array\",\n      \"items\": {\n        \"type\": \"object\",\n        \"properties\": {\n          \"prompt\": {\n            \"type\": \"string\"\n          }\n        }\n      }\n    },\n    \"parameters\": {\n      \"type\": \"object\",\n      \"properties\": {\n        \"topK\": {\n          \"type\": \"number\"\n        },\n        \"temperature\": {\n          \"type\": \"number\"\n        },\n        \"maxOutputTokens\": {\n          \"type\": \"number\"\n        },\n        \"topP\": {\n          \"type\": \"number\"\n        }\n      }\n    }\n  }\n}"
    },
    {
      "key": "Content",
      "dataType": "STRING_VALUE",
      "displayName": "Content",
      "inputOutputType": "OUT"
    }
  ]
}
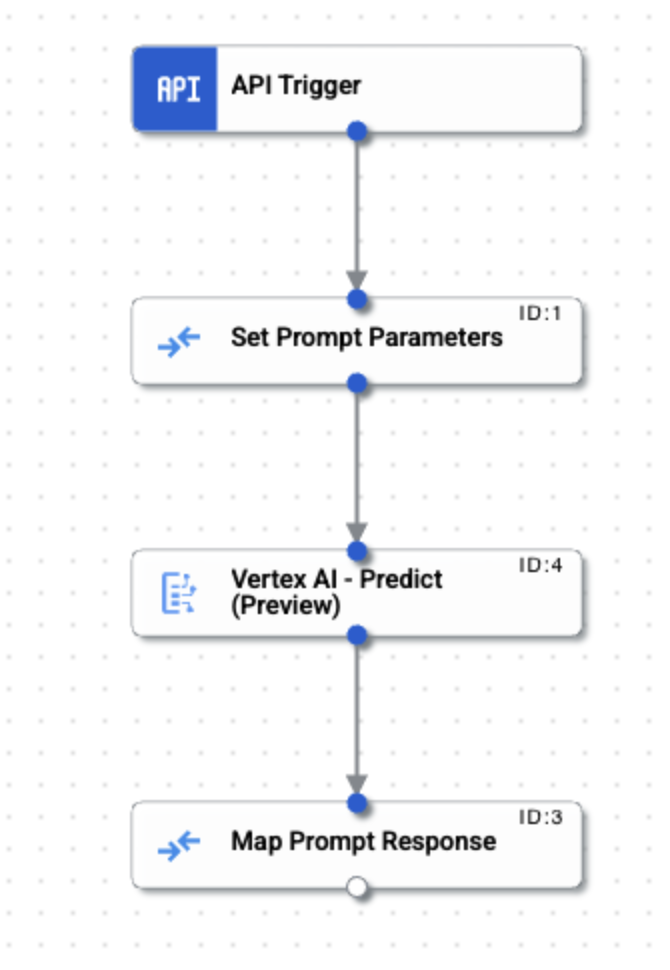
샘플 통합 흐름
다음 이미지는 이 통합 코드 샘플에 대한 통합 편집기의 샘플 레이아웃을 보여줍니다.


샘플 통합 업로드 및 실행
샘플 통합을 업로드하고 실행하려면 다음 단계를 수행합니다.
- 통합 샘플을 .json 파일로 시스템에 저장합니다.
- Google Cloud 콘솔에서 Application Integration 페이지로 이동합니다.
- 왼쪽 탐색 메뉴에서 통합을 클릭하여 통합 페이지를 엽니다.
- 기존 통합을 선택하거나 통합 만들기를 클릭하여 새 통합을 만듭니다.
새 통합을 만드는 경우:
- 통합 만들기 대화상자에 이름과 설명을 입력합니다.
- 통합 리전을 선택합니다.
- 통합을 위한 서비스 계정을 선택합니다. 통합 툴바의 info 통합 요약 창에서 언제든지 통합에 대한 서비스 계정 세부정보를 변경하거나 업데이트할 수 있습니다.
- 만들기를 클릭합니다.
통합 편집기 페이지에서 통합이 열립니다.
- 통합 편집기에서 publish업로드/다운로드 메뉴를 클릭한 후 통합 업로드를 선택합니다.
- 파일 브라우저 대화상자에서 1단계에서 저장한 파일을 선택한 후 열기를 클릭합니다.
업로드된 파일을 통해 새 버전의 통합이 생성됩니다.
- 통합 편집기에서 테스트를 클릭합니다.
- 통합 테스트를 클릭합니다. 그러면 통합이 실행되고 통합 테스트 창에 실행 결과가 표시됩니다.

