使用集合让一切井井有条
根据您的偏好保存内容并对其进行分类。
查看 Application Integration 支持的连接器。
将字符串连接到字符串数组
使用“数据映射”任务,遍历字符串数组的元素,并应用转换函数将字符串值连接到所有数组元素。
代码示例
示例集成流程
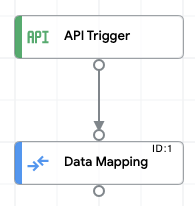
下图显示了此集成代码示例的集成编辑器示例布局。
上传并运行示例集成
如需上传并运行示例集成,请执行以下步骤:
- 将集成示例保存为系统中的 .json 文件。
- 在 Google Cloud 控制台中,前往 Application Integration 页面。
转到 Application Integration
- 点击左侧导航菜单中的集成,打开集成页面。
- 选择现有集成,或通过点击创建集成来创建新的集成。
要创建新的集成,请执行以下操作:
- 在创建 Integrations对话框中输入名称和说明。
- 选择集成的区域。
- 为集成选择服务账号。您可以随时在集成工具栏的info 集成摘要窗格中更改或更新集成的服务账号详细信息。
- 点击创建。
这将在集成编辑器中打开集成。
- 在集成编辑器中,点击 publish上传/下载菜单,然后选择上传集成。
- 在文件浏览器对话框中,选择您在第 1 步中保存的文件,然后点击打开。
系统会使用上传的文件创建新版本的集成。
- 在集成编辑器中,点击测试。
- 点击测试集成。此操作会运行集成,并在测试集成窗格中显示执行结果。
如未另行说明,那么本页面中的内容已根据知识共享署名 4.0 许可获得了许可,并且代码示例已根据 Apache 2.0 许可获得了许可。有关详情,请参阅 Google 开发者网站政策。Java 是 Oracle 和/或其关联公司的注册商标。
最后更新时间 (UTC):2025-09-25。
[[["易于理解","easyToUnderstand","thumb-up"],["解决了我的问题","solvedMyProblem","thumb-up"],["其他","otherUp","thumb-up"]],[["很难理解","hardToUnderstand","thumb-down"],["信息或示例代码不正确","incorrectInformationOrSampleCode","thumb-down"],["没有我需要的信息/示例","missingTheInformationSamplesINeed","thumb-down"],["翻译问题","translationIssue","thumb-down"],["其他","otherDown","thumb-down"]],["最后更新时间 (UTC):2025-09-25。"],[],[]]