Application Integration에 지원되는 커넥터를 참조하세요.
공개 API에 REST 호출 전송
REST 엔드포인트 호출 태스크를 사용하여 https://mocktarget.apigee.net/json
에 호출을 전송하고 응답을 JSON 변수에 저장합니다.
코드 샘플
{
"triggerConfigs": [{
"label": "API Trigger",
"startTasks": [{
"taskId": "1"
}],
"properties": {
"Trigger name": "CallRestEndpointDemo_API_1"
},
"triggerType": "API",
"triggerNumber": "1",
"triggerId": "api_trigger/CallRestEndpointDemo_API_1"
}],
"taskConfigs": [{
"task": "GenericRestV2Task",
"taskId": "1",
"parameters": {
"throwError": {
"key": "throwError",
"value": {
"booleanValue": true
}
},
"responseBody": {
"key": "responseBody",
"value": {
"stringArray": {
"stringValues": ["$`Task_1_responseBody`$"]
}
}
},
"disableSSLValidation": {
"key": "disableSSLValidation",
"value": {
"booleanValue": false
}
},
"httpParams": {
"key": "httpParams"
},
"responseHeader": {
"key": "responseHeader",
"value": {
"stringArray": {
"stringValues": ["$`Task_1_responseHeader`$"]
}
}
},
"userAgent": {
"key": "userAgent",
"value": {
"stringValue": ""
}
},
"httpMethod": {
"key": "httpMethod",
"value": {
"stringValue": "GET"
}
},
"responseStatus": {
"key": "responseStatus",
"value": {
"stringArray": {
"stringValues": ["$`Task_1_responseStatus`$"]
}
}
},
"url": {
"key": "url",
"value": {
"stringValue": "https://mocktarget.apigee.net/json"
}
},
"urlFetchingService": {
"key": "urlFetchingService",
"value": {
"stringValue": "HARPOON"
}
},
"useSSL": {
"key": "useSSL",
"value": {
"booleanValue": false
}
},
"requestorId": {
"key": "requestorId",
"value": {
"stringValue": ""
}
},
"urlQueryStrings": {
"key": "urlQueryStrings"
},
"requestBody": {
"key": "requestBody",
"value": {
"stringValue": ""
}
},
"followRedirects": {
"key": "followRedirects",
"value": {
"booleanValue": true
}
},
"additionalHeaders": {
"key": "additionalHeaders"
}
},
"nextTasks": [{
"taskId": "2"
}],
"taskExecutionStrategy": "WHEN_ALL_SUCCEED",
"displayName": "Call REST Endpoint"
}, {
"task": "FieldMappingTask",
"taskId": "2",
"parameters": {
"FieldMappingConfigTaskParameterKey": {
"key": "FieldMappingConfigTaskParameterKey",
"value": {
"jsonValue": "{\n \"@type\": \"type.googleapis.com/enterprise.crm.eventbus.proto.FieldMappingConfig\",\n \"mappedFields\": [{\n \"inputField\": {\n \"fieldType\": \"JSON_VALUE\",\n \"transformExpression\": {\n \"initialValue\": {\n \"referenceValue\": \"$`Task_1_responseBody`$\"\n },\n \"transformationFunctions\": [{\n \"functionType\": {\n \"stringFunction\": {\n \"functionName\": \"TO_JSON\"\n }\n }\n }]\n }\n },\n \"outputField\": {\n \"referenceKey\": \"$OutputJson$\",\n \"fieldType\": \"JSON_VALUE\",\n \"cardinality\": \"OPTIONAL\"\n }\n }]\n}"
}
}
},
"taskExecutionStrategy": "WHEN_ALL_SUCCEED",
"displayName": "Data Mapping"
}],
"integrationParameters": [{
"key": "`Task_1_responseHeader`",
"dataType": "STRING_VALUE",
"displayName": "`Task_1_responseHeader`",
"isTransient": true,
"producer": "1_1"
}, {
"key": "`Task_1_responseBody`",
"dataType": "STRING_VALUE",
"displayName": "`Task_1_responseBody`",
"isTransient": true,
"producer": "1_1"
}, {
"key": "`Task_1_responseStatus`",
"dataType": "STRING_VALUE",
"displayName": "`Task_1_responseStatus`",
"isTransient": true,
"producer": "1_1"
}, {
"key": "OutputJson",
"dataType": "JSON_VALUE",
"displayName": "OutputJson",
"inputOutputType": "OUT"
}]
}
샘플 통합 흐름
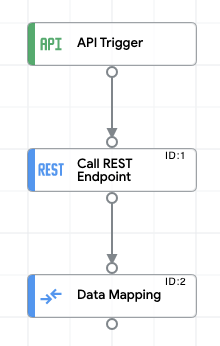
다음 이미지는 이 통합 코드 샘플에 대한 통합 편집기의 샘플 레이아웃을 보여줍니다.
샘플 통합 업로드 및 실행
샘플 통합을 업로드하고 실행하려면 다음 단계를 수행합니다.
- 통합 샘플을 .json 파일로 시스템에 저장합니다.
- Google Cloud 콘솔에서 Application Integration 페이지로 이동합니다.
Application Integration으로 이동
- 탐색 메뉴에서 통합을 클릭합니다. 통합 목록 페이지가 나타납니다.
- 기존 통합을 선택하거나 통합 만들기를 클릭하여 새 통합을 만듭니다.
새 통합을 만드는 경우:
- 통합 만들기 대화상자에 이름과 설명을 입력합니다.
- 통합 리전을 선택합니다.
- 통합을 위한 서비스 계정을 선택합니다. 통합 툴바의 info 통합 요약 창에서 언제든지 통합에 대한 서비스 계정 세부정보를 변경하거나 업데이트할 수 있습니다.
- 만들기를 클릭합니다.
통합 편집기 페이지에서 통합이 열립니다.
- 통합 편집기에서 publish업로드/다운로드 메뉴를 클릭한 후 통합 업로드를 선택합니다.
- 파일 브라우저 대화상자에서 1단계에서 저장한 파일을 선택한 후 열기를 클릭합니다.
업로드된 파일을 통해 새 버전의 통합이 생성됩니다.
- 통합 편집기에서 테스트를 클릭합니다.
- 통합 테스트를 클릭합니다. 그러면 통합이 실행되고 통합 테스트 대화상자에 실행 결과가 표시됩니다.