Learn how to use wildcard DNS records to configure a domain for your cluster. You must configure a domain to enable your services to accept requests and allow you access for testing purposes.
By default, your Knative serving clusters use the example.com base
domain and do not allow requests to your services. For example, sending requests
to http://{service}.{namespace}.example.com fails.
To enable the services in your cluster to accept requests, you must configure your domain to use either of the following:
- Free DNS wildcard service
- Custom domain you own. For details, see Mapping custom domains.
DNS wildcard records should be used for testing only due to the issues around the reliability of requests. Learn more about wildcard DNS records.
Before you begin
Make sure you have installed and configured Google Cloud CLI and kubectl.
Choosing between a wildcard DNS service and a custom domain
When you are developing and testing, you can change the default domain to use a wildcard DNS test site. Examples include:
If you already have a domain you want to use for testing purposes, or if you don't mind purchasing a domain for testing purposes, you can set the default domain to use your own domain. A custom domain offers better reliability for testing.
Getting the external IP address
Before proceeding, you must obtain the external IP address of the load balancer service created for the Istio ingress controller.
Console
To get the load balancer's external IP address from the Google Cloud console:
Go to the GKE page in the Google Cloud console:
Go to the GKE pageClick Services and ingress.
Identify the service that is your cluster's Istio ingress controller. The service's Type will be External load balancer. The following table shows the service's name based on your cluster's version:
Cluster version ISTIO-GATEWAY 1.15.3-gke.19and greater1.14.3-gke.12and greater1.13.10-gke.8and greateristio-ingressAll other versions istio-ingressgatewayOnce you've found your cluster's Istio ingress controller, copy its Endpoint. This will be the IP address without the port number. For example, you might see
00.000.000.000:11listed as an endpoint, but you only need to copy00.000.000.000.
Command line
To get the external IP for the Istio ingress gateway:kubectl get svc istio-ingress -n gke-system
NAME            TYPE           CLUSTER-IP     EXTERNAL-IP  PORT(S)
istio-ingress   LoadBalancer   XX.XX.XXX.XX   pending      80:32380/TCP,443:32390/TCP,32400:32400/TCP
If you're using a wildcard service, you'll need the external IP address when you edit the cluster configuration. If you're using your own custom domain, you'll need the external IP address to create or update a record at your domain registrar.
Configuring your cluster's domain
Knative serving uses the config-domain ConfigMap to define the base
domain for all services deployed to the cluster. The command to edit this
configuration will vary depending on whether you use a wildcard DNS service
or a custom domain that you own. You can repeat these steps with different
values if you want to update the default cluster domain in the future.
Testing with a DNS wildcard service
xip.io is used to demonstrate how to configure your domain to use a DNS
wildcard service, but you can replace it with whatever service you choose.
Console
To change the default base domain from example.com to one of the DNS
wildcard services (xip.io for example) in the Google Cloud console:
Go to the Knative serving Domain mappings page in the Google Cloud console:
Select Add mapping > Add cluster default domain
Select the checkbox next to "Apply this domain mapping to all Knative serving services deployed to this cluster."
Select your cluster from the drop-down menu.
In the Domain field, enter [EXTERNAL-IP].xip.io. Replace:
[EXTERNAL-IP] with the Load Balancer external IP address.
xip.io with the wildcard DNS site you are using.
Command line
To change the default base domain from example.com to one of the DNS
wildcard sites (xip.io for example), use the command:
kubectl patch configmap config-domain --namespace knative-serving --patch \
  '{"data": {"example.com": null, "[EXTERNAL-IP].xip.io": ""}}'
Replace
- [EXTERNAL-IP] with the Load Balancer external IP address.
- xip.io with the wildcard DNS site you are using.
Your service is now available at {service-name}.{namespace}.{[EXTERNAL-IP].xip.io}.
Testing with a custom domain
If you want to use a custom domain of your own for testing, the following steps will help you get set up.
First, update the cluster's ConfigMap to point to your domain:
Console
Go to the Knative serving Domain mappings page in the Google Cloud console:
Select Add mapping > Add cluster default domain
Select the checkbox next to "Apply this domain mapping to all Knative serving services deployed to this cluster."
Select your cluster from the drop-down menu.
In the Domain field, enter your domain name. For example,
example.com.
Command line
Specify your custom domain using the command:
kubectl patch configmap config-domain --namespace knative-serving --patch \
'{"data": {"example.com": null, "[DOMAIN]": ""}}'
Replace [DOMAIN] with your own domain, for example, mydomain.com
The command above removes example.com from the ConfigMap and adds
mydomain.com as the default base domain. You can repeat this command if you
want to change this again to some other domain.
The remaining steps must be performed on your domain registrar's website:
Log in to your account at your domain registrar and then open the DNS configuration page.
Locate the host records section of your domain's configuration page and then add the resource records you need.
To add a DNS record to the account at the DNS provider:
- Select the record type
A. Supply the wildcard
*, as shown in the following example: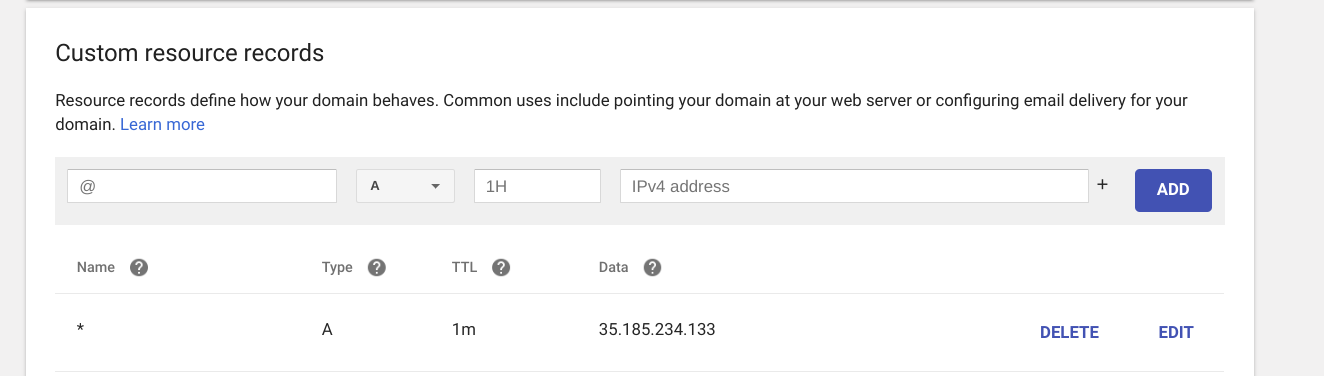
- Select the record type
Save your changes in the DNS configuration page of your domain's account. In most cases, it takes only a few minutes for these changes to take effect, but in some cases it can take up several hours, depending on the registrar, and on the Time-To-Live (TTL) of any previous DNS records for your domain.
After updating your DNS records and pointing them to your cluster, your service
is available at {service-name}.{namespace}.{your-domain}.