This document explains how to make Google Distributed Cloud available for management in the Google Cloud console. This includes basic management such as being able to log in to clusters and view their workloads, as well as how to enable cluster lifecycle management so that you can upgrade, update, and delete clusters.
Fleet members and the console
All Google Distributed Cloud must be members of a fleet—a unified way to view and manage multiple clusters and their workloads. Each fleet of clusters is associated with a fleet host project.
In Google Distributed Cloud, a user cluster is registered to a fleet at creation time:
When you create a cluster using
gkectl, you specify your fleet host project in thegkeConnectsection of the cluster configuration file. Google Distributed Cloud uses that information to register your cluster to the specified fleet project.When you create a user cluster in the console, the cluster automatically becomes a fleet member in the project selected in the console.
Fleet members outside of Google Cloud like Google Distributed Cloud are displayed in the console in your fleet host project, along with other fleet clusters such as GKE on Google Cloud. The extent to which you can manage Google Distributed Cloud from the console depends on the following:
If you have set up authentication, you can log in to your clusters and view their workloads and other details.
If you have enabled cluster lifecycle management for the cluster, you can also upgrade, update, or delete user clusters by using the console. To do this, the cluster must be managed by a service called the Anthos On-Prem API. For user clusters created in the console, cluster lifecycle management is enabled at cluster creation time, or you can enable this feature later for user clusters created using
gkectl. If this feature is not enabled, you can only manage cluster lifecycle usinggkectlon your admin workstation.
View registered clusters
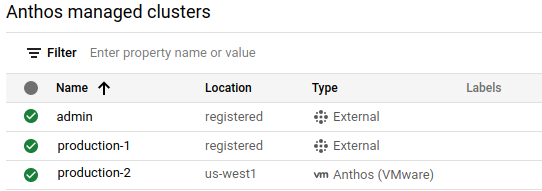
All your fleet clusters are displayed on the GKE Enterprise Clusters and the GKE Clusters pages in the console. This both gives you an overview of your entire fleet and, for Google Distributed Cloud, lets you see which clusters are managed by the Anthos On-Prem API.
To view your fleet clusters:
In the console, go to the GKE Enterprise clusters page.
Select the Google Cloud project.
If vm Anthos (VMware) is displayed in the Type column, the cluster is managed by the Anthos On-Prem API.
If External is displayed in the Type column, the cluster isn't managed by the Anthos On-Prem API.
To see more details about a cluster, users need to log in and authenticate to the cluster. To do this, you need to:
Set up authentication
As described above, all fleet clusters appear in the GKE and GKE Enterprise clusters lists in the console. However, to see more details such as nodes and workloads (and to perform cluster lifecycle management tasks if the feature is enabled), users need to log in and authenticate to the cluster. To do this, your registered clusters must be set up with one of the following authentication methods:
Google identity: This option lets users log in using their Google Cloud identity, which is the email address associated with your Google Cloud account. Use this option if users already have access to Google Cloud with their Google identity. If you created the cluster in the console, you can log in to the cluster using your Google identity, but you will need to configure authentication for other users.
Login with Google identity is the simplest approach to authentication in the console, particularly if you are trying out Google Distributed Cloud with a minimal installation, and so we have described how to set this up in more detail below in Set up Google identity authentication.
OpenID Connect (OIDC): This option lets users log in to clusters from the console using their identity from a third-party OIDC identity provider such as Okta or Microsoft AD FS. You might want to use this option if your users have existing usernames, passwords, and security group memberships from your provider. You can find out how to set up third-party OIDC authentication for your clusters in the following guides:
Configure clusters for GKE Identity Service with OIDC: This guide shows you how to set up OIDC authentication on a cluster by cluster basis.
Set up GKE Identity Service for a fleet: This option lets you set up OIDC at the fleet level.
Bearer token: If the preceding Google-provided solutions aren't suitable for your organization, you can set up authentication using a Kubernetes service account and using its bearer token to log in. For details, see Set up using a bearer token.
Grant required roles
Access to the console is controlled by Google Cloud IAM. These IAM roles are required no matter which authentication method you choose. To manage the cluster lifecycle in the console you need to grant some IAM roles.
To let users access the console, at a minimum, you need to grant the following roles:
roles/container.viewer. This role lets users view the GKE Clusters page and other container resources in the console. For details about the permissions included in this role, or to grant a role with read/write permissions, see Kubernetes Engine roles in the IAM documentation.roles/gkehub.viewer. This role lets users view clusters outside Google Cloud in the console. For details about the permissions included in this role, or to grant a role with read/write permissions, see GKE Hub roles in the IAM documentation.
To let users manage the cluster lifecycle in the console, grant the
roles/gkeonprem.adminIAM role. Theroles/gkeonprem.adminrole gives users administrative access to the Anthos On-Prem API, which the console uses to manage the cluster lifecycle. For details on the permissions included in this role, see GKE on-prem roles in the IAM documentation.
The following commands shows how to grant the minimal roles needed to manage cluster lifecycle in the console:
gcloud projects add-iam-policy-binding FLEET_HOST_PROJECT_ID \
    --member=MEMBER \
    --role=roles/container.viewer

gcloud projects add-iam-policy-binding FLEET_HOST_PROJECT_ID \
    --member=MEMBER \
    --role=roles/gkehub.viewer

gcloud projects add-iam-policy-binding FLEET_HOST_PROJECT_ID \
    --member=MEMBER \
    --role=roles/gkeonprem.admin
where:
FLEET_HOST_PROJECT_IDis the fleet host project. For clusters created usinggkectl, this is the project that you configured in thegkeConnectsection of the user cluster's configuration file. For clusters created in the console, this is the project that you chose when the cluster was created.MEMBERis the user's email address in the formatuser:emailID, for example:user:alice@example.com
Enable cluster lifecycle management in the console
User clusters created in the console are automatically managed by
the Anthos On-Prem API, and let you perform cluster lifecycle management tasks
in the console. If you want to enable this feature for user
clusters created using gkectl, follow the steps in
Configure a user cluster to be managed by the Anthos On-Prem API.
When cluster lifecycle management is enabled, you can do the following tasks
from the console:
Set up Google identity authentication
To let users log in to the cluster using their Google identity, you need to configure the following:
Users need specific Identity and Access Management (IAM) roles to be able to see and interact with clusters in the console on the GKE Clusters list and the GKE Enterprise Clusters list pages.
Users need to be added to the Kubernetes role-based access control (RBAC) policies that the Connect gateway needs to access the cluster's Kubernetes API server via the Connect agent.
Configure RBAC authorization
Each cluster's Kubernetes API server needs to be able to authorize requests that come from the console. To configure authorization, you need to configure Kubernetes role-based access control (RBAC) policies on each cluster. If you created the cluster in the console, the Anthos On-Prem API adds your user account as an administrator and creates appropriate RBAC policies that grant you full administrative access to the cluster.
If you created the cluster in the console, and later you use
gcloud to configure the RBAC policies, the user email addresses won't be
visible in the Cluster Details section in the console.
gcloud CLI
Run the following commands to log in with your Google account and update components:
gcloud auth login
gcloud components update
Generate and apply the RBAC policies to your cluster for users and service accounts:
gcloud container fleet memberships generate-gateway-rbac  \
    --membership=MEMBERSHIP_NAME \
    --role=ROLE \
    --users=USERS \
    --project=FLEET_HOST_PROJECT_ID \
    --kubeconfig=KUBECONFIG_PATH \
    --context=KUBECONFIG_CONTEXT \
    --apply
Replace the following:
- MEMBERSHIP_NAME: the name used to uniquely represent the cluster in its fleet. In Google Distributed Cloud, the membership name and the cluster name are the same.
- ROLE: the Kubernetes role you want to grant to the users on the
cluster. To grant users full access to every resource in the cluster in
all namespaces, specify
clusterrole/cluster-admin. To restrict access, create a custom role, for example:role/mynamespace/namespace-reader. The custom role must already exist before you run the command. - USERS: the email addresses of the users (user accounts or
service accounts) to whom you want to grant the permissions, as a
comma-separated list. For example:
--users=foo@example.com,test-acct@test-project.iam.gserviceaccount.com. - FLEET_HOST_PROJECT_ID: the project ID of the fleet host project.
- KUBECONFIG_PATH: the local filepath where your kubeconfig containing an entry for the cluster is stored.
KUBECONFIG_CONTEXT: the context of the cluster as it appears in the kubeconfig file. You can get the current context from the command line by running
kubectl config current-context. Whether you use the current context or not, make sure that it works for accessing the cluster by running a simple command such as:kubectl get namespaces \ --kubeconfig=KUBECONFIG_PATH \ --context=KUBECONFIG_CONTEXT
After running
gcloud container fleet memberships generate-gateway-rbac, you see something like the following at the end of the output, which is truncated for readability:Validating input arguments. Specified Cluster Role is: clusterrole/cluster-admin Generated RBAC policy is: -------------------------------------------- ... Applying the generate RBAC policy to cluster with kubeconfig: /usr/local/google/home/foo/.kube/config, context: kind-kind Writing RBAC policy for user: foo@example.com to cluster. Successfully applied the RBAC policy to cluster.This is the context for accessing the cluster through the Connect gateway.
For more details on the
generate-gateway-rbaccommand, see the gcloud CLI reference guide.
Console
To apply the RBAC policies to users, do the following steps in the console:
In the console, go to the GKE Enterprise clusters page.
Select the Google Cloud project that the user cluster is in.
In the cluster list, click the name of the cluster, and then click More details in the Details panel.
In the Authorization section, click the Cluster admin users field and enter the email address of each user.
When you are finished adding users, click Done.
More information
- Fleet management overview
- Work with clusters from the Google Cloud console
- Connect overview
- Connect Agent overview