This page shows you how to create an Google Distributed Cloud user cluster and an admin cluster on Compute Engine Virtual Machines (VMs). The provided script creates Compute Engine VMs for the admin and user cluster nodes and an admin workstation.
The admin workstation hosts command-line interface (CLI) tools and configuration files to provision clusters during installation, and CLI tools for interacting with provisioned clusters post-installation. The script installs the CLI tools on the admin workstation VM.
A user cluster is a Kubernetes cluster that runs your containerized workloads. It consists of control plane nodes and worker nodes. User clusters must contain one or more worker nodes that run user workloads. An admin cluster is a Kubernetes cluster that manages one or more user clusters, helping with creation, updates, and deletion of user clusters. An admin cluster consists of only control plane nodes. To learn more, see Admin and user cluster deployment.
The script configures a Virtual Extensible LAN (VXLAN) overlay network between the VMs and prepares the VMs for cluster creation. Optionally, the script creates an admin cluster, or you can choose to create the admin cluster yourself to learn about the tools that Google Distributed Cloud provides for creating admin clusters.
With the provided script, you can try out Google Distributed Cloud quickly and without having to prepare any hardware. Completing the steps on this page provides you with a working Google Distributed Cloud test environment that runs on Compute Engine.
What is the Anthos On-Prem API?
The Anthos On-Prem API is a Google Cloud-hosted API that lets you manage the lifecycle of your on-premises clusters using Terraform and standard Google Cloud applications. The Anthos On-Prem API runs in Google Cloud's infrastructure. Terraform, the console, and the gcloud CLI are clients of the API, and they use the API to create clusters in your data center.
To manage the lifecycle of your clusters, the Anthos On-Prem API must store metadata about your cluster's state in Google Cloud, using the Google Cloud region that you specify when creating the cluster. This metadata lets the API manage the cluster lifecycle and doesn't include workload-specific data.
When you create a cluster using an Anthos On-Prem API client, you specify a Google Cloud project. After the cluster is created, it is automatically registered to the specified project's fleet. This project is referred to as the fleet host project. The fleet host project can't be changed after the cluster is created.
Before you begin
- Sign in to your Google Cloud account. If you're new to Google Cloud, create an account to evaluate how our products perform in real-world scenarios. New customers also get $300 in free credits to run, test, and deploy workloads.
-
In the Google Cloud console, on the project selector page, select or create a Google Cloud project.
Roles required to select or create a project
- Select a project: Selecting a project doesn't require a specific IAM role—you can select any project that you've been granted a role on.
-
Create a project: To create a project, you need the Project Creator role
(
roles/resourcemanager.projectCreator), which contains theresourcemanager.projects.createpermission. Learn how to grant roles.
-
Verify that billing is enabled for your Google Cloud project.
-
In the Google Cloud console, on the project selector page, select or create a Google Cloud project.
Roles required to select or create a project
- Select a project: Selecting a project doesn't require a specific IAM role—you can select any project that you've been granted a role on.
-
Create a project: To create a project, you need the Project Creator role
(
roles/resourcemanager.projectCreator), which contains theresourcemanager.projects.createpermission. Learn how to grant roles.
-
Verify that billing is enabled for your Google Cloud project.
- Make a note of the project ID because you need it to set an environment variable that is used in the script and commands on this page. If you selected an existing project, make sure that you are either a project owner or editor.
-
You can run the script on Cloud Shell or your
local machine running Linux or macOS. If you aren't using
Cloud Shell:
- Make sure you have installed the latest
Google Cloud CLI, the command line tool for
interacting with Google Cloud. Update the gcloud CLI components,
if needed:
gcloud components update
Depending on how the gcloud CLI was installed, you might see the following message: "You cannot perform this action because the Google Cloud CLI component manager is disabled for this installation. You can run the following command to achieve the same result for this installation:" Follow the instructions to copy and paste the command to update the components.
- Make sure you have
kubectlinstalled. If you need to installkubectl, run the following command:gcloud components install kubectl
- Make sure you have installed the latest
Google Cloud CLI, the command line tool for
interacting with Google Cloud. Update the gcloud CLI components,
if needed:
Create the VM infrastructure and optionally, the admin cluster
Do the following steps to get set up and run the script. The script that you download and run is from the anthos-samples repository. If you want to learn more about the script before you run it, see the next section, About the script.
Setup environment variables:
export PROJECT_ID=PROJECT_ID export ADMIN_CLUSTER_NAME=ADMIN_CLUSTER_NAME export ON_PREM_API_REGION=ON_PREM_API_REGION export ZONE=ZONEON_PREM_API_REGION: The Google Cloud region in which the Anthos On-Prem API runs and stores its metadata. Specifyus-central1or another supported region.ZONE: The Google Cloud zone that the Compute Engine VMs will be created in. You can useus-central1-aor any of the other Compute Engine zones.
Run the following commands to set the default project and zone.
gcloud config set project $PROJECT_ID
gcloud config set compute/zone $ZONE
If you get a
PERMISSION_DENIEDerror, double check the project ID that you entered. If the project ID is correct, rungcloud auth loginto sign in to the gcloud CLI with the account that has access to the project.Get a list of available versions that you can install:
gcloud container bare-metal admin-clusters query-version-config \
      --location=ON_PREM_API_REGION
Select a version from the output of the previous command and set it in an environment variable:
export BMCTL_VERSION=BMCTL_VERSIONClone the
anthos-samplesrepository and change to the directory where the script is located:git clone https://github.com/GoogleCloudPlatform/anthos-samples cd anthos-samples/anthos-bm-gcp-bashRun the script:
bash install_admin_cluster.shWhen prompted, enter a number to choose the installation mode:
- Enter 1 to have the script set up the VM infrastructure and install the admin cluster.
- Enter 2 to have the script set up the VM infrastructure only.
When prompted, confirm your selection.
The script outputs each command it runs and the status. When it finishes, the script outputs the following depending on whether you chose to install the admin cluster:
Admin cluster created
✅ Installation complete. Please check the logs for any errors!!!
✅ If you do not see any errors in the output log, then you now have the following setup:

|---------------------------------------------------------------------------------------------------------|
| VM Name               | L2 Network IP (VxLAN) | INFO                                                    |
|---------------------------------------------------------------------------------------------------------|
| abm-admin-cluster-cp1 | 10.200.0.3            | Has control plane of admin cluster running inside       |
| abm-user-cluster-cp1  | 10.200.0.4            | 🌟 Ready for use as control plane for the user cluster  |
| abm-user-cluster-w1   | 10.200.0.5            | 🌟 Ready for use as worker for the user cluster         |
| abm-user-cluster-w2   | 10.200.0.6            | 🌟 Ready for use as worker for the user cluster         |
|---------------------------------------------------------------------------------------------------------|
Set up VMs only
|---------------------------------------------------------------------------------------------------------|
| VM Name               | L2 Network IP (VxLAN) | INFO                                                    |
|---------------------------------------------------------------------------------------------------------|
| abm-admin-cluster-cp1 | 10.200.0.3            | 🌟 Ready for use as control plane for the admin cluster |
| abm-user-cluster-cp1  | 10.200.0.4            | 🌟 Ready for use as control plane for the user cluster  |
| abm-user-cluster-w1   | 10.200.0.5            | 🌟 Ready for use as worker for the user cluster         |
| abm-user-cluster-w2   | 10.200.0.6            | 🌟 Ready for use as worker for the user cluster         |
|---------------------------------------------------------------------------------------------------------|
About the script
To learn more about
install_admin_cluster.sh, click
About the script on the
next line.
About the script
The script automates the following manual steps:
-
Creates a service account called
baremetal-gcr, and grants the service account additional permissions to avoid needing multiple service accounts for different APIs and services. -
Enables the following Google Cloud APIs:
  anthos.googleapis.com
  anthosaudit.googleapis.com
  anthosgke.googleapis.com
  cloudresourcemanager.googleapis.com
  connectgateway.googleapis.com
  container.googleapis.com
  gkeconnect.googleapis.com
  gkehub.googleapis.com
  gkeonprem.googleapis.com
  iam.googleapis.com
  logging.googleapis.com
  monitoring.googleapis.com
  opsconfigmonitoring.googleapis.com
  serviceusage.googleapis.com
  stackdriver.googleapis.com
  storage.googleapis.com
-
Creates the following VMs:
- One VM for the admin workstation. The admin workstation will have access to all the other cluster nodes via SSH.
- One VM for the control plane node of the admin cluster.
- Two VMs for the worker nodes of the user cluster.
- One VM for the control plane node of the user cluster.
- Creates a Virtual Extensible LAN (VXLAN) overlay network for layer 2 connectivity between the VMs. The VXLAN isn't persistent, so if you reboot a VM instance the network is destroyed. The network is setup to be on the 10.200.0.0/24 subnet. The layer 2 connectivity is a requirement for the bundled load balancer.
-
Installs the following tools on the admin workstation:
bmctlkubectl- Docker
The script also downloads the service account key for the
baremetal-gcrservice account to the admin workstation. -
Ensures that
root@10.200.0.xfrom the admin workstation works by doing the following tasks:- Generate a new SSH key on the admin workstation.
- Adds the public key to all the other VMs in the deployment.
-
Optionally, the script creates the admin cluster with the following
configuration file:
If you chose to have the script create the admin cluster, the script uses SSH to log in to the admin workstation as the root user. Next, the script runs the
bmctlcommand-line tool to create the admin cluster. This is one of the tools that you can use to create admin clusters.When Google Distributed Cloud creates clusters, it deploys a Kubernetes in Docker (kind) cluster on the admin workstation. This bootstrap cluster hosts the Kubernetes controllers needed to create clusters and is used to create the admin cluster. Upon creation, relevant controllers are moved from the bootstrap cluster into the admin cluster. Finally, unless you specify otherwise, the bootstrap cluster is removed when cluster creation completes successfully. The bootstrap cluster requires Docker to pull container images.
Optionally create the admin cluster
If the script created the admin cluster, skip to the next section Verify the admin cluster. Otherwise, follow the steps in this section to create a bootstrap cluster and the admin cluster.
Before you create the admin cluster, you need to run the
bmctl register bootstrap command on your admin workstation. This command
deploys a temporary Kubernetes in Docker (kind) cluster on the admin
workstation. This bootstrap cluster hosts the Kubernetes controllers needed to
create the admin cluster. When you create the admin cluster, the controllers on
the bootstrap cluster will provision nodes, run preflight checks, and register
the admin cluster to the fleet. The bootstrap cluster is automatically deleted
after the cluster is successfully created.
Console
In the Google Cloud console, go to the GKE Enterprise clusters page.
Make sure to select
PROJECT_IDfrom the project list.Click Create Cluster.
In the dialog box, click On-premises.
Next to Bare metal, click Configure. The Prerequisites page displays the requirements for your admin workstation and cluster node machines.
Make sure that Create an admin cluster is selected.
In the left-navigation bar, click Install bootstrap environment.
Enter
ADMIN_CLUSTER_NAMEas the admin cluster name. Notice that the bootstrap cluster name is derived by prepending bootstrap- to the admin cluster name.Select
VERSIONas the version for your admin cluster. The script downloaded this version of thebmctlcommand-line tool to the admin workstation. The Google Distributed Cloud version that you install must match thebmctlversion.In the Google Cloud API Location field, select ON_PREM_API_REGION from the list. This setting specifies the region where the Anthos On-Prem API runs, and the region in which the following are stored:
- The cluster metadata that the Anthos On-Prem API needs to manage the cluster lifecycle
- The Cloud Logging and Cloud Monitoring data of system components
- The Admin Audit log created by Cloud Audit Logs
The cluster name, project, and location together uniquely identify the cluster in Google Cloud.
Use the steps in the next section instead of the steps displayed in the console to create the bootstrap cluster. Leave the console page displayed because you will come back there to create the admin cluster.
gcloud CLI
Open a new terminal window. You will use the second terminal window to connect to the admin workstation to create the bootstrap cluster. You will use the first terminal window to run the gcloud CLI command to create the admin cluster.
Create the bootstrap cluster
Do the following steps on your admin workstation.
SSH into the admin workstation as root:
gcloud compute ssh root@abm-ws --zone ZONEYou can ignore any messages about updating the VM and complete this tutorial. If you plan to keep the VMs as a test environment, you might want to update the OS or upgrade to the next release as described in the Ubuntu documentation.
Set your user credentials as Application Default Credentials (ADC):
gcloud auth application-default loginFollow the prompts to select your Google account for ADC.
Create the bootstrap cluster.
bmctl register bootstrap \
  --ssh-key=/root/.ssh/id_rsa \
  --name=bootstrap-ADMIN_CLUSTER_NAME \
  --project-id=PROJECT_ID
After bmctl successfully creates the bootstrap cluster, you see output
similar to the following:
[2023-03-22 17:35:24+0000] Waiting for the temporary cluster to be registered... OK
[2023-03-22 17:35:37+0000] Please go to https://console.cloud.google.com/home/dashboard?project=example-project-12345 to create the cluster
[2023-03-22 17:35:37+0000] Waiting for preflight checks and cluster to run..
Create the admin cluster
Console
On the Install bootstrap environment page in the Bootstrap environment from admin workstation section, click Check Connection.
On success, the console displays Connection established.
The connection to the bootstrap cluster must be established before you continue. If the connection isn't established, check the arguments that you specified to the
bmctl register bootstrapcommand:Make sure that the value for
--namematches the Derived bootstrap name displayed in the Bootstrap environment basics section.Make sure the value for
--project-idmatches the ID of the project that you selected in the console.
If you need to change the bootstrap cluster name or the project ID, enter
Ctrl-Cto exit out ofbmctl register bootstrapand re-run the command.Click Networking in the left-navigation bar.
In the Control plane section, enter the following in the Control plane node IP 1 field:
10.200.0.3This is the IP address of the abm-admin-cluster-cp VM in the VXLAN created by the script.
In the Load balancer section, make sure that Bundled is selected.
In the Virtual IPs (VIPs) section, enter the following in the Control plane VIP field:
10.200.0.48Click Verify and Create.
The console displays status messages as it verifies the settings and creates the cluster.
gcloud CLI
Ensure the environment variables that you defined previously have the correct values. Although the example command uses placeholders, they need to match the environment variables that the script used.
echo $PROJECT_ID
echo $ADMIN_CLUSTER_NAME
echo $ON_PREM_API_REGION
echo $BMCTL_VERSION
Confirm that the bootstrap cluster has been registered as a member of the fleet:
gcloud container fleet memberships list \
  --project=PROJECT_ID
If the bootstrap cluster isn't listed, check the bootstrap cluster name and project ID that you specified to
bmctl register bootstrap. If you need to change the bootstrap cluster name or the project ID, enterCtrl-Cto exit out ofbmctl register bootstrapand re-run the command.Create the admin cluster with the bundled load balancer:
gcloud container bare-metal admin-clusters create ADMIN_CLUSTER_NAME \
  --project=PROJECT_ID \
  --location=ON_PREM_API_REGION \
  --version=BMCTL_VERSION \
  --max-pods-per-node=110 \
  --control-plane-vip=10.200.0.48 \
  --control-plane-load-balancer-port=443 \
  --control-plane-node-configs node-ip=10.200.0.3 \
  --island-mode-service-address-cidr-blocks=10.96.0.0/20 \
  --island-mode-pod-address-cidr-blocks=192.168.0.0/16 \
  --lvp-share-path=/mnt/localpv-share \
  --lvp-share-storage-class=local-shared \
  --lvp-node-mounts-config-path=/mnt/localpv-disk \
  --lvp-node-mounts-config-storage-class=local-disks
In the previous command:
--control-plane-vip: Is set to10.200.0.48. This is the virtual IP (VIP) on the load balancer for the cluster's Kubernetes API server.--control-plane-node-configs: Thenode-ipis set to10.200.0.3. This is the IP address of the abm-admin-cluster-cp VM in the VXLAN created by the script.
For a complete list of the flags and their descriptions, see the gcloud CLI reference.
The output from the command is similar to the following:
Waiting for operation [projects/example-project-12345/locations/us-west1/operations/operation-1679543737105-5f7893fd5bae9-942b3f97-75e59179] to complete.
In the example output, the string
operation-1679543737105-5f7893fd5bae9-942b3f97-75e59179is theOPERATION_IDof the long-running operation. You can find out the status of the operation by running the following command in another terminal window:gcloud container bare-metal operations describe OPERATION_ID \ --project=PROJECT_ID \ --location=ON_PREM_API_REGION
Details about the cluster creation process are output on your admin
workstation. Before creating the cluster, bmctl runs a series of preflight
checks to verify the configuration. If the preflight checks pass, you see
something like the following:
[2023-03-22 23:12:47+0000] Waiting for cluster kubeconfig to become ready OK [2023-03-22 23:15:47+0000] Writing kubeconfig file [2023-03-22 23:15:47+0000] kubeconfig of cluster being created is present at bmctl-workspace/abm-cluster-1/abm-cluster-1-kubeconfig [2023-03-22 23:15:47+0000] Please restrict access to this file as it contains authentication credentials of your cluster. [2023-03-22 23:15:47+0000] Waiting for cluster to become ready OK [2023-03-22 23:20:17+0000] Please run [2023-03-22 23:20:17+0000] kubectl --kubeconfig bmctl-workspace/abm-cluster-1/abm-cluster-1-kubeconfig get nodes [2023-03-22 23:20:17+0000] to get cluster nodes status. [2023-03-22 23:20:17+0000] Waiting for node pools to become ready OK [2023-03-22 23:20:37+0000] Waiting for metrics to become ready in GCP OK [2023-03-22 23:25:38+0000] Waiting for cluster API provider to install in the created admin cluster OK [2023-03-22 23:25:48+0000] Moving admin cluster resources to the created admin cluster [2023-03-22 23:25:51+0000] Waiting for node update jobs to finish OK [2023-03-22 23:27:41+0000] Flushing logs... OK [2023-03-22 23:27:41+0000] Deleting membership... OK [2023-03-22 23:27:42+0000] Deleting bootstrap cluster.
Verify the admin cluster
You can find your admin cluster's kubeconfig file on the admin workstation in
the bmctl-workspace directory of the root account. To verify your deployment,
complete the following steps.
If the script created the admin cluster, SSH into the admin workstation as root:
gcloud compute ssh root@abm-ws --zone ZONEYou can ignore any messages about updating the VM and complete this tutorial. If you plan to keep the VMs as a test environment, you might want to update the OS or upgrade to the next release as described in the Ubuntu documentation.
Set the
KUBECONFIGenvironment variable with the path to the cluster's configuration file to runkubectlcommands on the cluster.export clusterid=ADMIN_CLUSTER_NAME export KUBECONFIG=$HOME/bmctl-workspace/$clusterid/$clusterid-kubeconfig kubectl get nodesThe output is similar to the following:
NAME STATUS ROLES AGE VERSION abm-admin-cluster-cp Ready control-plane,master 91m v1.24.2-gke.1900Set the current context in an environment variable:
export CONTEXT="$(kubectl config current-context)"Run the following
gcloudcommand. This command does the following:- Grants your user account the Kubernetes
clusterrole/cluster-adminrole on the cluster. - Configures the cluster so that you can run
kubectlcommands on your local computer without having to SSH to the admin workstation. - Lets you log in to the cluster in the console using your Google identity.
Replace
YOUR_EMAIL_ADDRESSwith the email address that is associated with your Google Cloud account. For example:--users=alex@example.com.gcloud container fleet memberships generate-gateway-rbac \ --membership=ADMIN_CLUSTER_NAME \ --role=clusterrole/cluster-admin \ --users=YOUR_EMAIL_ADDRESS \ --project=PROJECT_ID \ --kubeconfig=$KUBECONFIG \ --context=$CONTEXT\ --applyThe output of this command is similar to the following, which is truncated for readability:
Validating input arguments. Specified Cluster Role is: clusterrole/cluster-admin Generated RBAC policy is: -------------------------------------------- ... Applying the generate RBAC policy to cluster with kubeconfig: /root/bmctl-workspace/ADMIN_CLUSTER_NAME/ADMIN_CLUSTER_NAME-kubeconfig, context: ADMIN_CLUSTER_NAME-admin@ADMIN_CLUSTER_NAME Writing RBAC policy for user: YOUR_EMAIL_ADDRESS to cluster. Successfully applied the RBAC policy to cluster.- Grants your user account the Kubernetes
When you are finished exploring, enter exit to log out of the admin workstation.
Run the following command on your local computer to get the kubeconfig entry that can access the cluster through the connect gateway:
gcloud container fleet memberships get-credentials ADMIN_CLUSTER_NAMEThe output is similar to the following:
Starting to build Gateway kubeconfig... Current project_id: PROJECT_ID A new kubeconfig entry "connectgateway_PROJECT_ID_global_ADMIN_CLUSTER_NAME" has been generated and set as the current context.You can now run
kubectlcommands through the connect gateway:kubectl get nodesThe output is similar to the following:
NAME STATUS ROLES AGE VERSION abm-admin-cluster-cp Ready control-plane,master 94m v1.24.2-gke.1900If the script created the admin cluster, run the following command to enroll the cluster in the Anthos On-Prem API:
gcloud container bare-metal admin-clusters enroll ADMIN_CLUSTER_NAME \ --project=PROJECT_ID \ --admin-cluster-membership=projects/PROJECT_ID/locations/global/memberships/ADMIN_CLUSTER_NAME \ --location=ON_PREM_API_REGIONIf you created the cluster, it is automatically enrolled in the Anthos On-Prem API.
Create the user cluster
When the script created the L2 VXLAN for the VMs, it assigned the following IP addresses in the 10.200.0.0/24 network. You use these IP addresses when configuring network and node pool settings for the user cluster.
| VM Name | Network IP | Node description |
|---|---|---|
| abm-admin-cluster-cp1 | 10.200.0.3 | Control plane node for the admin cluster |
| abm-user-cluster-cp1 | 10.200.0.4 | Control plane node for the user cluster |
| abm-user-cluster-w1 | 10.200.0.5 | Worker node for the user cluster |
| abm-user-cluster-w2 | 10.200.0.6 | Another worker node for the user cluster |
You can use the Google Cloud console, the Google Cloud CLI, or Terraform to create the user cluster.
Console
Do the following steps to create a user cluster in the console:
In the console, go to the GKE Enterprise clusters page.
Make sure that the Google Cloud project in which you created the admin cluster is selected. You should see the admin cluster on the list.
Click Create Cluster.
In the dialog box, click On-premises.
Next to Bare metal, click Configure. The Prerequisites page displays.
Under Choose your cluster type, select Create a user cluster for an existing admin cluster
Click Next.
Cluster basics
Enter a name for the user cluster or use the default.
Make sure that the newly created admin cluster is selected. You can use the defaults for the rest of the settings on this page.
Click Networking in the left-navigation bar.
Networking
In the Control plane section, enter the following in the Control plane node IP 1 field:
10.200.0.4This is the IP address of the abm-user-cluster-cp1 VM in the VXLAN created by the script.
In the Load balancer section, use the default load balancer, Bundled with MetalLB.
In the New address pool section, enter the following IP address range in the IP address range 1 field:
10.200.0.51-10.200.0.70Click Done.
In the Virtual IPs section, enter the following IP address in the Control Plane VIP field:
10.200.0.50Enter the following IP address for the Ingress VIP:
10.200.0.51Use the default IP addresses in the Service and Pod CIDRs section.
Click default pool in the left-navigation bar.
Create a node pool
Your cluster must have at least one node pool for worker nodes. A node pool is a template for the groups of worker nodes created in this cluster.
Enter the following IP address in the Nodes address 1 field:
10.200.0.5
This is the IP address of the abm-user-cluster-w1 VM in the VXLAN created by the script.
Create the cluster
Click Verify and Create to create the user cluster.
It takes 15 minutes or more to create the user cluster. The console displays status messages as it verifies the settings and creates the cluster.
If there is a problem with the configuration, the console displays an error message that should be clear enough for you to fix the configuration issue and try again to create the cluster.
To see additional information about the creation process, click Show details to display a side panel. Click to close the details panel.
When the cluster is created, Cluster status: running is displayed.
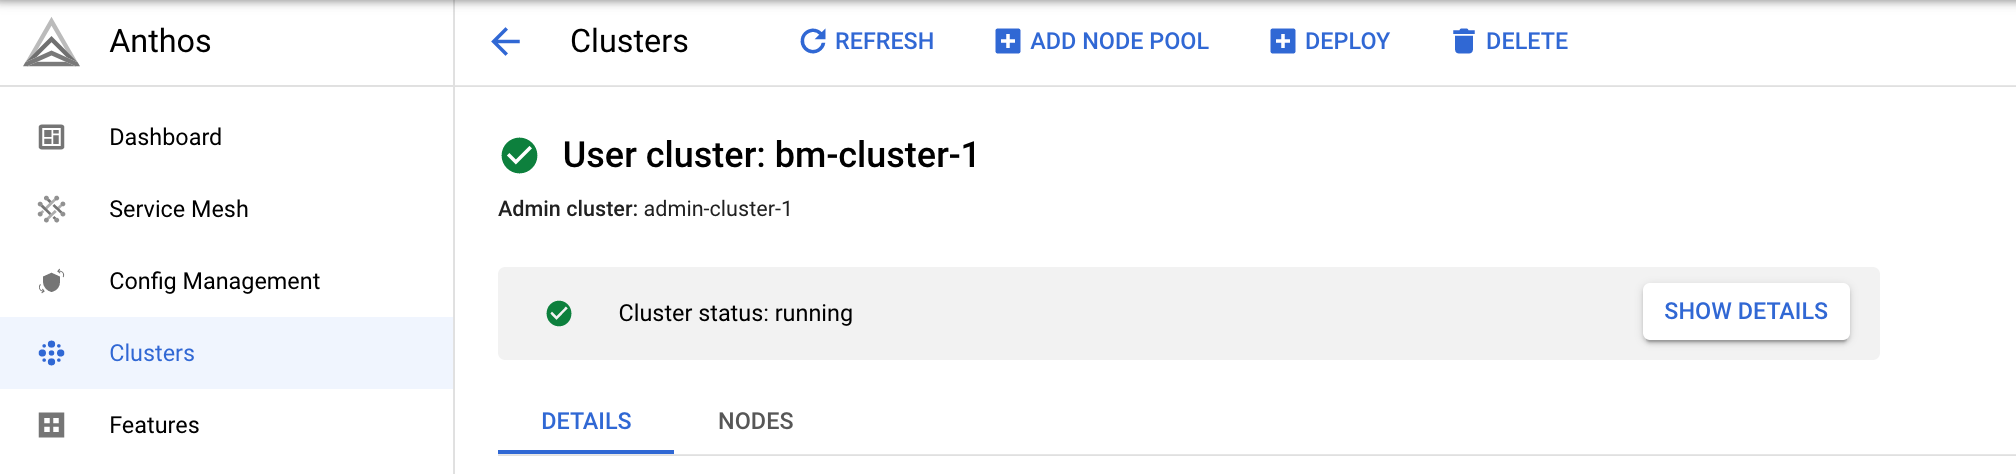
After the cluster is created, click Clusters to go back to the Clusters page.
gcloud CLI
You use the following command to create a user cluster:
gcloud container bare-metal clusters create
After creating the cluster, you need to create at least one node pool using the following command:
gcloud container bare-metal node-pools create
To create the user cluster:
Ensure the environment variables that you defined previously have the correct values. Although the example command uses placeholders, they need to match the environment variables that the script used.
echo $PROJECT_ID echo $ADMIN_CLUSTER_NAME echo $ON_PREM_API_REGION echo $BMCTL_VERSION
Run the following command to create the user cluster. Replace the the following:
USER_CLUSTER_NAME: The name for the cluster.Be sure that
--admin-usersis set to the email address associated with your Google account so that you can administer the cluster.
The rest of the flag values have been filled out for you. Scroll over if needed to verify that the
--admin-cluster-membershipflag has the correct value for the admin cluster name, which is the last segment in the fully-specified membership name.gcloud container bare-metal clusters create USER_CLUSTER_NAME \ --project=PROJECT_ID \ --admin-cluster-membership=projects/PROJECT_ID/locations/global/memberships/ADMIN_CLUSTER_NAME \ --location=ON_PREM_API_REGION \ --version=BMCTL_VERSION \ --admin-users=YOUR_EMAIL_ADDRESS \ --metal-lb-address-pools='pool=lb-pool-1,manual-assign=True,addresses=10.200.0.51-10.200.0.70' \ --control-plane-node-configs='node-ip=10.200.0.4' \ --control-plane-vip=10.200.0.50 \ --control-plane-load-balancer-port=443 \ --ingress-vip=10.200.0.51 \ --island-mode-service-address-cidr-blocks=10.96.0.0/20 \ --island-mode-pod-address-cidr-blocks=192.168.0.0/16 \ --lvp-share-path=/mnt/localpv-share \ --lvp-share-storage-class=local-shared \ --lvp-node-mounts-config-path=/mnt/localpv-disk \ --lvp-node-mounts-config-storage-class=local-disks
The following list describes the flags:
--project: The ID of the project in which the user cluster will be registered. This project is referred to as the fleet host project.--admin-cluster-membership: The fully-specified admin cluster name that identifies the admin cluster in the fleet.--location: The Google Cloud region in which the Anthos On-Prem API runs and stores its metadata.--version: The Google Distributed Cloud version.--admin-users: Include your email address to be granted the Kubernetes role-based access control (RBAC) policies that gives you full administrative access to the cluster.--metal-lb-address-pools: The address pool configuration for the bundled MetalLB load balancer. The IP address range must be in the10.200.0.0/24network that the script created. The address range must not contain the IP addresses assigned to the VMs nor the control plane VIP. Note, however, that the ingress VIP must be in this address range.--control-plane-node-configs: The control plane node configuration for the user cluster. The value fornode-ipis10.200.0.4, which is the IP address that the script assigned to the VMabm-user-cluster-cp1.--control-plane-vip: The virtual IP for the control plane. The value10.200.0.50is in the10.200.0.0/24network that the script created, but doesn't overlap with the IP address range used for the MetalLB load balancer address pools.--control-plane-load-balancer-port: The port the load balancer serves the control plane on. Although you can configure another value, port443is the standard port used for HTTPS connections.--ingress-vip: The virtual IP for the ingress service. This IP address must be in the IP address range used for the MetalLB load balancer address pools.--island-mode-service-address-cidr-blocks: A range of IP addresses, in CIDR format, to be used for Services in the user cluster. The example command used10.96.0.0/20, which is the default value provided by the console. The CIDR range must be between /24 and /12, where /12 provides the most IP addresses. We recommend that you use a range in the IP address space for private internets, as defined in RFC 1918.--island-mode-pod-address-cidr-blocks: A range of IP addresses, in CIDR format, to be used for Pods in the user cluster. The example command used192.168.0.0/16, which is the default value provided by the console. The CIDR range must be between /18 and /8, where /8 provides the most IP addresses. We recommend that you use a range in the IP address space for private internets, as defined in RFC 1918.--lvp-share-path: This is the host machine path where subdirectories can be created. A local PersistentVolume (PV) is created for each subdirectory.--lvp-share-storage-class: This is the StorageClass to use to create persistent volumes. The StorageClass is created during cluster creation.--lvp-node-mounts-config-path: This is the host machine path where mounted disks can be discovered. A local PersistentVolume (PV) is created for each mount.--lvp-node-mounts-config-storage: The storage class that PVs are created with during cluster creation.
After running the command, you see output like the following:
Waiting for operation [projects/PROJECT_ID/locations/ON_PREM_API_REGION/operations/operation-1678304606537-5f668bde5c57e-341effde-b612ff8a] to complete...
In the example output, the string operation-1678304606537-5f668bde5c57e-341effde-b612ff8a
is the OPERATION_ID of the long-running operation.
To find out the status of the operation, copy the
OPERATION_ID from your output into the following
command. Open another terminal window and run the command.
gcloud container bare-metal operations describe OPERATION_ID \
  --project=PROJECT_ID \
  --location=ON_PREM_API_REGION
It takes about 15 minutes or more to create the cluster. As the cluster is being created, you can run the previous command every so often to get the current status.
When the cluster is created, you see output like the following:
Created Anthos cluster on bare metal [https://gkeonprem.googleapis.com/v1/projects/PROJECT_ID/locations/ON_PREM_API_REGION/bareMetalClusters/USER_CLUSTER_NAME].
Create a node pool
After the cluster is successfully created, run the following command
to create a node pool. Replace NODE_POOL_NAME
with a name for the node pool, and ensure that the placeholder for the
the --cluster flag is still set to the user cluster's name.
gcloud container bare-metal node-pools create NODE_POOL_NAME \
  --cluster=USER_CLUSTER_NAME \
  --project=PROJECT_ID \
  --location=ON_PREM_API_REGION \
  --node-configs='node-ip=10.200.0.5'
-node-configs: The value assigned tonode-ipis the IP address of the abm-user-cluster-w1 VM in the VXLAN created by the script.
After running the command, you see output like the following:
Waiting for operation [projects/PROJECT_ID/locations/ON_PREM_API_REGION/operations/operation-1678308682052-5f669b0d132cb-6ebd1c2c-816287a7] to complete...
It takes about 5 minutes or less to create the node pool. When the node pool is created, you see output like the following:
Created node pool in Anthos cluster on bare metal [https://gkeonprem.googleapis.com/v1/projects/PROJECT_ID/locations/ON_PREM_API_REGION/bareMetalClusters/USER_CLUSTER_NAME/bareMetalNodePools/NODE_POOL_NAME].
Other user cluster commands
In addition to creating clusters, there are other gcloud CLI commands that you can run, for example:
- To list your user clusters:
gcloud container bare-metal clusters list \
    --project=PROJECT_ID \
    --location=ON_PREM_API_REGION
- To describe a user cluster:
gcloud container bare-metal clusters describe USER_CLUSTER_NAME \
    --project=PROJECT_ID \
    --location=ON_PREM_API_REGION
For more information, see gcloud container bare-metal clusters.
Other node pool commands
In addition to creating node pools, there are other gcloud CLI commands that you can run, for example:
- To list node pools:
gcloud container bare-metal node-pools list \
    --cluster=USER_CLUSTER_NAME \
    --project=PROJECT_ID \
    --location=ON_PREM_API_REGION
- To describe a node pool:
gcloud container bare-metal node-pools describe NODE_POOL_NAME \
    --cluster=USER_CLUSTER_NAME \
    --project=PROJECT_ID \
    --location=ON_PREM_API_REGION
For more information, see gcloud container bare-metal node-pools.
Terraform
You can use the following basic configuration sample to create a user cluster
with bundled MetalLB load balancer. For more information, see the
google_gkeonprem_bare_metal_cluster reference documentation.
In the directory where you cloned
anthos-samples, change to the directory where the Terraform sample is located:cd anthos-samples/anthos-onprem-terraform/abm_user_cluster_metallb
The sample provides an example variables file to pass in to
main.tf.Make a copy of the
terraform.tfvars.samplefile:cp terraform.tfvars.sample terraform.tfvars
Modify the parameters values in
terraform.tfvarsand save the file.The following list describes the variables:
project_id: The ID of the project in which the user cluster will be registered. This project is referred to as the fleet host project.region: The Google Cloud region that you set at the beginning of the tutorial. Runecho $ON_PREM_API_REGIONto get the value.admin_cluster_name: The name of the admin cluster that you set at the beginning of this tutorial. Run echo$ADMIN_CLUSTER_NAMEto get the value.bare_metal_version: The Google Distributed Cloud version for your user cluster. To use the same version that you used for the admin cluster, runecho $BMCTL_VERSIONto get the value. If you prefer, you can specify a version that is no more than one minor version lower than the admin cluster version. The user cluster version can't be higher than the admin cluster version.cluster_name: You can either use the name in the TVARS file for the user cluster or specify a name of your choice. The name can't be changed after the cluster is created.admin_user_emails: A list of email addresses of the users to be granted administrative privileges on the cluster. Be sure to add your email address so that you can administer the cluster.When the cluster is created, the Anthos On-Prem API applies the Kubernetes role-based access control (RBAC) policies to the cluster to grant the admin users the Kubernetes
clusterrole/cluster-adminrole, which provides full access to every resource in the cluster in all namespaces. This also lets users log on to the console using their Google identity.
Use the default values defined in
terraform.tvarsfor the remaining variables. The script used these values when it created the VMs and admin cluster.control_plane_ips: A list of one or more IPv4 addresses for the control plane nodes. Use the default value, which is the IP address that the script assigned to the VMabm-user-cluster-cp1.worker_node_ips: A list of one or more IPv4 addresses for the worker node machines. Use the default values, which are the IP addresses that the script assigned to the VMsabm-user-cluster-w1andabm-user-cluster-w2.control_plane_vip: The virtual IP (VIP) for the control plane. Use the default value,10.200.0.50, which is in the10.200.0.0/24network that the script created. Note that this IP address doesn't overlap with the IP address range used for the MetalLB load balancer address pools.ingress_vip: The virtual IP address to configure on the load balancer for the ingress proxy. Use the default value,10.200.0.51, which is in the10.200.0.0/24network that the script created. Note that this IP address is in the IP address range used for the MetalLB load balancer address pools.lb_address_pools: A list of maps that define the address pools for the MetalLB load balancer. Use the default value.
Save the changes in
terraform.tfvars.Initialize and create the Terraform plan:
terraform initTerraform installs any needed libraries, such as the Google Cloud provider.
Review the configuration and make changes if needed:
terraform planApply the Terraform plan to create the user cluster:
terraform applyIt takes 15 minutes or more to create the user cluster. You can view the cluster in the Google Cloud console on the Anthos clusters page.
Connect to the user cluster
When you create a user cluster using the console or the
gcloud CLI, the cluster is configured with the same Kubernetes
role-based access control (RBAC) policies that you configured for the admin
cluster when you ran gcloud container fleet memberships generate-gateway-rbac.
These RBAC policies let you connect to the cluster using your Google Cloud
identity, which is the email address associated with your Google Cloud
account. These RBAC policies let you log in to the console
without any additional configuration.
Connect to the cluster in the console
If you used the gcloud CLI to create the user cluster, go to the GKE Enterprise clusters page in the console:
Go to the GKE Enterprise clusters page
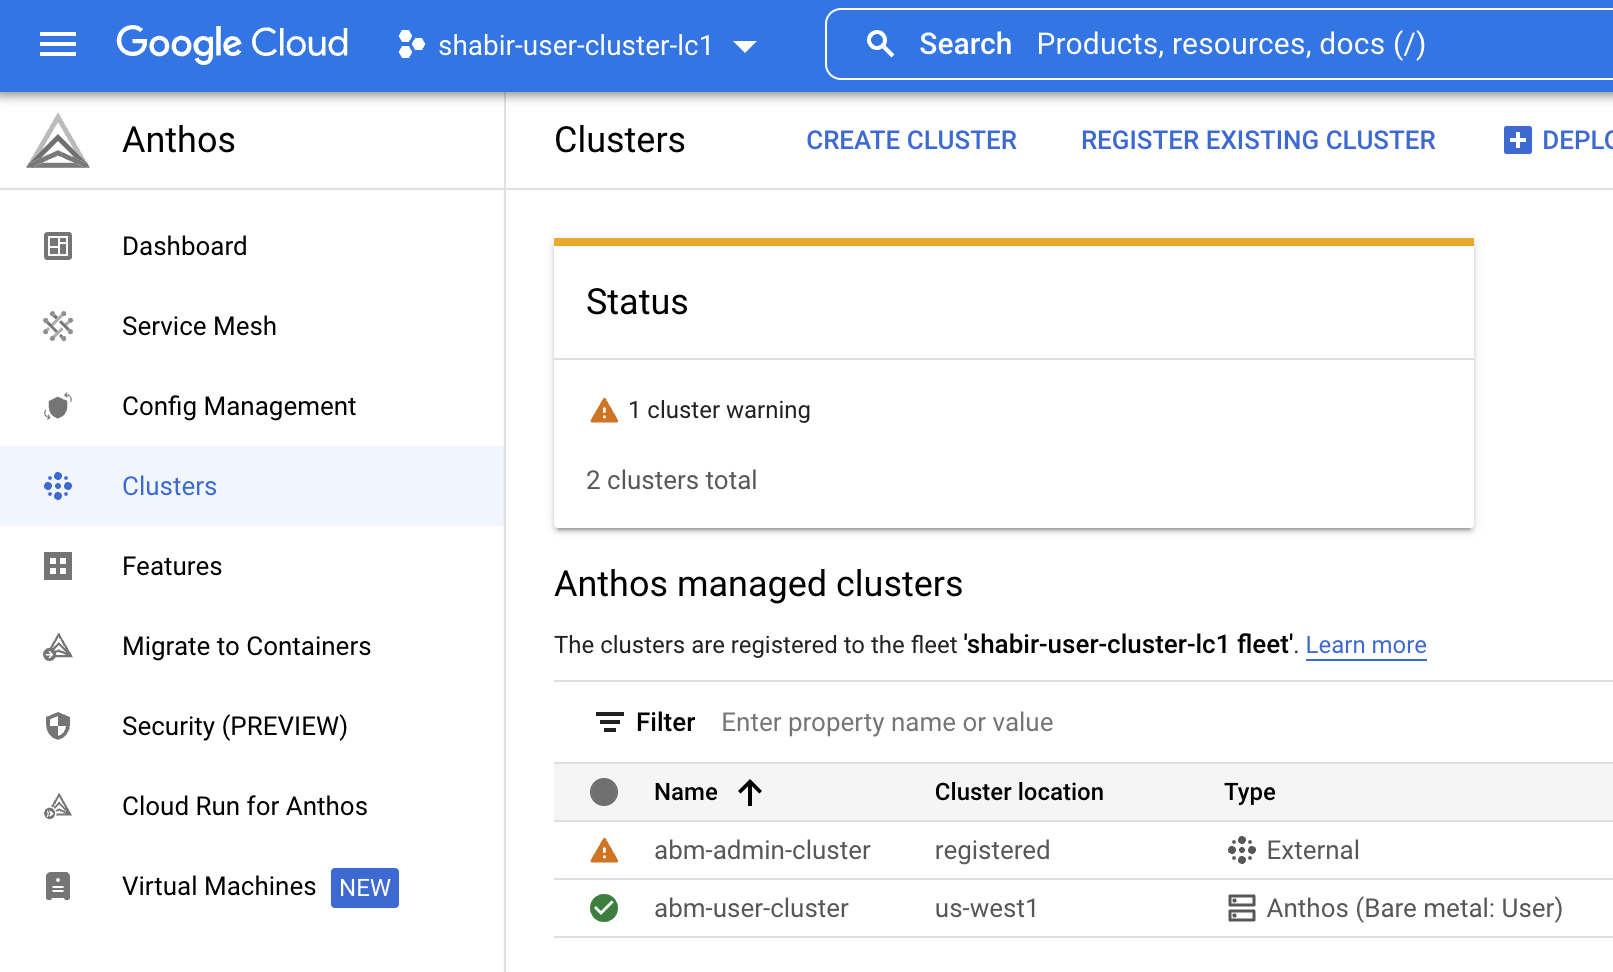
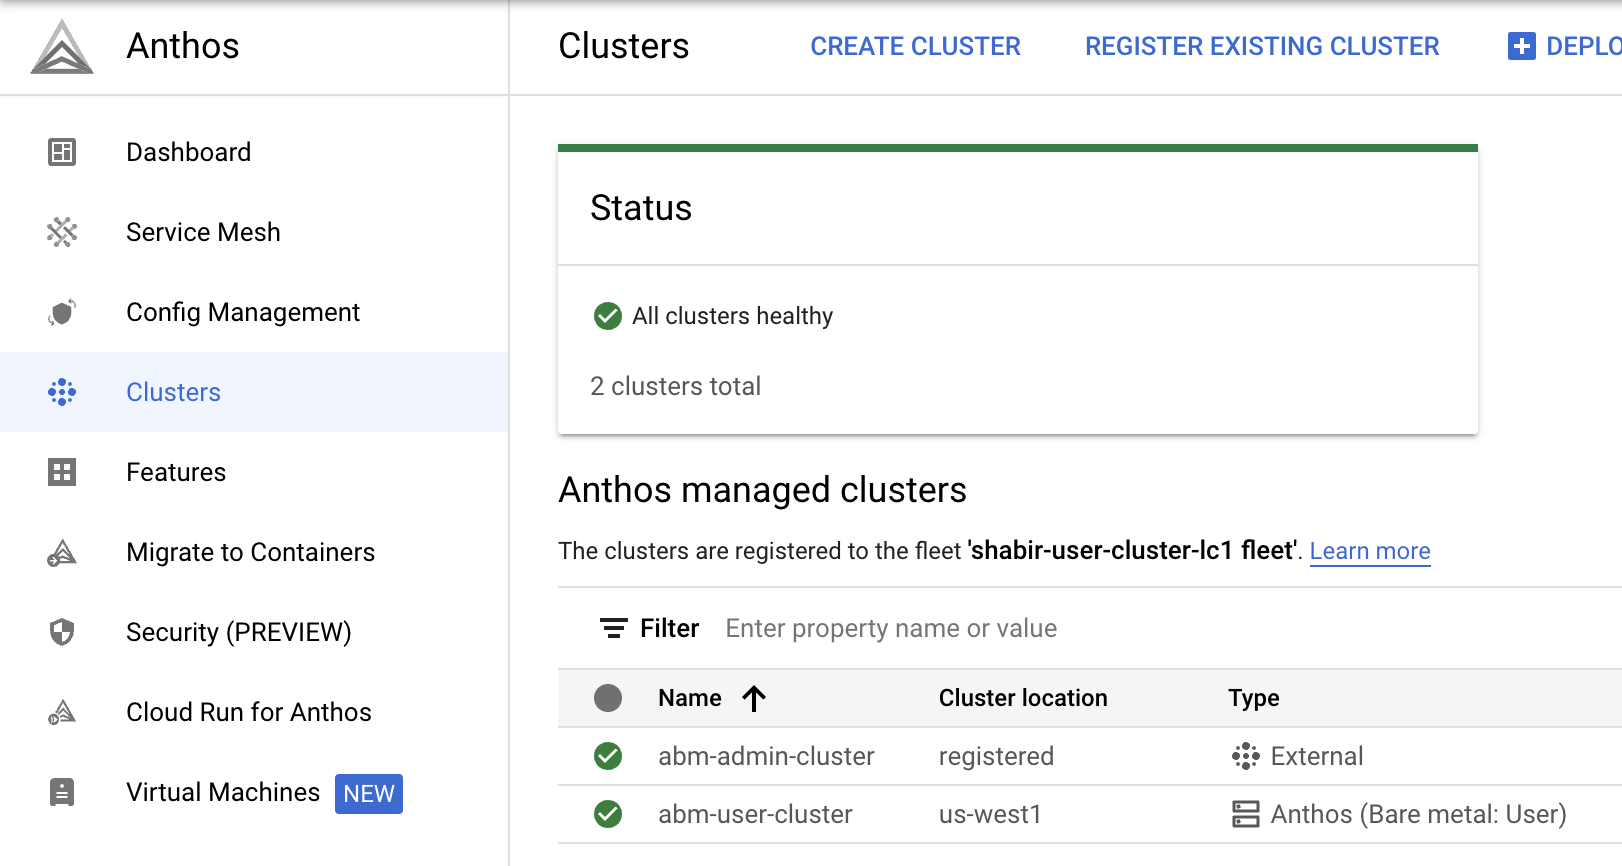
Make sure that the project in which you created the user cluster is selected. You should see both the admin and user cluster on the list.
Notice that the user cluster has Anthos (Bare metal: User) in the Type column. This indicates that the cluster is managed by the Anthos On-Prem API.
The admin cluster has External in the Type column. This indicates that the cluster isn't managed by the Anthos On-Prem API.
Although the admin cluster was created by the script using bmctl, you
can
configure the admin cluster to be managed by the Anthos On-Prem API.
To login to a cluster:
Click the link on the cluster name, and on the side panel, click Login.
Select Use your Google identity to log in.
Click Login.
Repeat the same steps to log into the admin cluster as well.
Connect to the cluster on the command line
The Anthos On-Prem API configures the RBAC policies for you as the user
cluster creator. These policies let you run kubectl commands on your local
desktop using the Connect gateway's kubeconfig.
From your local computer:
Get the
kubeconfigentry that can access the cluster through the Connect gateway.gcloud container fleet memberships get-credentials USER_CLUSTER_NAMEThe output is similar to the following:
Starting to build Gateway kubeconfig...
Current project_id: PROJECT_ID
A new kubeconfig entry "connectgateway_PROJECT_ID_global_USER_CLUSTER_NAME" has been generated and set as the current context.
You can now run
kubectlcommands through the Connect gateway:kubectl get nodesThe output is similar to the following:
NAME                  STATUS   ROLES                  AGE     VERSION
abm-user-cluster-cp   Ready    control-plane,master   14m     v1.24.2-gke.1900
abm-user-cluster-w1   Ready    worker                 8m28s   v1.24.2-gke.1900
Add another node pool to the user cluster
Console
In the Google Cloud console, go to the GKE Enterprise clusters page.
In the cluster list, click the name of the cluster, and then click More details in the Details panel.
Click the Nodes tab.
Click Add Node Pool.
Enter a name for the node pool.
In the Nodes address 1 field, enter the following IP address:
10.200.0.6This is the IP address of the abm-user-cluster-w2 VM that the script created.
Click Create
Click the Nodes tab again if needed.
The new node pool shows a status of Reconciling.
Click in the top-right corner to view the status of the node pool creation. You might have to refresh the page to see the updated status in the node pools list.
gcloud CLI
Run the following command to create another node pool. Replace
NODE_POOL_NAME_2 with a name for the node pool, and
ensure that the placeholder for the --cluster flag is still set to the user
cluster's name.
gcloud container bare-metal node-pools create NODE_POOL_NAME_2 \
  --cluster=USER_CLUSTER_NAME \
  --project=PROJECT_ID \
  --location=ON_PREM_API_REGION \
  --node-configs='node-ip=10.200.0.6'
-node-configs: The value assigned tonode-ipis the IP address of the abm-user-cluster-w2 VM in the VXLAN created by the script.
Terraform
If you created the cluster using Terraform, the cluster was created with
two nodes, so there aren't any additional VMs in the VXLAN available to
add another node. For information on adding node pools, see
see the
google_gkeonprem_bare_metal_cluster reference documentation.
You can also verify the new node using kubectl. You first have to run the
gcloud container fleet memberships get-credentials command as shown
earlier to fetch the cluster config:
kubectl get nodes
The output is similar to the following:
NAME                  STATUS   ROLES                  AGE     VERSION
abm-user-cluster-cp   Ready    control-plane,master   24m   v1.24.2-gke.1900
abm-user-cluster-w1   Ready    worker                 18m   v1.24.2-gke.1900
abm-user-cluster-w2   Ready    worker                 52s   v1.24.2-gke.1900
Clean up
Delete the user cluster
Console
In the console, go to the GKE Enterprise clusters page.
In the list of clusters, click the user cluster.
In the Details panel, click More details.
Near the top of the window, click Delete.
When prompted to confirm, enter the cluster name and click Confirm.
Click in the top-right corner to view the status of the deletion. You might have to refresh the page to update the clusters list.
gcloud CLI
Run the following command to delete the cluster:
gcloud container bare-metal clusters delete USER_CLUSTER_NAME \
  --project=PROJECT_ID \
  --location=ON_PREM_API_REGION \
  --force
The --force flag lets you delete a cluster that has node pools.
Without the --force flag, you have to
delete the node pools
first, and then delete the cluster.
For information about other flags, see gcloud container bare-metal clusters delete.
Terraform
Run the following command:
terraform destroy
Wait for the user cluster to be deleted before deleting the admin cluster and VMs.
Delete the admin cluster and VMs
Unenroll the admin cluster from the Anthos On-Prem API:
gcloud container bare-metal admin-clusters unenroll ADMIN_CLUSTER_NAME \
    --project=PROJECT_ID \
    --location=ON_PREM_API_REGION
Connect to the admin workstation:
gcloud compute ssh root@abm-ws --zone ZONEDelete the admin cluster:
bmctl reset -c ADMIN_CLUSTER_NAMEbmctlunregisters the cluster from the fleet and then deletes the cluster. Wait for the cluster to be deleted before deleting the VMs.Exit the admin workstation.
List all VMs that have
abmin their name:gcloud compute instances list | grep 'abm'Verify that you're fine with deleting all VMs that contain
abmin the name.After you've verified, you can delete
abmVMs by running the following command:gcloud compute instances list --format="value(name)" | \ grep 'abm' | \ xargs gcloud --quiet compute instances deleteDelete the service account:
gcloud iam service-accounts delete baremetal-gcr@PROJECT_ID.iam.gserviceaccount.comAt the confirmation prompt, enter y.
What's next