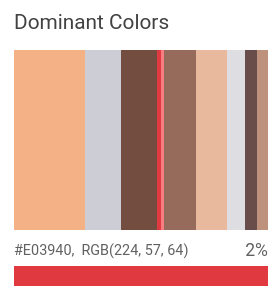
图片属性功能可检测图片的一般属性,如主色。
 
  检测到主色:
 
图片属性检测请求
设置您的 Google Cloud 项目和身份验证
如果您尚未创建 Google Cloud 项目,请立即创建。展开本部分可查看相关说明。
- Sign in to your Google Cloud account. If you're new to Google Cloud, create an account to evaluate how our products perform in real-world scenarios. New customers also get $300 in free credits to run, test, and deploy workloads.
- 


        In the Google Cloud console, on the project selector page, select or create a Google Cloud project. Roles required to select or create a project - Select a project: Selecting a project doesn't require a specific IAM role—you can select any project that you've been granted a role on.
- 
      Create a project: To create a project, you need the Project Creator
      (roles/resourcemanager.projectCreator), which contains theresourcemanager.projects.createpermission. Learn how to grant roles.
 
- 
  
    Verify that billing is enabled for your Google Cloud project. 
- 


      Enable the Vision API. Roles required to enable APIs To enable APIs, you need the Service Usage Admin IAM role ( roles/serviceusage.serviceUsageAdmin), which contains theserviceusage.services.enablepermission. Learn how to grant roles.
- 
      Install the Google Cloud CLI. 
- 
          如果您使用的是外部身份提供方 (IdP),则必须先使用联合身份登录 gcloud CLI。 
- 
        如需初始化 gcloud CLI,请运行以下命令: gcloud init
- 


        In the Google Cloud console, on the project selector page, select or create a Google Cloud project. Roles required to select or create a project - Select a project: Selecting a project doesn't require a specific IAM role—you can select any project that you've been granted a role on.
- 
      Create a project: To create a project, you need the Project Creator
      (roles/resourcemanager.projectCreator), which contains theresourcemanager.projects.createpermission. Learn how to grant roles.
 
- 
  
    Verify that billing is enabled for your Google Cloud project. 
- 


      Enable the Vision API. Roles required to enable APIs To enable APIs, you need the Service Usage Admin IAM role ( roles/serviceusage.serviceUsageAdmin), which contains theserviceusage.services.enablepermission. Learn how to grant roles.
- 
      Install the Google Cloud CLI. 
- 
          如果您使用的是外部身份提供方 (IdP),则必须先使用联合身份登录 gcloud CLI。 
- 
        如需初始化 gcloud CLI,请运行以下命令: gcloud init
- BASE64_ENCODED_IMAGE:二进制图片数据的 base64 表示(ASCII 字符串)。此字符串应类似于以下字符串:
  - /9j/4QAYRXhpZgAA...9tAVx/zDQDlGxn//2Q==
 
- RESULTS_INT:(可选)要返回的结果的整数值。如果您省略 "maxResults"字段及其值,则 API 会默认返回 10 个结果。此字段不适用于以下功能类型:TEXT_DETECTION、DOCUMENT_TEXT_DETECTION或CROP_HINTS。
- PROJECT_ID:您的 Google Cloud 项目 ID。
- CLOUD_STORAGE_IMAGE_URI:Cloud Storage 存储桶中有效图片文件的路径。您必须至少拥有该文件的读取权限。
  示例:
  - gs://cloud-samples-data/vision/image_properties/bali.jpeg 
 
- RESULTS_INT:(可选)要返回的结果的整数值。如果您省略 "maxResults"字段及其值,则 API 会默认返回 10 个结果。此字段不适用于以下功能类型:TEXT_DETECTION、DOCUMENT_TEXT_DETECTION或CROP_HINTS。
- PROJECT_ID:您的 Google Cloud 项目 ID。
检测本地图片中的图片属性
您可以使用 Vision API 对本地图片文件执行特征检测。
对于 REST 请求,请将图片文件的内容作为 base64 编码的字符串在请求正文中发送。
对于 gcloud 和客户端库请求,请在请求中指定本地图片的路径。
ColorInfo 字段不包含用于解释 RGB 值的绝对颜色空间(例如 sRGB、Adobe RGB、DCI-P3、BT.2020 等等)的相关信息。默认情况下,应用应采用 sRGB 颜色空间。
REST
在使用任何请求数据之前,请先进行以下替换:
HTTP 方法和网址:
POST https://vision.googleapis.com/v1/images:annotate
请求 JSON 正文:
{
  "requests": [
    {
      "image": {
        "content": "BASE64_ENCODED_IMAGE"
      },
      "features": [
        {
          "maxResults": RESULTS_INT,
          "type": "IMAGE_PROPERTIES"
        },
      ]
    }
  ]
}
如需发送请求,请选择以下方式之一:
curl
      将请求正文保存在名为 request.json 的文件中,然后执行以下命令:
    
curl -X POST \
-H "Authorization: Bearer $(gcloud auth print-access-token)" \
-H "x-goog-user-project: PROJECT_ID" \
-H "Content-Type: application/json; charset=utf-8" \
-d @request.json \
"https://vision.googleapis.com/v1/images:annotate"
PowerShell
      将请求正文保存在名为 request.json 的文件中,然后执行以下命令:
    
$cred = gcloud auth print-access-token
$headers = @{ "Authorization" = "Bearer $cred"; "x-goog-user-project" = "PROJECT_ID" }
Invoke-WebRequest `
-Method POST `
-Headers $headers `
-ContentType: "application/json; charset=utf-8" `
-InFile request.json `
-Uri "https://vision.googleapis.com/v1/images:annotate" | Select-Object -Expand Content
如果请求成功,服务器将返回一个 200 OK HTTP 状态代码以及 JSON 格式的响应。
响应:
响应
{
  "responses": [
    {
      "imagePropertiesAnnotation": {
        "dominantColors": {
          "colors": [
            {
              "color": {
                "red": 243,
                "green": 177,
                "blue": 133
              },
              "score": 0.18074834,
              "pixelFraction": 0.013533333
            },
            {
              "color": {
                "red": 204,
                "green": 205,
                "blue": 213
              },
              "score": 0.092455424,
              "pixelFraction": 0.19266666
            },
            {
              "color": {
                "red": 114,
                "green": 77,
                "blue": 64
              },
              "score": 0.090447456,
              "pixelFraction": 0.034133334
            },
            {
              "color": {
                "red": 224,
                "green": 57,
                "blue": 64
              },
              "score": 0.010952942,
              "pixelFraction": 0.014266667
            },
            {
              "color": {
                "red": 248,
                "green": 125,
                "blue": 130
              },
              "score": 0.006984347,
              "pixelFraction": 0.0057333335
            },
            {
              "color": {
                "red": 150,
                "green": 107,
                "blue": 92
              },
              "score": 0.081589326,
              "pixelFraction": 0.019666666
            },
            {
              "color": {
                "red": 233,
                "green": 185,
                "blue": 158
              },
              "score": 0.08035342,
              "pixelFraction": 0.0122
            },
            {
              "color": {
                "red": 221,
                "green": 221,
                "blue": 226
              },
              "score": 0.045200635,
              "pixelFraction": 0.202
            },
            {
              "color": {
                "red": 105,
                "green": 77,
                "blue": 75
              },
              "score": 0.030223774,
              "pixelFraction": 0.013866667
            },
            {
              "color": {
                "red": 189,
                "green": 145,
                "blue": 123
              },
              "score": 0.028689377,
              "pixelFraction": 0.0069333334
            }
          ]
        }
      },
      "cropHintsAnnotation": {
        "cropHints": [
          {
            "boundingPoly": {
              "vertices": [
                {},
                {
                  "x": 2549
                },
                {
                  "x": 2549,
                  "y": 1699
                },
                {
                  "y": 1699
                }
              ]
            },
            "confidence": 0.79999995,
            "importanceFraction": 1
          }
        ]
      }
    }
  ]
}
Go
试用此示例之前,请按照《Vision 快速入门:使用客户端库》中的 Go 设置说明进行操作。 如需了解详情,请参阅 Vision Go API 参考文档。
如需向 Vision 进行身份验证,请设置应用默认凭证。如需了解详情,请参阅为本地开发环境设置身份验证。
// detectProperties gets image properties from the Vision API for an image at the given file path.
func detectProperties(w io.Writer, file string) error {
	ctx := context.Background()
	client, err := vision.NewImageAnnotatorClient(ctx)
	if err != nil {
		return err
	}
	f, err := os.Open(file)
	if err != nil {
		return err
	}
	defer f.Close()
	image, err := vision.NewImageFromReader(f)
	if err != nil {
		return err
	}
	props, err := client.DetectImageProperties(ctx, image, nil)
	if err != nil {
		return err
	}
	fmt.Fprintln(w, "Dominant colors:")
	for _, quantized := range props.DominantColors.Colors {
		color := quantized.Color
		r := int(color.Red) & 0xff
		g := int(color.Green) & 0xff
		b := int(color.Blue) & 0xff
		fmt.Fprintf(w, "%2.1f%% - #%02x%02x%02x\n", quantized.PixelFraction*100, r, g, b)
	}
	return nil
}
Java
在试用此示例之前,请按照Vision API 快速入门:使用客户端库中的 Java 设置说明进行操作。如需了解详情,请参阅 Vision API Java 参考文档。
import com.google.cloud.vision.v1.AnnotateImageRequest;
import com.google.cloud.vision.v1.AnnotateImageResponse;
import com.google.cloud.vision.v1.BatchAnnotateImagesResponse;
import com.google.cloud.vision.v1.ColorInfo;
import com.google.cloud.vision.v1.DominantColorsAnnotation;
import com.google.cloud.vision.v1.Feature;
import com.google.cloud.vision.v1.Image;
import com.google.cloud.vision.v1.ImageAnnotatorClient;
import com.google.protobuf.ByteString;
import java.io.FileInputStream;
import java.io.IOException;
import java.util.ArrayList;
import java.util.List;
public class DetectProperties {
  public static void detectProperties() throws IOException {
    // TODO(developer): Replace these variables before running the sample.
    String filePath = "path/to/your/image/file.jpg";
    detectProperties(filePath);
  }
  // Detects image properties such as color frequency from the specified local image.
  public static void detectProperties(String filePath) throws IOException {
    List<AnnotateImageRequest> requests = new ArrayList<>();
    ByteString imgBytes = ByteString.readFrom(new FileInputStream(filePath));
    Image img = Image.newBuilder().setContent(imgBytes).build();
    Feature feat = Feature.newBuilder().setType(Feature.Type.IMAGE_PROPERTIES).build();
    AnnotateImageRequest request =
        AnnotateImageRequest.newBuilder().addFeatures(feat).setImage(img).build();
    requests.add(request);
    // Initialize client that will be used to send requests. This client only needs to be created
    // once, and can be reused for multiple requests. After completing all of your requests, call
    // the "close" method on the client to safely clean up any remaining background resources.
    try (ImageAnnotatorClient client = ImageAnnotatorClient.create()) {
      BatchAnnotateImagesResponse response = client.batchAnnotateImages(requests);
      List<AnnotateImageResponse> responses = response.getResponsesList();
      for (AnnotateImageResponse res : responses) {
        if (res.hasError()) {
          System.out.format("Error: %s%n", res.getError().getMessage());
          return;
        }
        // For full list of available annotations, see http://g.co/cloud/vision/docs
        DominantColorsAnnotation colors = res.getImagePropertiesAnnotation().getDominantColors();
        for (ColorInfo color : colors.getColorsList()) {
          System.out.format(
              "fraction: %f%nr: %f, g: %f, b: %f%n",
              color.getPixelFraction(),
              color.getColor().getRed(),
              color.getColor().getGreen(),
              color.getColor().getBlue());
        }
      }
    }
  }
}Node.js
试用此示例之前,请按照《Vision 快速入门:使用客户端库》中的 Node.js 设置说明进行操作。 如需了解详情,请参阅 Vision Node.js API 参考文档。
如需向 Vision 进行身份验证,请设置应用默认凭证。如需了解详情,请参阅为本地开发环境设置身份验证。
const vision = require('@google-cloud/vision');
// Creates a client
const client = new vision.ImageAnnotatorClient();
/**
 * TODO(developer): Uncomment the following line before running the sample.
 */
// const fileName = 'Local image file, e.g. /path/to/image.png';
// Performs property detection on the local file
const [result] = await client.imageProperties(fileName);
const colors = result.imagePropertiesAnnotation.dominantColors.colors;
colors.forEach(color => console.log(color));Python
试用此示例之前,请按照《Vision 快速入门:使用客户端库》中的 Python 设置说明进行操作。 如需了解详情,请参阅 Vision Python API 参考文档。
如需向 Vision 进行身份验证,请设置应用默认凭证。如需了解详情,请参阅为本地开发环境设置身份验证。
def detect_properties(path):
    """Detects image properties in the file."""
    from google.cloud import vision
    client = vision.ImageAnnotatorClient()
    with open(path, "rb") as image_file:
        content = image_file.read()
    image = vision.Image(content=content)
    response = client.image_properties(image=image)
    props = response.image_properties_annotation
    print("Properties:")
    for color in props.dominant_colors.colors:
        print(f"fraction: {color.pixel_fraction}")
        print(f"\tr: {color.color.red}")
        print(f"\tg: {color.color.green}")
        print(f"\tb: {color.color.blue}")
        print(f"\ta: {color.color.alpha}")
    if response.error.message:
        raise Exception(
            "{}\nFor more info on error messages, check: "
            "https://cloud.google.com/apis/design/errors".format(response.error.message)
        )
其他语言
C#: 请按照客户端库页面上的 C# 设置说明操作,然后访问 .NET 版 Vision 参考文档。
PHP: 请按照客户端库页面上的 PHP 设置说明操作,然后访问 PHP 版 Vision 参考文档。
Ruby 版: 请按照客户端库页面上的 Ruby 设置说明操作,然后访问 Ruby 版 Vision 参考文档。
检测远程图片中的图片属性
您可以使用 Vision API 对位于 Cloud Storage 或网络中的远程图片文件执行特征检测。如需发送远程文件请求,请在请求正文中指定文件的网址或 Cloud Storage URI。
ColorInfo 字段不包含用于解释 RGB 值的绝对颜色空间(例如 sRGB、Adobe RGB、DCI-P3、BT.2020 等等)的相关信息。默认情况下,应用应采用 sRGB 颜色空间。
REST
在使用任何请求数据之前,请先进行以下替换:
HTTP 方法和网址:
POST https://vision.googleapis.com/v1/images:annotate
请求 JSON 正文:
{
  "requests": [
    {
      "image": {
        "source": {
          "gcsImageUri": "CLOUD_STORAGE_IMAGE_URI"
        }
      },
      "features": [
        {
          "maxResults": RESULTS_INT,
          "type": "IMAGE_PROPERTIES"
        },
      ]
    }
  ]
}
如需发送请求,请选择以下方式之一:
curl
      将请求正文保存在名为 request.json 的文件中,然后执行以下命令:
    
curl -X POST \
-H "Authorization: Bearer $(gcloud auth print-access-token)" \
-H "x-goog-user-project: PROJECT_ID" \
-H "Content-Type: application/json; charset=utf-8" \
-d @request.json \
"https://vision.googleapis.com/v1/images:annotate"
PowerShell
      将请求正文保存在名为 request.json 的文件中,然后执行以下命令:
    
$cred = gcloud auth print-access-token
$headers = @{ "Authorization" = "Bearer $cred"; "x-goog-user-project" = "PROJECT_ID" }
Invoke-WebRequest `
-Method POST `
-Headers $headers `
-ContentType: "application/json; charset=utf-8" `
-InFile request.json `
-Uri "https://vision.googleapis.com/v1/images:annotate" | Select-Object -Expand Content
如果请求成功,服务器将返回一个 200 OK HTTP 状态代码以及 JSON 格式的响应。
响应:
响应
{
  "responses": [
    {
      "imagePropertiesAnnotation": {
        "dominantColors": {
          "colors": [
            {
              "color": {
                "red": 243,
                "green": 177,
                "blue": 133
              },
              "score": 0.18074834,
              "pixelFraction": 0.013533333
            },
            {
              "color": {
                "red": 204,
                "green": 205,
                "blue": 213
              },
              "score": 0.092455424,
              "pixelFraction": 0.19266666
            },
            {
              "color": {
                "red": 114,
                "green": 77,
                "blue": 64
              },
              "score": 0.090447456,
              "pixelFraction": 0.034133334
            },
            {
              "color": {
                "red": 224,
                "green": 57,
                "blue": 64
              },
              "score": 0.010952942,
              "pixelFraction": 0.014266667
            },
            {
              "color": {
                "red": 248,
                "green": 125,
                "blue": 130
              },
              "score": 0.006984347,
              "pixelFraction": 0.0057333335
            },
            {
              "color": {
                "red": 150,
                "green": 107,
                "blue": 92
              },
              "score": 0.081589326,
              "pixelFraction": 0.019666666
            },
            {
              "color": {
                "red": 233,
                "green": 185,
                "blue": 158
              },
              "score": 0.08035342,
              "pixelFraction": 0.0122
            },
            {
              "color": {
                "red": 221,
                "green": 221,
                "blue": 226
              },
              "score": 0.045200635,
              "pixelFraction": 0.202
            },
            {
              "color": {
                "red": 105,
                "green": 77,
                "blue": 75
              },
              "score": 0.030223774,
              "pixelFraction": 0.013866667
            },
            {
              "color": {
                "red": 189,
                "green": 145,
                "blue": 123
              },
              "score": 0.028689377,
              "pixelFraction": 0.0069333334
            }
          ]
        }
      },
      "cropHintsAnnotation": {
        "cropHints": [
          {
            "boundingPoly": {
              "vertices": [
                {},
                {
                  "x": 2549
                },
                {
                  "x": 2549,
                  "y": 1699
                },
                {
                  "y": 1699
                }
              ]
            },
            "confidence": 0.79999995,
            "importanceFraction": 1
          }
        ]
      }
    }
  ]
}
Go
试用此示例之前,请按照《Vision 快速入门:使用客户端库》中的 Go 设置说明进行操作。 如需了解详情,请参阅 Vision Go API 参考文档。
如需向 Vision 进行身份验证,请设置应用默认凭证。如需了解详情,请参阅为本地开发环境设置身份验证。
// detectProperties gets image properties from the Vision API for an image at the given file path.
func detectPropertiesURI(w io.Writer, file string) error {
	ctx := context.Background()
	client, err := vision.NewImageAnnotatorClient(ctx)
	if err != nil {
		return err
	}
	image := vision.NewImageFromURI(file)
	props, err := client.DetectImageProperties(ctx, image, nil)
	if err != nil {
		return err
	}
	fmt.Fprintln(w, "Dominant colors:")
	for _, quantized := range props.DominantColors.Colors {
		color := quantized.Color
		r := int(color.Red) & 0xff
		g := int(color.Green) & 0xff
		b := int(color.Blue) & 0xff
		fmt.Fprintf(w, "%2.1f%% - #%02x%02x%02x\n", quantized.PixelFraction*100, r, g, b)
	}
	return nil
}
Java
试用此示例之前,请按照《Vision 快速入门:使用客户端库》中的 Java 设置说明进行操作。 如需了解详情,请参阅 Vision Java API 参考文档。
如需向 Vision 进行身份验证,请设置应用默认凭证。如需了解详情,请参阅为本地开发环境设置身份验证。
import com.google.cloud.vision.v1.AnnotateImageRequest;
import com.google.cloud.vision.v1.AnnotateImageResponse;
import com.google.cloud.vision.v1.BatchAnnotateImagesResponse;
import com.google.cloud.vision.v1.ColorInfo;
import com.google.cloud.vision.v1.DominantColorsAnnotation;
import com.google.cloud.vision.v1.Feature;
import com.google.cloud.vision.v1.Image;
import com.google.cloud.vision.v1.ImageAnnotatorClient;
import com.google.cloud.vision.v1.ImageSource;
import java.io.IOException;
import java.util.ArrayList;
import java.util.List;
public class DetectPropertiesGcs {
  public static void detectPropertiesGcs() throws IOException {
    // TODO(developer): Replace these variables before running the sample.
    String filePath = "gs://your-gcs-bucket/path/to/image/file.jpg";
    detectPropertiesGcs(filePath);
  }
  // Detects image properties such as color frequency from the specified remote image on Google
  // Cloud Storage.
  public static void detectPropertiesGcs(String gcsPath) throws IOException {
    List<AnnotateImageRequest> requests = new ArrayList<>();
    ImageSource imgSource = ImageSource.newBuilder().setGcsImageUri(gcsPath).build();
    Image img = Image.newBuilder().setSource(imgSource).build();
    Feature feat = Feature.newBuilder().setType(Feature.Type.IMAGE_PROPERTIES).build();
    AnnotateImageRequest request =
        AnnotateImageRequest.newBuilder().addFeatures(feat).setImage(img).build();
    requests.add(request);
    // Initialize client that will be used to send requests. This client only needs to be created
    // once, and can be reused for multiple requests. After completing all of your requests, call
    // the "close" method on the client to safely clean up any remaining background resources.
    try (ImageAnnotatorClient client = ImageAnnotatorClient.create()) {
      BatchAnnotateImagesResponse response = client.batchAnnotateImages(requests);
      List<AnnotateImageResponse> responses = response.getResponsesList();
      for (AnnotateImageResponse res : responses) {
        if (res.hasError()) {
          System.out.format("Error: %s%n", res.getError().getMessage());
          return;
        }
        // For full list of available annotations, see http://g.co/cloud/vision/docs
        DominantColorsAnnotation colors = res.getImagePropertiesAnnotation().getDominantColors();
        for (ColorInfo color : colors.getColorsList()) {
          System.out.format(
              "fraction: %f%nr: %f, g: %f, b: %f%n",
              color.getPixelFraction(),
              color.getColor().getRed(),
              color.getColor().getGreen(),
              color.getColor().getBlue());
        }
      }
    }
  }
}Node.js
试用此示例之前,请按照《Vision 快速入门:使用客户端库》中的 Node.js 设置说明进行操作。 如需了解详情,请参阅 Vision Node.js API 参考文档。
如需向 Vision 进行身份验证,请设置应用默认凭证。如需了解详情,请参阅为本地开发环境设置身份验证。
// Imports the Google Cloud client libraries
const vision = require('@google-cloud/vision');
// Creates a client
const client = new vision.ImageAnnotatorClient();
/**
 * TODO(developer): Uncomment the following lines before running the sample.
 */
// const bucketName = 'Bucket where the file resides, e.g. my-bucket';
// const fileName = 'Path to file within bucket, e.g. path/to/image.png';
// Performs property detection on the gcs file
const [result] = await client.imageProperties(
  `gs://${bucketName}/${fileName}`
);
const colors = result.imagePropertiesAnnotation.dominantColors.colors;
colors.forEach(color => console.log(color));Python
试用此示例之前,请按照《Vision 快速入门:使用客户端库》中的 Python 设置说明进行操作。 如需了解详情,请参阅 Vision Python API 参考文档。
如需向 Vision 进行身份验证,请设置应用默认凭证。如需了解详情,请参阅为本地开发环境设置身份验证。
def detect_properties_uri(uri):
    """Detects image properties in the file located in Google Cloud Storage or
    on the Web."""
    from google.cloud import vision
    client = vision.ImageAnnotatorClient()
    image = vision.Image()
    image.source.image_uri = uri
    response = client.image_properties(image=image)
    props = response.image_properties_annotation
    print("Properties:")
    for color in props.dominant_colors.colors:
        print(f"frac: {color.pixel_fraction}")
        print(f"\tr: {color.color.red}")
        print(f"\tg: {color.color.green}")
        print(f"\tb: {color.color.blue}")
        print(f"\ta: {color.color.alpha}")
    if response.error.message:
        raise Exception(
            "{}\nFor more info on error messages, check: "
            "https://cloud.google.com/apis/design/errors".format(response.error.message)
        )
gcloud
如需执行图片属性检测操作,请使用 gcloud ml vision detect-image-properties 命令,如以下示例所示:
gcloud ml vision detect-image-properties gs://cloud-samples-data/vision/image_properties/bali.jpeg
其他语言
C#: 请按照客户端库页面上的 C# 设置说明操作,然后访问 .NET 版 Vision 参考文档。
PHP: 请按照客户端库页面上的 PHP 设置说明操作,然后访问 PHP 版 Vision 参考文档。
Ruby 版: 请按照客户端库页面上的 Ruby 设置说明操作,然后访问 Ruby 版 Vision 参考文档。
试用
接下来,请尝试执行图片属性检测。您可以使用已指定的图片 (gs://cloud-samples-data/vision/image_properties/bali.jpeg) 或指定您自己的图片。选择执行即可发送请求。
 
  请求正文:
{
  "requests": [
    {
      "features": [
        {
          "maxResults": 10,
          "type": "IMAGE_PROPERTIES"
        }
      ],
      "image": {
        "source": {
          "imageUri": "gs://cloud-samples-data/vision/image_properties/bali.jpeg"
        }
      }
    }
  ]
}