Pelatihan Model

Anda membuat model kustom dengan melatihnya menggunakan set data yang telah disiapkan. AutoML Vision API menggunakan gambar dari set data untuk melatih model, mengujinya, dan evaluate performanya. Anda akan meninjau hasilnya, menyesuaikan set data pelatihan sesuai kebutuhan, dan melatih model baru menggunakan set data yang ditingkatkan.

Melatih model dapat memerlukan waktu beberapa jam untuk diselesaikan. AutoML Vision API memungkinkan Anda untuk memeriksa status pelatihan.

Pelatihan Model

Jika memiliki set data berisi kumpulan gambar pelatihan teranotasi yang disertai kotak pembatas dan label, Anda siap membuat dan melatih model kustom.

UI web

  1. Buka UI Deteksi Objek AutoML Vision.

    Halaman Set data menampilkan set data yang tersedia untuk project saat ini.

    Listing halaman set data

  2. Pilih set data yang ingin Anda gunakan untuk melatih model kustom.

  3. Jika set data sudah siap, pilih tab Train dan tombol Train new model .

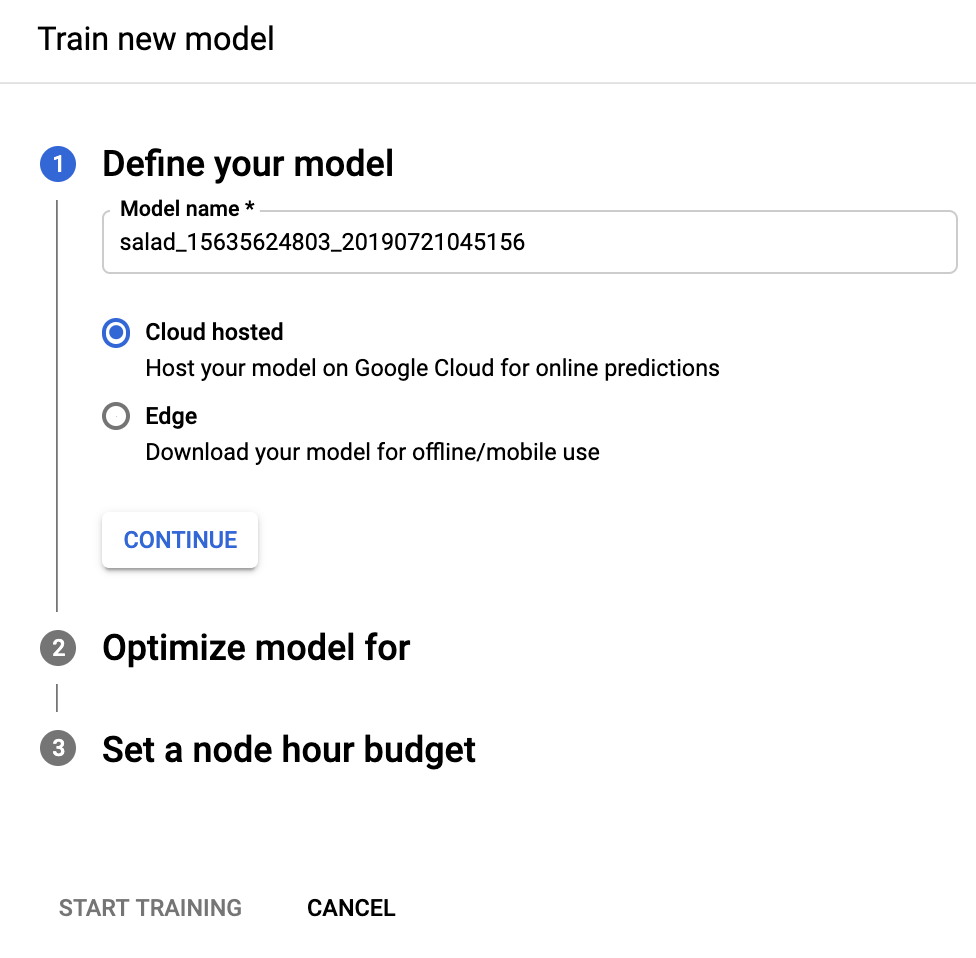
    Tindakan ini akan membuka jendela samping "Latih model baru" dengan opsi pelatihan.

  4. Dari bagian Tentukan model, tentukan Nama model (atau terima nama default). Pilih yang dihosting di Cloud sebagai jenis model (jika belum ditentukan). Setelah memilih untuk melatih model Edge, pilih Lanjutkan.

    Gambar tombol pilihan Melatih model Cloud

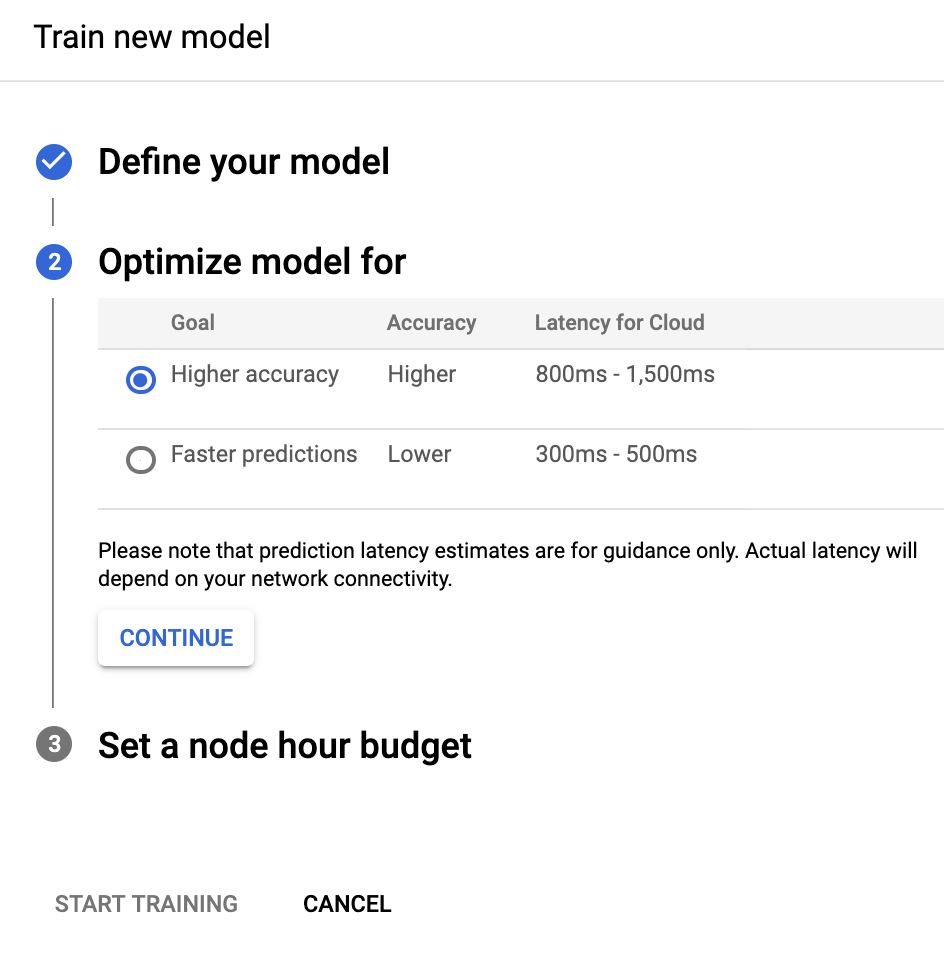
  5. Dalam bagian Optimalkan model untuk pilih kriteria pengoptimalan yang diinginkan: Akurasi lebih tinggi atau Prediksi lebih cepat. Setelah memilih spesifikasi pengoptimalan, pilih Lanjutkan.

    Gambar tombol "Pertukaran terbaik"

  6. Di bagian Tetapkan anggaran jam kerja node berikut, tentukan anggaran node yang Anda inginkan.

    Secara default, 24 jam kerja node seharusnya cukup bagi sebagian besar set data untuk melatih model Anda. Nilai yang direkomendasikan ini adalah estimasi untuk membuat model yang digabungkan sepenuhnya. Namun, Anda dapat memilih jumlah lain. Jumlah minimum jam kerja node untuk mendeteksi objek adalah 20. Untuk klasifikasi Gambar jumlah minimum ini adalah 8.

    Di bagian ini, Anda juga dapat memilih untuk terapkan deployment otomatis model Anda setelah pelatihan dengan memilih Deploy model ke 1 node setelah pelatihan. Jika tidak, Anda harus men-deploy model secara manual model Anda setelah pelatihan selesai.

    menetapkan bagian anggaran node

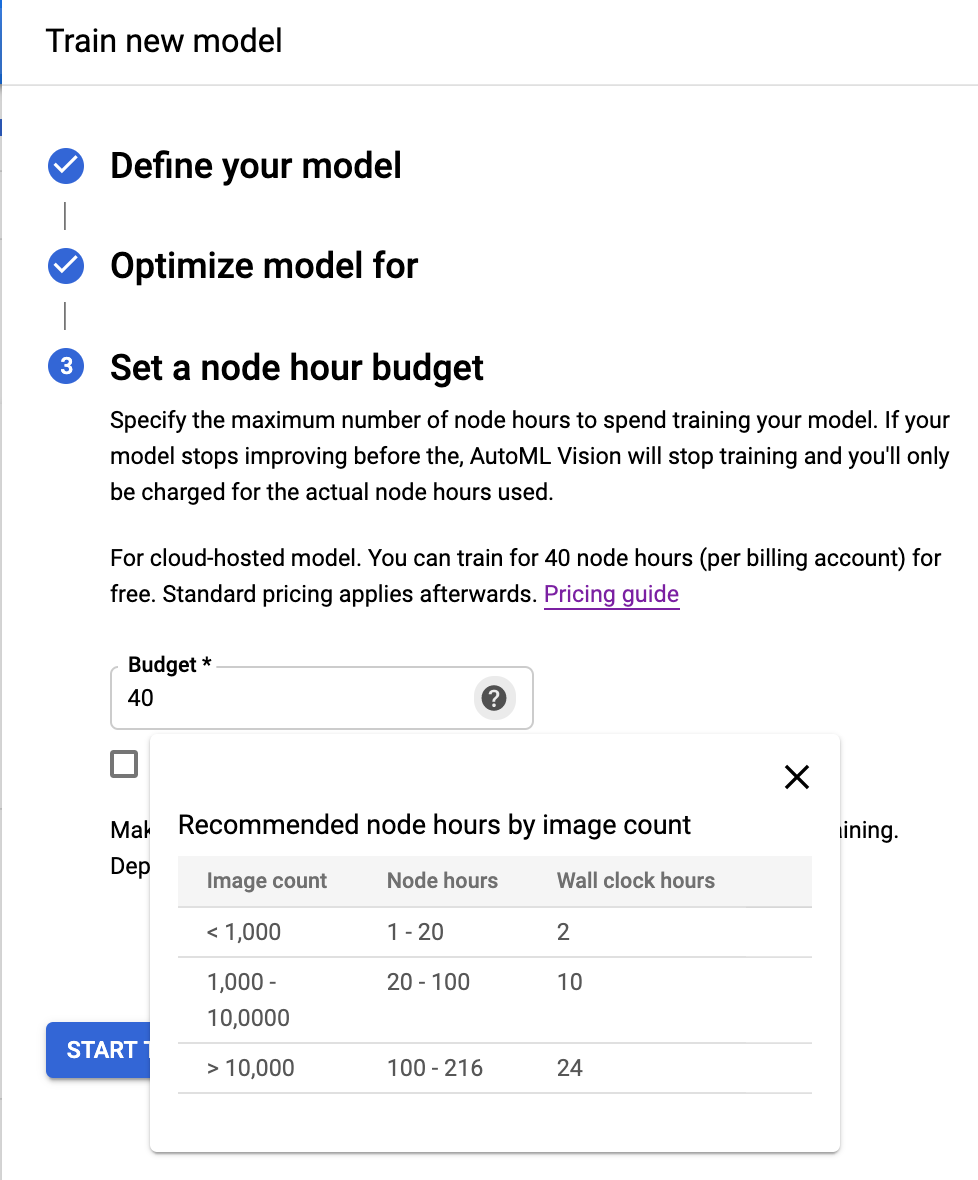
  7. PilihMulai pelatihan untuk memulai pelatihan model.

Melatih model dapat memerlukan waktu beberapa jam untuk diselesaikan. Setelah model berhasil dilatih, Anda akan menerima pesan di alamat email yang Anda gunakan untuk project Google Cloud Platform.

REST

Sebelum menggunakan salah satu data permintaan, lakukan penggantian berikut:

  • project-id: project ID GCP Anda.
  • dataset-id: ID set data Anda. ID adalah elemen terakhir dari nama set data Anda. Contoh:
    • nama set data: projects/project-id/locations/location-id/datasets/3104518874390609379
    • id set data: 3104518874390609379
  • display-name: nama tampilan string pilihan Anda.

Pertimbangan kolom spesifik:

  • imageObjectDetectionModelMetadata.modelType- Menunjukkan salah satu dari dua opsi yang tersedia terkait cara mengoptimalkan model:
    • cloud-low-latency-1 - Mengoptimalkan pelatihan untuk latensi.
    • cloud-high-accuracy-1 - Mengoptimalkan pelatihan untuk akurasi.
  • imageObjectDetectionModelMetadata.trainBudgetMilliNodeHours - Anggaran pelatihan untuk membuat model ini yang dinyatakan dalam milidetik jam node (nilai 1,000 dalam kolom ini berarti 1 jam kerja node). trainCostMilliNodeHoursyang sebenarnya akan sama atau kurang dari nilai ini. Jika pelatihan model lebih lanjut berhenti memberikan peningkatan, pelatihan akan berhenti tanpa menggunakananggaran penuh dan stopReason akan menjadi MODEL_CONVERGED.

    Catatan: jam_kerja_node = jam_aktual * jumlah_node_yang_terlibat.

    Untuk jenis model cloud-high-accuracy-1(default) dan cloud-low-latency-1, tanggaran pelatihan harus antara 20.000 dan 2.000.000 milidetik jam kerja node, inklusif. Nilai defaultnya adalah 216.000, yang mewakili satu hari dalam waktu aktual.

Metode HTTP dan URL:

POST https://automl.googleapis.com/v1/projects/PROJECT_ID/locations/us-central1/models

Isi JSON permintaan:

{
  "displayName": "DISPLAY_NAME",
  "datasetId": "DATASET_ID",
  "imageObjectDetectionModelMetadata": {
    "modelType": "cloud-low-latency-1",
    "trainBudgetMilliNodeHours": "216000"
  }
}

Untuk mengirim permintaan Anda, pilih salah satu opsi berikut:

curl

Simpan isi permintaan dalam file bernama request.json, dan jalankan perintah berikut:

curl -X POST \
-H "Authorization: Bearer $(gcloud auth print-access-token)" \
-H "x-goog-user-project: project-id" \
-H "Content-Type: application/json; charset=utf-8" \
-d @request.json \
"https://automl.googleapis.com/v1/projects/PROJECT_ID/locations/us-central1/models"

PowerShell

Simpan isi permintaan dalam file bernama request.json, dan jalankan perintah berikut:

$cred = gcloud auth print-access-token
$headers = @{ "Authorization" = "Bearer $cred"; "x-goog-user-project" = "project-id" }

Invoke-WebRequest `
-Method POST `
-Headers $headers `
-ContentType: "application/json; charset=utf-8" `
-InFile request.json `
-Uri "https://automl.googleapis.com/v1/projects/PROJECT_ID/locations/us-central1/models" | Select-Object -Expand Content

Anda akan melihat output yang serupa dengan berikut ini: Anda dapat menggunakan ID operasi (dalam contoh ini, IOD3074819451447675546) untuk mendapatkan status tugas tersebut. Sebagai contoh, lihat Bekerja dengan operasi yang berjalan lama.

{
  "name": "projects/PROJECT_ID/locations/us-central1/operations/IOD3074819451447675546",
  "metadata": {
    "@type": "type.googleapis.com/google.cloud.automl.v1.OperationMetadata",
    "createTime": "2019-07-26T21:10:18.338846Z",
    "updateTime": "2019-07-26T21:10:18.338846Z",
    "createModelDetails": {}
  }
}

Go

Sebelum mencoba contoh ini, ikuti petunjuk penyiapan untuk bahasa ini di halaman Library Klien.

import (
	"context"
	"fmt"
	"io"

	automl "cloud.google.com/go/automl/apiv1"
	"cloud.google.com/go/automl/apiv1/automlpb"
)

// visionObjectDetectionCreateModel creates a model for image object detection.
func visionObjectDetectionCreateModel(w io.Writer, projectID string, location string, datasetID string, modelName string) error {
	// projectID := "my-project-id"
	// location := "us-central1"
	// datasetID := "IOD123456789..."
	// modelName := "model_display_name"

	ctx := context.Background()
	client, err := automl.NewClient(ctx)
	if err != nil {
		return fmt.Errorf("NewClient: %w", err)
	}
	defer client.Close()

	req := &automlpb.CreateModelRequest{
		Parent: fmt.Sprintf("projects/%s/locations/%s", projectID, location),
		Model: &automlpb.Model{
			DisplayName: modelName,
			DatasetId:   datasetID,
			ModelMetadata: &automlpb.Model_ImageObjectDetectionModelMetadata{
				ImageObjectDetectionModelMetadata: &automlpb.ImageObjectDetectionModelMetadata{},
			},
		},
	}

	op, err := client.CreateModel(ctx, req)
	if err != nil {
		return fmt.Errorf("CreateModel: %w", err)
	}
	fmt.Fprintf(w, "Processing operation name: %q\n", op.Name())
	fmt.Fprintf(w, "Training started...\n")

	return nil
}

Java

Sebelum mencoba contoh ini, ikuti petunjuk penyiapan untuk bahasa ini di halaman Library Klien.

import com.google.api.gax.longrunning.OperationFuture;
import com.google.cloud.automl.v1.AutoMlClient;
import com.google.cloud.automl.v1.ImageObjectDetectionModelMetadata;
import com.google.cloud.automl.v1.LocationName;
import com.google.cloud.automl.v1.Model;
import com.google.cloud.automl.v1.OperationMetadata;
import java.io.IOException;
import java.util.concurrent.ExecutionException;

class VisionObjectDetectionCreateModel {

  static void createModel() throws IOException, ExecutionException, InterruptedException {
    // TODO(developer): Replace these variables before running the sample.
    String projectId = "YOUR_PROJECT_ID";
    String datasetId = "YOUR_DATASET_ID";
    String displayName = "YOUR_DATASET_NAME";
    createModel(projectId, datasetId, displayName);
  }

  // Create a model
  static void createModel(String projectId, String datasetId, String displayName)
      throws IOException, ExecutionException, InterruptedException {
    // Initialize client that will be used to send requests. This client only needs to be created
    // once, and can be reused for multiple requests. After completing all of your requests, call
    // the "close" method on the client to safely clean up any remaining background resources.
    try (AutoMlClient client = AutoMlClient.create()) {
      // A resource that represents Google Cloud Platform location.
      LocationName projectLocation = LocationName.of(projectId, "us-central1");
      // Set model metadata.
      ImageObjectDetectionModelMetadata metadata =
          ImageObjectDetectionModelMetadata.newBuilder().build();
      Model model =
          Model.newBuilder()
              .setDisplayName(displayName)
              .setDatasetId(datasetId)
              .setImageObjectDetectionModelMetadata(metadata)
              .build();

      // Create a model with the model metadata in the region.
      OperationFuture<Model, OperationMetadata> future =
          client.createModelAsync(projectLocation, model);
      // OperationFuture.get() will block until the model is created, which may take several hours.
      // You can use OperationFuture.getInitialFuture to get a future representing the initial
      // response to the request, which contains information while the operation is in progress.
      System.out.format("Training operation name: %s\n", future.getInitialFuture().get().getName());
      System.out.println("Training started...");
    }
  }
}

Node.js

Sebelum mencoba contoh ini, ikuti petunjuk penyiapan untuk bahasa ini di halaman Library Klien.

/**
 * TODO(developer): Uncomment these variables before running the sample.
 */
// const projectId = 'YOUR_PROJECT_ID';
// const location = 'us-central1';
// const dataset_id = 'YOUR_DATASET_ID';
// const displayName = 'YOUR_DISPLAY_NAME';

// Imports the Google Cloud AutoML library
const {AutoMlClient} = require('@google-cloud/automl').v1;

// Instantiates a client
const client = new AutoMlClient();

async function createModel() {
  // Construct request
  const request = {
    parent: client.locationPath(projectId, location),
    model: {
      displayName: displayName,
      datasetId: datasetId,
      imageObjectDetectionModelMetadata: {},
    },
  };

  // Don't wait for the LRO
  const [operation] = await client.createModel(request);
  console.log(`Training started... ${operation}`);
  console.log(`Training operation name: ${operation.name}`);
}

createModel();

Python

Sebelum mencoba contoh ini, ikuti petunjuk penyiapan untuk bahasa ini di halaman Library Klien.

from google.cloud import automl

# TODO(developer): Uncomment and set the following variables
# project_id = "YOUR_PROJECT_ID"
# dataset_id = "YOUR_DATASET_ID"
# display_name = "your_models_display_name"

client = automl.AutoMlClient()

# A resource that represents Google Cloud Platform location.
project_location = f"projects/{project_id}/locations/us-central1"
# Leave model unset to use the default base model provided by Google
# train_budget_milli_node_hours: The actual train_cost will be equal or
# less than this value.
# https://cloud.google.com/automl/docs/reference/rpc/google.cloud.automl.v1#imageobjectdetectionmodelmetadata
metadata = automl.ImageObjectDetectionModelMetadata(
    train_budget_milli_node_hours=24000
)
model = automl.Model(
    display_name=display_name,
    dataset_id=dataset_id,
    image_object_detection_model_metadata=metadata,
)

# Create a model with the model metadata in the region.
response = client.create_model(parent=project_location, model=model)

print(f"Training operation name: {response.operation.name}")
print("Training started...")

Bahasa tambahan

C# : Ikuti Petunjuk penyiapan C# di halaman library klien, lalu kunjungi Dokumentasi referensi Deteksi Objek Vision AutoML untuk .NET.

PHP : Ikuti petunjuk penyiapan PHP di halaman library klien, lalu kunjungi dokumentasi referensi Deteksi Objek AutoML Vision untuk PHP.

Ruby : Ikuti Petunjuk penyiapan Ruby di halaman library klien, lalu kunjungi Dokumentasi referensi Deteksi Objek AutoML Vision untuk Ruby.

Mencantumkan operasi

Gunakan contoh kode berikut untuk mencantumkan operasi project Anda, dan memfilter hasilnya.

REST

Sebelum menggunakan salah satu data permintaan, lakukan penggantian berikut:

  • project-id: Project ID GCP Anda.

Metode HTTP dan URL:

GET https://automl.googleapis.com/v1/projects/PROJECT_ID/locations/us-central1/operations

Untuk mengirim permintaan Anda, pilih salah satu opsi berikut:

curl

Jalankan perintah berikut:

curl -X GET \
-H "Authorization: Bearer $(gcloud auth print-access-token)" \
-H "x-goog-user-project: project-id" \
"https://automl.googleapis.com/v1/projects/PROJECT_ID/locations/us-central1/operations"

PowerShell

Jalankan perintah berikut:

$cred = gcloud auth print-access-token
$headers = @{ "Authorization" = "Bearer $cred"; "x-goog-user-project" = "project-id" }

Invoke-WebRequest `
-Method GET `
-Headers $headers `
-Uri "https://automl.googleapis.com/v1/projects/PROJECT_ID/locations/us-central1/operations" | Select-Object -Expand Content

Output yang Anda lihat akan bervariasi, bergantung pada operasi yang Anda minta

Anda juga akan memfilter operasi yang ditampilkan menggunakan parameter kueri tertentu (operationId, done, dan worksOn). Contohnya, Untuk menampilkan daftar operasi yang telah berjalan, ubah URL:

GET https://automl.googleapis.com/v1/projects/PROJECT_ID/locations/us-central1/operations?filter="done=true"

Go

Sebelum mencoba sampel ini, ikuti petunjuk penyiapan untuk bahasa ini di halaman API & Referensi > Library Klien.

import (
	"context"
	"fmt"
	"io"

	automl "cloud.google.com/go/automl/apiv1"
	longrunning "cloud.google.com/go/longrunning/autogen/longrunningpb"
	"google.golang.org/api/iterator"
)

// listOperationStatus lists existing operations' status.
func listOperationStatus(w io.Writer, projectID string, location string) error {
	// projectID := "my-project-id"
	// location := "us-central1"

	ctx := context.Background()
	client, err := automl.NewClient(ctx)
	if err != nil {
		return fmt.Errorf("NewClient: %w", err)
	}
	defer client.Close()

	req := &longrunning.ListOperationsRequest{
		Name: fmt.Sprintf("projects/%s/locations/%s", projectID, location),
	}

	it := client.LROClient.ListOperations(ctx, req)

	// Iterate over all results
	for {
		op, err := it.Next()
		if err == iterator.Done {
			break
		}
		if err != nil {
			return fmt.Errorf("ListOperations.Next: %w", err)
		}

		fmt.Fprintf(w, "Name: %v\n", op.GetName())
		fmt.Fprintf(w, "Operation details:\n")
		fmt.Fprintf(w, "%v", op)
	}

	return nil
}

Java

Sebelum mencoba sampel ini, ikuti petunjuk penyiapan untuk bahasa ini di halaman API & Referensi > Library Klien.

import com.google.cloud.automl.v1.AutoMlClient;
import com.google.cloud.automl.v1.LocationName;
import com.google.longrunning.ListOperationsRequest;
import com.google.longrunning.Operation;
import java.io.IOException;

class ListOperationStatus {

  static void listOperationStatus() throws IOException {
    // TODO(developer): Replace these variables before running the sample.
    String projectId = "YOUR_PROJECT_ID";
    listOperationStatus(projectId);
  }

  // Get the status of an operation
  static void listOperationStatus(String projectId) throws IOException {
    // Initialize client that will be used to send requests. This client only needs to be created
    // once, and can be reused for multiple requests. After completing all of your requests, call
    // the "close" method on the client to safely clean up any remaining background resources.
    try (AutoMlClient client = AutoMlClient.create()) {
      // A resource that represents Google Cloud Platform location.
      LocationName projectLocation = LocationName.of(projectId, "us-central1");

      // Create list operations request.
      ListOperationsRequest listrequest =
          ListOperationsRequest.newBuilder().setName(projectLocation.toString()).build();

      // List all the operations names available in the region by applying filter.
      for (Operation operation :
          client.getOperationsClient().listOperations(listrequest).iterateAll()) {
        System.out.println("Operation details:");
        System.out.format("\tName: %s\n", operation.getName());
        System.out.format("\tMetadata Type Url: %s\n", operation.getMetadata().getTypeUrl());
        System.out.format("\tDone: %s\n", operation.getDone());
        if (operation.hasResponse()) {
          System.out.format("\tResponse Type Url: %s\n", operation.getResponse().getTypeUrl());
        }
        if (operation.hasError()) {
          System.out.println("\tResponse:");
          System.out.format("\t\tError code: %s\n", operation.getError().getCode());
          System.out.format("\t\tError message: %s\n\n", operation.getError().getMessage());
        }
      }
    }
  }
}

Node.js

Sebelum mencoba sampel ini, ikuti petunjuk penyiapan untuk bahasa ini di halaman API & Referensi > Library Klien.

/**
 * TODO(developer): Uncomment these variables before running the sample.
 */
// const projectId = 'YOUR_PROJECT_ID';
// const location = 'us-central1';

// Imports the Google Cloud AutoML library
const {AutoMlClient} = require('@google-cloud/automl').v1;

// Instantiates a client
const client = new AutoMlClient();

async function listOperationStatus() {
  // Construct request
  const request = {
    name: client.locationPath(projectId, location),
    filter: `worksOn=projects/${projectId}/locations/${location}/models/*`,
  };

  const [response] = await client.operationsClient.listOperations(request);

  console.log('List of operation status:');
  for (const operation of response) {
    console.log(`Name: ${operation.name}`);
    console.log('Operation details:');
    console.log(`${operation}`);
  }
}

listOperationStatus();

Python

Sebelum mencoba sampel ini, ikuti petunjuk penyiapan untuk bahasa ini di halaman API & Referensi > Library Klien.

from google.cloud import automl

# TODO(developer): Uncomment and set the following variables
# project_id = "YOUR_PROJECT_ID"

client = automl.AutoMlClient()
# A resource that represents Google Cloud Platform location.
project_location = f"projects/{project_id}/locations/us-central1"
# List all the operations names available in the region.
response = client._transport.operations_client.list_operations(
    name=project_location, filter_="", timeout=5
)

print("List of operations:")
for operation in response:
    print(f"Name: {operation.name}")
    print("Operation details:")
    print(operation)

Bahasa tambahan

C# : Ikuti Petunjuk penyiapan C# di halaman library klien, lalu kunjungi Dokumentasi referensi Deteksi Objek Vision AutoML untuk .NET.

PHP : Ikuti petunjuk penyiapan PHP di halaman library klien, lalu kunjungi dokumentasi referensi Deteksi Objek AutoML Vision untuk PHP.

Ruby : Ikuti Petunjuk penyiapan Ruby di halaman library klien, lalu kunjungi Dokumentasi referensi Deteksi Objek AutoML Vision untuk Ruby.

Bekerja dengan operasi yang berjalan lama

REST

Sebelum menggunakan salah satu data permintaan, lakukan penggantian berikut:

  • project-id: project ID GCP Anda.
  • operation-id: ID operasi Anda. ID tersebut adalah elemen terakhir dari nama operasi Anda. Contoh:
    • nama operasi: projects/project-id/locations/location-id/operations/IOD5281059901324392598
    • ID Operasi: IOD5281059901324392598

Metode HTTP dan URL:

GET https://automl.googleapis.com/v1/projects/PROJECT_ID/locations/us-central1/operations/OPERATION_ID

Untuk mengirim permintaan Anda, pilih salah satu opsi berikut:

curl

Jalankan perintah berikut:

curl -X GET \
-H "Authorization: Bearer $(gcloud auth print-access-token)" \
-H "x-goog-user-project: project-id" \
"https://automl.googleapis.com/v1/projects/PROJECT_ID/locations/us-central1/operations/OPERATION_ID"

PowerShell

Jalankan perintah berikut:

$cred = gcloud auth print-access-token
$headers = @{ "Authorization" = "Bearer $cred"; "x-goog-user-project" = "project-id" }

Invoke-WebRequest `
-Method GET `
-Headers $headers `
-Uri "https://automl.googleapis.com/v1/projects/PROJECT_ID/locations/us-central1/operations/OPERATION_ID" | Select-Object -Expand Content
Anda akan melihat output yang serupa dengan berikut ini dari operasi impor yang telah selesai:
{
  "name": "projects/PROJECT_ID/locations/us-central1/operations/OPERATION_ID",
  "metadata": {
    "@type": "type.googleapis.com/google.cloud.automl.v1.OperationMetadata",
    "createTime": "2018-10-29T15:56:29.176485Z",
    "updateTime": "2018-10-29T16:10:41.326614Z",
    "importDataDetails": {}
  },
  "done": true,
  "response": {
    "@type": "type.googleapis.com/google.protobuf.Empty"
  }
}

Anda akan melihat output yang serupa dengan berikut ini dari operasi pembuatan model yang telah selesai:

{
  "name": "projects/PROJECT_ID/locations/us-central1/operations/OPERATION_ID",
  "metadata": {
    "@type": "type.googleapis.com/google.cloud.automl.v1.OperationMetadata",
    "createTime": "2019-07-22T18:35:06.881193Z",
    "updateTime": "2019-07-22T19:58:44.972235Z",
    "createModelDetails": {}
  },
  "done": true,
  "response": {
    "@type": "type.googleapis.com/google.cloud.automl.v1.Model",
    "name": "projects/PROJECT_ID/locations/us-central1/models/MODEL_ID"
  }
}

Go

Sebelum mencoba contoh ini, ikuti petunjuk penyiapan untuk bahasa ini di halaman Library Klien.

import (
	"context"
	"fmt"
	"io"

	automl "cloud.google.com/go/automl/apiv1"
	"cloud.google.com/go/automl/apiv1/automlpb"
)

// getOperationStatus gets an operation's status.
func getOperationStatus(w io.Writer, projectID string, location string, datasetID string, modelName string) error {
	// projectID := "my-project-id"
	// location := "us-central1"
	// datasetID := "ICN123456789..."
	// modelName := "model_display_name"

	ctx := context.Background()
	client, err := automl.NewClient(ctx)
	if err != nil {
		return fmt.Errorf("NewClient: %w", err)
	}
	defer client.Close()

	req := &automlpb.CreateModelRequest{
		Parent: fmt.Sprintf("projects/%s/locations/%s", projectID, location),
		Model: &automlpb.Model{
			DisplayName: modelName,
			DatasetId:   datasetID,
			ModelMetadata: &automlpb.Model_ImageClassificationModelMetadata{
				ImageClassificationModelMetadata: &automlpb.ImageClassificationModelMetadata{
					TrainBudgetMilliNodeHours: 1000, // 1000 milli-node hours are 1 hour
				},
			},
		},
	}

	op, err := client.CreateModel(ctx, req)
	if err != nil {
		return err
	}
	fmt.Fprintf(w, "Name: %v\n", op.Name())

	// Wait for the longrunning operation complete.
	resp, err := op.Wait(ctx)
	if err != nil && !op.Done() {
		fmt.Println("failed to fetch operation status", err)
		return err
	}
	if err != nil && op.Done() {
		fmt.Println("operation completed with error", err)
		return err
	}
	fmt.Fprintf(w, "Response: %v\n", resp)

	return nil
}

Java

Sebelum mencoba contoh ini, ikuti petunjuk penyiapan untuk bahasa ini di halaman Library Klien.

import com.google.cloud.automl.v1.AutoMlClient;
import com.google.longrunning.Operation;
import java.io.IOException;

class GetOperationStatus {

  static void getOperationStatus() throws IOException {
    // TODO(developer): Replace these variables before running the sample.
    String operationFullId = "projects/[projectId]/locations/us-central1/operations/[operationId]";
    getOperationStatus(operationFullId);
  }

  // Get the status of an operation
  static void getOperationStatus(String operationFullId) throws IOException {
    // Initialize client that will be used to send requests. This client only needs to be created
    // once, and can be reused for multiple requests. After completing all of your requests, call
    // the "close" method on the client to safely clean up any remaining background resources.
    try (AutoMlClient client = AutoMlClient.create()) {
      // Get the latest state of a long-running operation.
      Operation operation = client.getOperationsClient().getOperation(operationFullId);

      // Display operation details.
      System.out.println("Operation details:");
      System.out.format("\tName: %s\n", operation.getName());
      System.out.format("\tMetadata Type Url: %s\n", operation.getMetadata().getTypeUrl());
      System.out.format("\tDone: %s\n", operation.getDone());
      if (operation.hasResponse()) {
        System.out.format("\tResponse Type Url: %s\n", operation.getResponse().getTypeUrl());
      }
      if (operation.hasError()) {
        System.out.println("\tResponse:");
        System.out.format("\t\tError code: %s\n", operation.getError().getCode());
        System.out.format("\t\tError message: %s\n", operation.getError().getMessage());
      }
    }
  }
}

Node.js

Sebelum mencoba contoh ini, ikuti petunjuk penyiapan untuk bahasa ini di halaman Library Klien.

/**
 * TODO(developer): Uncomment these variables before running the sample.
 */
// const projectId = 'YOUR_PROJECT_ID';
// const location = 'us-central1';
// const operationId = 'YOUR_OPERATION_ID';

// Imports the Google Cloud AutoML library
const {AutoMlClient} = require('@google-cloud/automl').v1;

// Instantiates a client
const client = new AutoMlClient();

async function getOperationStatus() {
  // Construct request
  const request = {
    name: `projects/${projectId}/locations/${location}/operations/${operationId}`,
  };

  const [response] = await client.operationsClient.getOperation(request);

  console.log(`Name: ${response.name}`);
  console.log('Operation details:');
  console.log(`${response}`);
}

getOperationStatus();

Python

Sebelum mencoba contoh ini, ikuti petunjuk penyiapan untuk bahasa ini di halaman Library Klien.

from google.cloud import automl

# TODO(developer): Uncomment and set the following variables
# operation_full_id = \
#     "projects/[projectId]/locations/us-central1/operations/[operationId]"

client = automl.AutoMlClient()
# Get the latest state of a long-running operation.
response = client._transport.operations_client.get_operation(operation_full_id)

print(f"Name: {response.name}")
print("Operation details:")
print(response)

Bahasa tambahan

C# : Ikuti Petunjuk penyiapan C# di halaman library klien, lalu kunjungi Dokumentasi referensi Deteksi Objek Vision AutoML untuk .NET.

PHP : Ikuti petunjuk penyiapan PHP di halaman library klien, lalu kunjungi dokumentasi referensi Deteksi Objek AutoML Vision untuk PHP.

Ruby : Ikuti petunjuk penyiapan Ruby di halaman library klien, lalu kunjungi dokumentasi referensi Deteksi Objek AutoML Vision untuk Ruby.

Membatalkan Operasi

Anda dapat membatalkan tugas impor atau pelatihan menggunakan ID operasi.

REST

Sebelum mencoba contoh ini, ikuti petunjuk penyiapan untuk bahasa ini di halaman Library Klien.

Sebelum menggunakan salah satu data permintaan, lakukan penggantian berikut:

  • project-id: project ID GCP Anda.
  • operation-id: ID operasi Anda. ID tersebut adalah elemen terakhir dari nama operasi Anda. Contoh:
    • nama operasi: projects/project-id/locations/location-id/operations/IOD5281059901324392598
    • ID Operasi: IOD5281059901324392598

Metode HTTP dan URL:

POST https://automl.googleapis.com/v1/projects/PROJECT_ID/locations/us-central1/operations/OPERATION_ID:cancel

Untuk mengirim permintaan Anda, pilih salah satu opsi berikut:

curl

Jalankan perintah berikut:

curl -X POST \
-H "Authorization: Bearer $(gcloud auth print-access-token)" \
-H "x-goog-user-project: project-id" \
-H "Content-Type: application/json; charset=utf-8" \
-d "" \
"https://automl.googleapis.com/v1/projects/PROJECT_ID/locations/us-central1/operations/OPERATION_ID:cancel"

PowerShell

Jalankan perintah berikut:

$cred = gcloud auth print-access-token
$headers = @{ "Authorization" = "Bearer $cred"; "x-goog-user-project" = "project-id" }

Invoke-WebRequest `
-Method POST `
-Headers $headers `
-Uri "https://automl.googleapis.com/v1/projects/PROJECT_ID/locations/us-central1/operations/OPERATION_ID:cancel" | Select-Object -Expand Content
Anda akan melihat objek JSON kosong yang ditampilkan dari permintaan yang berhasil:
{}

Mendapatkan informasi tentang model

Gunakan contoh kode berikut untuk mendapatkan informasi tentang model terlatih tertentu. Anda dapat menggunakan informasi yang ditampilkan dari permintaan ini untuk mengubah mode atau mengirim permintaan prediksi.

REST

Sebelum menggunakan salah satu data permintaan, lakukan penggantian berikut:

  • project-id: Project ID GCP Anda.
  • model-id: ID model Anda, dari respons saat membuat model. ID adalah elemen terakhir dari nama model Anda. Misalnya:
    • nama model: projects/project-id/locations/location-id/models/IOD4412217016962778756
    • id model: IOD4412217016962778756

Metode HTTP dan URL:

GET https://automl.googleapis.com/v1/projects/project-id/locations/us-central1/models/model-id

Untuk mengirim permintaan Anda, pilih salah satu opsi berikut:

curl

Jalankan perintah berikut:

curl -X GET \
-H "Authorization: Bearer $(gcloud auth print-access-token)" \
-H "x-goog-user-project: project-id" \
"https://automl.googleapis.com/v1/projects/project-id/locations/us-central1/models/model-id"

PowerShell

Jalankan perintah berikut:

$cred = gcloud auth print-access-token
$headers = @{ "Authorization" = "Bearer $cred"; "x-goog-user-project" = "project-id" }

Invoke-WebRequest `
-Method GET `
-Headers $headers `
-Uri "https://automl.googleapis.com/v1/projects/project-id/locations/us-central1/models/model-id" | Select-Object -Expand Content

Anda akan menerima respons JSON yang mirip seperti berikut:

{
  "name": "projects/PROJECT_ID/locations/us-central1/models/MODEL_ID",
  "displayName": "DISPLAY_NAME",
  "datasetId": "DATASET_ID",
  "createTime": "2019-07-26T21:10:18.338846Z",
  "deploymentState": "UNDEPLOYED",
  "updateTime": "2019-07-26T22:28:57.464076Z",
  "imageObjectDetectionModelMetadata": {
    "modelType": "cloud-low-latency-1",
    "nodeQps": 1.2987012987012987,
    "stopReason": "MODEL_CONVERGED",
    "trainBudgetMilliNodeHours": "216000",
    "trainCostMilliNodeHours": "8230"
  }
}

Go

Sebelum mencoba contoh ini, ikuti petunjuk penyiapan untuk bahasa ini di halaman Library Klien.

import (
	"context"
	"fmt"
	"io"

	automl "cloud.google.com/go/automl/apiv1"
	"cloud.google.com/go/automl/apiv1/automlpb"
)

// getModel gets a model.
func getModel(w io.Writer, projectID string, location string, modelID string) error {
	// projectID := "my-project-id"
	// location := "us-central1"
	// modelID := "TRL123456789..."

	ctx := context.Background()
	client, err := automl.NewClient(ctx)
	if err != nil {
		return fmt.Errorf("NewClient: %w", err)
	}
	defer client.Close()

	req := &automlpb.GetModelRequest{
		Name: fmt.Sprintf("projects/%s/locations/%s/models/%s", projectID, location, modelID),
	}

	model, err := client.GetModel(ctx, req)
	if err != nil {
		return fmt.Errorf("GetModel: %w", err)
	}

	// Retrieve deployment state.
	deploymentState := "undeployed"
	if model.GetDeploymentState() == automlpb.Model_DEPLOYED {
		deploymentState = "deployed"
	}

	// Display the model information.
	fmt.Fprintf(w, "Model name: %v\n", model.GetName())
	fmt.Fprintf(w, "Model display name: %v\n", model.GetDisplayName())
	fmt.Fprintf(w, "Model create time:\n")
	fmt.Fprintf(w, "\tseconds: %v\n", model.GetCreateTime().GetSeconds())
	fmt.Fprintf(w, "\tnanos: %v\n", model.GetCreateTime().GetNanos())
	fmt.Fprintf(w, "Model deployment state: %v\n", deploymentState)

	return nil
}

Java

Sebelum mencoba contoh ini, ikuti petunjuk penyiapan untuk bahasa ini di halaman Library Klien.

import com.google.cloud.automl.v1.AutoMlClient;
import com.google.cloud.automl.v1.Model;
import com.google.cloud.automl.v1.ModelName;
import java.io.IOException;

class GetModel {

  static void getModel() throws IOException {
    // TODO(developer): Replace these variables before running the sample.
    String projectId = "YOUR_PROJECT_ID";
    String modelId = "YOUR_MODEL_ID";
    getModel(projectId, modelId);
  }

  // Get a model
  static void getModel(String projectId, String modelId) throws IOException {
    // Initialize client that will be used to send requests. This client only needs to be created
    // once, and can be reused for multiple requests. After completing all of your requests, call
    // the "close" method on the client to safely clean up any remaining background resources.
    try (AutoMlClient client = AutoMlClient.create()) {
      // Get the full path of the model.
      ModelName modelFullId = ModelName.of(projectId, "us-central1", modelId);
      Model model = client.getModel(modelFullId);

      // Display the model information.
      System.out.format("Model name: %s\n", model.getName());
      // To get the model id, you have to parse it out of the `name` field. As models Ids are
      // required for other methods.
      // Name Format: `projects/{project_id}/locations/{location_id}/models/{model_id}`
      String[] names = model.getName().split("/");
      String retrievedModelId = names[names.length - 1];
      System.out.format("Model id: %s\n", retrievedModelId);
      System.out.format("Model display name: %s\n", model.getDisplayName());
      System.out.println("Model create time:");
      System.out.format("\tseconds: %s\n", model.getCreateTime().getSeconds());
      System.out.format("\tnanos: %s\n", model.getCreateTime().getNanos());
      System.out.format("Model deployment state: %s\n", model.getDeploymentState());
    }
  }
}

Node.js

Sebelum mencoba contoh ini, ikuti petunjuk penyiapan untuk bahasa ini di halaman Library Klien.

/**
 * TODO(developer): Uncomment these variables before running the sample.
 */
// const projectId = 'YOUR_PROJECT_ID';
// const location = 'us-central1';
// const modelId = 'YOUR_MODEL_ID';

// Imports the Google Cloud AutoML library
const {AutoMlClient} = require('@google-cloud/automl').v1;

// Instantiates a client
const client = new AutoMlClient();

async function getModel() {
  // Construct request
  const request = {
    name: client.modelPath(projectId, location, modelId),
  };

  const [response] = await client.getModel(request);

  console.log(`Model name: ${response.name}`);
  console.log(
    `Model id: ${
      response.name.split('/')[response.name.split('/').length - 1]
    }`
  );
  console.log(`Model display name: ${response.displayName}`);
  console.log('Model create time');
  console.log(`\tseconds ${response.createTime.seconds}`);
  console.log(`\tnanos ${response.createTime.nanos / 1e9}`);
  console.log(`Model deployment state: ${response.deploymentState}`);
}

getModel();

Python

Sebelum mencoba contoh ini, ikuti petunjuk penyiapan untuk bahasa ini di halaman Library Klien.

from google.cloud import automl

# TODO(developer): Uncomment and set the following variables
# project_id = "YOUR_PROJECT_ID"
# model_id = "YOUR_MODEL_ID"

client = automl.AutoMlClient()
# Get the full path of the model.
model_full_id = client.model_path(project_id, "us-central1", model_id)
model = client.get_model(name=model_full_id)

# Retrieve deployment state.
if model.deployment_state == automl.Model.DeploymentState.DEPLOYED:
    deployment_state = "deployed"
else:
    deployment_state = "undeployed"

# Display the model information.
print(f"Model name: {model.name}")
print("Model id: {}".format(model.name.split("/")[-1]))
print(f"Model display name: {model.display_name}")
print(f"Model create time: {model.create_time}")
print(f"Model deployment state: {deployment_state}")

Bahasa tambahan

C# : Ikuti Petunjuk penyiapan C# di halaman library klien, lalu kunjungi Dokumentasi referensi Deteksi Objek Vision AutoML untuk .NET.

PHP : Ikuti petunjuk penyiapan PHP di halaman library klien, lalu kunjungi dokumentasi referensi Deteksi Objek AutoML Vision untuk PHP.

Ruby : Ikuti Petunjuk penyiapan Ruby di halaman library klien, lalu kunjungi Dokumentasi referensi Deteksi Objek AutoML Vision untuk Ruby.