What you will build
In this tutorial you will download an exported custom TensorFlow Lite model from AutoML Vision Edge. You will then run a pre-made iOS app that uses the model to detect multiple objects within an image (with bounding boxes), and provide custom labeling of object categories.
Objectives
In this introductory, end-to-end walkthrough you will use code to:
- Run a AutoML Vision Object Detection Edge model in an iOS app using the TF Lite interpreter.
Before you begin
Clone the Git repository
Using the command line, clone the following Git repository with the following command:
git clone https://github.com/tensorflow/examples.git
Navigate to the ios directory of the local clone of the repository
(examples/lite/examples/object_detection/ios/). You will run all following
code samples from the ios directory:
cd examples/lite/examples/object_detection/ios
Prerequisites
- Git installed.
- iOS versions supported: iOS 12.0 and above.
Setup the iOS app
Generate & open the workspace file
To begin setting up the original iOS app, you must first generate the workspace file using the required software:
Navigate to the
iosfolder if you haven't done so already:cd examples/lite/examples/object_detection/ios
Install the pod to generate the workspace file:
pod install
If you have installed this pod before, use the following command:
pod update
After you have generated the workspace file, you can open the project with Xcode. To open the project via the command line run the following command from the
iosdirectory:open ./ObjectDetection.xcworkspace
Create a unique identifier & build the app
With the ObjectDetection.xcworkspace open in Xcode you must first change the
bundle identifier (bundle ID) to a unique value.
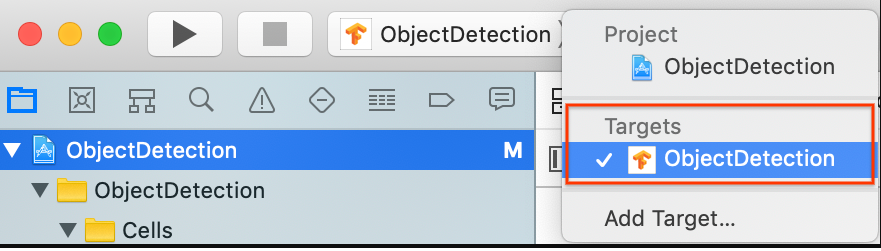
Select the top
ObjectDetectionproject item in the project navigator on the left.
Make sure you have Targets > ObjectDetection selected.
In the General > Identity section, change the Bundle Identifier field to a unique value. The preferred style is reverse domain name notation.
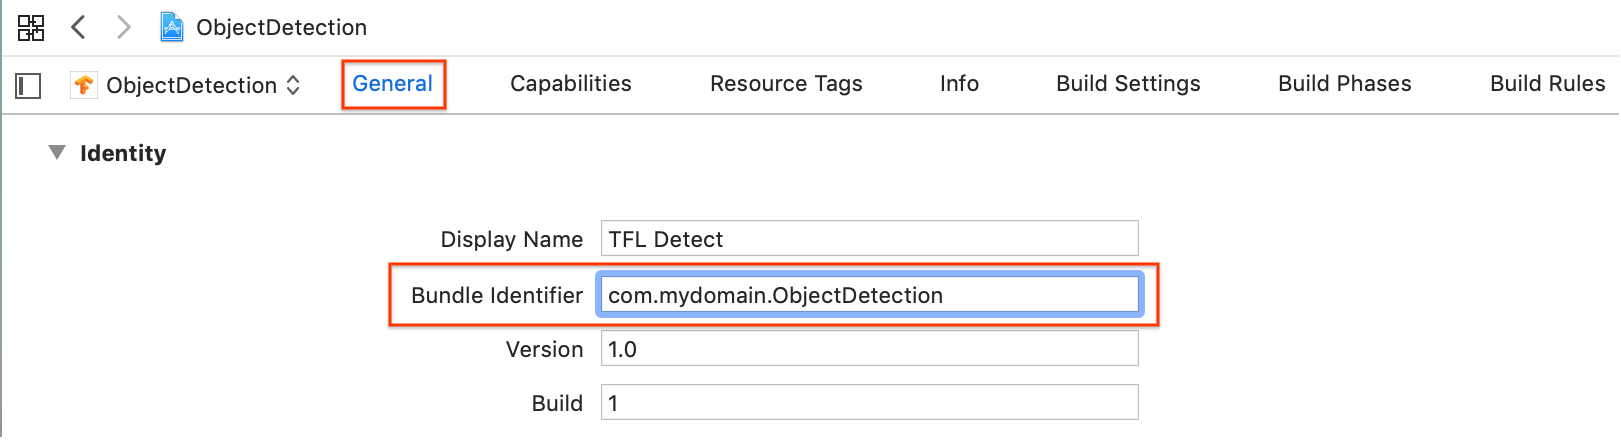
In the General > Signing section below Identity, specify a Team from the drop down menu. This value is provided from your Developer ID.
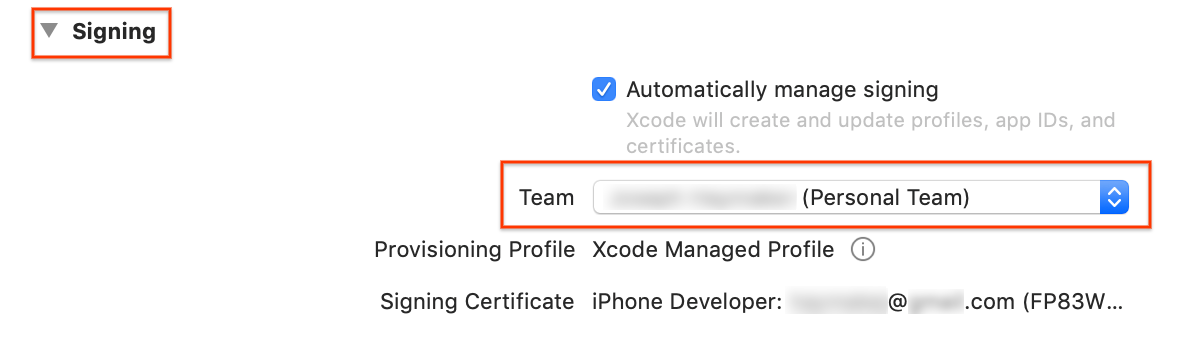
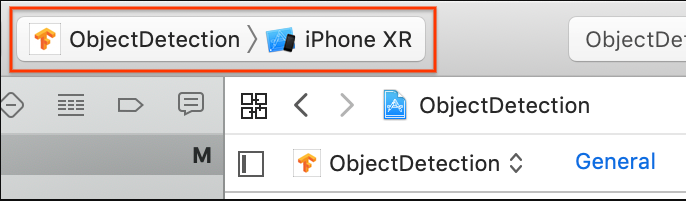
Connect an iOS device to your computer. After the device is detected select it from the list of devices.

After specifying all configuration changes, build the app in Xcode using the following command: Command + B.
Run the original app
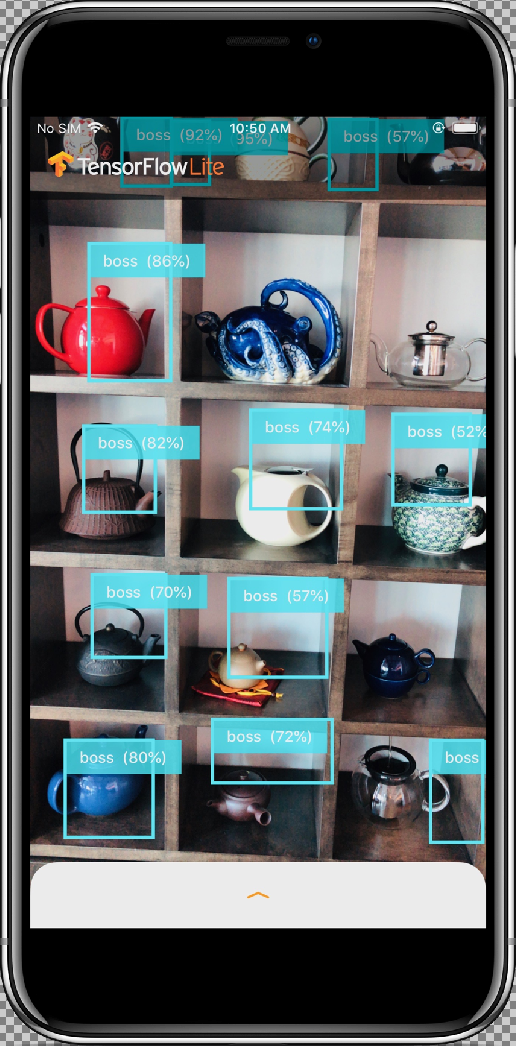
The sample app is a camera app that continuously detects the objects (bounding boxes and labels) in the frames seen by your device's back camera, using a quantized MobileNet SSD model trained on the COCO dataset.
These instructions walk you through building and running the demo on an iOS device.
The model files are downloaded via scripts in Xcode when you build and run. You don't need to do any steps to download TF Lite models into the project explicitly.
Before inserting your customized model, test the baseline version of the app which uses the base "mobilenet" trained model.
To launch the app in the Simulator, select the play button
 in the upper left corner of the Xcode window.
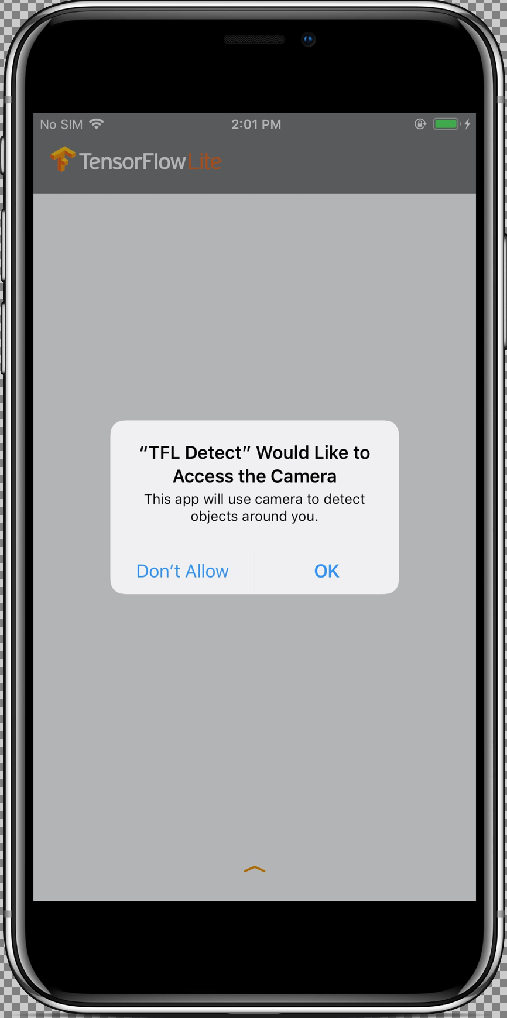
After you allow the app access to your camera by selecting the Allow button, the app will then start live detection and annotation. Objects will be detected and marked with a bounding box and label in each camera frame.
Move your device to different objects in your surroundings and verify the app is detecting images correctly.
Run the customized app
Modify the app so that it will use your retrained model with custom object image categories.
Add your model files to the project
The demo project is configured to search for a two files in the
ios/objectDetection/model directory:
detect.tflitelabelmap.txt
To replace those two files with your custom versions, run the following command:
cp tf_files/optimized_graph.lite ios/objectDetection/model/detect.tflite
cp tf_files/retrained_labels.txt ios/objectDetection/model/labelmap.txt
Run your app
To relaunch the app in your iOS device, select the play
button ![]() in the upper left corner of the Xcode window.
in the upper left corner of the Xcode window.
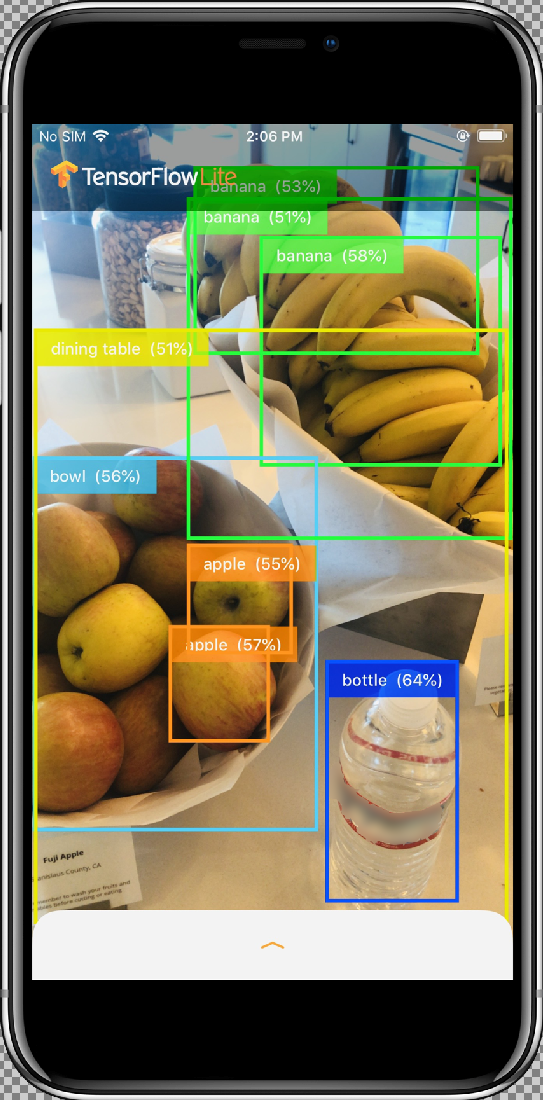
To test the modifications, move your device's camera to a variety of objects to see live predictions.
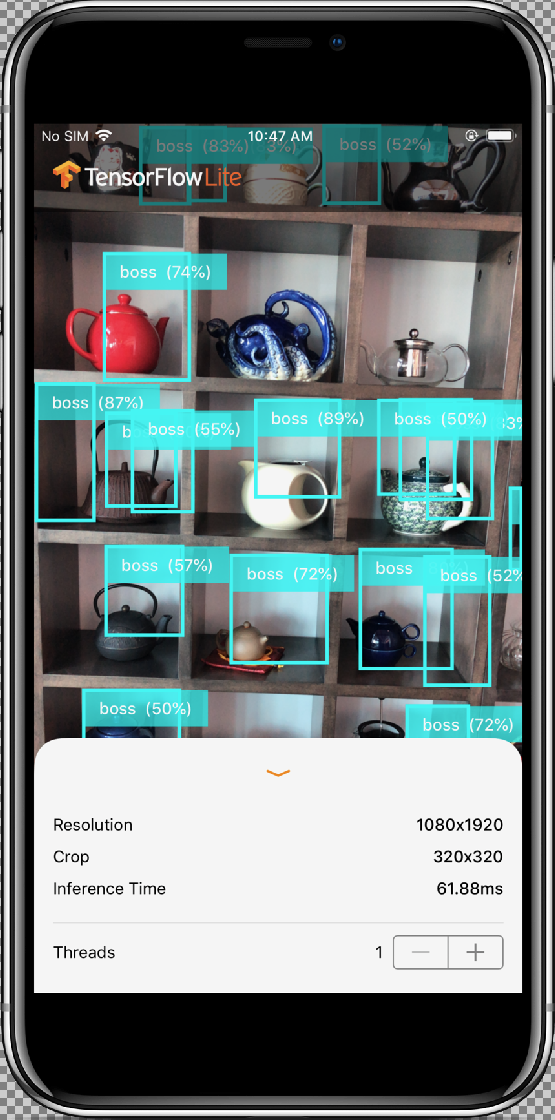
Results should look similar to this:
How does it work?
Now that you have the app running, look at the TensorFlow Lite specific code.
TensorFlowLite Pod
This app uses a pre-compiled TFLite Cocoapod. The Podfile includes the cocoapod in the project:
# Uncomment the next line to define a global platform for your project
platform :ios, '12.0'

target 'ObjectDetection' do
  # Comment the next line if you're not using Swift and don't want to use dynamic frameworks
  use_frameworks!

  # Pods for ObjectDetection
  pod 'TensorFlowLiteSwift'

end
The code interfacing to the TF Lite is all contained in the
ModelDataHandler.swift file. This class handles all data preprocessing and
makes calls to run inference on a given frame by invoking the Interpreter.
It then formats the inferences obtained and returns the top N results
for a successful inference.
Exploring the code
The first block of interest (after the necessary imports) is property
declarations. The tfLite model inputShape parameters (batchSize,
inputChannels, inputWidth, inputHeight) can be found in
tflite_metadata.json you will have this file when exporting the
tflite model. For more info visit the Exporting Edge models how-to topic.
The example of tflite_metadata.json looks similar to the following code:
{
    "inferenceType": "QUANTIZED_UINT8",
    "inputShape": [
        1,   // This represents batch size
        512,  // This represents image width
        512,  // This represents image Height
        3  //This represents inputChannels
    ],
    "inputTensor": "normalized_input_image_tensor",
    "maxDetections": 20,  // This represents max number of boxes.
    "outputTensorRepresentation": [
        "bounding_boxes",
        "class_labels",
        "class_confidences",
        "num_of_boxes"
    ],
    "outputTensors": [
        "TFLite_Detection_PostProcess",
        "TFLite_Detection_PostProcess:1",
        "TFLite_Detection_PostProcess:2",
        "TFLite_Detection_PostProcess:3"
    ]
}
...
Model parameters:
Replace the below values as per the tflite_metadata.json file for
your model.
let batchSize = 1 //Number of images to get prediction, the model takes 1 image at a time
let inputChannels = 3 //The pixels of the image input represented in RGB values
let inputWidth = 300 //Width of the image
let inputHeight = 300 //Height of the image
...
init
The init method, which creates the Interpreter with Model path
and InterpreterOptions, then allocates memory for the model's input.
init?(modelFileInfo: FileInfo, labelsFileInfo: FileInfo, threadCount: Int = 1) {
    let modelFilename = modelFileInfo.name

    // Construct the path to the model file.
    guard let modelPath = Bundle.main.path(forResource: modelFilename,ofType: modelFileInfo.extension)

    // Specify the options for the `Interpreter`.
   var options = InterpreterOptions()
    options.threadCount = threadCount
    do {
      // Create the `Interpreter`.
      interpreter = try Interpreter(modelPath: modelPath, options: options)
      // Allocate memory for the model's input  `Tensor`s.
      try interpreter.allocateTensors()
    }

    super.init()

    // Load the classes listed in the labels file.
    loadLabels(fileInfo: labelsFileInfo)
  }
…
runModel
The below runModel method:
- Scales input image to aspect ratio for which model is trained.
- Removes the alpha component from the image buffer to get the RGB data.
- Copies the RGB data to the input Tensor.
- Runs inference by invoking the
Interpreter. - Gets the output from the Interpreter.
- Formats output.
func runModel(onFrame pixelBuffer: CVPixelBuffer) -> Result? {
Crops the image to the biggest square in the center and scales it down to model dimensions:
let scaledSize = CGSize(width: inputWidth, height: inputHeight)
guard let scaledPixelBuffer = pixelBuffer.resized(to: scaledSize) else
{
    return nil
}
...

do {
  let inputTensor = try interpreter.input(at: 0)
Remove the alpha component from the image buffer to get the RGB data:
guard let rgbData = rgbDataFromBuffer(
  scaledPixelBuffer,
  byteCount: batchSize * inputWidth * inputHeight * inputChannels,
  isModelQuantized: inputTensor.dataType == .uInt8
) else {
  print("Failed to convert the image buffer to RGB data.")
  return nil
}
Copy the RGB data to the input Tensor:
try interpreter.copy(rgbData, toInputAt: 0)
Run inference by invoking the Interpreter:
    let startDate = Date()
    try interpreter.invoke()
    interval = Date().timeIntervalSince(startDate) * 1000
    outputBoundingBox = try interpreter.output(at: 0)
    outputClasses = try interpreter.output(at: 1)
    outputScores = try interpreter.output(at: 2)
    outputCount = try interpreter.output(at: 3)
  }
Formats the results:
    let resultArray = formatResults(
      boundingBox: [Float](unsafeData: outputBoundingBox.data) ?? [],
      outputClasses: [Float](unsafeData: outputClasses.data) ?? [],
      outputScores: [Float](unsafeData: outputScores.data) ?? [],
      outputCount: Int(([Float](unsafeData: outputCount.data) ?? [0])[0]),
      width: CGFloat(imageWidth),
      height: CGFloat(imageHeight)
    )
...
}
Filters out all the results with confidence score < threshold and returns the top N results sorted in descending order:
  func formatResults(boundingBox: [Float], outputClasses: [Float],
  outputScores: [Float], outputCount: Int, width: CGFloat, height: CGFloat)
  -> [Inference]{
    var resultsArray: [Inference] = []
    for i in 0...outputCount - 1 {

      let score = outputScores[i]
Filters results with confidence < threshold:
      guard score >= threshold else {
        continue
      }
Gets the output class names for detected classes from labels list:
      let outputClassIndex = Int(outputClasses[i])
      let outputClass = labels[outputClassIndex + 1]

      var rect: CGRect = CGRect.zero
Translates the detected bounding box to CGRect.
      rect.origin.y = CGFloat(boundingBox[4*i])
      rect.origin.x = CGFloat(boundingBox[4*i+1])
      rect.size.height = CGFloat(boundingBox[4*i+2]) - rect.origin.y
      rect.size.width = CGFloat(boundingBox[4*i+3]) - rect.origin.x
The detected corners are for model dimensions. So we scale the rect with
respect to the actual image dimensions.
let newRect = rect.applying(CGAffineTransform(scaleX: width, y: height))
Gets the color assigned for the class:
let colorToAssign = colorForClass(withIndex: outputClassIndex + 1)
      let inference = Inference(confidence: score,
                                className: outputClass,
                                rect: newRect,
                                displayColor: colorToAssign)
      resultsArray.append(inference)
    }

    // Sort results in descending order of confidence.
    resultsArray.sort { (first, second) -> Bool in
      return first.confidence  > second.confidence
    }

    return resultsArray
  }
CameraFeedManager
CameraFeedManager.swift manages all camera related functionality.
It initializes and configures the AVCaptureSession:
private func configureSession() {session.beginConfiguration()
It then tries to add an
AVCaptureDeviceInputand addsbuiltInWideAngleCameraas device input for Session.It then tries to add an
AVCaptureVideoDataOutput:session.commitConfiguration() self.cameraConfiguration = .success }Starts the session.
Stops the session.
Error handling:
- NSNotification.Name.AVCaptureSessionRuntimeError: This is
posted when an
unexpected error occurs while
AVCaptureSessioninstance is running. The userInfo dictionary contains anNSErrorobject for keyAVCaptureSessionErrorKey. - NSNotification.Name.AVCaptureSessionWasInterrupted: This is
posted when an interruption
(e.g. Phone call, alarm, etc.) occurs. When appropriate
AVCaptureSessioninstance will stop running automatically to response interruption. The userInfo will containAVCaptureSessionInterruptionReasonKeyindicating the reason for interruption. - NSNotification.Name.AVCaptureSessionInterruptionEnded: This
is posted when
AVCaptureSessionceases the interruption. Session instance can resume once interruption such as phone call ends.
The InferenceViewController.swift class is responsible for below screen, where as our main focus would be the highlighted part.
- Resolution: It displays the resolution of the current frame (Image from Video session).
- Crop: It displays the cropping size of the current frame.
- InferenceTime: It displays how much time the model is taking to detect the object.
- Threads: This displays how many number of threads are running.
User can increase or decrease this count by tapping
+or-sign of the Stepper. The current thread count used by the TensorFlow Lite Interpreter.
The ViewController.swift class holds the instance of CameraFeedManager,
which manages the camera related functionality and
ModelDataHandler. ModelDataHandler handles the Model (trained model) and
gets the output for image frame of video session.
private lazy var cameraFeedManager = CameraFeedManager(previewView: previewView)

private var modelDataHandler: ModelDataHandler? =
    ModelDataHandler(modelFileInfo: MobileNetSSD.modelInfo, labelsFileInfo: MobileNetSSD.labelsInfo)
Starts the camera session by calling:
cameraFeedManager.checkCameraConfigurationAndStartSession()
When you change the thread count, this class then re-initializes the model with
new thread count in the didChangeThreadCount function.
CameraFeedManager class will send the ImageFrame as CVPixelBuffer to
ViewController, which will be sent to model for prediction.
This method runs the live camera pixelBuffer through TensorFlow to get the
result.
@objc
func runModel(onPixelBuffer pixelBuffer: CVPixelBuffer) {
Run the live camera pixelBuffer through tensorFlow to get the result:
result = self.modelDataHandler?.runModel(onFrame: pixelBuffer)
...
let displayResult = result

let width = CVPixelBufferGetWidth(pixelBuffer)
    let height = CVPixelBufferGetHeight(pixelBuffer)

    DispatchQueue.main.async {
Display results by handing off to the InferenceViewController:
self.inferenceViewController?.resolution = CGSize(width: width, height: height)

self.inferenceViewController?.inferenceTime = inferenceTime
Draws the bounding boxes and displays class names and confidence scores:
self.drawAfterPerformingCalculations(onInferences: displayResult.inferences, withImageSize: CGSize(width: CGFloat(width), height: CGFloat(height)))
    }
  }
What Next
You've now completed a walkthrough of an iOS object detection and annotation app using an Edge model. You used a trained Edge Tensorflow Lite model to test an object detection app before making modifications to it and getting sample annotations. You then examined TensorFlow Lite specific code to to understand underlying functionality.
The following resources can help you continue to learn about TensorFlow models and AutoML Vision Edge:
- Learn more about TFLite from the official documentation and the code repository.
- Try some other TFLite ready models including a speech hot-word detector and an on-device version of smart-reply.
- Learn more about TensorFlow in general with TensorFlow's getting started documentation.