빌드 대상
이 가이드에서는 AutoML Vision Edge에서 내보낸 커스텀 TensorFlow Lite 모델을 다운로드합니다. 그런 다음 모델을 사용하여 경계 상자가 있는 이미지에서 여러 객체를 감지하는 미리 만들어진 iOS 앱을 실행하고, 객체 카테고리의 커스텀 라벨을 제공합니다.
목표
이 입문 내용에서는 코드를 사용해 다음을 수행하는 전반적인 과정을 둘러봅니다.
- iOS 앱에서 TF Lite 인터프리터를 사용하여 AutoML Vision Object Detection Edge 모델을 실행합니다.
시작하기 전에
Git 저장소 클론
명령줄을 사용하여 다음 명령어로 다음 Git 저장소를 클론합니다.
git clone https://github.com/tensorflow/examples.git
저장소 로컬 클론의 ios 디렉터리로 이동합니다(examples/lite/examples/object_detection/ios/). ios 디렉터리에서 다음 코드 샘플을 모두 실행합니다.
cd examples/lite/examples/object_detection/ios
자격 요건
- Git 설치
- 지원되는 iOS 버전: iOS 12.0 이상
iOS 앱 설정
작업공간 파일 생성 및 열기
원래 iOS 앱을 설정하려면 먼저 필수 소프트웨어를 사용하여 작업공간 파일을 생성해야 합니다.
아직 생성하지 않은 경우
ios폴더로 이동합니다.cd examples/lite/examples/object_detection/ios
Pod를 설치하여 작업공간 파일을 생성합니다.
pod install
이전에 이 Pod를 설치한 경우 다음 명령어를 사용합니다.
pod update
작업공간 파일을 생성한 후 Xcode로 프로젝트를 열 수 있습니다. 명령줄을 통해 프로젝트를 열려면
ios디렉터리에서 다음 명령어를 실행합니다.open ./ObjectDetection.xcworkspace
고유 식별자 생성 및 앱 빌드
Xcode에서 ObjectDetection.xcworkspace가 열린 상태에서 먼저 번들 식별자(번들 ID)를 고유한 값으로 변경해야 합니다.
왼쪽의 프로젝트 탐색기에서 상위
ObjectDetection프로젝트 항목을 선택합니다.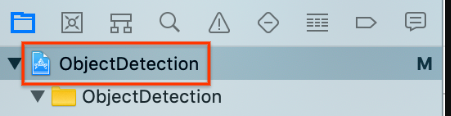
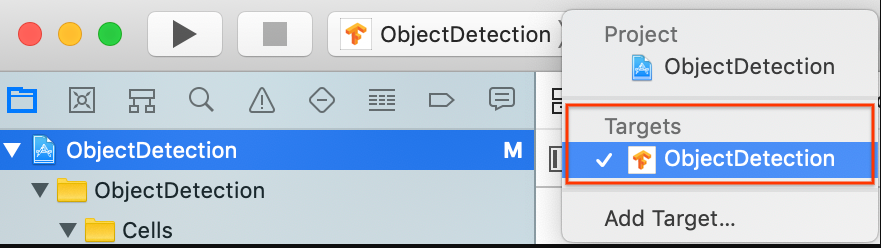
대상 > ObjectDetection이 선택되어 있는지 확인합니다.
일반 > ID 섹션에서 번들 식별자 필드를 고유한 값으로 변경합니다. 선호하는 스타일은 역방향 도메인 이름 표기법입니다.

ID 아래 일반 > 서명 섹션의 드롭다운 메뉴에서 팀을 지정합니다. 이 값은 개발자 ID에서 제공됩니다.

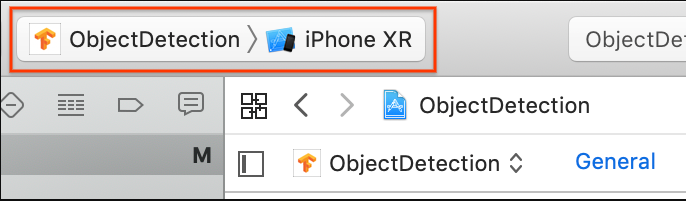
iOS 기기를 컴퓨터에 연결합니다. 기기가 인식되면 기기 목록에서 선택합니다.
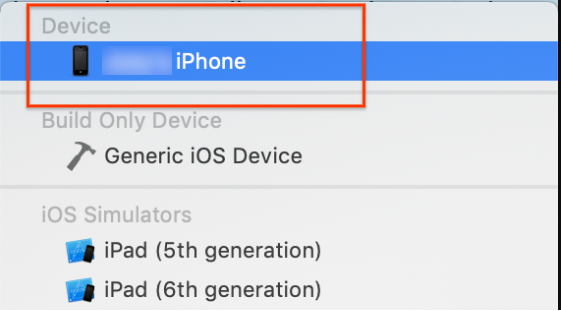
모든 구성 변경사항을 지정한 후 Command + B 명령어를 사용하여 Xcode에서 앱을 빌드합니다.
원래의 앱 실행
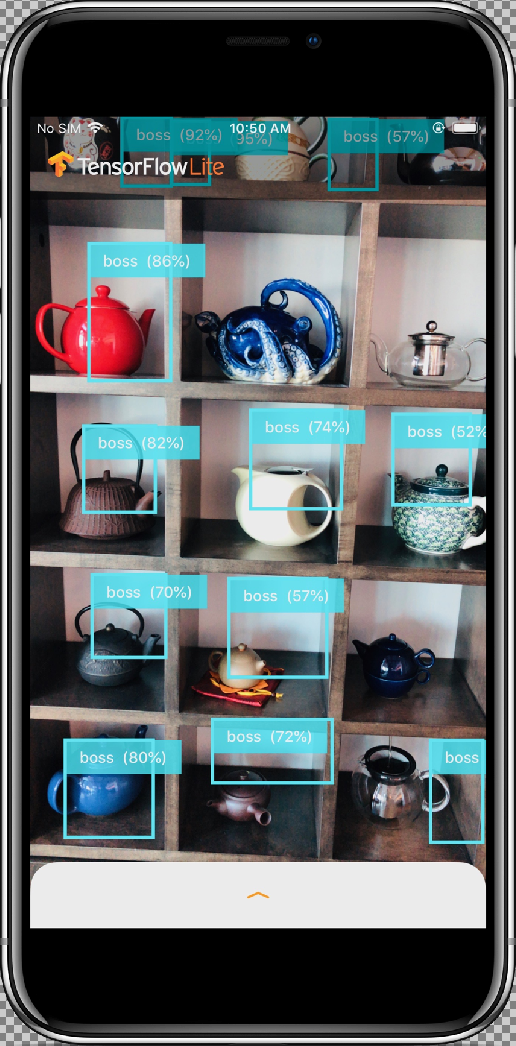
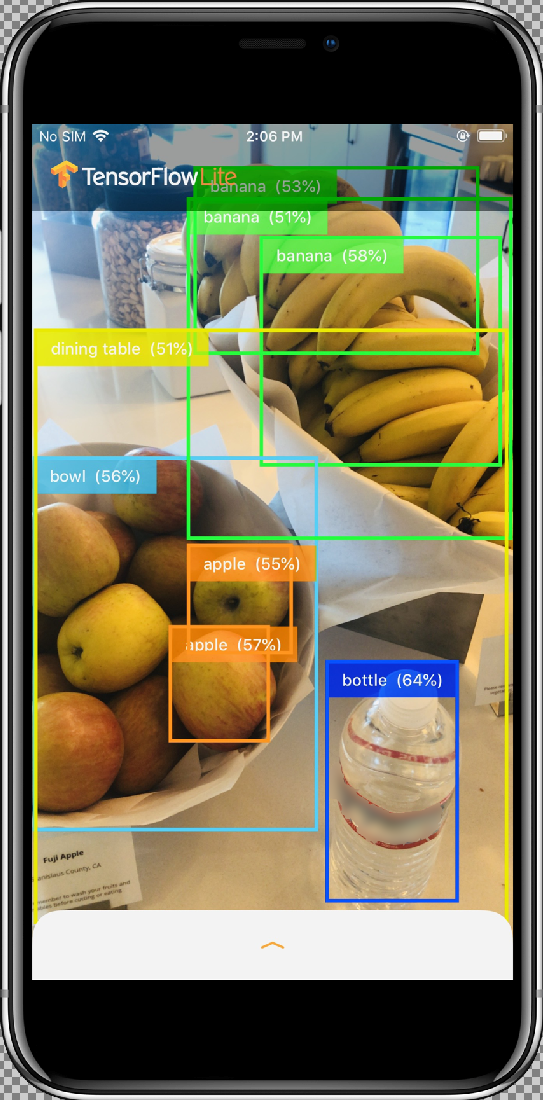
샘플 앱은 COCO 데이터 세트에 대해 학습된 양자화된 MobileNet SSD 모델을 사용하여 기기의 후면 카메라에 표시된 프레임의 객체(경계 상자 및 라벨)를 계속 감지하는 카메라 앱입니다.
다음 도움말은 iOS 기기에서 데모를 빌드하고 실행하는 단계를 안내합니다.
모델 파일은 빌드하고 실행할 때 Xcode의 스크립트를 통해 다운로드됩니다. TF Lite 모델을 프로젝트에 명시적으로 다운로드하기 위해 어떤 단계도 수행할 필요가 없습니다.
커스텀 모델을 삽입하기 전에 학습된 기본 "mobilenet" 모델을 사용하는 앱의 기준 버전을 테스트합니다.
시뮬레이터에서 앱을 실행하려면 Xcode 창의 왼쪽 상단에 있는 재생 버튼
 을 선택합니다.
허용 버튼을 선택하여 카메라에 대한 앱 액세스를 허용한 후에 앱에서 실시간 감지 및 주석을 시작합니다. 객체가 감지되고 각 카메라 프레임에서 경계 상자와 라벨로 표시됩니다.
기기를 주변의 다른 객체로 이동하여 앱이 이미지를 제대로 감지하는지 확인합니다.
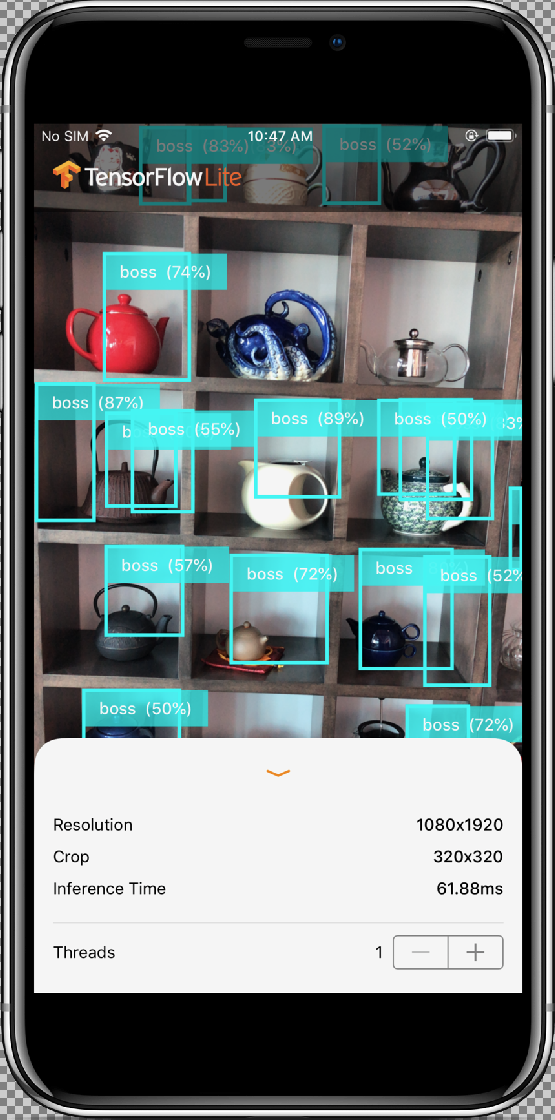
맞춤설정된 앱 실행
커스텀 객체 이미지 카테고리와 함께 다시 학습된 모델을 사용하도록 앱을 수정합니다.
모델 파일을 프로젝트에 추가
데모 프로젝트는 ios/objectDetection/model 디렉터리에서 2개의 파일을 검색하도록 구성되었습니다.
detect.tflitelabelmap.txt
이 두 파일을 커스텀 버전으로 바꾸려면 다음 명령어를 실행합니다.
cp tf_files/optimized_graph.lite ios/objectDetection/model/detect.tflite
cp tf_files/retrained_labels.txt ios/objectDetection/model/labelmap.txt
앱 실행
iOS 기기에서 앱을 다시 실행하려면 Xcode 창의 왼쪽 상단에 있는 재생 버튼 ![]() 을 선택합니다.
을 선택합니다.
수정 사항을 테스트하려면 기기의 카메라를 다양한 객체로 이동하여 실시간 예측을 확인합니다.
결과는 다음과 유사하게 나타납니다.
기본 원리
앱을 실행했으므로 이제 TensorFlow Lite 전용 코드를 살펴 보겠습니다.
TensorFlowLite Pod
이 앱은 사전 컴파일된 TFLite CocoaPod를 사용합니다. Podfile은 프로젝트에 CocoaPod를 포함합니다.
# Uncomment the next line to define a global platform for your project
platform :ios, '12.0'

target 'ObjectDetection' do
  # Comment the next line if you're not using Swift and don't want to use dynamic frameworks
  use_frameworks!

  # Pods for ObjectDetection
  pod 'TensorFlowLiteSwift'

end
TF Lite에 인터페이싱하는 코드는 모두 ModelDataHandler.swift 파일에 포함됩니다. 이 클래스는 모든 데이터 사전 처리를 처리하고 지정된 프레임에서 Interpreter를 호출하여 추론을 실행하도록 호출합니다.
이렇게 얻은 추론의 형식을 지정하고 성공적인 추론을 위해 상위 N개 결과를 반환합니다.
코드 탐색
첫 번째로 살펴볼 관심분야 블록(필요한 가져오기 이후)은 속성 선언입니다. tfLite 모델 inputShape 매개변수(batchSize , inputChannels, inputWidth, inputHeight)는 tflite 모델을 내보낼 때 생성되는 tflite_metadata.json 파일에서 찾을 수 있습니다. 자세한 내용은 Edge 모델 내보내기 방법 주제를 참조하세요.
tflite_metadata.json의 예시는 다음 코드와 유사합니다.
{
    "inferenceType": "QUANTIZED_UINT8",
    "inputShape": [
        1,   // This represents batch size
        512,  // This represents image width
        512,  // This represents image Height
        3  //This represents inputChannels
    ],
    "inputTensor": "normalized_input_image_tensor",
    "maxDetections": 20,  // This represents max number of boxes.
    "outputTensorRepresentation": [
        "bounding_boxes",
        "class_labels",
        "class_confidences",
        "num_of_boxes"
    ],
    "outputTensors": [
        "TFLite_Detection_PostProcess",
        "TFLite_Detection_PostProcess:1",
        "TFLite_Detection_PostProcess:2",
        "TFLite_Detection_PostProcess:3"
    ]
}
...
모델 매개변수:
모델의 tflite_metadata.json 파일에 따라 아래의 값을 바꿉니다.
let batchSize = 1 //Number of images to get prediction, the model takes 1 image at a time
let inputChannels = 3 //The pixels of the image input represented in RGB values
let inputWidth = 300 //Width of the image
let inputHeight = 300 //Height of the image
...
init
Model 경로 및 InterpreterOptions를 사용하여 Interpreter를 만든 다음 모델의 입력에 메모리를 할당하는 init 메서드입니다.
init?(modelFileInfo: FileInfo, labelsFileInfo: FileInfo, threadCount: Int = 1) {
    let modelFilename = modelFileInfo.name

    // Construct the path to the model file.
    guard let modelPath = Bundle.main.path(forResource: modelFilename,ofType: modelFileInfo.extension)

    // Specify the options for the `Interpreter`.
   var options = InterpreterOptions()
    options.threadCount = threadCount
    do {
      // Create the `Interpreter`.
      interpreter = try Interpreter(modelPath: modelPath, options: options)
      // Allocate memory for the model's input  `Tensor`s.
      try interpreter.allocateTensors()
    }

    super.init()

    // Load the classes listed in the labels file.
    loadLabels(fileInfo: labelsFileInfo)
  }
…
runModel
아래는 runModel 메서드입니다.
- 모델이 학습되는 가로세로 비율로 입력 이미지를 확장합니다.
- 이미지 버퍼에서 알파 구성요소를 삭제하여 RGB 데이터를 가져옵니다.
- RGB 데이터를 입력 텐서에 복사합니다.
Interpreter를 호출하여 추론을 실행합니다.- 인터프리터에서 출력을 가져옵니다.
- 출력 형식을 지정합니다.
func runModel(onFrame pixelBuffer: CVPixelBuffer) -> Result? {
이미지를 가운데의 가장 큰 정사각형으로 자르고 모델 크기에 맞게 축소합니다.
let scaledSize = CGSize(width: inputWidth, height: inputHeight)
guard let scaledPixelBuffer = pixelBuffer.resized(to: scaledSize) else
{
    return nil
}
...

do {
  let inputTensor = try interpreter.input(at: 0)
이미지 버퍼에서 알파 구성요소를 삭제하여 RGB 데이터를 가져옵니다.
guard let rgbData = rgbDataFromBuffer(
  scaledPixelBuffer,
  byteCount: batchSize * inputWidth * inputHeight * inputChannels,
  isModelQuantized: inputTensor.dataType == .uInt8
) else {
  print("Failed to convert the image buffer to RGB data.")
  return nil
}
RGB 데이터를 입력 Tensor에 복사합니다.
try interpreter.copy(rgbData, toInputAt: 0)
Interpreter를 호출하여 추론을 실행합니다.
    let startDate = Date()
    try interpreter.invoke()
    interval = Date().timeIntervalSince(startDate) * 1000
    outputBoundingBox = try interpreter.output(at: 0)
    outputClasses = try interpreter.output(at: 1)
    outputScores = try interpreter.output(at: 2)
    outputCount = try interpreter.output(at: 3)
  }
결과 형식을 지정합니다.
    let resultArray = formatResults(
      boundingBox: [Float](unsafeData: outputBoundingBox.data) ?? [],
      outputClasses: [Float](unsafeData: outputClasses.data) ?? [],
      outputScores: [Float](unsafeData: outputScores.data) ?? [],
      outputCount: Int(([Float](unsafeData: outputCount.data) ?? [0])[0]),
      width: CGFloat(imageWidth),
      height: CGFloat(imageHeight)
    )
...
}
신뢰도 점수가 임곗값 미만인 모든 결과를 필터링하고 내림차순으로 정렬된 상위 N개 결과를 반환합니다.
  func formatResults(boundingBox: [Float], outputClasses: [Float],
  outputScores: [Float], outputCount: Int, width: CGFloat, height: CGFloat)
  -> [Inference]{
    var resultsArray: [Inference] = []
    for i in 0...outputCount - 1 {

      let score = outputScores[i]
신뢰도가 임곗값 미만인 결과를 필터링합니다.
      guard score >= threshold else {
        continue
      }
라벨 목록에서 감지된 클래스의 출력 클래스 이름을 가져옵니다.
      let outputClassIndex = Int(outputClasses[i])
      let outputClass = labels[outputClassIndex + 1]

      var rect: CGRect = CGRect.zero
감지된 경계 상자를 CGRect로 변환합니다.
      rect.origin.y = CGFloat(boundingBox[4*i])
      rect.origin.x = CGFloat(boundingBox[4*i+1])
      rect.size.height = CGFloat(boundingBox[4*i+2]) - rect.origin.y
      rect.size.width = CGFloat(boundingBox[4*i+3]) - rect.origin.x
모델 크기에 대해 감지된 모서리입니다. 따라서 실제 이미지 크기에 따라 rect를 확장합니다.
let newRect = rect.applying(CGAffineTransform(scaleX: width, y: height))
클래스에 할당된 색상을 가져옵니다.
let colorToAssign = colorForClass(withIndex: outputClassIndex + 1)
      let inference = Inference(confidence: score,
                                className: outputClass,
                                rect: newRect,
                                displayColor: colorToAssign)
      resultsArray.append(inference)
    }

    // Sort results in descending order of confidence.
    resultsArray.sort { (first, second) -> Bool in
      return first.confidence  > second.confidence
    }

    return resultsArray
  }
CameraFeedManager
CameraFeedManager.swift는 모든 카메라 관련 기능을 관리합니다.
AVCaptureSession을 초기화하고 구성합니다.
private func configureSession() {session.beginConfiguration()
그런 다음
AVCaptureDeviceInput을 추가하려고 시도하고builtInWideAngleCamera를 세션의 기기 입력으로 추가합니다.addVideoDeviceInput()
그런 다음
AVCaptureVideoDataOutput을 추가하려고 시도합니다.addVideoDataOutput()
   session.commitConfiguration()
    self.cameraConfiguration = .success
  }
세션을 시작합니다.
세션을 중지합니다.
오류 처리:
- NSNotification.Name.AVCaptureSessionRuntimeError:
AVCaptureSession인스턴스가 실행되는 동안 예상치 않은 오류가 발생하면 게시됩니다. userInfo 사전에는AVCaptureSessionErrorKey키에 대한NSError객체가 포함됩니다. - NSNotification.Name.AVCaptureSessionWasInterrupted: 전화 통화, 경보 등의 중단이 발생하면 게시됩니다. 적절한 경우
AVCaptureSession인스턴스가 응답 중단에 대해 자동으로 실행 중지됩니다. userInfo에는 중단 이유를 나타내는AVCaptureSessionInterruptionReasonKey가 포함됩니다. - NSNotification.Name.AVCaptureSessionInterruptionEnded:
AVCaptureSession이 중단을 종료시키면 게시됩니다. 세션 인스턴스는 전화 통화와 같은 중단이 종료되면 다시 시작될 수 있습니다.
InferenceViewController.swift 클래스는 아래 화면을 담당하며, 여기서 중점을 두는 부분은 강조 표시된 부분입니다.
- 해상도: 현재 프레임의 해상도를 표시합니다(동영상 세션의 이미지).
- 자르기: 현재 프레임의 자르기 크기를 표시합니다.
- 추론 시간: 모델이 객체를 감지하는 데 걸리는 시간을 표시합니다.
- 스레드: 실행 중인 스레드 수를 표시합니다.
사용자는 증감자의
+또는-기호를 탭하여 이 수를 늘리거나 줄일 수 있습니다. TensorFlow Lite 인터프리터가 사용하는 현재 스레드 수입니다.
ViewController.swift 클래스는 카메라 관련 기능과 ModelDataHandler를 관리하는 CameraFeedManager의 인스턴스를 보유합니다. ModelDataHandler는 Model(학습된 모델)을 처리하고 동영상 세션의 이미지 프레임에 대한 출력을 가져옵니다.
private lazy var cameraFeedManager = CameraFeedManager(previewView: previewView)

private var modelDataHandler: ModelDataHandler? =
    ModelDataHandler(modelFileInfo: MobileNetSSD.modelInfo, labelsFileInfo: MobileNetSSD.labelsInfo)
다음을 호출하여 카메라 세션을 시작합니다.
cameraFeedManager.checkCameraConfigurationAndStartSession()
스레드 수를 변경하면 이 클래스는 didChangeThreadCount 함수에서 새 스레드 수를 사용하여 모델을 다시 초기화합니다.
CameraFeedManager 클래스는 ImageFrame을 CVPixelBuffer로 ViewController에 보내고, 이는 예측을 위해 모델로 전송됩니다.
이 메서드는 TensorFlow를 통해 실시간 카메라 pixelBuffer를 실행하여 결과를 가져옵니다.
@objc
func runModel(onPixelBuffer pixelBuffer: CVPixelBuffer) {
tensorFlow를 통해 실시간 카메라 pixelBuffer를 실행하여 결과를 가져옵니다.
result = self.modelDataHandler?.runModel(onFrame: pixelBuffer)
...
let displayResult = result

let width = CVPixelBufferGetWidth(pixelBuffer)
    let height = CVPixelBufferGetHeight(pixelBuffer)

    DispatchQueue.main.async {
InferenceViewController에 전달하여 결과를 표시합니다.
self.inferenceViewController?.resolution = CGSize(width: width, height: height)

self.inferenceViewController?.inferenceTime = inferenceTime
경계 상자를 그리고 클래스 이름과 신뢰도 점수를 표시합니다.
self.drawAfterPerformingCalculations(onInferences: displayResult.inferences, withImageSize: CGSize(width: CGFloat(width), height: CGFloat(height)))
    }
  }
다음 단계
Edge 모델을 사용하여 iOS 객체 감지 및 주석 앱을 끝까지 둘러보았습니다. 객체 감지 앱을 수정하고 샘플 주석을 가져오기 전에 학습된 Edge Tensorflow Lite 모델을 사용하여 객체 감지 앱을 테스트했습니다. 그런 다음 TensorFlow Lite 관련 코드를 검사하여 기본 기능을 이해했습니다.
다음은 계속해서 TensorFlow 모델 및 AutoML Vision Edge를 배우는 데 도움이 되는 리소스입니다.
- 공식 문서 및 코드 저장소에서 TFLite 자세히 알아보기
- 음성 핫 워드 감지기와 스마트 답장의 기기별 버전을 포함하여 다른 TFLite 지원 모델 사용해보기
- TensorFlow의 시작하기 문서를 통해 TensorFlow에 대한 일반적인 내용 자세히 알아보기