创建(训练)模型并将其部署后,您可以向它发出在线(或同步)预测请求。
在线(单个)预测示例
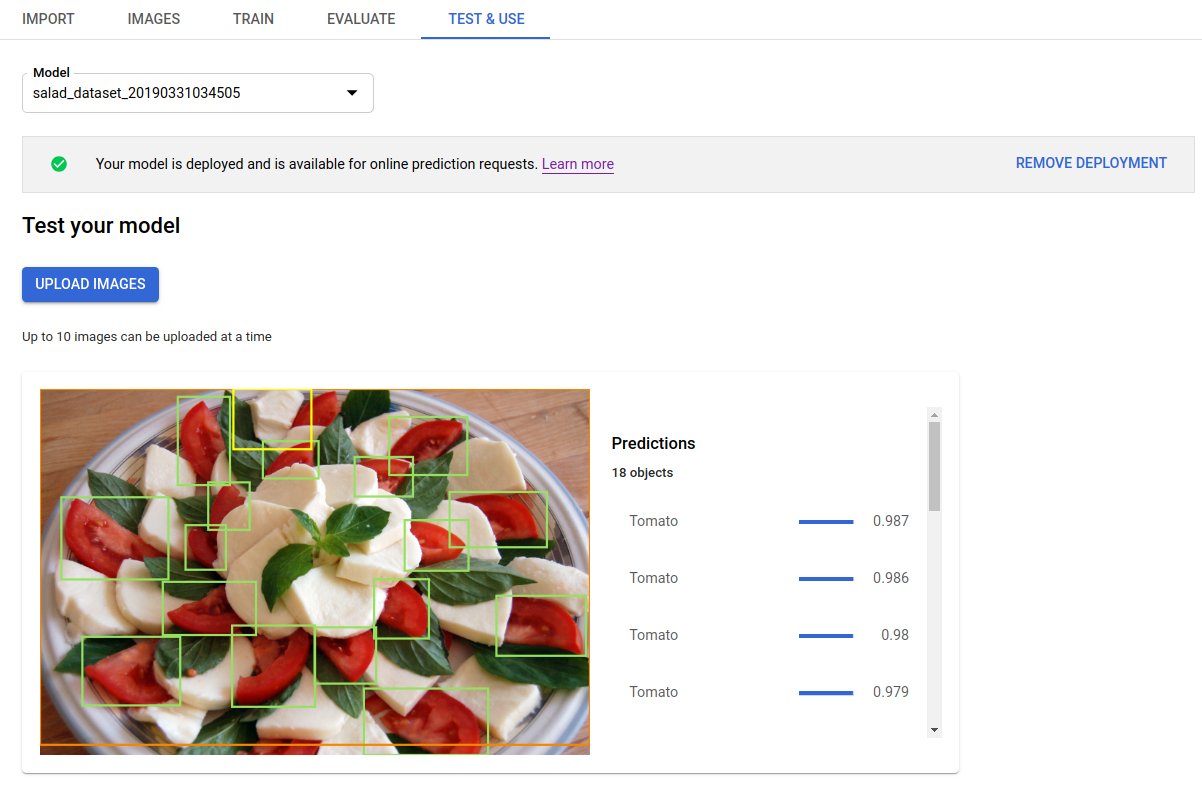
部署训练好的模型后,您可以使用 predict 方法请求图片预测,或使用界面获取预测注释。predict 方法将标签应用于图片中的对象边界框。
模型部署后即会产生费用。使用经过训练的模型进行预测后,如果您希望不再产生模型托管使用费,可以取消部署模型。
网页界面
打开 AutoML Vision Object Detection 界面,然后点击左侧导航栏中的模型标签页(带有灯泡图标)以显示可用的模型。
如需查看其他项目的模型,请从标题栏右上角的下拉列表中选择该项目。
点击要用于为图片添加标签的模型所对应的行。
如果模型尚未部署,请选择部署模型立即进行部署。
您必须先部署模型才能使用在线预测。部署模型会产生费用。如需了解详情,请参阅价格页面。
点击标题栏正下方的测试和使用标签页。
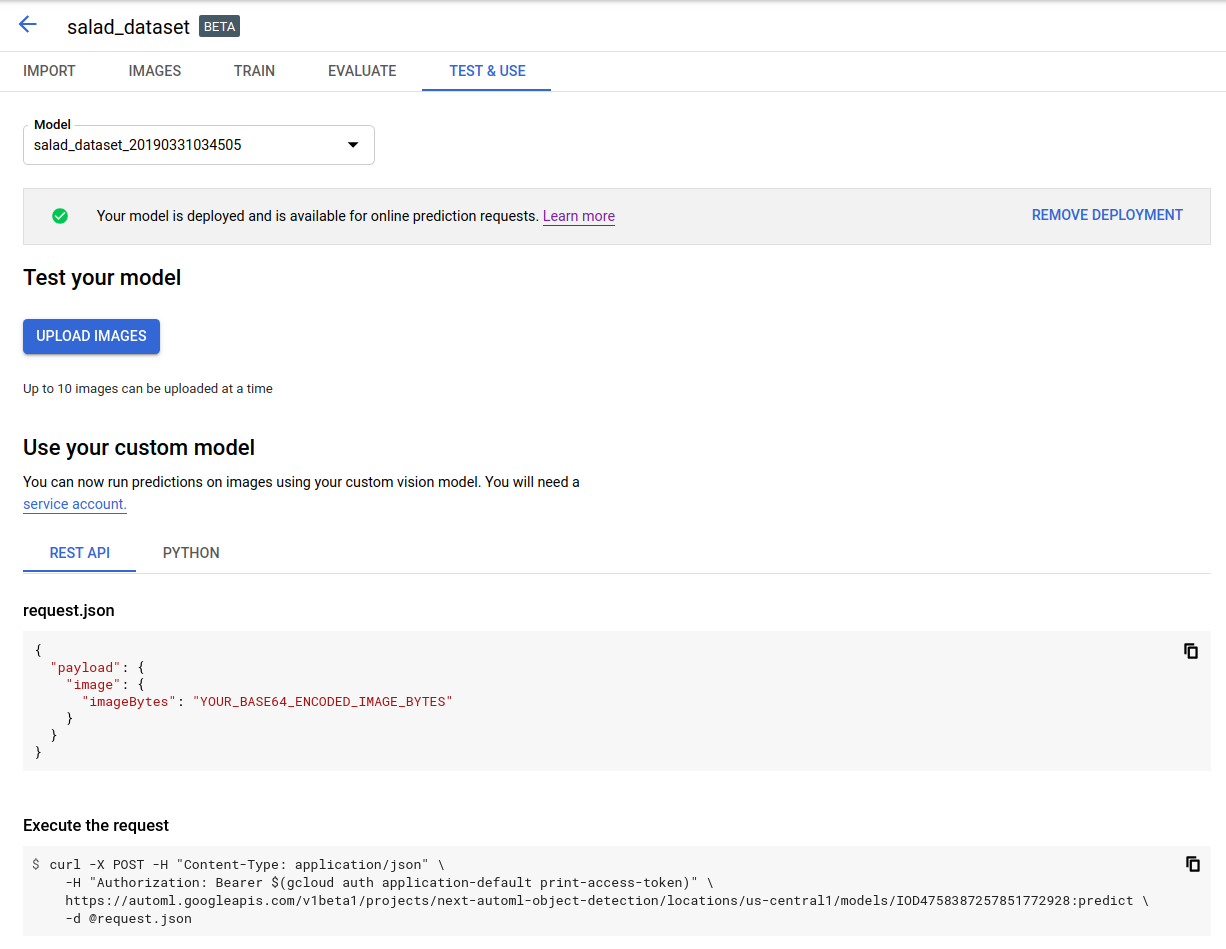
点击上传图片,上传要标记的图片。
REST
如需测试预测,您必须先部署云托管的模型。
在使用任何请求数据之前,请先进行以下替换:
- project-id:您的 GCP 项目 ID。
- model-id:您的模型的 ID(从创建模型时返回的响应中获取)。此 ID 是模型名称的最后一个元素。
例如:
- 模型名称:
projects/project-id/locations/location-id/models/IOD4412217016962778756 - 模型 ID:
IOD4412217016962778756
- 模型名称:
- base64-encoded-image:二进制图片数据的 base64 表示(ASCII 字符串)。此字符串应类似于以下字符串:
/9j/4QAYRXhpZgAA...9tAVx/zDQDlGxn//2Q==。如需了解详情,请访问 base64 编码主题。
特定于字段的注意事项:
scoreThreshold- 一个介于 0 到 1 之间的值。系统将只显示分数阈值不小于此值的值。默认值为 0.5。maxBoundingBoxCount- 在响应中返回的边界框的最大数目(上限)。默认值为 100,最大值为 500。 该值受资源限制,并且可能会受到服务器的限制。
HTTP 方法和网址:
POST https://automl.googleapis.com/v1/projects/PROJECT_ID/locations/us-central1/models/MODEL_ID:predict
请求 JSON 正文:
{
  "payload": {
    "image": {
      "imageBytes": "BASE64_ENCODED_IMAGE"
    }
  },
  "params": {
    "scoreThreshold": "0.5",
    "maxBoundingBoxCount": "100"
  }
}
如需发送请求,请选择以下方式之一:
curl
将请求正文保存在名为 request.json 的文件中,然后执行以下命令:
curl -X POST \
     -H "Authorization: Bearer $(gcloud auth print-access-token)" \
     -H "x-goog-user-project: project-id" \
     -H "Content-Type: application/json; charset=utf-8" \
     -d @request.json \
     "https://automl.googleapis.com/v1/projects/PROJECT_ID/locations/us-central1/models/MODEL_ID:predict"
PowerShell
将请求正文保存在名为 request.json 的文件中,然后执行以下命令:
$cred = gcloud auth print-access-token
$headers = @{ "Authorization" = "Bearer $cred"; "x-goog-user-project" = "project-id" }

Invoke-WebRequest `
    -Method POST `
    -Headers $headers `
    -ContentType: "application/json; charset=utf-8" `
    -InFile request.json `
    -Uri "https://automl.googleapis.com/v1/projects/PROJECT_ID/locations/us-central1/models/MODEL_ID:predict" | Select-Object -Expand Content
输出以 JSON 格式返回。来自您的 AutoML Vision Object Detection 模型的预测包含在 payload 字段中:
- 对象的
boundingBox由对角顶点指定。 displayName是由 AutoML Vision Object Detection 模型预测的对象标签。score表示指定标签适用于图片的置信度。它的范围为0(零置信度)到1(高置信度)。
{
  "payload": [
    {
      "imageObjectDetection": {
        "boundingBox": {
          "normalizedVertices": [
            {
              "x": 0.034553755,
              "y": 0.015524037
            },
            {
              "x": 0.941527,
              "y": 0.9912563
            }
          ]
        },
        "score": 0.9997793
      },
      "displayName": "Salad"
    },
    {
      "imageObjectDetection": {
        "boundingBox": {
          "normalizedVertices": [
            {
              "x": 0.11737197,
              "y": 0.7098793
            },
            {
              "x": 0.510878,
              "y": 0.87987
            }
          ]
        },
        "score": 0.63219965
      },
      "displayName": "Tomato"
    }
  ]
}
Go
在试用此示例之前,请按照客户端库页面中与此编程语言对应的设置说明执行操作。
Java
在试用此示例之前,请按照客户端库页面中与此编程语言对应的设置说明执行操作。
Node.js
在试用此示例之前,请按照客户端库页面中与此编程语言对应的设置说明执行操作。
Python
在试用此示例之前,请按照客户端库页面中与此编程语言对应的设置说明执行操作。
其他语言
C#: 请按照客户端库页面上的 C# 设置说明操作,然后访问 .NET 版 AutoML Vision Object Detection 参考文档。
PHP: 请按照客户端库页面上的 PHP 设置说明操作,然后访问 PHP 版 AutoML Vision Object Detection 参考文档。
Ruby 版: 请按照客户端库页面上的 Ruby 设置说明操作,然后访问 Ruby 版 AutoML Vision Object Detection 参考文档。