Membuat prediksi individual

Setelah membuat (melatih) model dan men-deploy model tersebut, Anda dapat membuat permintaan prediksi online (atau sinkron) untuk model tersebut.

Contoh prediksi online (secara individu)

Setelah men-deploy model terlatih, Anda dapat meminta prediksi untuk gambar menggunakan metode predict 
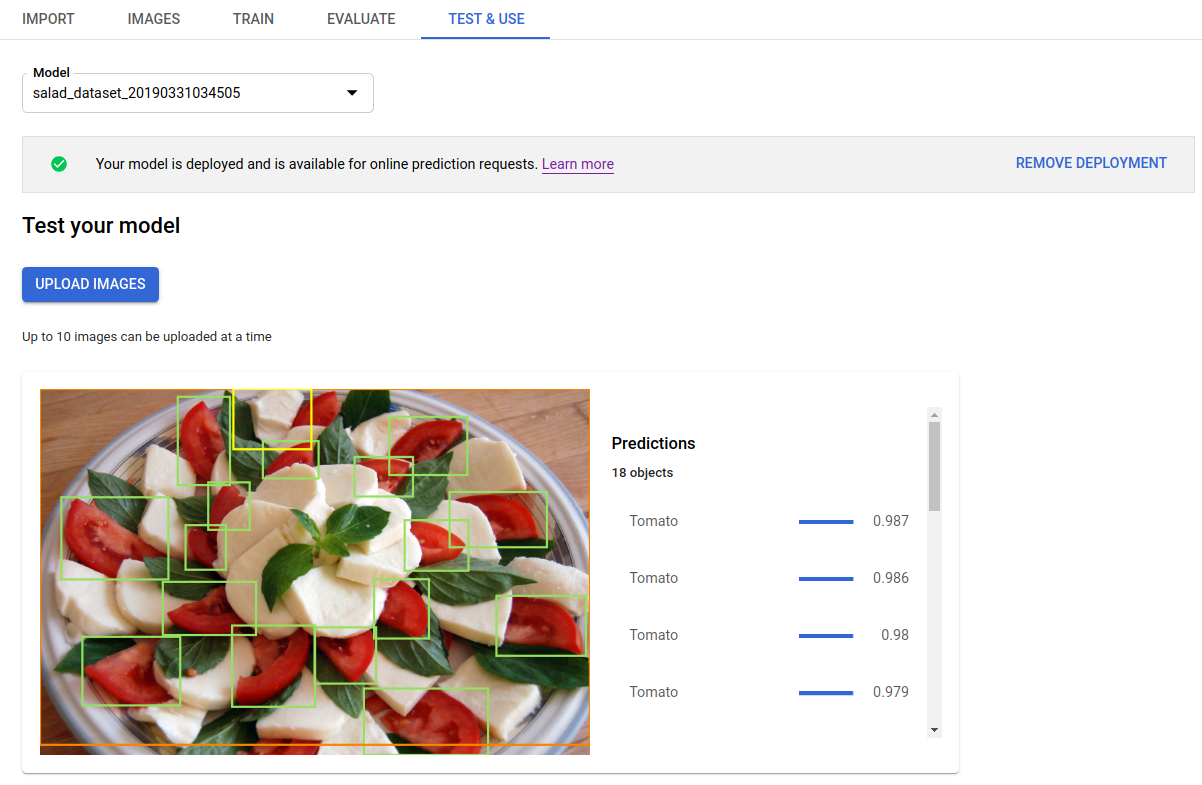
atau menggunakan UI untuk mendapatkan anotasi prediksi. Metode predict tersebut menerapkan label ke kotak pembatas objek di gambar Anda.

Model Anda akan dikenai biaya saat di-deploy. Setelah membuat prediksi dengan model terlatih, Anda dapat undeploy model jika tidak ingin lagi dikenai biaya penggunaan hosting model.

UI web

  1. Buka Deteksi Objek AutoML Vision UI lalu klik tab Model (dengan ikon bohlam) di menu navigasi sebelah kiri untuk menampilkan model yang tersedia.

    Untuk melihat model project yang berbeda, pilih project dari menu drop-down di kanan atas panel judul.

  2. Klik baris model yang ingin Anda gunakan untuk memberi label pada gambar.

  3. Jika model Anda belum di-deploy, deploy sekarang dengan memilih Deploy model.

    Model Anda harus di-deploy agar bisa menggunakan prediksi online. Anda akan dikenai biaya untuk men-deploy model Untuk mengetahui informasi selengkapnya, lihat halaman harga.

  4. Klik tab Pengujian & Penggunaan tepat di bawah kolom judul.

    Uji dan gunakan halaman model

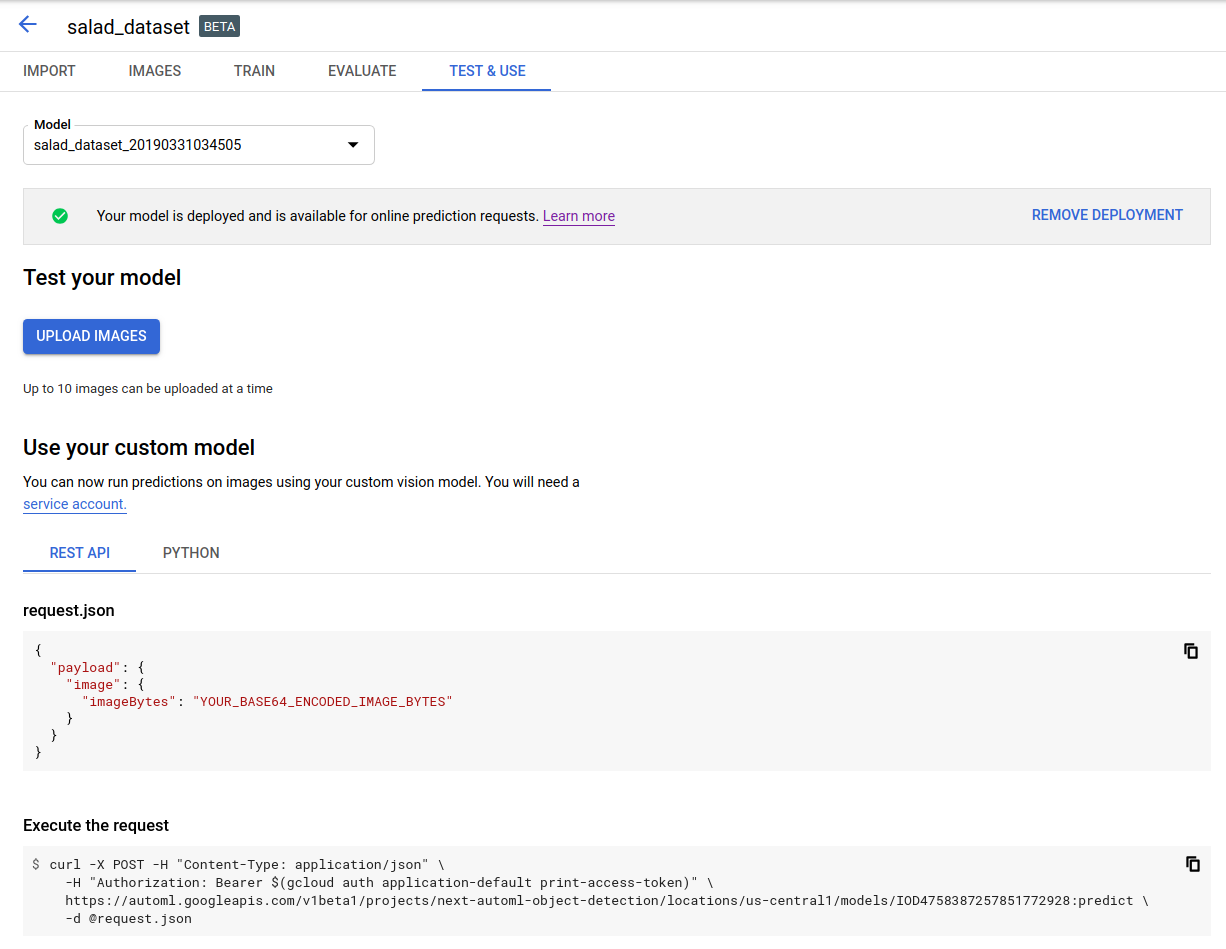
  5. Klik Upload Gambar untuk mengupload gambar yang ingin Anda beri label.

    Prediksi pada halaman gambar yang diupload

REST

Untuk menguji prediksi, Anda harus men-deploy model yang dihosting Cloud terlebih dahulu.

Sebelum menggunakan salah satu data permintaan, lakukan penggantian berikut:

  • project-id: Project ID GCP Anda.
  • model-id: ID model Anda, dari respons saat membuat model. ID adalah elemen terakhir dari nama model Anda. Misalnya:
    • nama model: projects/project-id/locations/location-id/models/IOD4412217016962778756
    • id model: IOD4412217016962778756
  • base64-encoded-image: representasi base64 (string ASCII) dari data gambar biner Anda. String ini akan terlihat seperti string berikut: /9j/4QAYRXhpZgAA...9tAVx/zDQDlGxn//2Q==. Kunjungi topik mengenkode base64 untuk informasi selengkapnya.

Pertimbangan khusus kolom:

  • scoreThreshold - Nilai antara 0 hingga 1. Hanya dengan skor nilai minimum setidaknya nilai ini yang akan ditampilkan. Nilai defaultnya adalah 0.5.
  • maxBoundingBoxCount - Jumlah terbesar (batas atas) kotak pembatas yang akan dikembalikan dalam respons. Nilai default adalah 100 dan maksimum adalah 500. Nilai ini tunduk pada batasan resource, dan mungkin dibatasi oleh server.

Metode HTTP dan URL:

POST https://automl.googleapis.com/v1/projects/PROJECT_ID/locations/us-central1/models/MODEL_ID:predict

Isi JSON permintaan:

{
  "payload": {
    "image": {
      "imageBytes": "BASE64_ENCODED_IMAGE"
    }
  },
  "params": {
    "scoreThreshold": "0.5",
    "maxBoundingBoxCount": "100"
  }
}

Untuk mengirim permintaan Anda, pilih salah satu opsi berikut:

curl

Simpan isi permintaan dalam file bernama request.json, dan jalankan perintah berikut:

curl -X POST \
-H "Authorization: Bearer $(gcloud auth print-access-token)" \
-H "x-goog-user-project: project-id" \
-H "Content-Type: application/json; charset=utf-8" \
-d @request.json \
"https://automl.googleapis.com/v1/projects/PROJECT_ID/locations/us-central1/models/MODEL_ID:predict"

PowerShell

Simpan isi permintaan dalam file bernama request.json, dan jalankan perintah berikut:

$cred = gcloud auth print-access-token
$headers = @{ "Authorization" = "Bearer $cred"; "x-goog-user-project" = "project-id" }

Invoke-WebRequest `
-Method POST `
-Headers $headers `
-ContentType: "application/json; charset=utf-8" `
-InFile request.json `
-Uri "https://automl.googleapis.com/v1/projects/PROJECT_ID/locations/us-central1/models/MODEL_ID:predict" | Select-Object -Expand Content

Output ditampilkan dalam bentuk JSON. Prediksi dari model Deteksi Objek Vision AutoML Anda terdapat di kolom payload:

  • boundingBox objek ditentukan oleh verteks yang berlawanan secara diagonal.
  • displayName adalah label objek yang diprediksi oleh model Deteksi Objek AutoML Vision.
  • score menunjukkan tingkat keyakinan yang diterapkan pada label yang ditentukan pada gambar. Rentangnya mulai dari 0 (tanpa keyakinan) hingga 1 (keyakinan tinggi).

{
  "payload": [
    {
      "imageObjectDetection": {
        "boundingBox": {
          "normalizedVertices": [
            {
              "x": 0.034553755,
              "y": 0.015524037
            },
            {
              "x": 0.941527,
              "y": 0.9912563
            }
          ]
        },
        "score": 0.9997793
      },
      "displayName": "Salad"
    },
    {
      "imageObjectDetection": {
        "boundingBox": {
          "normalizedVertices": [
            {
              "x": 0.11737197,
              "y": 0.7098793
            },
            {
              "x": 0.510878,
              "y": 0.87987
            }
          ]
        },
        "score": 0.63219965
      },
      "displayName": "Tomato"
    }
  ]
}

Go

Sebelum mencoba contoh ini, ikuti petunjuk penyiapan untuk bahasa ini di halaman Library Klien.

import (
	"context"
	"fmt"
	"io"
	"io/ioutil"
	"os"

	automl "cloud.google.com/go/automl/apiv1"
	"cloud.google.com/go/automl/apiv1/automlpb"
)

// visionObjectDetectionPredict does a prediction for image classification.
func visionObjectDetectionPredict(w io.Writer, projectID string, location string, modelID string, filePath string) error {
	// projectID := "my-project-id"
	// location := "us-central1"
	// modelID := "IOD123456789..."
	// filePath := "path/to/image.jpg"

	ctx := context.Background()
	client, err := automl.NewPredictionClient(ctx)
	if err != nil {
		return fmt.Errorf("NewPredictionClient: %w", err)
	}
	defer client.Close()

	file, err := os.Open(filePath)
	if err != nil {
		return fmt.Errorf("Open: %w", err)
	}
	defer file.Close()
	bytes, err := ioutil.ReadAll(file)
	if err != nil {
		return fmt.Errorf("ReadAll: %w", err)
	}

	req := &automlpb.PredictRequest{
		Name: fmt.Sprintf("projects/%s/locations/%s/models/%s", projectID, location, modelID),
		Payload: &automlpb.ExamplePayload{
			Payload: &automlpb.ExamplePayload_Image{
				Image: &automlpb.Image{
					Data: &automlpb.Image_ImageBytes{
						ImageBytes: bytes,
					},
				},
			},
		},
		// Params is additional domain-specific parameters.
		Params: map[string]string{
			// score_threshold is used to filter the result.
			"score_threshold": "0.8",
		},
	}

	resp, err := client.Predict(ctx, req)
	if err != nil {
		return fmt.Errorf("Predict: %w", err)
	}

	for _, payload := range resp.GetPayload() {
		fmt.Fprintf(w, "Predicted class name: %v\n", payload.GetDisplayName())
		fmt.Fprintf(w, "Predicted class score: %v\n", payload.GetImageObjectDetection().GetScore())
		boundingBox := payload.GetImageObjectDetection().GetBoundingBox()
		fmt.Fprintf(w, "Normalized vertices:\n")
		for _, vertex := range boundingBox.GetNormalizedVertices() {
			fmt.Fprintf(w, "\tX: %v, Y: %v\n", vertex.GetX(), vertex.GetY())
		}
	}

	return nil
}

Java

Sebelum mencoba contoh ini, ikuti petunjuk penyiapan untuk bahasa ini di halaman Library Klien.

import com.google.cloud.automl.v1.AnnotationPayload;
import com.google.cloud.automl.v1.BoundingPoly;
import com.google.cloud.automl.v1.ExamplePayload;
import com.google.cloud.automl.v1.Image;
import com.google.cloud.automl.v1.ModelName;
import com.google.cloud.automl.v1.NormalizedVertex;
import com.google.cloud.automl.v1.PredictRequest;
import com.google.cloud.automl.v1.PredictResponse;
import com.google.cloud.automl.v1.PredictionServiceClient;
import com.google.protobuf.ByteString;
import java.io.IOException;
import java.nio.file.Files;
import java.nio.file.Paths;

class VisionObjectDetectionPredict {

  static void predict() throws IOException {
    // TODO(developer): Replace these variables before running the sample.
    String projectId = "YOUR_PROJECT_ID";
    String modelId = "YOUR_MODEL_ID";
    String filePath = "path_to_local_file.jpg";
    predict(projectId, modelId, filePath);
  }

  static void predict(String projectId, String modelId, String filePath) throws IOException {
    // Initialize client that will be used to send requests. This client only needs to be created
    // once, and can be reused for multiple requests. After completing all of your requests, call
    // the "close" method on the client to safely clean up any remaining background resources.
    try (PredictionServiceClient client = PredictionServiceClient.create()) {
      // Get the full path of the model.
      ModelName name = ModelName.of(projectId, "us-central1", modelId);
      ByteString content = ByteString.copyFrom(Files.readAllBytes(Paths.get(filePath)));
      Image image = Image.newBuilder().setImageBytes(content).build();
      ExamplePayload payload = ExamplePayload.newBuilder().setImage(image).build();
      PredictRequest predictRequest =
          PredictRequest.newBuilder()
              .setName(name.toString())
              .setPayload(payload)
              .putParams(
                  "score_threshold", "0.5") // [0.0-1.0] Only produce results higher than this value
              .build();

      PredictResponse response = client.predict(predictRequest);
      for (AnnotationPayload annotationPayload : response.getPayloadList()) {
        System.out.format("Predicted class name: %s\n", annotationPayload.getDisplayName());
        System.out.format(
            "Predicted class score: %.2f\n",
            annotationPayload.getImageObjectDetection().getScore());
        BoundingPoly boundingPoly = annotationPayload.getImageObjectDetection().getBoundingBox();
        System.out.println("Normalized Vertices:");
        for (NormalizedVertex vertex : boundingPoly.getNormalizedVerticesList()) {
          System.out.format("\tX: %.2f, Y: %.2f\n", vertex.getX(), vertex.getY());
        }
      }
    }
  }
}

Node.js

Sebelum mencoba contoh ini, ikuti petunjuk penyiapan untuk bahasa ini di halaman Library Klien.

/**
 * TODO(developer): Uncomment these variables before running the sample.
 */
// const projectId = 'YOUR_PROJECT_ID';
// const location = 'us-central1';
// const modelId = 'YOUR_MODEL_ID';
// const filePath = 'path_to_local_file.jpg';

// Imports the Google Cloud AutoML library
const {PredictionServiceClient} = require('@google-cloud/automl').v1;
const fs = require('fs');

// Instantiates a client
const client = new PredictionServiceClient();

// Read the file content for translation.
const content = fs.readFileSync(filePath);

async function predict() {
  // Construct request
  // params is additional domain-specific parameters.
  // score_threshold is used to filter the result
  const request = {
    name: client.modelPath(projectId, location, modelId),
    payload: {
      image: {
        imageBytes: content,
      },
    },
    params: {
      score_threshold: '0.8',
    },
  };

  const [response] = await client.predict(request);

  for (const annotationPayload of response.payload) {
    console.log(`Predicted class name: ${annotationPayload.displayName}`);
    console.log(
      `Predicted class score: ${annotationPayload.imageObjectDetection.score}`
    );
    console.log('Normalized vertices:');
    for (const vertex of annotationPayload.imageObjectDetection.boundingBox
      .normalizedVertices) {
      console.log(`\tX: ${vertex.x}, Y: ${vertex.y}`);
    }
  }
}

predict();

Python

Sebelum mencoba contoh ini, ikuti petunjuk penyiapan untuk bahasa ini di halaman Library Klien.

from google.cloud import automl

# TODO(developer): Uncomment and set the following variables
# project_id = "YOUR_PROJECT_ID"
# model_id = "YOUR_MODEL_ID"
# file_path = "path_to_local_file.jpg"

prediction_client = automl.PredictionServiceClient()

# Get the full path of the model.
model_full_id = automl.AutoMlClient.model_path(project_id, "us-central1", model_id)

# Read the file.
with open(file_path, "rb") as content_file:
    content = content_file.read()

image = automl.Image(image_bytes=content)
payload = automl.ExamplePayload(image=image)

# params is additional domain-specific parameters.
# score_threshold is used to filter the result
# https://cloud.google.com/automl/docs/reference/rpc/google.cloud.automl.v1#predictrequest
params = {"score_threshold": "0.8"}

request = automl.PredictRequest(name=model_full_id, payload=payload, params=params)

response = prediction_client.predict(request=request)
print("Prediction results:")
for result in response.payload:
    print(f"Predicted class name: {result.display_name}")
    print(f"Predicted class score: {result.image_object_detection.score}")
    bounding_box = result.image_object_detection.bounding_box
    print("Normalized Vertices:")
    for vertex in bounding_box.normalized_vertices:
        print(f"\tX: {vertex.x}, Y: {vertex.y}")

Bahasa tambahan

C# : Ikuti Petunjuk penyiapan C# di halaman library klien, lalu kunjungi Dokumentasi referensi Deteksi Objek Vision AutoML untuk .NET.

PHP : Ikuti petunjuk penyiapan PHP di halaman library klien, lalu kunjungi dokumentasi referensi Deteksi Objek AutoML Vision untuk PHP.

Ruby : Ikuti Petunjuk penyiapan Ruby di halaman library klien, lalu kunjungi Dokumentasi referensi Deteksi Objek AutoML Vision untuk Ruby.