Sebuah project dapat memiliki beberapa set data, dan setiap data digunakan untuk melatih model terpisah. Anda dapat memperoleh daftar set data yang tersedia, memperoleh set data tertentu, mengekspor set data, dan dapat menghapus set data yang tidak lagi Anda butuhkan.
Mencantumkan set data
Project dapat mencakup banyak set data. Bagian ini menjelaskan cara mengambil daftar set data yang tersedia untuk project.
UI Web
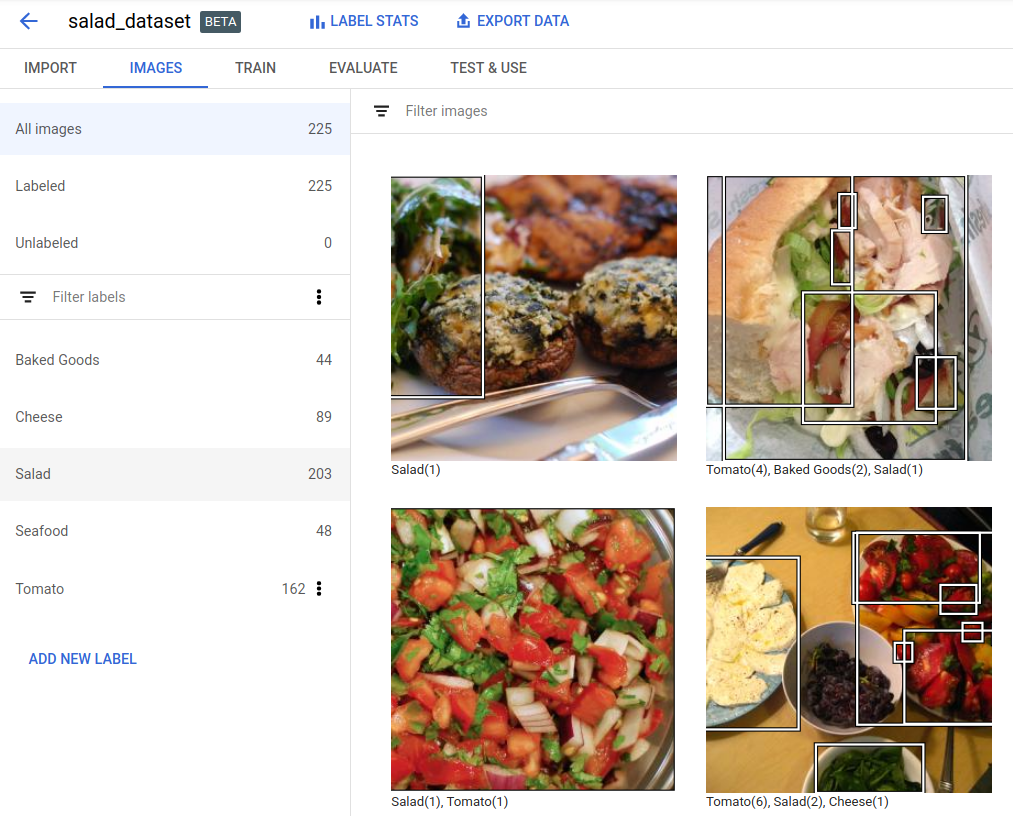
Untuk melihat daftar set data yang tersedia menggunakan UI Deteksi Objek AutoML Vision, klik link Set Data di bagian atas menu navigasi sebelah kiri.

Untuk melihat set data project lain, pilih project dari menu drop-down di sisi kiri kolom judul.
REST
Sebelum menggunakan salah satu data permintaan, lakukan penggantian berikut:
- project-id: Project ID GCP Anda.
Metode HTTP dan URL:
GET https://automl.googleapis.com/v1/projects/PROJECT_ID/locations/us-central1/datasets
Untuk mengirim permintaan Anda, pilih salah satu opsi berikut:
curl
Jalankan perintah berikut:
curl -X GET \
     -H "Authorization: Bearer $(gcloud auth print-access-token)" \
     -H "x-goog-user-project: project-id" \
     "https://automl.googleapis.com/v1/projects/PROJECT_ID/locations/us-central1/datasets"
PowerShell
Jalankan perintah berikut:
$cred = gcloud auth print-access-token
$headers = @{ "Authorization" = "Bearer $cred"; "x-goog-user-project" = "project-id" }

Invoke-WebRequest `
    -Method GET `
    -Headers $headers `
    -Uri "https://automl.googleapis.com/v1/projects/PROJECT_ID/locations/us-central1/datasets" | Select-Object -Expand Content
Anda akan menerima respons JSON yang mirip seperti berikut:
{
  "datasets": [
    {
      "name": "projects/PROJECT_ID/locations/us-central1/datasets/DATASET_ID",
      "displayName": "DISPLAY_NAME",
      "createTime": "2018-10-29T15:45:53.353442Z",
      "exampleCount": 227,
      "imageObjectDetectionDatasetMetadata": {}
    }
  ]
}
Go
Sebelum mencoba contoh ini, ikuti petunjuk penyiapan untuk bahasa ini di halaman Library Klien.
Java
Sebelum mencoba contoh ini, ikuti petunjuk penyiapan untuk bahasa ini di halaman Library Klien.
Node.js
Sebelum mencoba contoh ini, ikuti petunjuk penyiapan untuk bahasa ini di halaman Library Klien.
Python
Sebelum mencoba contoh ini, ikuti petunjuk penyiapan untuk bahasa ini di halaman Library Klien.
Bahasa tambahan
C# : Ikuti Petunjuk penyiapan C# di halaman library klien, lalu kunjungi Dokumentasi referensi Deteksi Objek Vision AutoML untuk .NET.
PHP : Ikuti petunjuk penyiapan PHP di halaman library klien, lalu kunjungi dokumentasi referensi Deteksi Objek AutoML Vision untuk PHP.
Ruby : Ikuti Petunjuk penyiapan Ruby di halaman library klien, lalu kunjungi Dokumentasi referensi Deteksi Objek AutoML Vision untuk Ruby.
Mendapatkan set data
Anda juga dapat memperoleh set data tertentu menggunakan ID set data.
UI Web
Untuk melihat daftar set data yang tersedia menggunakan UI Deteksi Objek AutoML Vision, klik link Set Data di bagian atas menu navigasi sebelah kiri.
Untuk melihat set data project lain, pilih project dari daftar drop-down di sisi kiri panel judul.
Mengakses set data tertentu dengan memilih namanya dari daftar.
REST
Sebelum menggunakan salah satu data permintaan, lakukan penggantian berikut:
- project-id: project ID GCP Anda.
- dataset-id: ID set data Anda. ID adalah elemen terakhir dari nama
set data Anda. Contoh:
- nama set data:
projects/project-id/locations/location-id/datasets/3104518874390609379 - id set data:
3104518874390609379
- nama set data:
Metode HTTP dan URL:
GET https://automl.googleapis.com/v1/projects/PROJECT_ID/locations/us-central1/datasets/DATASET_ID
Untuk mengirim permintaan Anda, pilih salah satu opsi berikut:
curl
Jalankan perintah berikut:
curl -X GET \
     -H "Authorization: Bearer $(gcloud auth print-access-token)" \
     -H "x-goog-user-project: project-id" \
     "https://automl.googleapis.com/v1/projects/PROJECT_ID/locations/us-central1/datasets/DATASET_ID"
PowerShell
Jalankan perintah berikut:
$cred = gcloud auth print-access-token
$headers = @{ "Authorization" = "Bearer $cred"; "x-goog-user-project" = "project-id" }

Invoke-WebRequest `
    -Method GET `
    -Headers $headers `
    -Uri "https://automl.googleapis.com/v1/projects/PROJECT_ID/locations/us-central1/datasets/DATASET_ID" | Select-Object -Expand Content
Anda akan menerima respons JSON yang mirip seperti berikut:
{
  "name": "projects/PROJECT_ID/locations/us-central1/datasets/DATASET_ID",
  "displayName": "DISPLAY_NAME",
  "createTime": "2019-03-31T22:29:41.136184Z",
  "etag": "AB3BwFo-bssF99O7d4iI4_kwfnSi5pIK8FQ4D8h6Z_EaC4thAeZFbgbaIDvqXWuzjx9s",
  "exampleCount": 225,
  "imageObjectDetectionDatasetMetadata": {}
}
Go
Sebelum mencoba contoh ini, ikuti petunjuk penyiapan untuk bahasa ini di halaman Library Klien.
Java
Sebelum mencoba contoh ini, ikuti petunjuk penyiapan untuk bahasa ini di halaman Library Klien.
Node.js
Sebelum mencoba contoh ini, ikuti petunjuk penyiapan untuk bahasa ini di halaman Library Klien.
Python
Sebelum mencoba contoh ini, ikuti petunjuk penyiapan untuk bahasa ini di halaman Library Klien.
Bahasa tambahan
C# : Ikuti Petunjuk penyiapan C# di halaman library klien, lalu kunjungi Dokumentasi referensi Deteksi Objek Vision AutoML untuk .NET.
PHP : Ikuti petunjuk penyiapan PHP di halaman library klien, lalu kunjungi dokumentasi referensi Deteksi Objek AutoML Vision untuk PHP.
Ruby : Ikuti Petunjuk penyiapan Ruby di halaman library klien, lalu kunjungi Dokumentasi referensi Deteksi Objek AutoML Vision untuk Ruby.
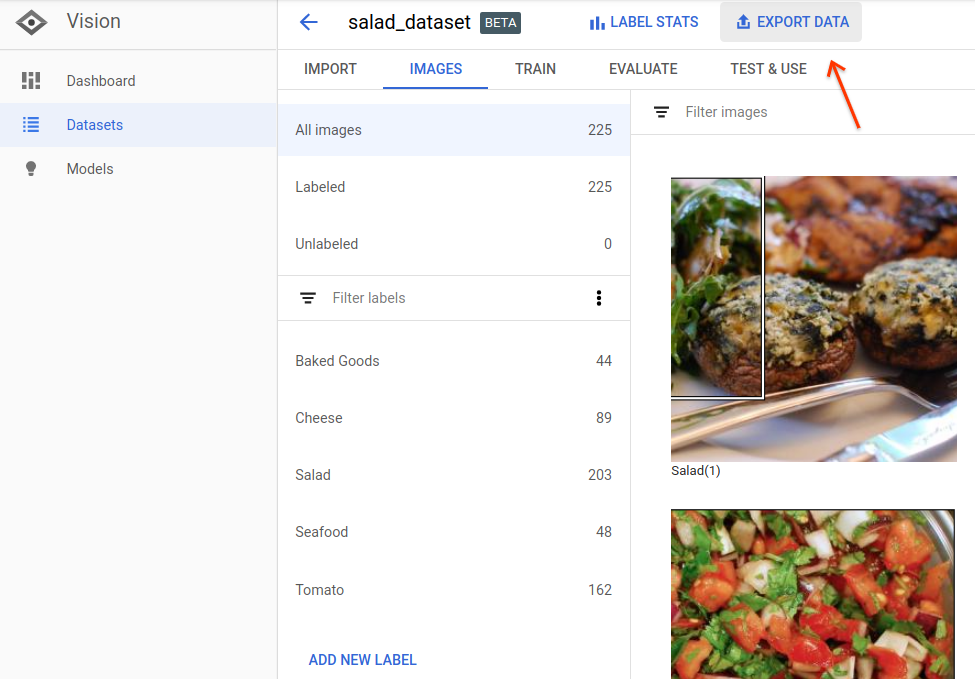
Mengekspor set data
Anda dapat mengekspor file CSV yang berisi semua informasi set data ke bucket Google Cloud Storage. Hal ini sangat membantu untuk kasus ketika Anda menambahkan, menghapus, atau mengubah anotasi gambar latihan di UI.
UI web
Untuk mengekspor set data yang tidak kosong, selesaikan langkah-langkah berikut:
Pilih set data yang tidak kosong dari halaman Set Data.

Memilih set data yang tidak kosong akan mengarahkan Anda ke halaman detail Set Data.
Memilih opsi Mengekspor data di bagian atas halaman detail Dataset.
Tindakan ini akan membuka jendela tempat Anda dapat memilih lokasi bucket Google Cloud Storage, atau membuat bucket baru dan menetapkannya sebagai lokasi untuk menyimpan file CSV.
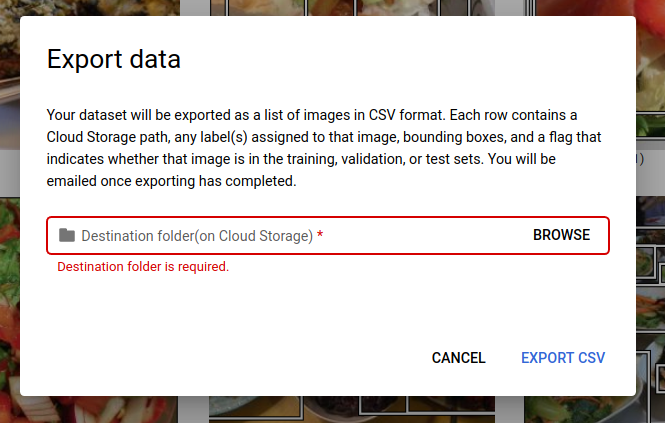
Memilih Ekspor CSV setelah Anda memilih lokasi bucket Google Cloud Storage baru atau yang sudah ada.
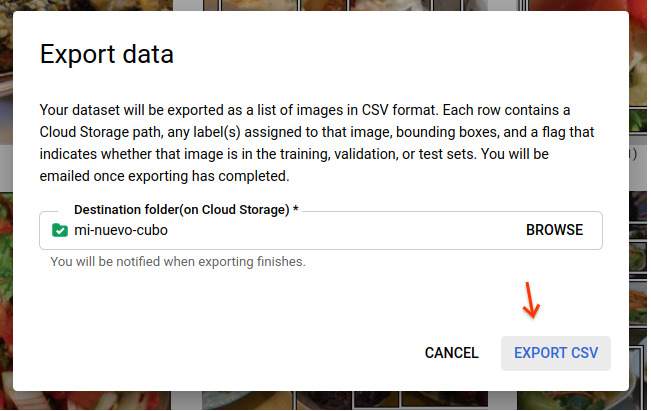
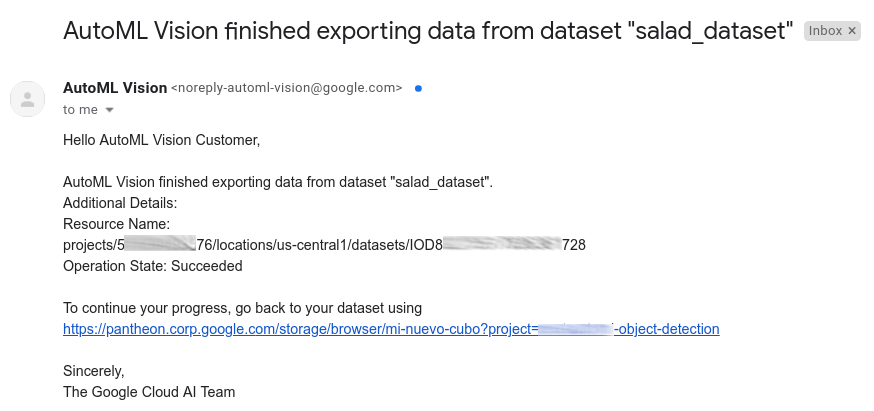
Anda akan menerima email saat proses ekspor data selesai.
REST
Sebelum menggunakan salah satu data permintaan, lakukan penggantian berikut:
- project-id: project ID GCP Anda.
- dataset-id: ID set data Anda. ID adalah elemen terakhir dari nama
set data Anda. Contoh:
- nama set data:
projects/project-id/locations/location-id/datasets/3104518874390609379 - id set data:
3104518874390609379
- nama set data:
- output-storage-bucket: bucket/direktori Google Cloud Storage
tempat file output disimpan, yang dinyatakan dalam bentuk berikut:
gs://bucket/directory/. Pengguna yang membuat permintaan harus memiliki izin tulis ke bucket.
Metode HTTP dan URL:
POST https://automl.googleapis.com/v1/projects/PROJECT_ID/locations/us-central1/datasets/DATASET_ID:exportData
Isi JSON permintaan:
{
  "outputConfig": {
    "gcsDestination": {
      "outputUriPrefix": "CLOUD_STORAGE_BUCKET"
    }
  }
}
Untuk mengirim permintaan Anda, pilih salah satu opsi berikut:
curl
Simpan isi permintaan dalam file bernama request.json,
dan jalankan perintah berikut:
curl -X POST \
     -H "Authorization: Bearer $(gcloud auth print-access-token)" \
     -H "x-goog-user-project: project-id" \
     -H "Content-Type: application/json; charset=utf-8" \
     -d @request.json \
     "https://automl.googleapis.com/v1/projects/PROJECT_ID/locations/us-central1/datasets/DATASET_ID:exportData"
PowerShell
Simpan isi permintaan dalam file bernama request.json,
dan jalankan perintah berikut:
$cred = gcloud auth print-access-token
$headers = @{ "Authorization" = "Bearer $cred"; "x-goog-user-project" = "project-id" }

Invoke-WebRequest `
    -Method POST `
    -Headers $headers `
    -ContentType: "application/json; charset=utf-8" `
    -InFile request.json `
    -Uri "https://automl.googleapis.com/v1/projects/PROJECT_ID/locations/us-central1/datasets/DATASET_ID:exportData" | Select-Object -Expand Content
Anda akan melihat output yang serupa dengan berikut ini: Anda dapat menggunakan ID operasi untuk mendapatkan status tugas. Sebagai contoh, lihat Bekerja dengan operasi yang berjalan lama.
{
  "name": "projects/PROJECT_ID/locations/us-central1/operations/OPERATION_ID",
  "metadata": {
    "@type": "type.googleapis.com/google.cloud.automl.v1.OperationMetadata",
    "createTime": "2019-08-12T18:52:31.637075Z",
    "updateTime": "2019-08-12T18:52:31.637075Z",
    "exportDataDetails": {
      "outputInfo": {
        "gcsOutputDirectory": "CLOUD_STORAGE_BUCKET/export_data-DATASET_NAME-TIMESTAMP_OF_EXPORT_CALL/"
      }
    }
  }
}
Go
Sebelum mencoba contoh ini, ikuti petunjuk penyiapan untuk bahasa ini di halaman Library Klien.
Java
Sebelum mencoba contoh ini, ikuti petunjuk penyiapan untuk bahasa ini di halaman Library Klien.
Node.js
Sebelum mencoba contoh ini, ikuti petunjuk penyiapan untuk bahasa ini di halaman Library Klien.
Python
Sebelum mencoba contoh ini, ikuti petunjuk penyiapan untuk bahasa ini di halaman Library Klien.
Bahasa tambahan
C# : Ikuti Petunjuk penyiapan C# di halaman library klien, lalu kunjungi Dokumentasi referensi Deteksi Objek Vision AutoML untuk .NET.
PHP : Ikuti petunjuk penyiapan PHP di halaman library klien, lalu kunjungi dokumentasi referensi Deteksi Objek AutoML Vision untuk PHP.
Ruby : Ikuti Petunjuk penyiapan Ruby di halaman library klien, lalu kunjungi Dokumentasi referensi Deteksi Objek AutoML Vision untuk Ruby.
Format CSV yang diekspor
File CSV yang diekspor berisi format yang sama dengan CSV impor data pelatihan:
set,path,label,x_min,y_min,x_max,y_min,x_max,y_max,x_min,y_max
File CSV ini disimpan di folder ekspor yang telah dibuat yang dibedakan berdasarkan stempel waktu yang unik. Berikut adalah beberapa baris contoh dari file CSV yang diekspor:
/export_data-salad_dataset-2019-05-29T18:12:18.750Z/image_object_detection_1.csv
TRAIN,gs://my-storage-bucket/img/img009.jpg,Cheese,0.643239,0.362779,0.662498,0.362779,0.662498,0.416544,0.643239,0.416544
TRAIN,gs://my-storage-bucket/img/img009.jpg,Salad,0.205697,0.255249,0.459074,0.255249,0.459074,0.775244,0.205697,0.775244
TEST,gs://my-storage-bucket/img/img118.jpg,Cheese,0.320334,0.501238,0.726751,0.501238,0.726751,0.741431,0.320334,0.741431
TEST,gs://my-storage-bucket/img/img118.jpg,Salad,0.0,0.037361,1.0,0.037361,1.0,0.926321,0.0,0.926321
TEST,gs://my-storage-bucket/img/img118.jpg,Cheese,0.358745,0.29076,0.740381,0.29076,0.740381,0.497936,0.358745,0.497936
TRAIN,gs://my-storage-bucket/img/img375.jpg,Tomato,0.027274,0.41247,0.43122,0.41247,0.43122,0.702593,0.027274,0.702593
VALIDATION,gs://my-storage-bucket/img/img852.jpg,Tomato,0.716958,0.178534,0.805999,0.178534,0.805999,0.329861,0.716958,0.329861
VALIDATION,gs://my-storage-bucket/img/img852.jpg,Tomato,0.858044,0.297255,0.950847,0.297255,0.950847,0.39173,0.858044,0.39173
VALIDATION,gs://my-storage-bucket/img/img852.jpg,Tomato,0.199644,0.624155,0.321919,0.624155,0.321919,0.796384,0.199644,0.796384
VALIDATION,gs://my-storage-bucket/img/img852.jpg,Cheese,0.399672,0.277189,0.600955,0.277189,0.600955,0.47032,0.399672,0.47032
Perlu diperhatikan bahwa hanya ada satu representasi kotak pembatas dan labelnya per baris. Informasi ini memberi tahu Anda hal berikut:
img009.jpg- berada dalam set LATIHAN dan berisi dua kotak pembatas dengan labelCheesedanSaladimg118.jpg- berada dalam set PENGUJIAN dan memiliki tiga kotak pembatas dengan labelCheese,Salad, danCheeseimg375.jpg- berada dalam set LATIHAN dan memiliki satu kotak pembatas dengan labelTomatoimg852.jpgberada dalam set VALIDASI dan memiliki 4 kotak pembatas yang berbeda dengan labelTomato,Tomato,Tomato, danCheese
Menghapus set data
Anda dapat menghapus resource set data menggunakan ID set data.
UI web
Di UI Deteksi Objek AutoML Vision, klik link Set Data di bagian atas menu navigasi sebelah kiri untuk menampilkan daftar set data yang tersedia.

Klik menu tiga titik di ujung kanan baris yang ingin Anda hapus, lalu pilih Hapus set data.
Klik Hapus di kotak dialog konfirmasi.
REST
Sebelum menggunakan salah satu data permintaan, lakukan penggantian berikut:
- project-id: project ID GCP Anda.
- dataset-id: ID set data Anda. ID adalah elemen terakhir dari nama
set data Anda. Contoh:
- nama set data:
projects/project-id/locations/location-id/datasets/3104518874390609379 - id set data:
3104518874390609379
- nama set data:
Metode HTTP dan URL:
DELETE https://automl.googleapis.com/v1/projects/PROJECT_ID/locations/us-central1/datasets/DATASET_ID
Untuk mengirim permintaan Anda, pilih salah satu opsi berikut:
curl
Jalankan perintah berikut:
curl -X DELETE \
     -H "Authorization: Bearer $(gcloud auth print-access-token)" \
     -H "x-goog-user-project: project-id" \
     "https://automl.googleapis.com/v1/projects/PROJECT_ID/locations/us-central1/datasets/DATASET_ID"
PowerShell
Jalankan perintah berikut:
$cred = gcloud auth print-access-token
$headers = @{ "Authorization" = "Bearer $cred"; "x-goog-user-project" = "project-id" }

Invoke-WebRequest `
    -Method DELETE `
    -Headers $headers `
    -Uri "https://automl.googleapis.com/v1/projects/PROJECT_ID/locations/us-central1/datasets/DATASET_ID" | Select-Object -Expand Content
Anda akan melihat output yang mirip dengan berikut ini. Anda dapat menggunakan ID operasi untuk mendapatkan status tugas. Sebagai contoh, lihat Bekerja dengan operasi yang berjalan lama.
{
  "name": "projects/PROJECT_ID/locations/us-central1/operations/OPERATION_ID",
  "metadata": {
    "@type": "type.googleapis.com/google.cloud.automl.v1.OperationMetadata",
    "createTime": "2019-11-08T22:37:19.822128Z",
    "updateTime": "2019-11-08T22:37:19.822128Z",
    "deleteDetails": {}
  },
  "done": true,
  "response": {
    "@type": "type.googleapis.com/google.protobuf.Empty"
  }
}
Go
Sebelum mencoba contoh ini, ikuti petunjuk penyiapan untuk bahasa ini di halaman Library Klien.
Java
Sebelum mencoba contoh ini, ikuti petunjuk penyiapan untuk bahasa ini di halaman Library Klien.
Node.js
Sebelum mencoba contoh ini, ikuti petunjuk penyiapan untuk bahasa ini di halaman Library Klien.
Python
Sebelum mencoba contoh ini, ikuti petunjuk penyiapan untuk bahasa ini di halaman Library Klien.
Bahasa tambahan
C# : Ikuti Petunjuk penyiapan C# di halaman library klien, lalu kunjungi Dokumentasi referensi Deteksi Objek Vision AutoML untuk .NET.
PHP : Ikuti petunjuk penyiapan PHP di halaman library klien, lalu kunjungi dokumentasi referensi Deteksi Objek AutoML Vision untuk PHP.
Ruby: Ikuti Petunjuk penyiapan Ruby di halaman client libraries lalu kunjungi Dokumentasi referensi Deteksi Objek AutoML Vision untuk Ruby.