A dataset contains representative samples of the type of content you want to classify, annotated with labels and bounding boxes. The dataset serves as the input for training a model.
The main steps for building a dataset are:
- Create a dataset and give it a memorable name.
- Import data examples into the dataset.
- Modify imported image annotations (optional) to add, delete, or modify bounding boxes and labels in your images.
Creating a dataset
The first step in creating a custom model with the AutoML API is to create an empty dataset that will eventually hold the training data for the model.
As of the General Availability (GA) release of AutoML Vision Object Detection this request returns the ID of a long-running operation.
After the long-running operation completes you can import images into it. The newly created dataset doesn't contain any data until you import images into it.
Save the dataset ID of the new dataset (from the response) for use with other operations, such as importing images into your dataset and training a model.
Web UI
The AutoML Vision Object Detection UI enables you to create a new dataset and import images into the dataset from the same page.Open the AutoML Vision Object Detection UI.
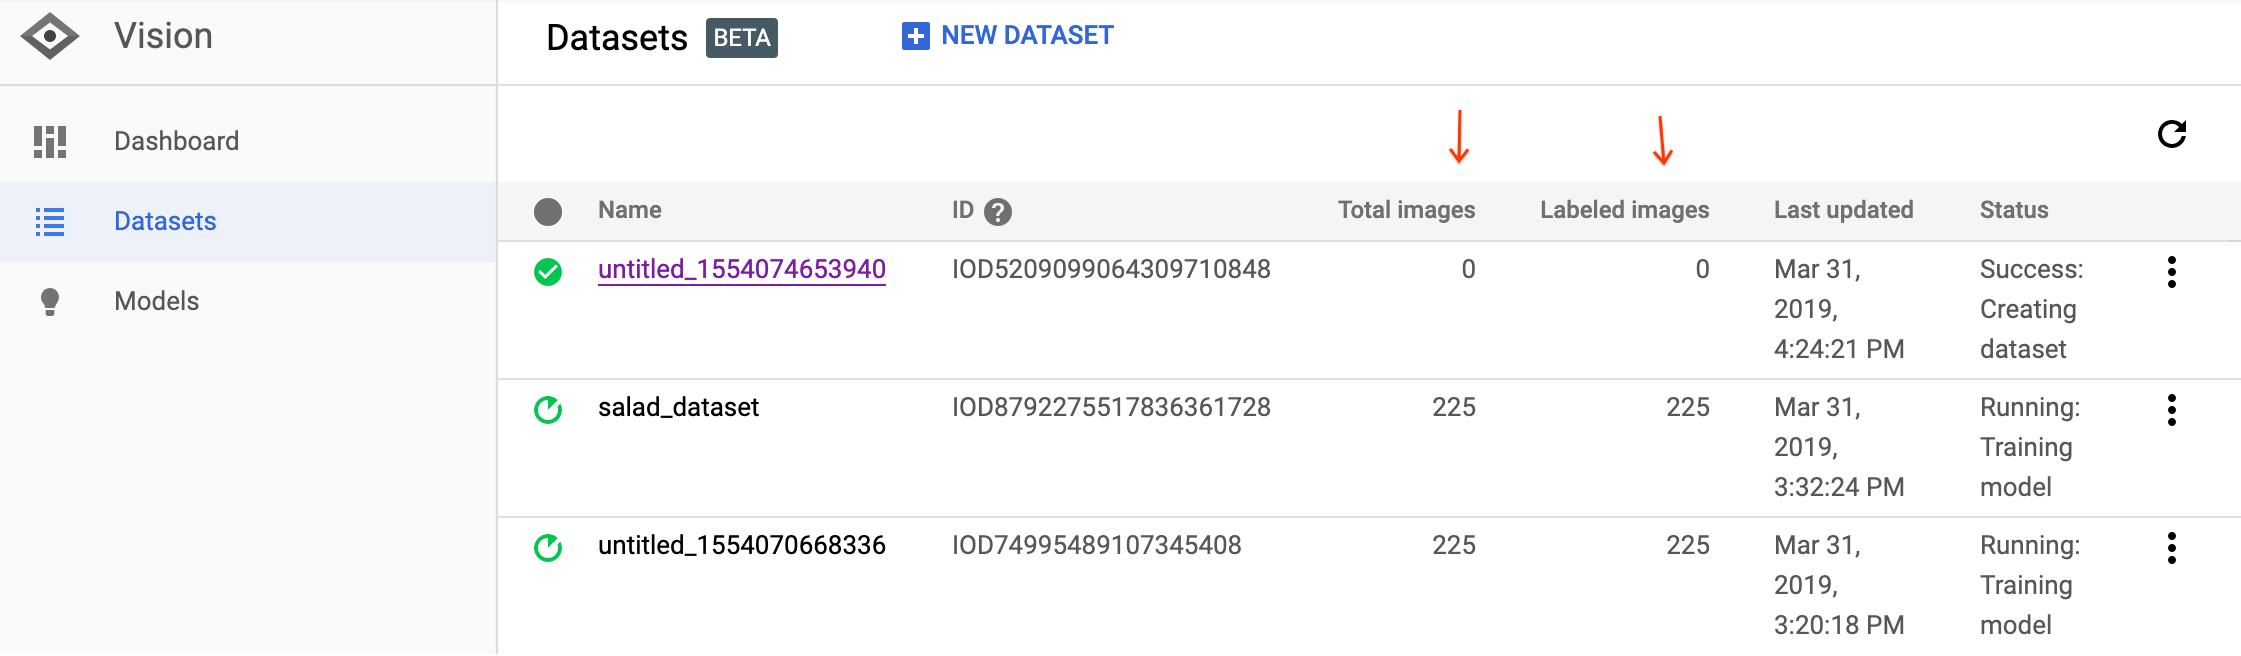
The Datasets page shows the status of previously created datasets for the current project.

To add a dataset for a different project, select the project from the drop-down list in the upper right of the title bar.
Click the New Dataset button in the title bar.
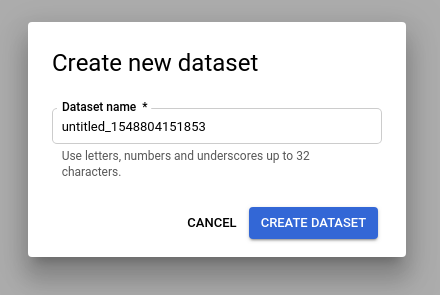
In the Create new dataset pop-up window, enter a name for the dataset and select the "Create dataset" option.
After creating an empty dataset you are taken to the Import tab in the dataset details page. You can then specify the Google Cloud Storage location of the .csv file listing training images to include in the dataset. These training images must similarly be stored in a Google Cloud Storage bucket.
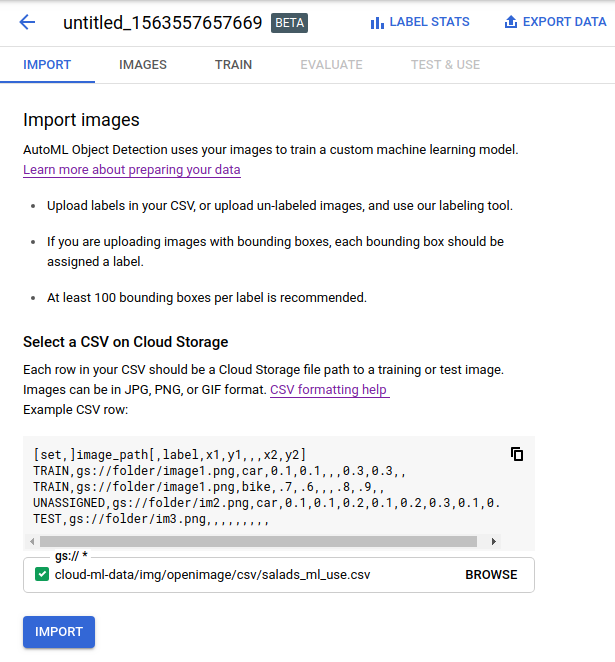
To create a dataset you must upload a .csv file that contains the training images with their associated bounding boxes and labels from Google Cloud Storage.
After import completes you can add, remove, or modify any annotations in the UI.
Select Import.
You're returned to the Datasets page; your dataset will show an in progress animation while your images are being imported. This process should take approximately 10 minutes per 1000 examples, but may take more or less time.
REST
Before using any of the request data, make the following replacements:
- project-id: your GCP project ID.
- display-name: a string display name of your choosing.
HTTP method and URL:
POST https://automl.googleapis.com/v1/projects/PROJECT_ID/locations/us-central1/datasets
Request JSON body:
{
  "displayName": "DISPLAY_NAME",
  "imageObjectDetectionDatasetMetadata": {
  }
}
To send your request, choose one of these options:
curl
Save the request body in a file named request.json,
and execute the following command:
curl -X POST \
     -H "Authorization: Bearer $(gcloud auth print-access-token)" \
     -H "x-goog-user-project: project-id" \
     -H "Content-Type: application/json; charset=utf-8" \
     -d @request.json \
     "https://automl.googleapis.com/v1/projects/PROJECT_ID/locations/us-central1/datasets"
PowerShell
Save the request body in a file named request.json,
and execute the following command:
$cred = gcloud auth print-access-token
$headers = @{ "Authorization" = "Bearer $cred"; "x-goog-user-project" = "project-id" }

Invoke-WebRequest `
    -Method POST `
    -Headers $headers `
    -ContentType: "application/json; charset=utf-8" `
    -InFile request.json `
    -Uri "https://automl.googleapis.com/v1/projects/PROJECT_ID/locations/us-central1/datasets" | Select-Object -Expand Content
You should see output similar to the following. You can use the operation ID
(IOD3819960680614725486, in this case) to get the status of the task. For an
example, see Working with long-running operations:
{
  "name": "projects/PROJECT_ID/locations/us-central1/operations/IOD3819960680614725486",
  "metadata": {
    "@type": "type.googleapis.com/google.cloud.automl.v1.OperationMetadata",
    "createTime": "2019-11-14T16:49:13.667526Z",
    "updateTime": "2019-11-14T16:49:13.667526Z",
    "createDatasetDetails": {}
  }
}
After the long-running operation completes you can get the dataset's ID with the same operation status request. The response should look similar to the following:
{
  "name": "projects/PROJECT_ID/locations/us-central1/operations/IOD3819960680614725486",
  "metadata": {
    "@type": "type.googleapis.com/google.cloud.automl.v1.OperationMetadata",
    "createTime": "2019-11-14T16:49:13.667526Z",
    "updateTime": "2019-11-14T16:49:17.975314Z",
    "createDatasetDetails": {}
  },
  "done": true,
  "response": {
    "@type": "type.googleapis.com/google.cloud.automl.v1.Dataset",
    "name": "projects/PROJECT_ID/locations/us-central1/datasets/IOD5496445433112696489"
  }
}
Go
Before trying this sample, follow the setup instructions for this language on the Client Libraries page.
Java
Before trying this sample, follow the setup instructions for this language on the Client Libraries page.
Node.js
Before trying this sample, follow the setup instructions for this language on the Client Libraries page.
Python
Before trying this sample, follow the setup instructions for this language on the Client Libraries page.
Additional languages
C#: Please follow the C# setup instructions on the client libraries page and then visit the AutoML Vision Object Detection reference documentation for .NET.
PHP: Please follow the PHP setup instructions on the client libraries page and then visit the AutoML Vision Object Detection reference documentation for PHP.
Ruby: Please follow the Ruby setup instructions on the client libraries page and then visit the AutoML Vision Object Detection reference documentation for Ruby.
Importing images into a dataset
After you have created a dataset, you can import image URIs and labeled bounding boxes for images from a CSV file stored in a Google Cloud Storage bucket.
For details on preparing your data and creating a CSV file for import, see Preparing your training data. For details on modifying image annotations after the images are imported, see Annotating imported training images.
You can import images into an empty dataset or a dataset that already contains training images.
Web UI
For AutoML Vision Object Detection dataset creation and image import are combined in consecutive steps in the UI.
Importing images into an empty dataset:
For subsequent dataset creation you are prompted to import images directly after creating an empty dataset, but this import step is not required at that time.
To import images into an empty dataset, complete the following steps:
Select the empty dataset from the Datasets page.
On the Import page, add the Google Cloud Storage location of your .csv file. After you indicate the location of your .csv file on Google Cloud Storage select Import to begin the file import process.
Importing images into a non-empty dataset:
You have the option to add more training images to a dataset that already contains training images.
To add training images to a non-empty dataset, complete the following steps:
Select the non-empty dataset from the Datasets page.

Selecting the non-empty dataset will take you to the Dataset details page.
On the Dataset details page, select the Import tab.
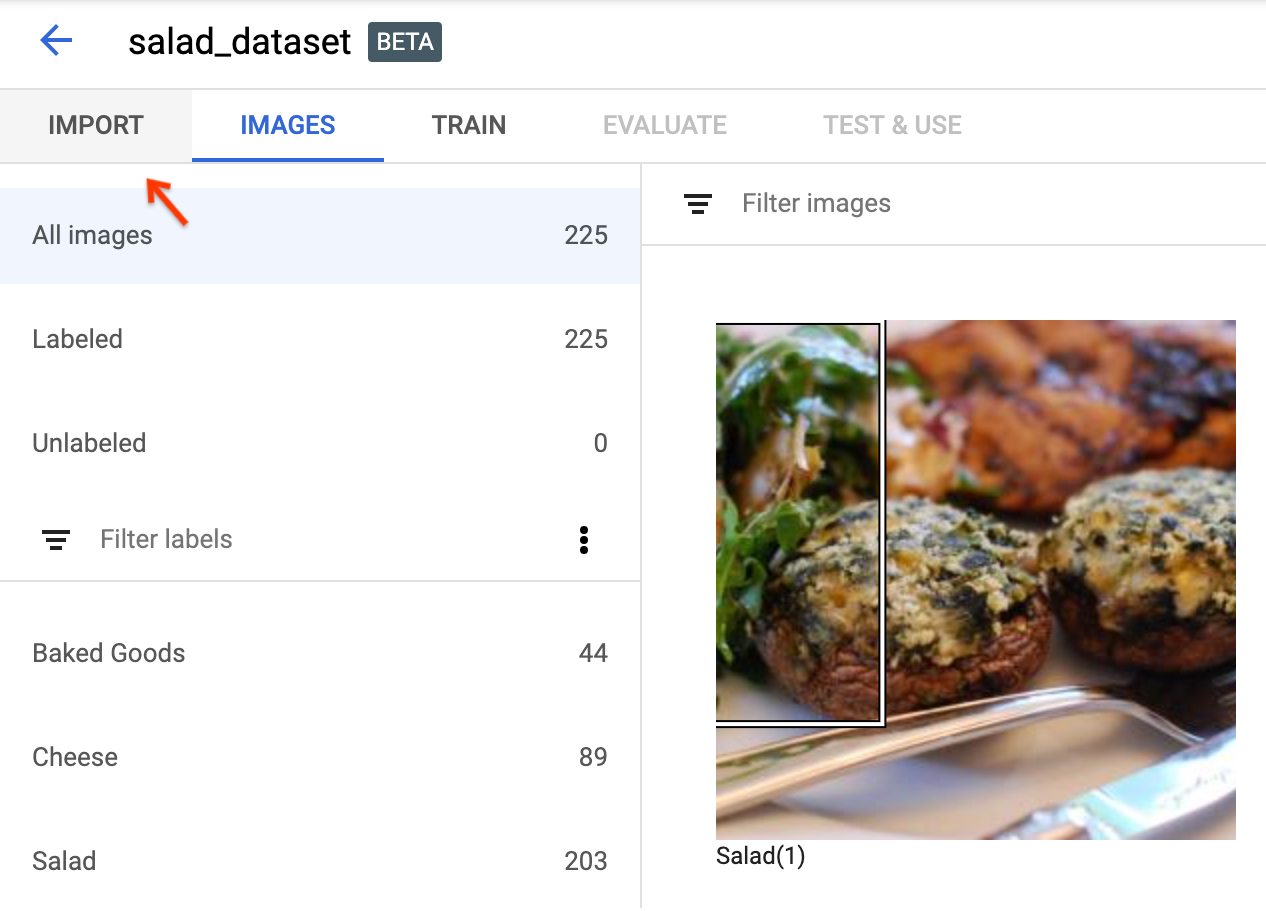
Selecting the Import tab will take you to the Create dataset page. You can then specify the Google Cloud Storage location of your .csv file and select Import to begin the image import process.
REST
Before using any of the request data, make the following replacements:
- project-id: your GCP project ID.
- dataset-id: the ID of your dataset. The ID is the last element of the name
of your dataset. For example:
- dataset name:
projects/project-id/locations/location-id/datasets/3104518874390609379 - dataset id:
3104518874390609379
- dataset name:
- input-storage-path: the path to a CSV file stored on Google Cloud Storage. The requesting user must have at least read permission to the bucket.
HTTP method and URL:
POST https://automl.googleapis.com/v1/projects/PROJECT_ID/locations/us-central1/datasets/DATASET_ID:importData
Request JSON body:
{
  "inputConfig": {
    "gcsSource": {
       "inputUris": ["INPUT_STORAGE_PATH"]
    }
  }
}
To send your request, choose one of these options:
curl
Save the request body in a file named request.json,
and execute the following command:
curl -X POST \
     -H "Authorization: Bearer $(gcloud auth print-access-token)" \
     -H "x-goog-user-project: project-id" \
     -H "Content-Type: application/json; charset=utf-8" \
     -d @request.json \
     "https://automl.googleapis.com/v1/projects/PROJECT_ID/locations/us-central1/datasets/DATASET_ID:importData"
PowerShell
Save the request body in a file named request.json,
and execute the following command:
$cred = gcloud auth print-access-token
$headers = @{ "Authorization" = "Bearer $cred"; "x-goog-user-project" = "project-id" }

Invoke-WebRequest `
    -Method POST `
    -Headers $headers `
    -ContentType: "application/json; charset=utf-8" `
    -InFile request.json `
    -Uri "https://automl.googleapis.com/v1/projects/PROJECT_ID/locations/us-central1/datasets/DATASET_ID:importData" | Select-Object -Expand Content
You should see output similar to the following. You can use the operation ID to get the status of the task. For an example, see Working with long-running operations.
{
  "name": "projects/PROJECT_ID/locations/us-central1/operations/OPERATION_ID",
  "metadata": {
    "@type": "type.googleapis.com/google.cloud.automl.v1.OperationMetadata",
    "createTime": "2018-10-29T15:56:29.176485Z",
    "updateTime": "2018-10-29T15:56:29.176485Z",
    "importDataDetails": {}
  }
}
Go
Before trying this sample, follow the setup instructions for this language on the Client Libraries page.
Java
Before trying this sample, follow the setup instructions for this language on the Client Libraries page.
Node.js
Before trying this sample, follow the setup instructions for this language on the Client Libraries page.
Python
Before trying this sample, follow the setup instructions for this language on the Client Libraries page.
Additional languages
C#: Please follow the C# setup instructions on the client libraries page and then visit the AutoML Vision Object Detection reference documentation for .NET.
PHP: Please follow the PHP setup instructions on the client libraries page and then visit the AutoML Vision Object Detection reference documentation for PHP.
Ruby: Please follow the Ruby setup instructions on the client libraries page and then visit the AutoML Vision Object Detection reference documentation for Ruby.
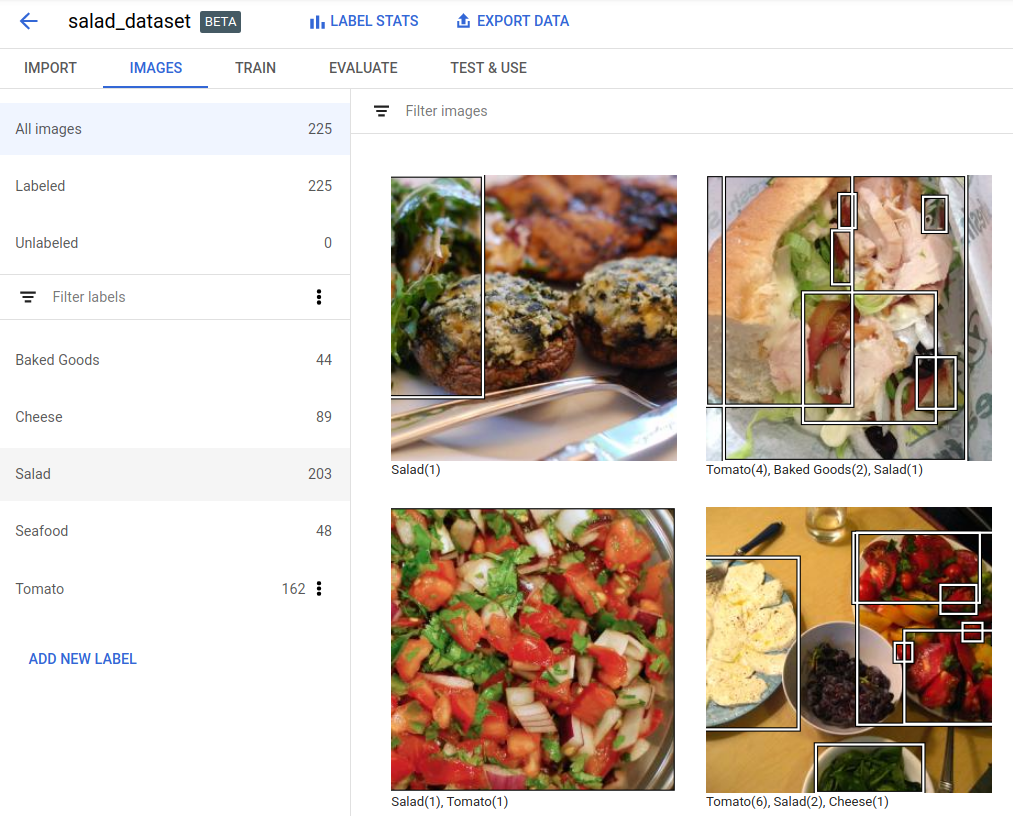
The Annotating imported training images topic explains how to manually add bounding boxes and labels to images in the UI, as well as how to list label statistics.
The Managing datasets topic includes more information about using a dataset resource, such as how to list, get, export, or delete datasets.
Working with long-running operations
REST
Before using any of the request data, make the following replacements:
- project-id: your GCP project ID.
- operation-id: the ID of your operation. The ID is the last element of the name
of your operation. For example:
- operation name:
projects/project-id/locations/location-id/operations/IOD5281059901324392598 - operation id:
IOD5281059901324392598
- operation name:
HTTP method and URL:
GET https://automl.googleapis.com/v1/projects/PROJECT_ID/locations/us-central1/operations/OPERATION_ID
To send your request, choose one of these options:
curl
Execute the following command:
curl -X GET \
     -H "Authorization: Bearer $(gcloud auth print-access-token)" \
     -H "x-goog-user-project: project-id" \
     "https://automl.googleapis.com/v1/projects/PROJECT_ID/locations/us-central1/operations/OPERATION_ID"
PowerShell
Execute the following command:
$cred = gcloud auth print-access-token
$headers = @{ "Authorization" = "Bearer $cred"; "x-goog-user-project" = "project-id" }

Invoke-WebRequest `
    -Method GET `
    -Headers $headers `
    -Uri "https://automl.googleapis.com/v1/projects/PROJECT_ID/locations/us-central1/operations/OPERATION_ID" | Select-Object -Expand Content
{
  "name": "projects/PROJECT_ID/locations/us-central1/operations/OPERATION_ID",
  "metadata": {
    "@type": "type.googleapis.com/google.cloud.automl.v1.OperationMetadata",
    "createTime": "2018-10-29T15:56:29.176485Z",
    "updateTime": "2018-10-29T16:10:41.326614Z",
    "importDataDetails": {}
  },
  "done": true,
  "response": {
    "@type": "type.googleapis.com/google.protobuf.Empty"
  }
}
You should see output similar to the following for a completed create model operation:
{
  "name": "projects/PROJECT_ID/locations/us-central1/operations/OPERATION_ID",
  "metadata": {
    "@type": "type.googleapis.com/google.cloud.automl.v1.OperationMetadata",
    "createTime": "2019-07-22T18:35:06.881193Z",
    "updateTime": "2019-07-22T19:58:44.972235Z",
    "createModelDetails": {}
  },
  "done": true,
  "response": {
    "@type": "type.googleapis.com/google.cloud.automl.v1.Model",
    "name": "projects/PROJECT_ID/locations/us-central1/models/MODEL_ID"
  }
}
Go
Before trying this sample, follow the setup instructions for this language on the APIs & Reference > Client Libraries page.
Java
Before trying this sample, follow the setup instructions for this language on the APIs & Reference > Client Libraries page.
Node.js
Before trying this sample, follow the setup instructions for this language on the APIs & Reference > Client Libraries page.
Python
Before trying this sample, follow the setup instructions for this language on the APIs & Reference > Client Libraries page.
Additional languages
C#: Please follow the C# setup instructions on the client libraries page and then visit the AutoML Vision reference documentation for .NET.
PHP: Please follow the PHP setup instructions on the client libraries page and then visit the AutoML Vision reference documentation for PHP.
Ruby: Please follow the Ruby setup instructions on the client libraries page and then visit the AutoML Vision reference documentation for Ruby.