Introduction
This beginner's guide introduces AutoML. To understand key differences between AutoML and custom training, see Choosing a training method.
Imagine:
- You're in the marketing department for a digital retailer.
- You're working on an architectural project that identifies types of buildings.
- Your business has a contact form on its website.
Manually curating images and tables is tedious and time consuming. Teach a computer to automatically identify and flag the content.
Image
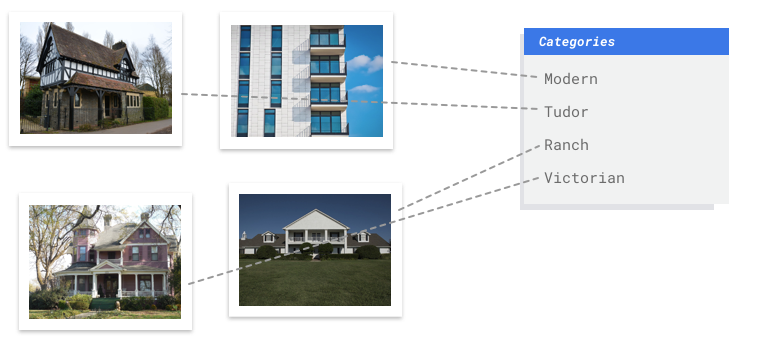
You work with an architectural preservation board that's attempting to identify
neighborhoods that have a consistent architectural style in your city. You have hundreds of
thousands of snapshots of homes to sift through. However, it's tedious and error-prone when
trying to categorize all these images by hand. An intern labeled a few hundred of them a
few months ago, but nobody else has looked at the data. It'd be so useful if you could just teach
your computer to do this review for you!
Tabular
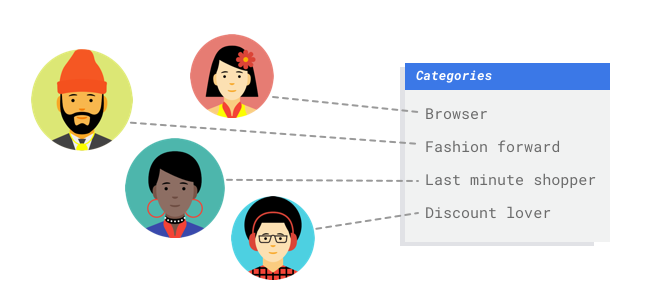
You work in the marketing department for a digital retailer. You and your team are
creating a personalized email program based on customer personas. You've created the personas
and the marketing emails are ready to go. Now you must create a system that buckets customers
into each persona based on retail preferences and spending behavior, even when they're new
customers. To maximize customer engagement, you also want to predict their spending habits so you
can optimize when to send them the emails.
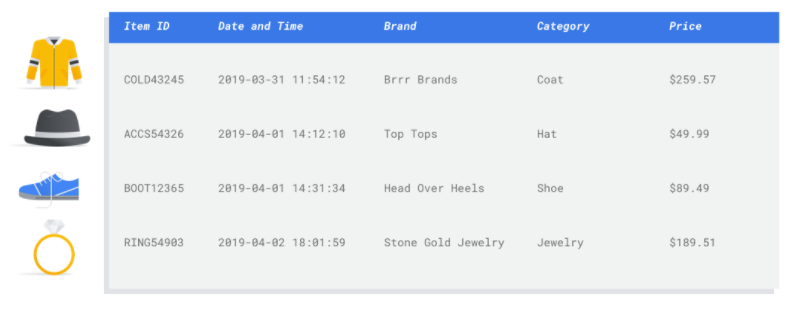
Because you're a digital retailer, you have data on your customers and the purchases they've made. But what about new customers? Traditional approaches can calculate these values for existing customers with long purchase histories, but don't do well with customers with little historical data. What if you could create a system to predict these values and increase the speed at which you deliver personalized marketing programs to all your customers?
Fortunately, machine learning and Vertex AI is well positioned to solve these problems.
This guide walks you through how Vertex AI works for AutoML datasets and models, and illustrates the kinds of problems Vertex AI solves.
A note about fairness
Google is committed to making progress in following responsible AI practices. To achieve this, our ML products, including AutoML, are designed around core principles such as fairness and human-centered machine learning. For more information about best practices for mitigating bias when building your own ML system, see Inclusive ML guide - AutoML
Why is Vertex AI the right tool for this problem?
Classical programming requires the programmer to specify step-by-step instructions for a computer to follow. So much variation exists in color, angle, resolution, and lighting that it requires coding far too many rules to tell a machine how to make the correct decision. It's hard to imagine where you'd even begin. Or, customer comments use a broad and varied vocabulary and structure, and are too diverse for a simple set of rules to capture. If you try to build manual filters, you quickly find that you aren't able to categorize most of your customer comments. You need a system that can generalize to a wide variety of comments. In a scenario where a sequence of specific rules is bound to expand exponentially, you need a system that can learn from examples.
Fortunately, machine learning solves these problems.
How does Vertex AI work?
Vertex AI involves supervised learning tasks to achieve a chosen outcome. The specifics of the algorithm and training methods change based on the data type and use case. Many different subcategories of machine learning exist, all of which solve different problems and work within different constraints.
Image
You train, test, and validate the machine learning model with example images that are annotated with labels for classification, or annotated with labels and bounding boxes for object detection. Using supervised learning, you can train a model to recognize the patterns and content that you care about in images.
Tabular
You train a machine learning model with example data. Vertex AI
uses tabular (structured) data to train a machine learning model to make
inferences on new data. One column from your dataset, called the target, is
what your model will learn to predict. Some number of the other data columns
are inputs (called features) that the model will learn patterns from. You can
use the same input features to build multiple kinds of models just by changing
the target column and training options. From the email marketing example, this
means you could build models with the same input features but with different
target inferences. One model could predict a customer's persona (a
categorical target), another model could predict their monthly spending (a
numerical target), and another could forecast daily demand of your products
for the next three months (series of numerical targets).
Vertex AI workflow
Vertex AI uses a standard machine learning workflow:
- Gather your data: Determine the data you need for training and testing your model based on the outcome you want to achieve.
- Prepare your data: Make sure your data is properly formatted and labeled.
- Train: Set parameters and build your model.
- Evaluate: Review model metrics.
- Deploy and predict: Make your model available to use.
Data Preparation
But before you start gathering your data, think about the problem you are trying to solve. This informs your data requirements.
Assess your use case
Start with your problem: What outcome do you want to achieve?
Image
While putting together the dataset, always start with your use case. You can begin with the following questions:
- What is the outcome you're trying to achieve?
- What kinds of categories or objects would you need to recognize to achieve this outcome?
- Is it possible for humans to recognize those categories? Although Vertex AI can handle a greater magnitude of categories than humans can remember and assign at any one time, if a human cannot recognize a specific category, then Vertex AI will have a hard time as well.
- What kinds of examples would best reflect the type and range of data your system will see and try to classify?
Tabular
What kind of data is the target column? How much data do you have access to? Depending on yours answers, Vertex AI creates the necessary model to solve your use case:
- A binary classification model predicts a binary outcome (one of two classes). Use this for yes or no questions, for example, predicting whether a customer would buy a subscription (or not). All else being equal, a binary classification problem requires less data than other model types.
- A multi-class classification model predicts one class from three or more discrete classes. Use this to categorize things. For the retail example, you'd want to build a multi-class classification model to segment customers into different personas.
- A forecasting model predicts a sequence of values. For example, as a retailer, you might want to forecast daily demand of your products for the next 3 months so that you can appropriately stock product inventories in advance.
- A regression model predicts a continuous value. For the retail example, you'd want to build a regression model to predict how much a customer will spend next month.
Gather your data
After you establish your use case, gather the data that lets you create the model you want.
Image
 After you've established what data you need, you have to find a way to source it. You can
begin by considering all the data your organization collects. You may find that you're
already collecting the relevant data you need to train a model. In case you don't have that data,
you can obtain it manually or outsource it to a third-party provider.
Include enough labeled examples in each category
 The bare minimum required by Vertex AI Training is 100 image examples per category/label for classification.
The likelihood of successfully recognizing a label goes up with the number of high-quality
examples for each; in general, the more labeled data you can bring to the training process,
the better your model will be. Target at least 1000 examples per label.
Distribute examples equally across categories
It's important to capture roughly similar amounts of training examples for each category. Even
if you have an abundance of data for one label, it is best to have an equal distribution for
each label. To see why, imagine that 80% of the images you use to build your model are pictures
of single-family homes in a modern style. With such an unbalanced distribution of labels, your
model is very likely to learn that it's safe to always tell you a photo is of a modern
single-family house, rather than going out on a limb to try to predict a much less common label.
It's like writing a multiple-choice test where almost all the correct answers are "C" - soon
your savvy test-taker will figure out it can answer "C" every time without even looking at
the question.
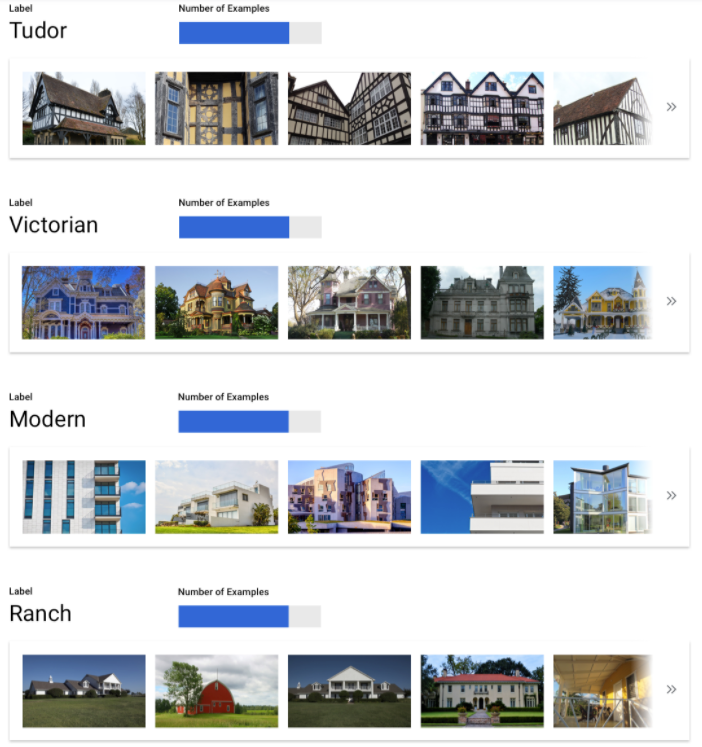
We understand it may not always be possible to source an approximately equal number of examples for each label. High quality, unbiased examples for some categories may be harder to source. In those circumstances, you can follow this rule of thumb - the label with the lowest number of examples should have at least 10% of the examples as the label with the highest number of examples. So if the largest label has 10,000 examples, the smallest label should have at least 1,000 examples.
Capture the variation in your problem space
For similar reasons, try to ensure that your data captures the variety and diversity of your
problem space. The broader a selection the model training process gets to see, the more readily
it will generalize to new examples. For example, if you're trying to classify photos of consumer
electronics into categories, the wider a variety of consumer electronics the model is exposed to
in training, the more likely it'll be able to distinguish between a novel model of tablet,
phone, or laptop, even if it's never seen that specific model before.

Match data to the intended output for your model

Find images that are visually similar to what you're planning to make inferences on. If you are
trying to classify house images that were all taken in snowy winter weather, you probably won't
get great performance from a model trained only on house images taken in sunny weather even if
you've tagged them with the classes you're interested in, as the lighting and scenery may be
different enough to affect performance. Ideally, your training examples are real-world data
drawn from the same dataset you're planning to use the model to classify.
Tabular
 After you've established your use case, you'll need to gather data to train your model.
Data sourcing and preparation are critical steps for building a machine learning model.
The data you have available informs the kind of problems you can solve. How much data do
you have available? Are your data relevant to the questions you're trying to answer? While
gathering your data, keep in mind the following key considerations.
Select relevant features
A feature is an input attribute used for model training. Features are how your model identifies patterns to make inferences, so they need to be relevant to your problem. For example, to build a model that predicts whether a credit card transaction is fraudulent or not, you'll need to build a dataset that contains transaction details like the buyer, seller, amount, date and time, and items purchased. Other helpful features could be historic information about the buyer and seller, and how often the item purchased has been involved in fraud. What other features might be relevant?
Consider the retail email marketing use case from the introduction. Here's some feature columns you might require:
- List of items purchased (including brands, categories, prices, discounts)
- Number of items purchased (last day, week, month, year)
- Sum of money spent (last day, week, month, year)
- For each item, total number sold each day
- For each item, total in stock each day
- Whether you're running a promotion for a particular day
- Known demographic profile of shopper
Include enough data
 In general, the more training examples you have, the better your outcome. The amount of example
data required also scales with the complexity of the problem you're trying to solve. You won't
need as much data to get an accurate binary classification model compared to a multi-class model
because it's less complicated to predict one class from two rather than many.
There's no perfect formula, but there are recommended minimums of example data:
- Classification problem: 50 rows x the number features
- Forecasting problem:
- 5000 rows x the number of features
- 10 unique values in the time series identifier column x the number of features
- Regression problem: 200 x the number of features
Capture variation
Your dataset should capture the diversity of your problem space. The more diverse examples a model sees during training, the more readily it can generalize to new or less common examples. Imagine if your retail model was trained only using purchase data from the winter. Would it be able to successfully predict summer clothing preferences or purchase behaviors?
Prepare your data
Image
 After you've decided which is right for you—a manual or the default split—you can add data in
Vertex AI by using one of the following methods:
- You can import data either from your computer or from Cloud Storage in an available format (CSV or JSON Lines) with the labels (and bounding boxes, if necessary) inline. For more information on import file format, see Preparing your training data. If you want to split your dataset manually, you can specify the splits in your CSV or JSON Lines import file.
- If your data hasn't been annotated, you can upload unlabeled images and use the Google Cloud console to apply annotations. You can manage these annotations in multiple annotation sets for the same set of images. For example, for a single set of images you can have one annotation set with bounding box and label information to do object detection, and also have another annotation set with just label annotations for classification.
Tabular
 After you've identified your available data, you need to make sure it's ready for training.
If your data is biased or contains missing or erroneous values, this affects the quality of
the model. Consider the following before you start training your model.
Learn more.
Prevent data leakage and training-serving skew
Data leakage is when you use input features during training that "leak" information about the target that you are trying to predict which is unavailable when the model is actually served. This can be detected when a feature that is highly correlated with the target column is included as one of the input features. For example, if you're building a model to predict whether a customer will sign up for a subscription in the next month and one of the input features is a future subscription payment from that customer. This can lead to strong model performance during testing, but not when deployed in production, since future subscription payment information isn't available at serving time.
Training-serving skew is when input features used during training time are different from the ones provided to the model at serving time, causing poor model quality in production. For example, building a model to predict hourly temperatures but training with data that only contains weekly temperatures. Another example: always providing a student's grades in the training data when predicting student dropout, but not providing this information at serving time.
Understanding your training data is important to preventing data leakage and training-serving skew:
- Before using any data, make sure you know what the data means and whether or not you should use it as a feature
- Check the correlation in the Train tab. High correlations should be flagged for review.
- Training-serving skew: make sure you only provide input features to the model that are available in the exact same form at serving time.
Clean up missing, incomplete, and inconsistent data
It's common to have missing and inaccurate values in your example data. Take time to review and, when possible, improve your data quality before using it for training. The more missing values, the less useful your data will be for training a machine learning model.
- Check your data for missing values and correct them if possible, or leave the value blank if the column is set to be nullable. Vertex AI can handle missing values, but you are more likely to get optimal results if all values are available.
- For forecasting, check that the interval between training rows is consistent. Vertex AI can impute missing values, but you are more likely to get optimal results if all rows are available.
- Clean your data by correcting or deleting data errors or noise. Make your data consistent: Review spelling, abbreviations, and formatting.
Analyze your data after importing
Vertex AI provides an overview of your dataset after it's been imported. Review your imported dataset to make sure each column has the correct variable type. Vertex AI will automatically detect the variable type based on the columns values, but it's best to review each one. You should also review each column's nullability, which determines whether a column can have missing or NULL values.
Train model
Image
Consider how Vertex AI uses your dataset in creating a custom model
Your dataset contains training, validation and testing sets. If you do not specify the splits
(see Prepare your data), then Vertex AI automatically uses 80% of your images for training,
10% for validating, and 10% for testing.

Training Set
 The vast majority of your data should be in the training set. This is the data your model "sees"
during training: it's used to learn the parameters of the model, namely the weights of the
connections between nodes of the neural network.
Validation Set
 The validation set, sometimes also called the "dev" set, is also used during the training process.
After the model learning framework incorporates training data during each iteration of the
training process, it uses the model's performance on the validation set to tune the model's
hyperparameters, which are variables that specify the model's structure. If you tried to use the
training set to tune the hyperparameters, it's quite likely the model would end up overly focused
on your training data, and have a hard time generalizing to examples that don't exactly match it.
Using a somewhat novel dataset to fine-tune model structure means your model will generalize
better.
Test Set
 The test set is not involved in the training process at all. Once the model has completed its
training entirely, we use the test set as an entirely new challenge for your model. The
performance of your model on the test set is intended to give you a pretty good idea of how your
model will perform on real-world data.
Manual splitting
 You can also split your dataset yourself. Manually splitting your data is a good choice when
you want to exercise more control over the process or if there are specific examples that you're
sure you want included in a certain part of your model training lifecycle.
Tabular
After your dataset is imported, the next step is to train a model. Vertex AI will generate a reliable machine learning model with the training defaults, but you may want to adjust some of the parameters based on your use case.
Try to select as many feature columns as possible for training, but review each to make sure that it's appropriate for training. Keep in mind the following for feature selection:
- Don't select feature columns that will create noise, like randomly assigned identifier columns with a unique value for each row.
- Make sure you understand each feature column and its values.
- If you're creating multiple models from one dataset, remove target columns that aren't part of the current inference problem.
- Recall the fairness principles: Are you training your model with a feature that could lead to biased or unfair decision-making for marginalized groups?
How Vertex AI uses your dataset
Your dataset will be split into training, validation and testing sets. The
default split Vertex AI applies depends on the type of model that
you are training. You can also specify the splits (manual splits) if
necessary. For more information, see About data splits for AutoML
models.

Training Set
 The vast majority of your data should be in the training set. This is the data your model "sees"
during training: it's used to learn the parameters of the model, namely the weights of the
connections between nodes of the neural network.
Validation Set
 The validation set, sometimes also called the "dev" set, is also used during the training process.
After the model learning framework incorporates training data during each iteration of the
training process, it uses the model's performance on the validation set to tune the model's
hyperparameters, which are variables that specify the model's structure. If you tried to use the
training set to tune the hyperparameters, it's quite likely the model would end up overly focused
on your training data, and have a hard time generalizing to examples that don't exactly match it.
Using a somewhat novel dataset to fine-tune model structure means your model will generalize
better.
Test Set
 The test set is not involved in the training process at all. After the model has completed its
training entirely, Vertex AI uses the test set as an entirely new challenge for your model.
The performance of your model on the test set is intended to give you a pretty good idea of how
your model will perform on real-world data.
Evaluate, test, and deploy your model
Evaluate model
Image
After your model is trained, you will receive a summary of the model's performance. Click evaluate or see full evaluation to view a detailed analysis.
 Debugging a model is more about debugging the data than the model itself. If at any point your
model starts acting in an unexpected manner as you're evaluating its performance before and
after pushing to production, you should return and check your data to see where it might be
improved.
What kinds of analysis can I perform in Vertex AI?
In the Vertex AI evaluate section, you can assess your custom model's performance using the model's output on test examples, and common machine learning metrics. In this section, we will cover what each of these concepts mean.
- The model output
- The score threshold
- True positives, true negatives, false positives, and false negatives
- Precision and recall
- Precision/recall curves
- Average precision
How do I interpret the model's output?
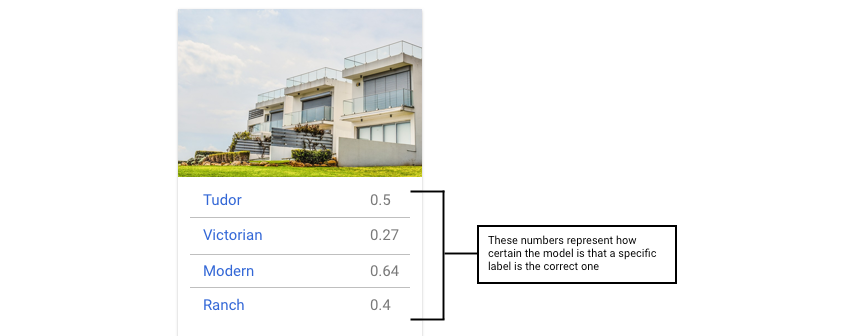
Vertex AI pulls examples from your test data to present entirely new challenges for your
model. For each example, the model outputs a series of numbers that communicate how strongly it
associates each label with that example. If the number is high, the model has high confidence
that the label should be applied to that document.
What is the Score Threshold?
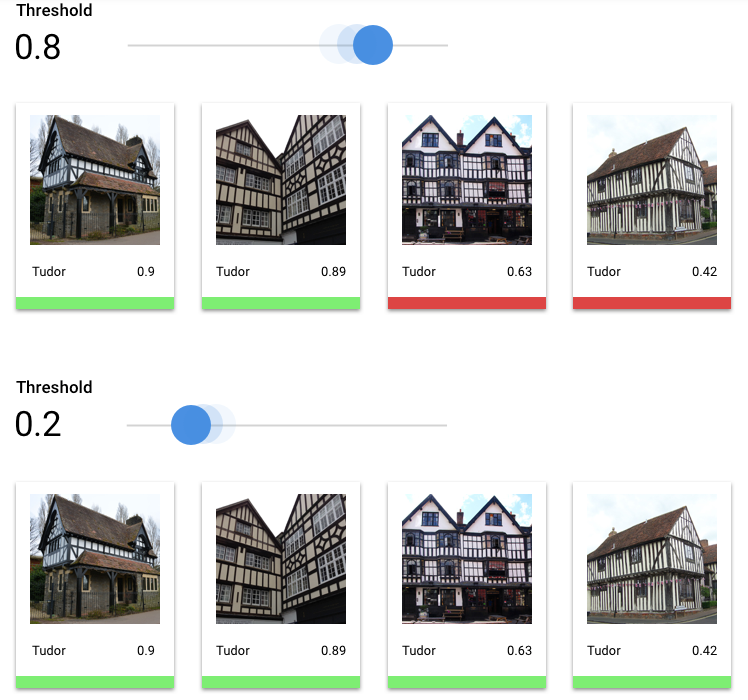
We can convert these probabilities into binary 'on'/'off' values by setting a score threshold.
The score threshold refers to the level of confidence the model must have to assign a category to
a test item. The score threshold slider in the Google Cloud console is a visual tool to test
the effect of different thresholds for all categories and individual categories in your dataset.
If your score threshold is low, your model will classify more images, but runs the risk of
misclassifying a few images in the process. If your score threshold is high, your model classifies
fewer images, but it has a lower risk of misclassifying images. You can tweak the per-category
thresholds in the Google Cloud console to experiment. However, when using your model in
production, you must enforce the thresholds you found optimal on your side.
What are True Positives, True Negatives, False Positives, False Negatives?
After applying the score threshold, the inferences made by your model will fall in one of the
following four categories:
The thresholds you found optimal on your side.
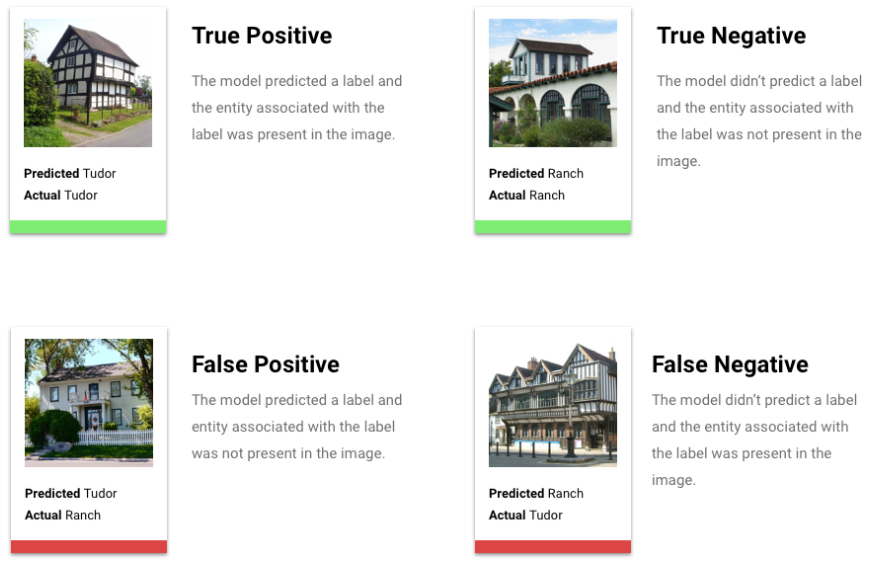
We can use these categories to calculate precision and recall — metrics that help us gauge the effectiveness of our model.
What are precision and recall?
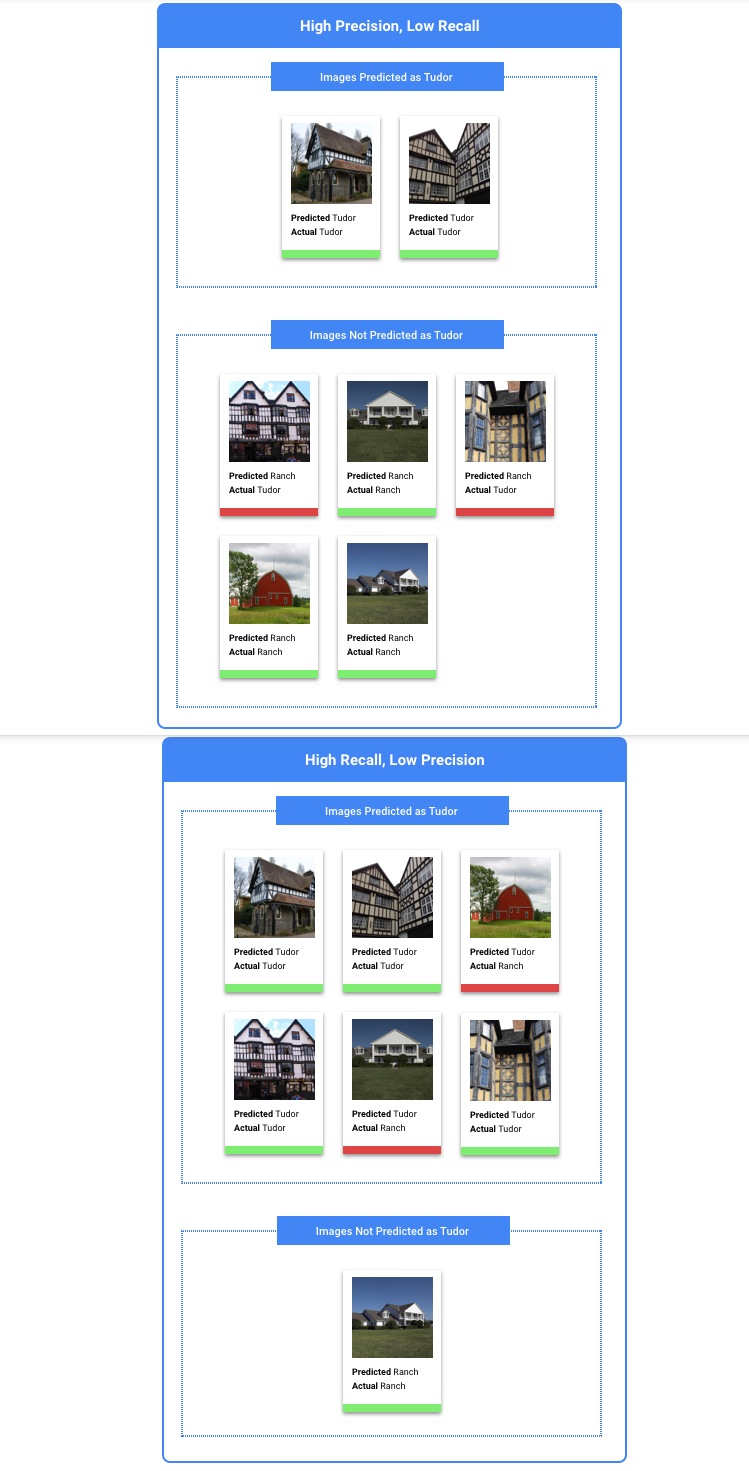
Precision and recall help us understand how well our model is capturing information, and how much
it's leaving out. Precision tells us, from all the test examples that were assigned a label, how
many actually were supposed to be categorized with that label. Recall tells us, from all the test
examples that should have had the label assigned, how many were actually assigned the label.
Should I optimize for precision or recall?
Depending on your use case, you may want to optimize for either precision or recall. Consider the following two use cases when deciding which approach works best for you.
Use Case: Privacy in images
Suppose you want to create a system that automatically detects sensitive information and blurs it out.

False positives in this case would be, things that don't need to be blurred that get blurred,
which can be annoying but not detrimental.

False negatives in this case would be things that need to be blurred that fail to get blurred, like a credit card, which can lead to identity theft.
In this case, you would want to optimize for recall. This metric measures, for all the inferences made, how much is being left out. A high-recall model is likely to label marginally relevant examples. This is useful for cases where your category has scarce training data.
Use case: Stock photo search
Suppose you want to create a system that finds the best stock photo for a given keyword.

A false positive in this case would be returning an irrelevant image. Since your product prides itself on returning only the best-match images, this would be a major failure.

A false negative in this case would be failing to return a relevant image for a keyword search. Since many search terms have thousands of photos that are a strong potential match, this is fine.
In this case, you would want to optimize for precision. This metric measures, for all the inferences made, how correct they are. A high-precision model is likely to label only the most relevant examples, which is useful for cases where your class is common in the training data.
How do I use the Confusion Matrix?
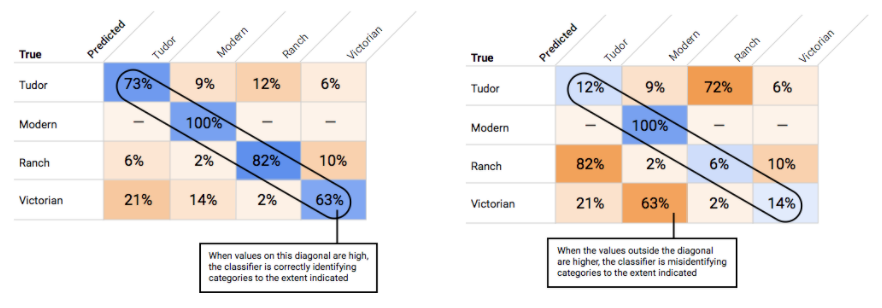
How do I interpret the precision-recall curves?
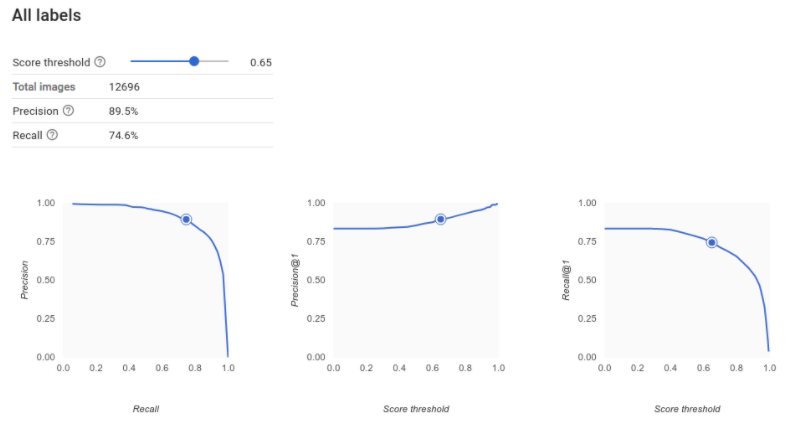
The score threshold tool lets you explore how your chosen score threshold affects
precision and recall. As you drag the slider on the score threshold bar, you can see where that
threshold places you on the precision-recall tradeoff curve, as well as how that threshold
affects your precision and recall individually (for multiclass models, on these graphs, precision
and recall means the only label used to calculate precision and recall metrics is the top-scored
label in the set of labels we return). This can help you find a good balance between false
positives and false negatives.
Once you've chosen a threshold that seems to be acceptable for your model as a whole, click the individual labels and see where that threshold falls on their per-label precision-recall curve. In some cases, it might mean you get a lot of incorrect inferences for a few labels, which might help you decide to choose a per-class threshold that's customized to those labels. For example, say you look at your houses dataset and notice that a threshold at 0.5 has reasonable precision and recall for every image type except "Tudor", perhaps because it's a very general category. For that category, you see tons of false positives. In that case, you might decide to use a threshold of 0.8 just for "Tudor" when you call the classifier for inferences.
What is average precision?
A useful metric for model accuracy is the area under the precision-recall curve. It measures how well your model performs across all score thresholds. In Vertex AI, this metric is called Average Precision. The closer to 1.0 this score is, the better your model is performing on the test set; a model guessing at random for each label would get an average precision around 0.5.
Tabular
 After model training, you'll receive a summary of its performance. Model evaluation metrics are
based on how the model performed against a slice of your dataset (the test dataset). There are a
couple of key metrics and concepts to consider when determining whether your model is ready to be
used with real data.
Classification metrics
Score threshold
Consider a machine learning model that predicts whether a customer will buy a jacket in the next
year. How sure does the model need to be before predicting that a given customer will buy a
jacket? In classification models, each inference is assigned a confidence score – a numeric
assessment of the model's certainty that the predicted class is correct. The score threshold is
the number that determines when a given score is converted into a yes or no decision; that is,
the value at which your model says "yes, this confidence score is high enough to conclude that
this customer will purchase a coat in the next year.
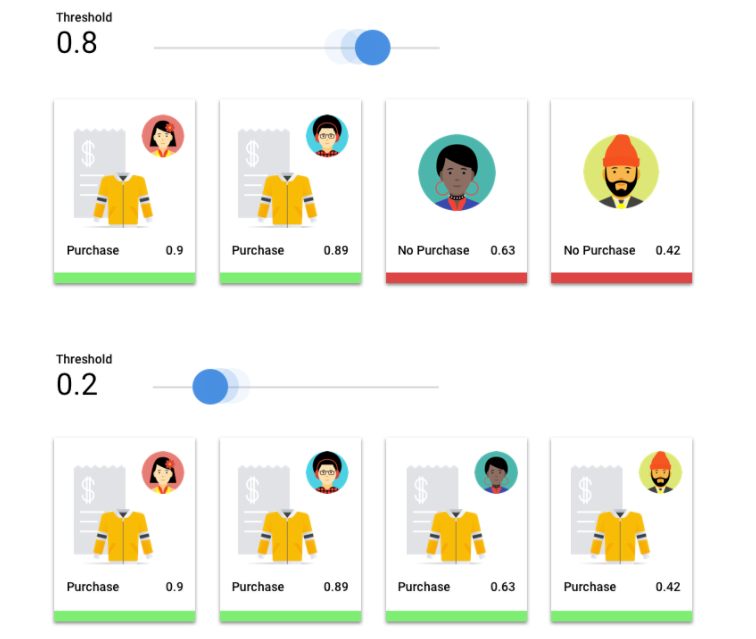
If your score threshold is low, your model will run the risk of misclassification. For that reason, the score threshold should be based on a given use case.
Inference outcomes
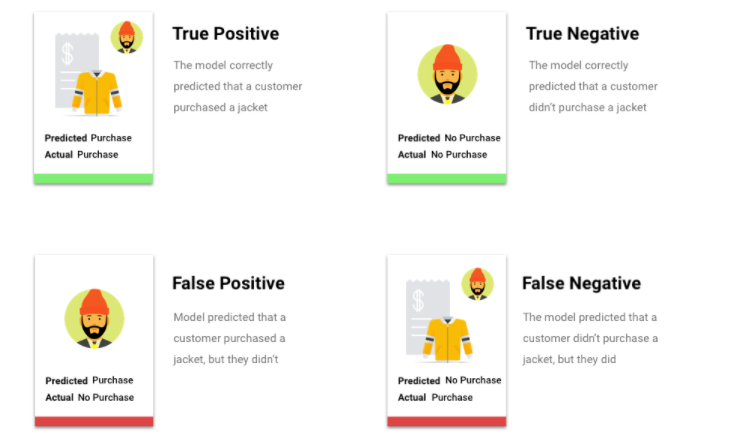
After applying the score threshold, inferences made by your model will fall into one of four categories. To understand these categories, imagine again a jacket binary classification model. In this example, the positive class (what the model is attempting to predict) is that the customer will purchase a jacket in the next year.
- True positive: The model correctly predicts the positive class. The model correctly predicted that a customer purchased a jacket.
- False positive: The model incorrectly predicts the positive class. The model predicted that a customer purchased a jacket, but they didn't.
- True negative: The model correctly predicts the negative class. The model correctly predicted that a customer didn't purchase a jacket.
- False negative: The model incorrectly predicts a negative class. The model predicted that a customer didn't purchase a jacket, but they did.
Precision and recall
Precision and recall metrics help you understand how well your model is capturing information and what it's leaving out. Learn more about precision and recall.
- Precision is the fraction of the positive inferences that were correct. Of all the inferences of a customer purchase, what fraction were actual purchases?
- Recall is the fraction of rows with this label that the model correctly predicted. Of all the customer purchases that could have been identified, what fraction were?
Depending on your use case, you may need to optimize for either precision or recall.
Other classification metrics
- AUC PR: The area under the precision-recall (PR) curve. This value ranges from zero to one, where a higher value indicates a higher-quality model.
- AUC ROC: The area under the receiver operating characteristic (ROC) curve. This ranges from zero to one, where a higher value indicates a higher-quality model.
- Accuracy: The fraction of classification inferences produced by the model that were correct.
- Log loss: The cross-entropy between the model inferences and the target values. This ranges from zero to infinity, where a lower value indicates a higher-quality model.
- F1 score: The harmonic mean of precision and recall. F1 is a useful metric if you're looking for a balance between precision and recall and there's an uneven class distribution.
Forecasting and regression metrics
After your model is built, Vertex AI provides a variety of standard metrics for you to review. There's no perfect answer on how to evaluate your model; consider evaluation metrics in context with your problem type and what you want to achieve with your model. The following list is an overview of some metrics Vertex AI can provide.
Mean absolute error (MAE)
MAE is the average absolute difference between the target and predicted values. It measures the average magnitude of the errors--the difference between a target and predicted value--in a set of inferences. And because it uses absolute values, MAE doesn't consider the relationship's direction, nor indicate underperformance or overperformance. When evaluating MAE, a smaller value indicates a higher-quality model (0 represents a perfect predictor).
Root mean square error (RMSE)
RMSE is the square root of the average squared difference between the target and predicted values. RMSE is more sensitive to outliers than MAE, so if you're concerned about large errors, then RMSE can be a more useful metric to evaluate. Similar to MAE, a smaller value indicates a higher-quality model (0 represents a perfect predictor).
Root mean squared logarithmic error (RMSLE)
RMSLE is RMSE in logarithmic scale. RMSLE is more sensitive to relative errors than absolute ones and cares more about underperformance than overperformance.
Observed quantile (forecasting only)
For a given target quantile, the observed quantile shows the actual fraction of observed values below the specified quantile inference values. The observed quantile shows how far or close the model is to the target quantile. A smaller difference between the two values indicates a higher-quality model.
Scaled pinball loss (forecasting only)
Measures the quality of a model at a given target quantile. A lower number indicates a higher-quality model. You can compare the scaled pinball loss metric at different quantiles to determine the relative accuracy of your model between those different quantiles.
Test your model
Image
Vertex AI uses 10% of your data automatically (or, if you chose your data split yourself, whatever percentage you opted to use) to test the model, and the "Evaluate" page tells you how the model did on that test data. But just in case you want to confidence check your model, there are a few ways to do it. The easiest is to upload a few images on the "Deploy & test" page, and look at the labels the model chooses for your examples. Hopefully, this matches your expectations. Try a few examples of each type of image you expect to receive.
If you'd like to use your model in your own automated tests instead, the "Deploy & test" page also tells you how to make calls to the model programmatically.
Tabular
Evaluating your model metrics is primarily how you can determine whether your model is ready to deploy, but you can also test it with new data. Upload new data to see if the model's inferences match your expectations. Based on the evaluation metrics or testing with new data, you may need to continue improving your model's performance.
Deploy your model
Image
When you're satisfied with your model's performance, it's time to use the model. Perhaps that means production-scale usage, or maybe it's a one-time inference request. Depending on your use case, you can use your model in different ways.
Batch inference
Batch inference is useful for making many inference requests at once. Batch inference is asynchronous, meaning that the model will wait until it processes all of the inference requests before returning a JSON Lines file with inference values.
Online inference
Deploy your model to make it available for inference requests using a REST API. Online inference is synchronous (real-time), meaning that it will quickly return a inference result, but only accepts one inference request per API call. Online inference is useful if your model is part of an application and parts of your system are dependent on a quick inference turnaround.
Tabular
When you're satisfied with your model's performance, it's time to use the model. Perhaps that means production-scale usage, or maybe it's a one-time inference request. Depending on your use case, you can use your model in different ways.
Batch inference
Batch inference is useful for making many inference requests at once. Batch inference is asynchronous, meaning that the model will wait until it processes all of the inference requests before returning a CSV file or BigQuery Table with inference values.
Online inference
Deploy your model to make it available for inference requests using a REST API. Online inference is synchronous (real-time), meaning that it will quickly return a inference, but only accepts one inference request per API call. Online inference is useful if your model is part of an application and parts of your system are dependent on a quick inference turnaround.
Clean up
To help avoid unwanted charges, undeploy your model when it's not in use.
When you're finished using your model, delete the resources that you created to avoid incurring unwanted charges to your account.
