What you will build
In this tutorial you will download an exported custom Core ML
model (.mlmodel). You will then
run a pre-made iOS app
that uses the model to identify images of flowers.
Objectives
In this introductory, end-to-end walkthrough you will use code to:
- Run a pre-trained Core ML model in an iOS app.
Overview
With the Core ML framework, you can use a trained machine learning model to classify input data. The Vision framework works with Core ML to apply classification models to images, and to preprocess those images to make machine learning tasks easier and more reliable.
Before you begin
Download a general Edge model
Download a folder containing a pretrained Core ML model. You will use that model in this tutorial.
Unpack the downloaded zip file.
Before beginning the tutorial navigate to the root project directory:
cd ClassifyingImagesWithVisionAndCoreML
You will run all following code samples from this directory.
Train & export a customized Edge model
Before you continue, complete the Edge device model quickstart with the following modifications:
- Use the provided flowers dataset, or use your own dataset.
- At the Train your model step, select the Edge model radio option.
- At the Export the model step, follow the how-to instructions for exporting a Core ML model.
You will use the resulting flower Core ML model.mlmodel file to run a
customized version of the existing iOS app.
Setup the iOS app
The demo iOS app requires several additional tools:
- Xcode
- Xcode command line tools
Download Xcode
Use the following link to download Xcode on your machine.
Install Xcode command line tools
Install the Xcode command line tools by running the following command in the command line:
xcode-select --install
Open the project
Open the project with Xcode. You can open the project either through the command line or using the Google Cloud Platform Console. To open the project using the command line run the following command:
open ./Vision+ML\ Example.xcodeproj
Run the original app
To launch the app in the Simulator and get image annotations complete the following steps:
- Launch the app by selecting the play button
 in the upper left corner of the Xcode window.
 - Provide a prediction image to the app. You can provide an image in two ways:
- Take a picture with the device's camera, or
- add photos to the device's photo library by dragging-and-dropping them onto the Simulator window
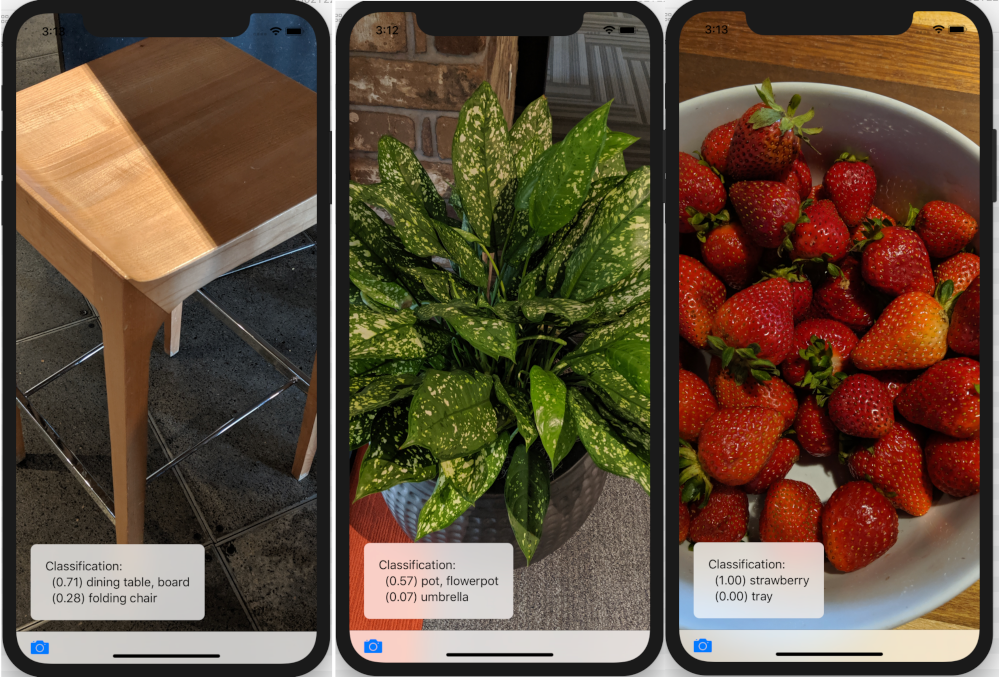
The app displays the top two classification categories in order of the confidence score the model assigns to each.
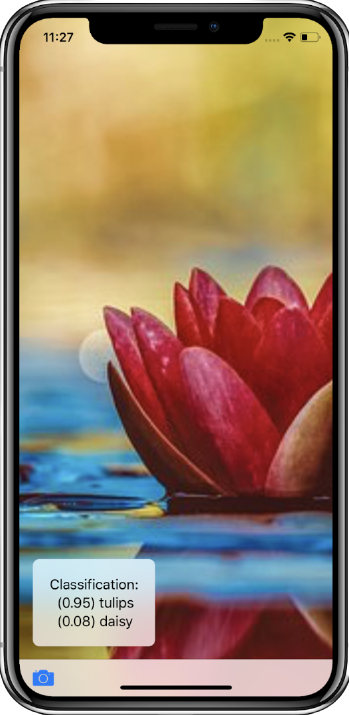
The result should display annotations similar to the following images:
Run the customized app
The original app uses a Core ML model that classifies images into one of the 1000 generic ImageNet classes (animal, fruit, furniture, plant, etc.), using the standard MobileNet.
Modify the app so that it will use your retrained model with the following custom flower image categories:
- daisy
- dandelion
- roses
- sunflowers
- tulips
Add your model files to the project
Download your custom flower model (exported Core ML
model.mlmodel) you get from completing the Edge device model quickstart. Themodel.mlmodelanddict.txtfiles from the Core ML model export will be in the Google Cloud Storage location you specified.Rename your custom model to
AutoML.mlmodel.Delete the existing model from the project (
MobileNet.mlmodel).Add the custom model into the project in the
Vision+ML Examplefolder.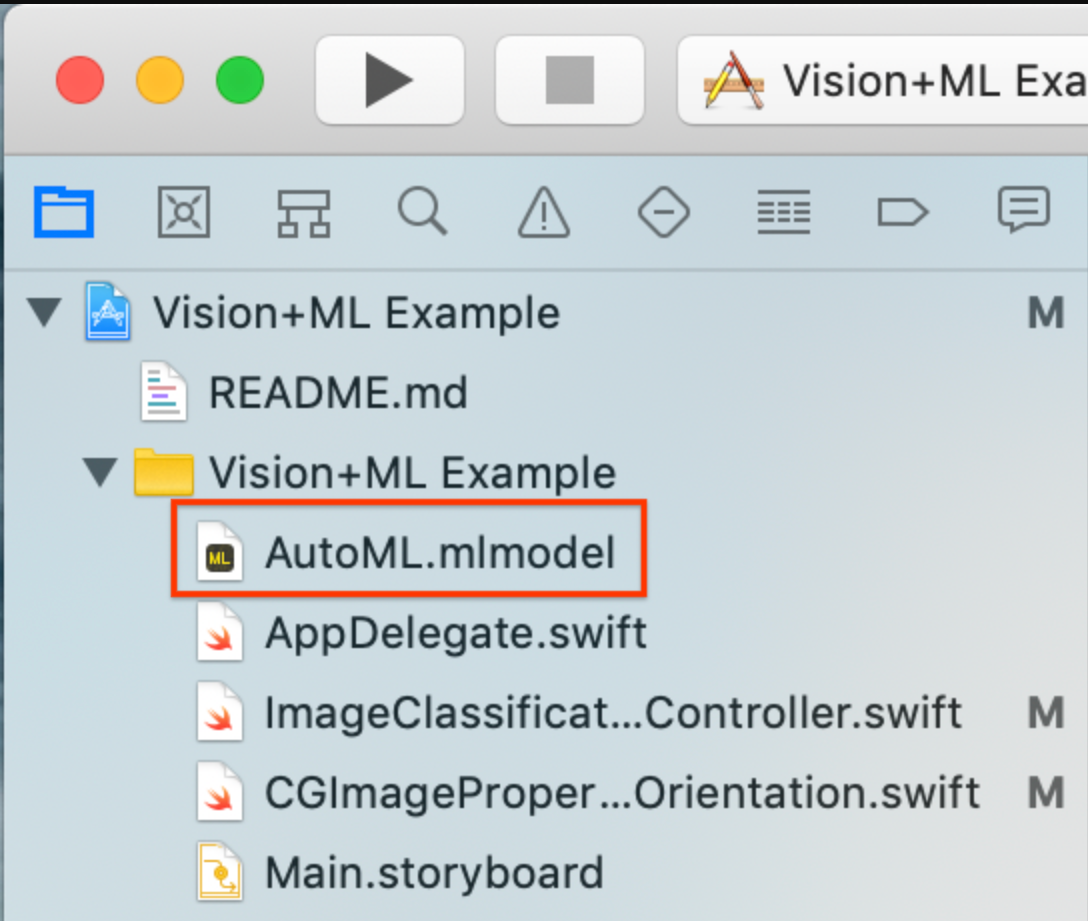
Modify line 30 in
ImageClassificationViewController. Remove:let model = try VNCoreMLModel(for: MobileNet().model)
Replace this line with:
let model = try VNCoreMLModel(for: AutoML().model)
Run your custom model app
To relaunch the app in the Simulator, select the play
button ![]() in the upper left corner of the Xcode window.
in the upper left corner of the Xcode window.
To test the modifications, add image files from the flower_photos/ directory
and get predictions.
Results should look similar to this:
To try out the model, add the training data images you downloaded earlier, or download images from a Google search to use for prediction.
How does it work?
Now that you have the app running, look at the CoreML and Vision Framework specific code.
Set Up Vision with a Core ML Model
Core ML automatically generates a Swift class that provides easy access to your ML model.
In this sample, Core ML automatically generates the MobileNet class from
the MobileNetmodel.
Get the model instance with the following code:
let model = try VNCoreMLModel(for: MobileNet().model)
Create the Vision request with above model and completion handler. The completion handler handles the prediction response from model.
The Google Cloud Platform Console should be updated in main thread:
let request = VNCoreMLRequest(model: model, completionHandler: { [weak self] request, error in
DispatchQueue.main.async {
guard let results = request.results else {
self.classificationLabel.text = "Unable to classify image.\n\(error!.localizedDescription)"
return
}
The results will always be in VNClassificationObservation, as specified by
the Core ML model in this project.
let classifications = results as! [VNClassificationObservation]
})
The Vision request's completion handler indicates whether the request succeeded
or resulted in an error. If it succeeded, its results property
contains VNClassificationObservation objects describing possible
classifications identified by the ML model.
An ML model processes input images in a fixed aspect ratio, but input images may have arbitrary aspect ratios, so Vision must scale or crop the image to fit. For best results, set the request's
imageCropAndScaleOptionproperty to match the image layout the model was trained with.request.imageCropAndScaleOption = .centerCrop
Create the
VisionRequestHandlerwith the input image using the following code:let handler = VNImageRequestHandler(ciImage: ciImage, orientation: orientation)
Call the perform function of the handler by passing request object.
do {
try handler.perform([self.classificationRequest])
} catch {
This handler catches general image processing errors. The
classificationRequest's completion handlerprocessClassifications(_:error:)catches errors specific to processing that request.print("Failed to perform classification.\n\(error.localizedDescription)") }
What Next
You've now completed a walkthrough of an iOS flower classification app using a Core ML model exported from AutoML Vision Edge. You used a trained Core ML model to test a general image classification app before making modifications to it and getting custom sample annotations of flowers. You then examined Core ML specific code to to understand underlying functionality.
The following resources can help you continue to learn about Core ML models and AutoML Vision Edge:
- Learn more about CoreML from the official documentation and the code repository.
- Try the camera version of this demo app, which uses a quantized version of the model. This provides the same power in a smaller, more efficient package.
- Try some other TFLite ready models including a speech hot-word detector and an on-device version of smart-reply.