Einführung
Dieser Leitfaden für Einsteiger ist eine Einführung in AutoML. Informationen zu den wichtigsten Unterschieden zwischen AutoML und benutzerdefiniertem Training finden Sie unter Trainingsmethode auswählen.
Stellen Sie sich Folgendes vor:
- Sie sind in der Marketingabteilung eines digitalen Einzelhändlers.
- Sie arbeiten an einem Architekturprojekt, das Arten von Gebäude identifiziert.
- Ihr Unternehmen hat ein Kontaktformular auf seiner Website.
Das manuelle Pflegen von Bildern und Tabellen ist mühsam und zeitaufwendig. Bringt einem Computer bei, Inhalte automatisch zu identifizieren und zu melden.
Bild
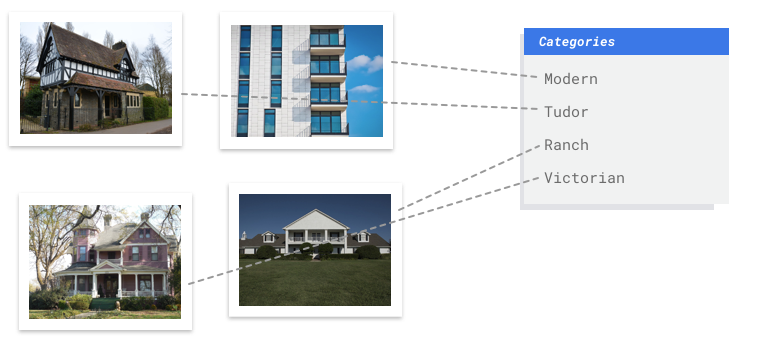
Sie arbeiten in einem Büro für Denkmalpflege und versuchen herauszufinden, welche Gegenden in Ihrer Stadt denselben Baustil haben. Dazu müssten Sie Hunderttausende Bilder von Gebäuden durchsehen und diese von Hand kategorisieren. Dieser Vorgang ist mühsam und fehleranfällig. Tatsächlich hat ein Praktikant bei Ihnen mal vor Monaten einige Hundert Bilder mit einem Label versehen, aber niemand sonst hat sich die Daten angesehen. Wäre es nicht toll, wenn Sie nun einem Computer beibringen könnten, diese Aufgabe für Sie zu übernehmen?
Tabellarisch
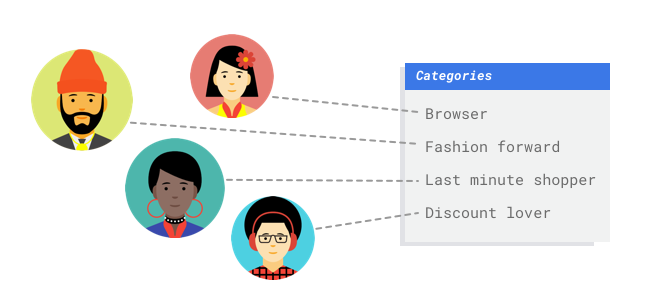
Sie arbeiten in der Marketingabteilung eines digitalen Einzelhändlers. Sie und Ihr Team erstellen ein personalisiertes E-Mail-Programm, das auf Kunden-Personas basiert. Sie haben die Personas erstellt und die Marketing-E-Mails sind einsatzbereit. Jetzt müssen Sie ein System erstellen, das Kunden je nach ihren Einzelhandelsvorlieben und ihrem Kaufverhalten in die einzelnen Personas einsortiert, auch wenn sie als Kunden neu sind. Sie möchten auch deren Ausgabegewohnheiten vorhersagen, damit Sie die optimale Zeit zum Versenden der E-Mails finden, um die Kundeninteraktion zu maximieren.
Da Sie ein digitaler Einzelhändler sind, haben Sie Daten zu Ihren Kunden und den von ihnen getätigten Einkäufen. Doch wie steht es mit Neukunden? Herkömmliche Ansätze können diese Werte für bestehende Kunden mit langer Kaufhistorie berechnen, eignen sich jedoch nicht für Kunden mit wenigen historischen Daten. Was wäre, wenn Sie ein System erstellen könnten, um diese Werte vorherzusagen und die Geschwindigkeit zu erhöhen, mit der Sie personalisierte Marketingprogramme für alle Ihre Kunden bereitstellen?
Genau auf diesem Gebiet sind maschinelles Lernen (ML) und Vertex AI sehr gut geeignet.
In diesem Leitfaden wird erläutert, wie Vertex AI für AutoML-Datasets und -Modelle funktioniert, und welche Probleme mit Vertex AI gelöst werden können.
Hinweis zur Fairness
Google setzt auf den Fortschritt bei verantwortungsbewussten KI-Praktiken. Unsere ML-Produkte einschließlich AutoML basieren deshalb auf Kernprinzipien wie Fairness und das menschzentrierte maschinelle Lernen. Weitere Informationen zu Best Practices für die Minderung von Verzerrungen beim Erstellen eines eigenen ML-Systems finden Sie in der Anleitung zu inklusivem ML – AutoML.
Warum ist Vertex AI das richtige Tool für dieses Problem?
Bei der klassischen Programmierung muss der Programmierer einem Computer alles Schritt für Schritt beibringen. Hier gibt es so viele Variationen bei der Farbe, dem Winkel, der Auflösung und Beleuchtung, dass zu viele Regeln codiert werden müssten, um einer Maschine zu erklären, wie sie die richtige Entscheidung trifft. Schwer vorstellbar, wo Sie überhaupt anfangen würden. Kundenkommentare umfassen ein breites und vielfältiges Vokabular und unterschiedliche Strukturen. Sie sind zu vielfältig, um von einem einfachen Regelwerk erfasst zu werden. Wenn Sie versuchen, manuelle Filter zu erstellen, werden Sie schnell feststellen, dass Sie die meisten Ihrer Kundenkommentare nicht kategorisieren können. Sie benötigen ein System, das die unterschiedlichsten Kommentare verallgemeinern kann. Da strikte Regeln auf Dauer exponentiell erweitert werden müssten, brauchen Sie stattdessen ein System, das aus Beispielen lernen kann.
Genau auf diesem Gebiet ist maschinelles Lernen die Lösung.
Wie funktioniert Vertex AI?
Vertex AI umfasst überwachte Lernaufgaben, um das gewählte Ergebnis zu erzielen. Je nach Datentyp und Anwendungsfall ändern sich die Eigenschaften des Algorithmus und der Trainingsmethoden. Es gibt viele verschiedene Unterkategorien des maschinellen Lernens, die jeweils unterschiedliche Probleme lösen und mit unterschiedlichen Einschränkungen arbeiten.
Bild
Sie trainieren, testen und validieren das Modell für maschinelles Lernen mit Beispielbildern, die zur Klassifizierung mit Labels oder mit Labels und Begrenzungsrahmen für die Objekterkennung versehen wurden. Mithilfe von überwachtem Lernen kann ein Modell darauf trainiert werden, relevante Muster und Inhalte in Bildern zu erkennen.
Tabellarisch
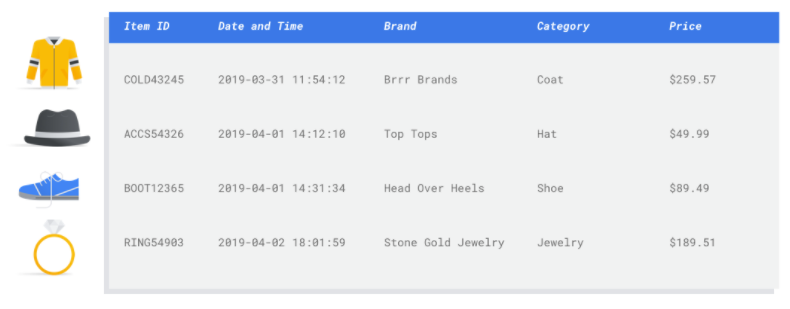
Sie trainieren ein Modell für maschinelles Lernen mit Beispieldaten. Vertex AI verwendet tabellarische (strukturierte) Daten, um ein Modell für maschinelles Lernen so zu trainieren, dass es Rückschlüsse auf neue Daten ziehen kann. Für eine Spalte aus Ihrem Dataset, die als Ziel bezeichnet wird, soll das Modell dann die Vorhersage treffen. Einige der anderen Datenspalten sind Eingaben (sogenannte Features), aus denen das Modell Muster lernt. Sie können dieselben Eingabe-Features zum Erstellen mehrerer Arten von Modellen verwenden, indem Sie einfach die Zielspalte und die Trainingsoptionen ändern. Im E-Mail-Marketing-Beispiel bedeutet dies, dass Sie Modelle mit denselben Eingabefeatures, aber mit unterschiedlichen Zielvorhersagen erstellen können. Ein Modell könnte die Persönlichkeit eines Kunden (ein kategoriales Ziel) vorhersagen, ein anderes Modell die monatlichen Ausgaben des Kunden (ein numerisches Ziel) und ein weiteres Modell könnte wiederum die tägliche Nachfrage nach Ihren Produkten für die nächsten drei Monate (Serie numerischer Ziele) vorhersagen.
Vertex-AI-Workflow
Vertex AI verwendet einen Standard-Workflow für maschinelles Lernen:
- Daten erfassen: Bestimmen Sie abhängig vom gewünschten Ergebnis die Daten, die Sie zum Trainieren und Testen Ihres Modells benötigen.
- Daten vorbereiten: Achten Sie darauf, dass Ihre Daten ordnungsgemäß formatiert und mit Labels versehen sind.
- Trainieren: Legen Sie Parameter fest und erstellen Sie Ihr Modell.
- Auswerten: Überprüfen Sie die Modellmesswerte.
- Bereitstellen und Vorhersagen: Machen Sie Ihr Modell für die Verwendung verfügbar.
Datenvorbereitung
Bevor Sie jedoch mit dem Erfassen von Daten beginnen, sollten Sie über das Problem nachdenken, das Sie lösen möchten. Dadurch werden Ihre Datenanforderungen bestimmt.
Anwendungsfall bewerten
Beginnen Sie mit dem Problem: Was möchten Sie erreichen?
Bild
Gehen Sie beim Erstellen des Datasets immer von Ihrem konkreten Anwendungsfall aus. Folgende Fragestellungen können Ihnen am Anfang helfen:
- Welches Ergebnis möchte ich erzielen?
- Welche Kategorien oder Objekte müssen erkannt werden, um dieses Ergebnis zu erzielen?
- Könnte ein Mensch diese Kategorien erkennen? Vertex AI kann zwar viel mehr Kategorien zuweisen, als sich ein Mensch überhaupt merken kann, aber wenn ein Mensch eine bestimmte Kategorie nicht erkennen kann, wird auch Vertex AI Schwierigkeiten damit haben.
- Welche Beispiele geben am besten die Art und Bandbreite der Daten wieder, die das System sehen und klassifizieren soll?
Tabellarisch
Welche Art von Daten befinden sich in der Zielspalte? Auf wie viele Daten haben Sie Zugriff? Abhängig von Ihren Antworten erstellt Vertex AI das erforderliche Modell, das Ihren Anwendungsfall lösen soll:
- Ein binäres Klassifizierungsmodell sagt ein binäres Ergebnis vorher (eine von zwei Klassen). Verwenden Sie diese Option für Ja- oder Nein-Fragen, um beispielsweise vorherzusagen, ob ein Kunde ein Abo erwerben würde (oder nicht). Wenn alles andere gleich ist, erfordert ein binäres Klassifizierungsproblem weniger Daten als andere Modelltypen.
- Ein Klassifizierungsmodell mit mehreren Klassen sagt eine Klasse aus drei oder mehr gesonderten Klassen vorher. Verwenden Sie diese Option, um Dinge zu kategorisieren. Für das Einzelhandelsbeispiel sollten Sie ein Klassifizierungsmodell mit mehreren Klassen erstellen, um Kunden in verschiedene Personas zu unterteilen.
- Ein Prognosemodell sagt eine Wertsequenz vorher. Als Einzelhändler möchten Sie beispielsweise die tägliche Nachfrage Ihrer Produkte für die nächsten drei Monate prognostizieren, damit Sie Inventarbestände im Voraus rechtzeitig planen können.
- Ein Regressionsmodell sagt einen kontinuierlichen Wert voraus. Für das Einzelhandelsbeispiel sollten Sie ein Regressionsmodell erstellen, um vorherzusagen, wie viel ein Kunde im nächsten Monat ausgeben wird.
Daten erfassen
Nachdem Sie Ihren Anwendungsfall festgelegt haben, müssen Sie die Daten erfassen, mit denen Sie das gewünschte Modell erstellen können.
Bild
 Nachdem Sie nun wissen, welche Art von Daten Sie benötigen, müssen Sie überlegen, woher Sie diese Daten bekommen. Als Erstes kommen alle Daten in Frage, die Ihr Unternehmen ohnehin erfasst. Möglicherweise erfassen Sie bereits die relevanten Daten, die Sie zum Trainieren eines Modells benötigen. Wenn diese Daten nicht verfügbar sind, können Sie sie manuell erfassen oder von einem Drittanbieter beziehen.
In jede Kategorie genug Beispiele mit Labels aufnehmen
 Vertex AI Training erfordert mindestens 100 Bildbeispiele pro Kategorie/Label für die Klassifizierung.
Je mehr hochwertige Beispiele zur Verfügung gestellt werden, desto wahrscheinlicher ist es, dass ein Label erfolgreich erkannt wird. Im Allgemeinen gilt: Je mehr mit Labels versehene Daten Sie in den Trainingsprozess einbringen, desto besser wird Ihr Modell. Wir empfehlen mindestens 1.000 Beispiele pro Label.
Vertex AI Training erfordert mindestens 100 Bildbeispiele pro Kategorie/Label für die Klassifizierung.
Je mehr hochwertige Beispiele zur Verfügung gestellt werden, desto wahrscheinlicher ist es, dass ein Label erfolgreich erkannt wird. Im Allgemeinen gilt: Je mehr mit Labels versehene Daten Sie in den Trainingsprozess einbringen, desto besser wird Ihr Modell. Wir empfehlen mindestens 1.000 Beispiele pro Label.
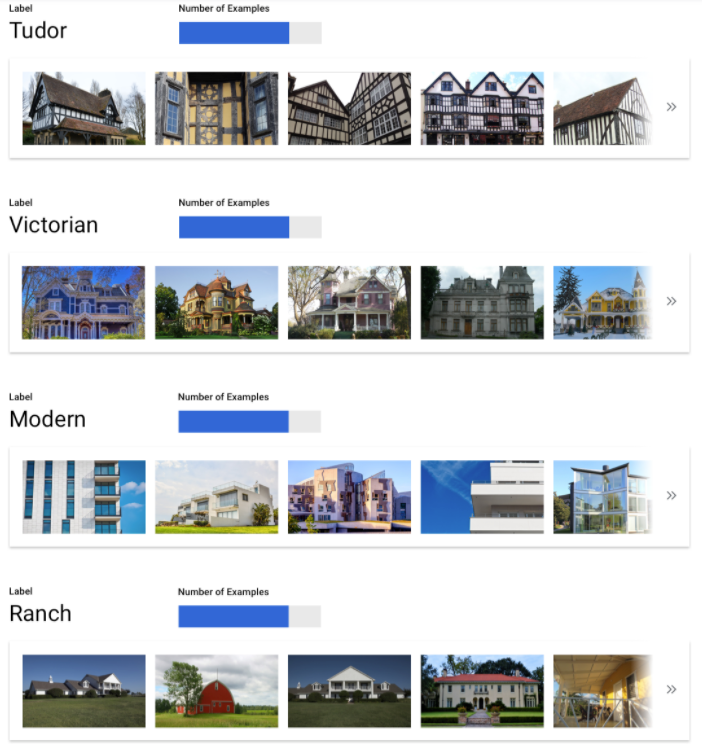
Beispiele gleichmäßig auf Kategorien verteilen
Es ist wichtig, für jede Kategorie ungefähr gleich viele Trainingsbeispiele zu erfassen. Auch wenn es für ein Label eine Fülle von Daten gibt, ist es am besten, wenn sie gleichmäßig auf die Labels verteilt sind. Sie fragen sich, warum? Stellen Sie sich vor, dass 80 % der Bilder, die Sie für Ihr Modell verwenden, Bilder von Einfamilienhäusern sind, deren Baustil der Moderne zuzuordnen ist. Wenn die Labels derart ungleichmäßig verteilt sind, wird Ihr Modell höchstwahrscheinlich lernen, dass es am sichersten ist, ein Bild jedes Mal einem modernen Einfamilienhaus zuzuordnen, statt die Vorhersage eines selteneren Labels zu riskieren.
Es ist wie bei einem Multiple-Choice-Test, bei dem fast alle richtigen Antworten "C" lauten. Ein versierter Testteilnehmer wird nach kurzer Zeit feststellen, dass man jedes Mal "C" ankreuzen kann, ohne sich die Frage vorher durchzulesen.
Natürlich ist es nicht immer möglich, für jedes Label etwa gleich viele Beispiele zu finden. Bei manchen Kategorien kann es schwieriger sein, hochwertige, eindeutige Beispiele zu finden. Wenn dies der Fall ist, gilt folgende Faustregel: Dem Label mit den wenigsten Beispielen sollten mindestens 10 % so viele Beispiele wie dem Label mit der größten Anzahl Beispiele zugeordnet werden. Wenn also das größte Label 10.000 Beispiele hat, sollte das kleinste Label mindestens 1.000 Beispiele haben.
Variation im Problembereich abdecken
Prüfen Sie analog dazu, ob Ihre Daten die Bandbreite und innere Vielfalt Ihres Problembereichs abdecken. Je mehr Auswahl für den Modelltrainingsprozess vorhanden ist, desto schneller können neue Beispiele nach allgemeinen Regeln eingeordnet werden. Nehmen wir den Fall, dass Sie Bilder im Bereich Unterhaltungselektronik in Kategorien einteilen wollen: Je mehr Daten zur Verfügung stehen, auf die das Modell während des Trainings zugreifen kann, desto eher wird es unterscheiden können, ob es sich um die neue Produktvariante eines Tablets, Smartphones oder Laptops handelt, auch wenn es das konkrete Gerät noch nie gesehen hat.

Daten an die beabsichtigte Ausgabe des Modells anpassen

Suchen Sie nach Bildern, die denen, für die Sie Rückschlüsse ziehen möchten, ähnlich sind. Wenn Sie versuchen, Bilder von Häusern zu klassifizieren, die alle bei verschneitem Winterwetter aufgenommen wurden, können Sie von einem Modell, das nur mit Bildern von Häusern bei sonnigem Wetter trainiert wurde, keine guten Ergebnisse erwarten. Auch dann nicht, wenn Sie sie mit den Klassen markiert haben, die für Sie von Interesse sind. Schon kleine Unterschiede in Beleuchtung und Umgebung können nämlich das Ergebnis beeinflussen. Im Idealfall handelt es sich bei Ihren Trainingsbeispielen um reale Daten, die aus dem Dataset stammen, für das Sie auch das Modell zur Klassifizierung verwenden möchten.
Tabellarisch
Nachdem Sie Ihren Anwendungsfall festgelegt haben, müssen Sie Daten erfassen, um Ihr Modell zu trainieren.
Datenbeschaffung und -vorbereitung sind wichtige Schritte beim Erstellen eines Modells für maschinelles Lernen.
Die Daten, die Ihnen zur Verfügung stehen, haben einen Einfluss darauf, welche Art von Problemen Sie lösen können. Wie viele Daten stehen Ihnen zur Verfügung? Sind Ihre Daten für die Fragen relevant, die Sie beantworten möchten? Beachten Sie beim Erfassen der Daten die folgenden wichtigen Überlegungen.
Relevante Funktionen auswählen
Ein Feature ist ein Eingabeattribut, das für das Modelltraining verwendet wird. Anhand von Features identifiziert Ihr Modell Muster, um Rückschlüsse zu ziehen, daher müssen die Features für Ihr Problem relevant sein. Wenn Sie beispielsweise ein Modell erstellen möchten, das vorhersagt, ob eine Kreditkartentransaktion betrügerisch ist oder nicht, müssen Sie ein Dataset erstellen, das Transaktionsdetails wie den Käufer, den Verkäufer, den Betrag, das Datum und die Uhrzeit sowie die gekauften Artikel enthält. Andere hilfreiche Features wären historische Informationen über den Käufer und den Verkäufer und wie oft der gekaufte Artikel im Zusammenhang mit einem Betrugsfall stand. Welche anderen Features könnten relevant sein?
Betrachten Sie den Anwendungsfall für E-Mail-Marketing im Einzelhandel aus der Einleitung. Hier sind einige Feature-Spalten, die Sie möglicherweise benötigen:
- Liste der gekauften Artikel (einschließlich Marken, Kategorien, Preise, Rabatte)
- Anzahl der gekauften Artikel (letzter Tag, letzte Woche, letzter Monat, letztes Jahr)
- Ausgegebener Geldbetrag (letzter Tag, letzte Woche, letzter Monat, letztes Jahr)
- Gesamtzahl der täglich verkauften Artikel
- Gesamtzahl der Artikel auf Lager pro Tag
- Ob Sie eine Werbeaktion für einen bestimmten Tag durchführen
- Bekanntes demografisches Profil des Käufers
Genügend Daten einbeziehen
Generell gilt: Je mehr Trainingsbeispiele Sie haben, desto besser das Ergebnis. Die Menge der erforderlichen Beispieldaten hängt auch von der Komplexität des Problems ab, das Sie lösen möchten. Im Vergleich zu einem Modell mit mehreren Klassen benötigen Sie für ein genaues binäres Klassifizierungsmodell nicht so viele Daten, da es weniger kompliziert ist, eine Klasse aus zwei statt aus vielen Klassen vorherzusagen.
Eine perfekte Formel gibt es nicht, aber Empfehlungen für die Mindestanzahl von Beispieldaten.
- Klassifizierungsproblem: 50 Zeilen x die Anzahl der Features
- Prognoseproblem:
- 5.000 Zeilen x die Anzahl der Features
- 10 eindeutige Werte in der ID-Spalte der Zeitreihe x die Anzahl der Features
- Regressionsproblem: 200 x die Anzahl der Features
Variation erfassen
Ihr Dataset sollte die Vielfalt Ihres Problembereichs erfassen. Je vielfältiger die Beispiele sind, mit denen ein Modell während des Trainings zu tun hat, umso schneller kann es neue oder weniger verbreitete Beispiele verallgemeinern. Stellen Sie sich vor, Ihr Einzelhandelsmodell würde nur mit Kaufdaten aus dem Winter trainiert. Wäre dieses Modell in der Lage, Kleidungspräferenzen oder das Kaufverhalten im Sommer erfolgreich vorherzusagen?
Daten vorbereiten
Bild
 Nachdem Sie sich für eine manuelle oder automatische Aufteilung entschieden haben, können Sie Daten in Vertex AI mit einer der folgenden Methoden hinzufügen:
- Sie können Daten entweder von Ihrem Computer oder aus Cloud Storage in einem verfügbaren Format (CSV oder JSON Lines) mit den Labels (und gegebenenfalls Begrenzungsrahmen) inline importieren. Weitere Informationen zum Importdateiformat finden Sie unter Trainingsdaten vorbereiten. Wenn Sie Ihr Dataset manuell aufteilen möchten, können Sie die Aufteilungen in Ihrer CSV- oder JSONL Lines-Importdatei angeben.
- Wenn Ihre Daten nicht mit Annotationen versehen sind, können Sie Bilder ohne Label hochladen und mithilfe der Google Cloud Console die Annotationen anwenden. Sie können diese Annotationen in mehreren Annotationssätzen für dasselbe Set von Bildern verwalten. Beispiel: Für ein einzelnes Set von Bildern können Sie beispielsweise einen Annotationssatz mit Begrenzungsrahmen und Labelinformationen für die Objekterkennung festlegen und gleichzeitig einen weiterer Annotationssatz nur mit Labelannotationen zur Klassifizierung festlegen.
Tabellarisch
Nachdem Sie die verfügbaren Daten identifiziert haben, müssen Sie nachprüfen, ob diese für das Training bereit sind.
Sollten die Daten verzerrt sein oder fehlende oder fehlerhafte Werte enthalten, hat dies Auswirkungen auf die Qualität des Modells. Beachten Sie Folgendes, bevor Sie mit dem Training des Modells beginnen.
Weitere Informationen
Datenlecks und Abweichungen zwischen Training und Bereitstellung
Datenverluste treten auf, wenn Sie während des Trainings Eingabe-Features verwenden, die Informationen über das Ziel, das Sie vorherzusagen versuchen, "durchsickern lassen", die nicht verfügbar sind, wenn das Modell tatsächlich bereitgestellt wird. Dies lässt sich erkennen, wenn ein Feature, das stark mit der Zielspalte korreliert, als eines der Eingabe-Features enthalten ist. Wenn Sie beispielsweise ein Modell erstellen, um vorherzusagen, ob sich ein Kunde im nächsten Monat für ein Abo anmeldet und eines der Eingabe-Features dabei eine zukünftige Abo-Zahlung von diesem Kunden ist. Dies kann zwar eine starke Modellleistung beim Testen bewirken, jedoch nicht bei der Bereitstellung in der Produktion, da die Informationen zu zukünftigen Abo-Zahlungen zum Zeitpunkt der Bereitstellung nicht mehr verfügbar sind.
Abweichungen zwischen Training und Bereitstellung liegen vor, wenn sich die während der Trainingszeit verwendeten Eingabe-Features von denen unterscheiden, die dem Modell zum Zeitpunkt der Bereitstellung zur Verfügung gestellt werden, was eine schlechte Modellqualität in der Produktion zur Folge hat. Ein Beispiel hierfür wäre, wenn Sie ein Modell zur Vorhersage von stündlichen Temperaturen erstellen, es jedoch mit Daten trainieren, die nur wöchentliche Temperaturen enthalten. Ein weiteres Beispiel: Wenn Sie zur Prognose von Schulabbrüchen in den Trainingsdaten immer die Noten eines Schülers mitliefern, diese Informationen zum Zeitpunkt der Bereitstellung jedoch nicht zur Verfügung stehen.
Das Verständnis Ihrer Trainingsdaten ist wichtig, um Datenverluste und Abweichungen zwischen Training und Bereitstellung zu vermeiden:
- Stellen Sie vor der Verwendung von Daten sicher, dass Sie wissen, was die Daten bedeuten und ob Sie sie als Feature verwenden sollten.
- Prüfen Sie die Korrelation auf dem Tab "Train" (Trainieren). Hohe Korrelationen sollten zur Überprüfung markiert werden.
- Abweichungen zwischen Training und Bereitstellung: Achten Sie darauf, dass Sie nur Eingabe-Features für das Modell zur Verfügung stellen, die zum Zeitpunkt der Bereitstellung in genau derselben Form verfügbar sind.
Fehlende, unvollständige und inkonsistente Daten bereinigen
Es ist normal, dass Beispieldaten fehlende und unrichtige Werte enthalten. Nehmen Sie sich Zeit, um die Qualität der Daten zu überprüfen und, wenn möglich, zu verbessern, bevor Sie sie für das Training verwenden. Je mehr Werte fehlen, desto weniger nützlich sind die Daten für das Training eines Modells für maschinelles Lernen.
- Prüfen Sie Ihre Daten auf fehlende Werte und korrigieren Sie sie, falls möglich. Oder lassen Sie den Wert leer, wenn für die Spalte Nullwerte zulässig sind. Vertex AI kann zwar fehlende Werte verarbeiten, Sie erhalten jedoch mit höherer Wahrscheinlichkeit optimale Ergebnisse, wenn alle Werte verfügbar sind.
- Prüfen Sie für die Prognose, ob das Intervall zwischen den Trainingszeilen konsistent ist. Vertex AI kann zwar fehlende Werte hinzu rechnen, Sie erhalten jedoch mit höherer Wahrscheinlichkeit optimale Ergebnisse, wenn alle Werte verfügbar sind.
- Bereinigen Sie Ihre Daten, indem Sie Datenfehler oder falsch positive Ergebnisse korrigieren oder löschen. Machen Sie die Daten konsistent: Überprüfen Sie Rechtschreibung, Abkürzungen und Formatierung.
Daten nach dem Import analysieren
Vertex AI bietet einen Überblick über Ihr Dataset, nachdem es importiert wurde. Prüfen Sie für das importierte Dataset, ob jede Spalte den richtigen Variablentyp hat. Vertex AI erkennt den Variablentyp automatisch anhand der Spaltenwerte. Dennoch sollten Sie diese immer einzeln überprüfen. Kontrollieren Sie außerdem bei jeder Spalte die Null-Zulässigkeit, die festlegt, ob eine Spalte fehlende Werte oder NULL-Werte enthalten darf.
Modell trainieren
Bild
Berücksichtigen, wie Vertex AI das Dataset beim Erstellen eines benutzerdefinierten Modells verwendet
Zu Ihrem Dataset gehören Trainings-, Validierungs- und Test-Datasets. Wenn Sie keine Aufteilung festlegen (siehe Daten vorbereiten), verwendet Vertex AI automatisch 80 % der Bilder für das Training, 10 % für die Validierung und 10 % für Tests.

Trainings-Dataset
 Die meisten Daten sollten im Trainings-Dataset enthalten sein. Das sind die Daten, die das Modell während des Trainings "sieht". Damit werden die Parameter des Modells erlernt, vor allem die Gewichtung der Verbindungen zwischen den Knoten des neuronalen Netzes.
Validierungs-Dataset
 Während des Trainingsvorgangs wird auch das Validierungs-Dataset, oft als "dev"-Dataset bezeichnet, verwendet.
Das Framework für das Modelllernen bindet bei jeder Iteration des Trainingsvorgangs Trainingsdaten ein. Anschließend optimiert es mit dem Validierungs-Dataset anhand der tatsächlichen Leistung des Modells dessen sogenannte Hyperparameter. Hyperparameter sind Variablen, die die Struktur des Modells festlegen. Sollten Sie versucht haben, die Hyperparameter mit dem Trainings-Dataset zu optimieren, ist es sehr wahrscheinlich, dass sich das Modell zu sehr auf die Trainingsdaten fokussiert und dass die verallgemeinernde Einordnung von Beispielen, die nicht genau mit diesen Daten übereinstimmen, schwieriger wird.
Durch die Verwendung eines neuen Datasets zur Feinabstimmung der Modellstruktur sind bessere Verallgemeinerungen für Ihr Modell möglich.
Während des Trainingsvorgangs wird auch das Validierungs-Dataset, oft als "dev"-Dataset bezeichnet, verwendet.
Das Framework für das Modelllernen bindet bei jeder Iteration des Trainingsvorgangs Trainingsdaten ein. Anschließend optimiert es mit dem Validierungs-Dataset anhand der tatsächlichen Leistung des Modells dessen sogenannte Hyperparameter. Hyperparameter sind Variablen, die die Struktur des Modells festlegen. Sollten Sie versucht haben, die Hyperparameter mit dem Trainings-Dataset zu optimieren, ist es sehr wahrscheinlich, dass sich das Modell zu sehr auf die Trainingsdaten fokussiert und dass die verallgemeinernde Einordnung von Beispielen, die nicht genau mit diesen Daten übereinstimmen, schwieriger wird.
Durch die Verwendung eines neuen Datasets zur Feinabstimmung der Modellstruktur sind bessere Verallgemeinerungen für Ihr Modell möglich.
Test-Dataset
 Das Test-Dataset wird völlig unabhängig vom Trainingsvorgang eingesetzt. Nachdem das Training des Modells abgeschlossen ist, nutzen Sie das Test-Dataset als vollständig neue Aufgabe für das Modell. Anhand der Leistung des Modells beim Test-Dataset lässt sich relativ genau absehen, wie gut es später mit Realdaten funktionieren wird.
Manuelle Aufteilung
 Sie können Ihr Dataset auch selbst aufteilen. Die manuelle Aufteilung Ihrer Daten ist dann sinnvoll, wenn Sie den Vorgang genauer steuern oder bestimmte Beispiele unbedingt in einem bestimmten Bereich des Modelltrainings verwenden möchten.
Tabellarisch
Nachdem das Dataset importiert wurde, trainieren Sie im nächsten Schritt ein Modell. Vertex AI generiert mit den Standardeinstellungen für das Training ein zuverlässiges Modell für maschinelles Lernen. Möglicherweise möchten Sie jedoch einige Parameter basierend auf Ihrem Anwendungsfall anpassen.
Versuchen Sie, so viele Feature-Spalten wie möglich für das Training auszuwählen, prüfen Sie jedoch jede einzelne, damit sie auch bestimmt für das Training geeignet ist. Beachten Sie bei der Auswahl der Features Folgendes:
- Wählen Sie keine Feature-Spalten aus, die einen störenden Einfluss haben können, wie zufällig zugewiesene ID-Spalten mit einem eindeutigen Wert für jede Zeile.
- Machen Sie sich unbedingt mit den einzelnen Featurespalten und ihren Werten vertraut.
- Wenn Sie mehrere Modelle aus einem Dataset erstellen, entfernen Sie Zielspalten, die nicht Teil des aktuellen Inferenzproblems sind.
- Beachten Sie die Fairnessprinzipien: Trainieren Sie Ihr Modell mit einem Feature, das zu voreingenommenen oder unfairen Entscheidungen für marginalisierte Gruppen führen kann?
So nutzt Vertex AI Ihr Dataset
Das Dataset wird in Trainings-, Validierungs- und Test-Datasets unterteilt. Die von Vertex AI standardmäßig angewendete Aufteilung hängt vom Modelltyp ab, den Sie trainieren. Bei Bedarf können Sie die Aufteilungen auch angeben (manuelle Aufteilungen). Weitere Informationen finden Sie unter Datenaufteilungen für AutoML-Modelle.
Trainings-Dataset
Die meisten Daten sollten im Trainings-Dataset enthalten sein. Das sind die Daten, die das Modell während des Trainings "sieht". Damit werden die Parameter des Modells erlernt, vor allem die Gewichtung der Verbindungen zwischen den Knoten des neuronalen Netzes.
Validierungs-Dataset
Während des Trainingsvorgangs wird auch das Validierungs-Dataset, oft als "dev"-Dataset bezeichnet, verwendet.
Das Framework für das Modelllernen bindet bei jeder Iteration des Trainingsvorgangs Trainingsdaten ein. Anschließend optimiert es mit dem Validierungs-Dataset anhand der tatsächlichen Leistung des Modells dessen sogenannte Hyperparameter. Hyperparameter sind Variablen, die die Struktur des Modells festlegen. Sollten Sie versucht haben, die Hyperparameter mit dem Trainings-Dataset zu optimieren, ist es sehr wahrscheinlich, dass sich das Modell zu sehr auf die Trainingsdaten fokussiert und dass die verallgemeinernde Einordnung von Beispielen, die nicht genau mit diesen Daten übereinstimmen, schwieriger wird.
Durch die Verwendung eines neuen Datasets zur Feinabstimmung der Modellstruktur sind bessere Verallgemeinerungen für Ihr Modell möglich.
Test-Dataset
Das Test-Dataset wird völlig unabhängig vom Trainingsvorgang eingesetzt. Nachdem das Training des Modells abgeschlossen ist, nutzt Vertex AI das Test-Dataset als komplett neue Aufgabe für das Modell.
Anhand der Leistung des Modells beim Test-Dataset lässt sich relativ genau absehen, wie gut es später mit Realdaten funktionieren wird.
Modell bewerten, testen und bereitstellen
Modell bewerten
Bild
Nachdem Ihr Modell trainiert ist, erhalten Sie eine Übersicht über die Leistung des Modells. Klicken Sie auf Bewerten oder Vollständige Bewertung einblenden, um eine detaillierte Analyse anzeigen zu lassen.
 Bei der Fehlerbehebung eines Modells geht es eher darum, Fehler in den Daten statt im Modell zu beheben. Wenn sich das Modell unerwartet verhält, während Sie die Leistung vor und nach der Fertigstellung bewerten, sollten Sie die bisherigen Schritte daraufhin prüfen, wo Ihre Daten verbessert werden könnten.
Welche Art von Analysen kann ich in Vertex AI durchführen?
In Vertex AI können Sie im Abschnitt "Bewerten" die Leistung Ihres benutzerdefinierten Modells bewerten. Die Bewertung beruht auf der Ausgabe des Modells für Testbeispiele und allgemeinen Messwerten für das maschinelle Lernen. In diesem Abschnitt wird erläutert, was folgende Konzepte jeweils bedeuten.
- Modellausgabe
- Score-Schwellenwert
- Richtig positive, richtig negative, falsch positive und falsch negative Ergebnisse
- Genauigkeit und Trefferquote
- Genauigkeits-/Trefferquotenkurve
- Durchschnittliche Genauigkeit
Wie interpretiere ich die Modellausgabe?
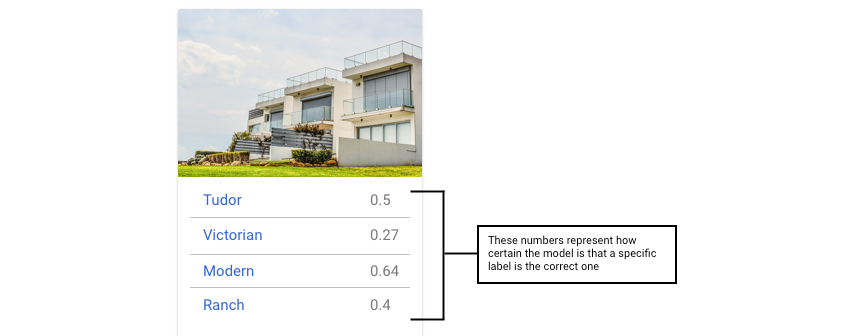
Vertex AI ruft Beispiele aus Ihren Testdaten ab, um Ihr Modell vor völlig neue Herausforderungen zu stellen. Für jedes Beispiel gibt das Modell eine Reihe von Zahlen aus, die angeben, wie eng das jeweilige Beispiel mit den einzelnen Labels verknüpft ist. Wenn die Zahl hoch ist, ist das Modell sehr sicher, dass das Label auf dieses Dokument angewendet werden sollte.
Was ist der Score-Schwellenwert?
Mit der Definition eines Score-Schwellenwerts können wir diese Wahrscheinlichkeiten in binäre Ein-/Aus-Werte umwandeln.
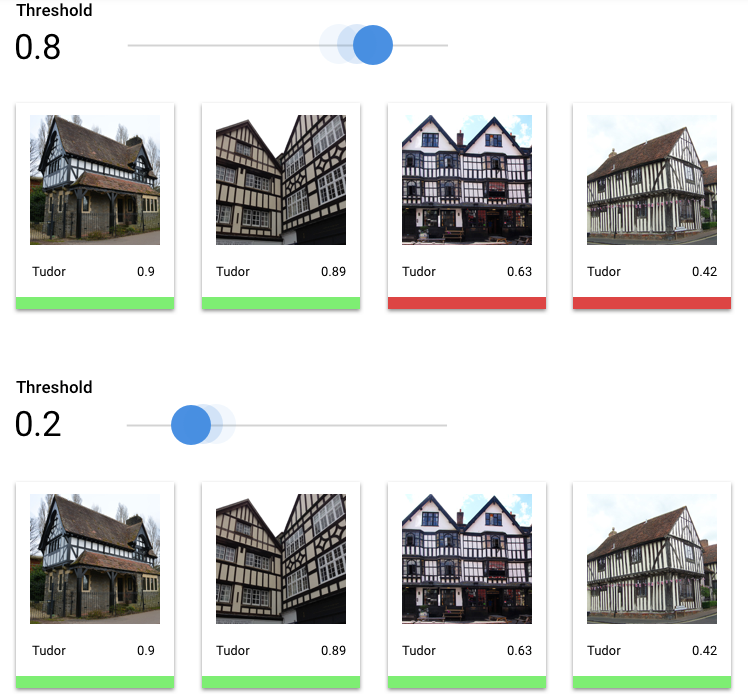
Der Score-Schwellenwert bezieht sich auf den Vertrauensgrad, den das Modell haben muss, um einem Testobjekt eine Kategorie zuzuweisen. Der Schieberegler für den Score-Grenzwert in der Google Cloud Console ist ein visuelles Werkzeug, mit dem Sie die Auswirkungen verschiedener Grenzwerte für alle Kategorien und einzelne Kategorien in Ihrem Dataset testen können.
Bei einem niedrigen Score-Grenzwert kann das Modell mehr Bilder klassifizieren, unterliegt jedoch dem Risiko, einige Bilder während des Vorgangs falsch zu klassifizieren. Wenn der Score-Grenzwert hoch ist, kann das Modell zwar weniger Bilder klassifizieren, aber dafür besteht ein geringeres Risiko, dass sie falsch klassifiziert werden. Sie können die Schwellenwerte für die einzelnen Kategorien in der Google Cloud Console anpassen, wenn Sie experimentieren möchten. Wenn Sie Ihr Modell in der Produktion verwenden, müssen Sie jedoch die von Ihnen als optimal ermittelten Grenzwerte durchsetzen.
Was sind richtig positive, richtig negative, falsch positive und falsch negative Ergebnisse?
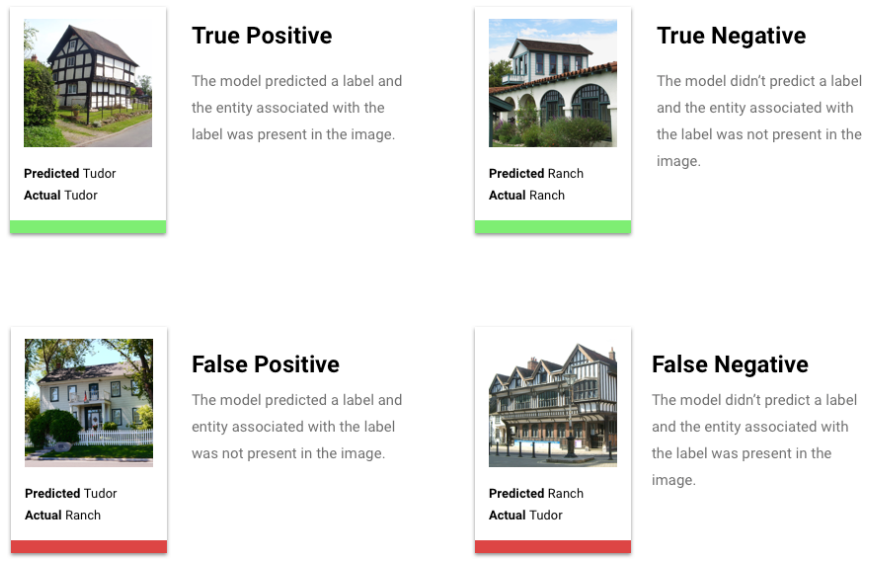
Nach Anwenden des Score-Schwellenwerts fallen die Vorhersagen Ihres Modells in eine der folgenden vier Kategorien:
die von Ihnen als optimal ermittelten Schwellenwerte.
Sie können diese Kategorien verwenden, um die Genauigkeit und die Trefferquote zu berechnen. Diese Messwerte helfen Ihnen, die Effektivität des Modells zu bestimmen.
Was sind Genauigkeit und Trefferquote?
Anhand von Genauigkeit ("Precision") und Trefferquote ("Recall") können Sie analysieren, wie gut das Modell Informationen erfasst und wie viele Informationen es auslässt. Die Genauigkeit zeigt, wie viele Testbeispiele, die mit einem Label versehen wurden, auch mit diesem Label kategorisiert werden sollten. Die Trefferquote zeigt, wie viele Testbeispiele, die mit diesem Label versehen werden sollten, tatsächlich mit diesem Label versehen wurden.
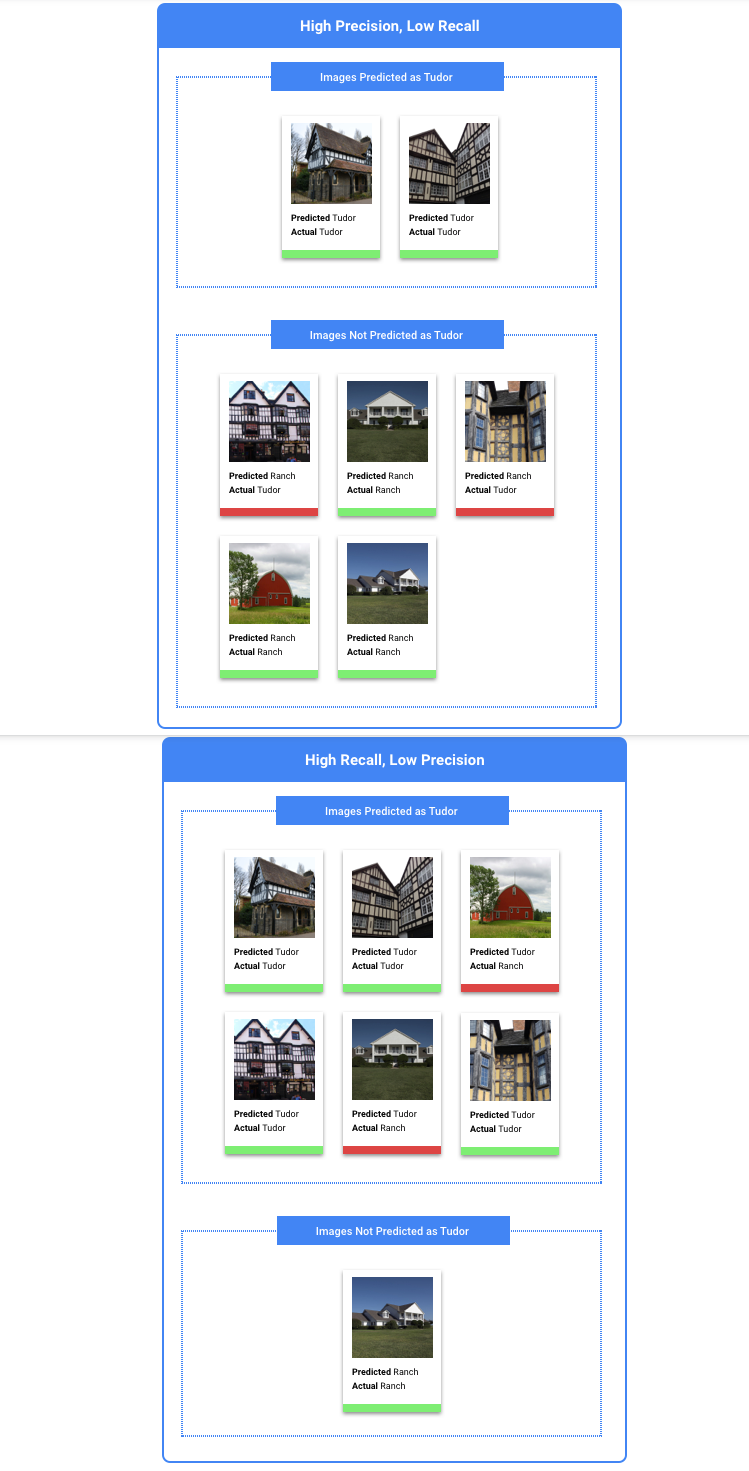
Empfiehlt sich die Optimierung der Genauigkeit oder der Trefferquote?
Ob Sie die Genauigkeit oder die Trefferquote optimieren sollten, hängt vom jeweiligen Anwendungsfall ab. Berücksichtigen Sie die folgenden zwei Anwendungsfälle, wenn Sie entscheiden, welcher Ansatz für Sie am besten geeignet ist.
Anwendungsfall: Datenschutz bei Bildern
Angenommen, Sie möchten ein System erstellen, das vertrauliche Informationen automatisch erkennt und unkenntlich macht.

Falsch positive Ergebnisse wären in diesem Fall Dinge, die eigentlich nicht unkenntlich gemacht werden müssten, aber dennoch unkenntlich gemacht wurden. Dies kann zwar lästig sein, muss aber nicht von Nachteil sein.

Falsch negative Ergebnisse wären in diesem Fall Dinge, die unkenntlich gemacht werden müssen, aber nicht gemacht wurden, wie z. B. eine Kreditkarte. Einem Identitätsdiebstahl wären dadurch theoretisch Tür und Tor geöffnet.
In diesem Fall wäre es besser, die Trefferquote zu optimieren. Die Trefferquote misst bei allen getroffenen Vorhersagen, wie viel ausgelassen wurde. Bei Modellen mit hoher Trefferquote ist die Wahrscheinlichkeit hoch, dass sie auch wenig relevante Beispiele mit einem Label versehen. Dies ist nützlich, wenn Ihre Kategorie zu wenig Trainingsdaten hat.
Anwendungsfall: Stockfotosuche
Angenommen, Sie möchten ein System erstellen, das das beste Stock-Foto für einen bestimmten Suchbegriff findet.

Ein falsch positives Ergebnis würde in diesem Fall ein irrelevantes Bild zurückgeben. Da Ihr Produkt dafür bekannt ist, nur Bilder mit der besten Übereinstimmung zurückzugeben, wäre dies ein großer Makel.

Ein falsch negatives Ergebnis würde in diesem Fall bei einer Stichwortsuche ein relevantes Bild nicht zurückgeben. Da viele Suchbegriffe Tausende von Fotos enthalten, die potenziell eine hohe Übereinstimmung darstellen, ist dies in Ordnung.
In diesem Fall wäre es besser, die Genauigkeit zu optimieren. Die Genauigkeit misst bei allen getroffenen Vorhersagen, wie genau sie sind. Bei Modellen mit hoher Genauigkeit ist die Wahrscheinlichkeit groß, dass sie nur sehr relevante Beispiele mit einem Label versehen. Das kann hilfreich sein, wenn Ihre Klasse in den Trainingsdaten häufig vorkommt.
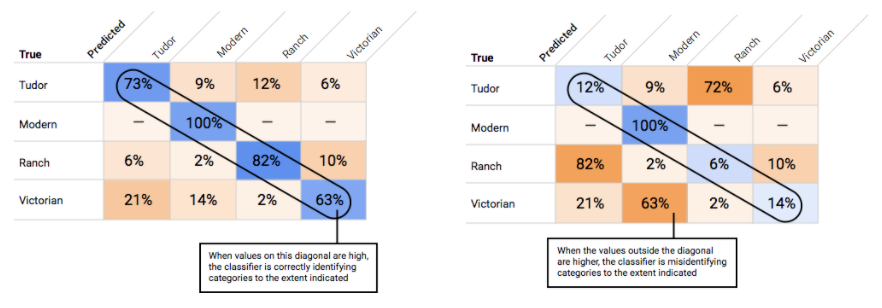
Wie verwende ich die Wahrheitsmatrix?
Wie interpretiere ich die Genauigkeits-/Trefferquotenkurve?
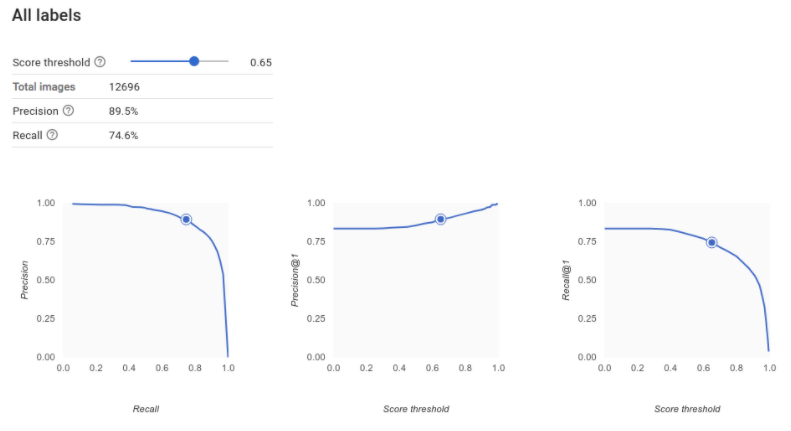
Mit dem Score-Schwellenwert-Tool können Sie herausfinden, wie sich der gewählte Score-Schwellenwert auf Genauigkeit und Trefferquote auswirkt. Bewegen Sie den Schieberegler für den Score-Schwellenwert, um zu sehen, wo Sie sich auf der Genauigkeits-/Trefferquotenkurve befinden und wie sich dieser Schwellenwert jeweils auf Genauigkeit und Trefferquote auswirkt. Bei Modellen mit mehreren Klassen wird für die Berechnung der Genauigkeit und der Trefferquote nur das am besten bewertete Label verwendet. Dies kann Ihnen helfen, ein gutes Verhältnis zwischen falsch positiven und falsch negativen Ergebnissen herzustellen.
Wenn Sie einen Schwellenwert gewählt haben, der für Ihr Modell als Ganzes akzeptabel erscheint, klicken Sie auf die einzelnen Labels, um zu sehen, in welchen Bereich dieser Schwellenwert auf der Genauigkeits-/Trefferquotenkurve eines bestimmten Labels fällt. Dabei kann es sein, dass Sie für einige Labels eine Menge falscher Vorhersagen erhalten. In diesem Fall ist es eine Überlegung wert, für jede Klasse einen eigenen Schwellenwert zu wählen, der genau auf diese Labels zugeschnitten ist. Nehmen wir beispielsweise an, Sie sehen sich Ihr Dataset von Häusern an und stellen fest, dass ein Schwellenwert von 0,5 für jeden Bildtyp mit Ausnahme von "Tudor" eine angemessene Genauigkeit und eine angemessene Trefferquote aufweist. Das könnte daran liegen, dass es sich um eine sehr allgemeine Kategorie handelt. Für diese Kategorie erhalten Sie eine Menge falsch positiver Ergebnisse. In diesem Fall könnten Sie einen Schwellenwert von 0,8 nur für „Tudor“ in Erwägung ziehen, wenn Sie den Klassifikator für Inferenzen verwenden.
Was ist eine durchschnittliche Genauigkeit?
Ein hilfreicher Messwert für die Modellgenauigkeit ist die Fläche unter der Genauigkeits-/Trefferquotenkurve. Er misst, wie gut Ihr Modell über alle Score-Schwellenwerte hinweg funktioniert. In Vertex AI wird dieser Messwert als durchschnittliche Genauigkeit bezeichnet. Je näher dieser Wert bei 1,0 liegt, desto besser schneidet Ihr Modell im Test-Dataset ab. Ein Modell, das Labels nach dem Zufallsprinzip ermittelt, hätte eine durchschnittliche Genauigkeit von etwa 0,5.
Tabellarisch
Im Anschluss an das Modelltraining erhalten Sie eine Zusammenfassung der Leistung. Modellbewertungsmesswerte basieren darauf, inwieweit das Modell bei einem Teil des Datasets (dem Test-Dataset) die Leistungserwartungen erfüllen konnte. Bei der Entscheidung, ob das Modell bereit für den Einsatz bei realen Daten ist, müssen Sie einige wichtige Messwerte und Konzepte berücksichtigen.
Klassifizierungsmesswerte
Punktzahl-Schwellenwert
Stellen Sie sich ein Modell für maschinelles Lernen vor, das vorhersagt, ob ein Kunde im nächsten Jahr eine Jacke kaufen wird. Wie sicher muss das Modell sein, bevor es voraussagen kann, dass ein bestimmter Kunde eine Jacke kauft? In Klassifizierungsmodellen wird jeder Inferenz ein Konfidenzwert zugewiesen – eine numerische Bewertung der Gewissheit des Modells, dass die vorhergesagte Klasse korrekt ist. Der Score-Schwellenwert ist die Zahl, die festlegt, wann eine bestimmte Bewertung in eine Ja- oder Nein-Entscheidung umgewandelt wird. Dies ist der Wert, bei dem Ihr Modell sagt: "Ja, dieser Konfidenzwert ist hoch genug, um zu der Schlussfolgerung zu gelangen, dass dieser Kunde im nächsten Jahr einen Mantel kaufen wird."
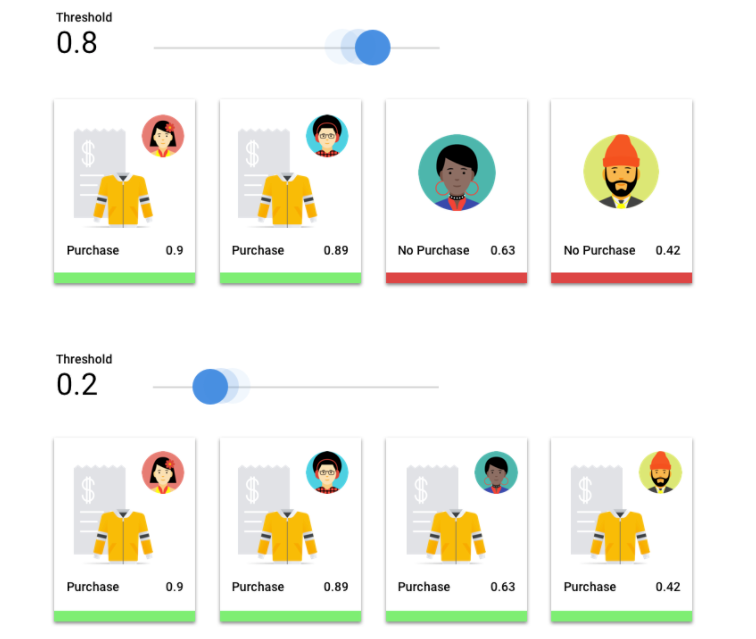
Wenn der Score-Schwellenwert niedrig ist, besteht für das Modell das Risiko einer Fehlklassifizierung. Aus diesem Grund sollte der Score-Schwellenwert auf einem bestimmten Anwendungsfall basieren.
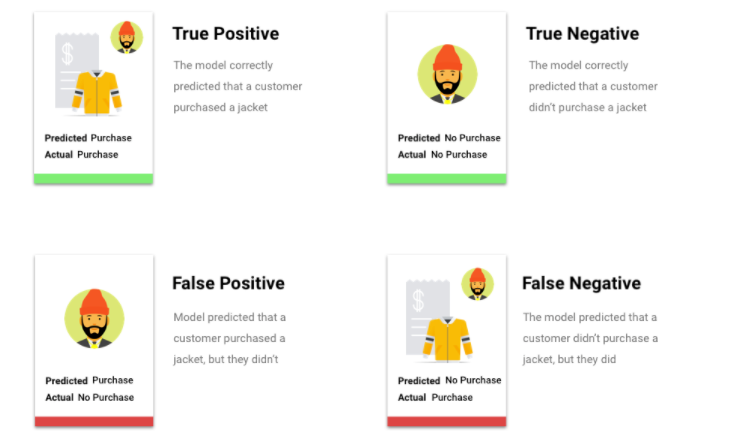
Inferenz-Ergebnisse
Nach Anwenden des Score-Schwellenwerts fallen die von Ihrem Modell gemachten Vorhersagen in eine von vier Kategorien. Zum Verständnis dieser Kategorien stellen Sie sich noch einmal ein binäres Klassifizierungsmodell für den Jackenkauf vor. In diesem Beispiel ist die positive Klasse (also das, was das Modell vorherzusagen versucht), dass der Kunde im nächsten Jahr eine Jacke kaufen wird.
- Richtig positiv: Das Modell sagt die positive Klasse richtig vorher. Das Modell sagte richtig vorher, dass ein Kunde eine Jacke kaufen würde.
- Falsch positiv: Das Modell sagt die positive Klasse falsch vorher. Das Modell sagte vorher, dass ein Kunde eine Jacke kaufen würde, aber das tat er nicht.
- Richtig negativ: Das Modell sagt die negative Klasse richtig vorher. Das Modell sagte richtig vorher, dass ein Kunde keine Jacke kaufen würde.
- Falsch negativ: Das Modell sagt fälschlicherweise eine negative Klasse vorher. Das Modell sagte vorher, dass ein Kunde keine Jacke kaufen würde, doch er hat eine gekauft.
Genauigkeit und Trefferquote
Anhand von Genauigkeit und Trefferquote können Sie analysieren, wie gut das Modell Informationen erfasst und welche es auslässt. Weitere Informationen zu Genauigkeit und Trefferquote
- Präzision ist der Anteil der positiven Vorhersagen, die richtig waren. Bei welchem Anteil aller abgeleiteten Kundeneinkäufe gab es tatsächlich Einkäufe?
- Trefferquote ist der Anteil an Zeilen mit diesem Label, die das Modell korrekt vorhergesagt hat. Welcher Anteil von allen Kundeneinkäufen, die man hätte identifizieren können, wurde tatsächlich identifiziert?
Abhängig von Ihrem Anwendungsfall müssen Sie möglicherweise entweder die Genauigkeit oder die Trefferquote optimieren.
Weitere Klassifizierungsmesswerte
- AUC PR: der Bereich unter der Precision-/Recallkurve (Precision-Recall, PR). Dieser reicht von null bis eins, wobei ein höherer Wert auf ein Modell von höherer Qualität verweist.
- AUC ROC: der Bereich unter der Grenzwertoptimierungskurve (Receiver Operating Curve, ROC). Dieser reicht von null bis eins, wobei ein höherer Wert auf ein Modell von höherer Qualität verweist.
- Richtigkeit: der Anteil der Klassifizierungsvorhersagen des Modells, die richtig waren.
- Logarithmischer Verlust: die Kreuzentropie zwischen den Modellinferenzen und den Zielwerten. Dieser hat einen Bereich von null bis unendlich, wobei ein niedrigerer Wert auf ein Modell von höherer Qualität hinweist.
- F1-Wert: der harmonische Mittelwert von Precision und Recall. F1 ist ein hilfreicher Messwert, wenn Sie ein Gleichgewicht zwischen Genauigkeit und Trefferquote anstreben und die Klassenverteilung ungleichmäßig ist.
Prognose- und Regressionsmesswerte
Nach dem Erstellen Ihres Modells bietet Vertex AI eine Vielzahl von Standardmesswerten, die Sie prüfen können. Eine perfekte Antwort auf die Frage, wie Sie Ihr Modell bewerten sollten, gibt es nicht. Berücksichtigen Sie Bewertungsmesswerte im Zusammenhang mit Ihrem Problemtyp und den Zielen, die Sie mit Ihrem Modell erreichen möchten. Im Folgenden finden Sie eine Übersicht über einige Messwerte, die Vertex AI bereitstellen kann.
Mittlerer absoluter Fehler (MAE)
Der mittlere absolute Fehler (Mean Absolute Error, MAE) ist die durchschnittliche absolute Differenz zwischen dem Zielwert und den vorhergesagten Werten. Er misst die durchschnittliche Größe der Fehler – die Differenz zwischen einem Zielwert und einem vorhergesagten Wert – in einer Reihe von Inferenzen. Da MAE absolute Werte verwendet, berücksichtigt diese Kennzahl weder die Richtung der Beziehung noch zeigt sie eine unter- oder überdurchschnittliche Leistung an. Bei der Bewertung von MAE zeigt ein kleinerer Wert ein Modell mit höherer Qualität an (0 steht für einen perfekten Predictor).
Wurzel der mittleren Fehlerquadratsumme (RMSE)
Die Wurzel der mittleren Fehlerquadratsumme (Root Mean Square Error, RMSE) ist die Quadratwurzel der mittleren quadrierten Differenz zwischen dem Zielwert und den vorhergesagten Werten. RMSE reagiert empfindlicher auf Ausreißer als MAE. Wenn Sie also große Fehler befürchten, ist es möglicherweise sinnvoller, RMSE als Messwert für die Auswertung zu nutzen. Ähnlich wie bei MAE zeigt ein kleinerer Wert ein Modell mit höherer Qualität an (0 steht für einen perfekten Prädiktor).
Wurzel des mittleren quadratischen logarithmischen Fehlers (RMSLE)
Die Wurzel des mittleren quadratischen logarithmischen Fehlers (Root Mean Squared Logarithmic Error, RMSLE) ist RMSE im logarithmischen Maßstab. RMSLE reagiert empfindlicher auf relative Fehler als auf absolute Fehler und misst einer unterdurchschnittlichen Leistung ein höheres Gewicht bei als einer überdurchschnittlichen Leistung.
Beobachtetes Quantil (nur Prognosen)
Bei einem bestimmten Ziel-Quantil gibt das beobachtete Quantil den tatsächlichen Anteil der beobachteten Werte unter den angegebenen Quantil-Vorhersagewerten an. Das beobachtete Quantil gibt die Entfernung des Modells zum angestrebten Quantil an. Ein kleinerer Unterschied zwischen den beiden Werten verweist auf ein Modell von höherer Qualität.
Skalierter Pinball-Loss (nur Prognose)
Misst die Qualität eines Modells bei einem bestimmten Zielquantil. Eine niedrigere Zahl gibt ein höheres Qualitätsmodell an. Sie können den Messwert für den skalierten Pinball-Verlust mit verschiedenen Quantilen vergleichen, um die relative Genauigkeit Ihres Modells zwischen diesen verschiedenen Quantilen zu bestimmen.
Modell testen
Bild
Zum Testen des Modells verwendet Vertex AI automatisch 10 % Ihrer Daten (bzw. den Prozentsatz, den Sie beim manuellen Aufteilen Ihrer Daten gewählt haben). Auf der Seite "Bewerten" können Sie sehen, wie das Modell mit diesen Testdaten abgeschnitten hat. Für eine Zuverlässigkeitsprüfung Ihres Modells haben Sie verschiedene Möglichkeiten. Am einfachsten ist es, ein paar Bilder auf der Seite "Bereitstellen und Testen" hochzuladen und sich die Labels anzusehen, die das Modell für Ihre Beispiele auswählt. Hoffentlich werden Ihre Erwartungen dabei erfüllt. Probieren Sie einfach ein paar Beispiele für jeden erwarteten Bildtyp aus.
Wenn Sie Ihr Modell stattdessen in Ihren eigenen automatisierten Tests verwenden möchten, lesen Sie die Informationen auf der Seite "Bereitstellen und testen". Dort erfahren Sie, wie Sie das Modell programmgesteuert aufrufen können.
Tabellarisch
Bei der Auswertung der Modellmesswerte geht es in erster Linie darum, festzustellen, ob das Modell einsatzbereit ist. Sie können es aber auch mit neuen Daten testen. Laden Sie neue Daten hoch, um herauszufinden, ob die Schlussfolgerungen des Modells Ihren Erwartungen entsprechen. Je nach den Bewertungsmesswerten oder den Ergebnissen der Tests mit neuen Daten müssen Sie möglicherweise die Leistung des Modells weiter verbessern.
Modell bereitstellen
Bild
Wenn Sie mit der Leistung des Modells zufrieden sind, können Sie das Modell nun einsetzen. Vielleicht bedeutet dies eine Nutzung in der Produktionsumgebung, vielleicht handelt es sich aber auch um eine einmalige Inferenzanfrage. Abhängig von Ihrem Anwendungsfall können Sie das Modell auf verschiedene Weise verwenden.
Batchinferenz
Die Batchinferenz eignet sich für die gleichzeitige Verarbeitung von vielen Inferenzanfragen. Die Batchinferenz ist asynchron, d. h. das Modell verarbeitet zuerst alle Inferenzenanfragen, bevor eine JSON Lines-Datei mit Inferenzenwerten zurückgegeben wird.
Onlineinferenz
Stellen Sie das Modell bereit, um es für Inferenzanfragen über eine REST API verfügbar zu machen. Die Onlineinferenz ist synchron (in Echtzeit), d. h., sie gibt in kürzester Zeit ein Inferenz-Ergebnis zurück, akzeptiert jedoch nur eine Inferenzanfrage pro API-Aufruf. Die Onlineinferenz eignet sich, wenn Ihr Modell Teil einer Anwendung ist und Teile Ihres Systems von einer schnellen Inferenzausführung abhängig sind.
Tabellarisch
Wenn Sie mit der Leistung des Modells zufrieden sind, können Sie das Modell nun einsetzen. Vielleicht bedeutet dies eine Nutzung in der Produktionsumgebung, vielleicht handelt es sich aber auch um eine einmalige Inferenzanfrage. Abhängig von Ihrem Anwendungsfall können Sie das Modell auf verschiedene Weise verwenden.
Batchinferenz
Die Batchinferenz eignet sich für die gleichzeitige Verarbeitung von vielen Inferenzanfragen. Die Batchinferenz ist asynchron, d. h., das Modell verarbeitet zuerst alle Inferenzenanfragen, bevor die Ergebnisse in Form einer CSV-Datei oder BigQuery-Tabelle mit Inferenzenwerten ausgegeben werden.
Onlineinferenz
Stellen Sie das Modell bereit, um es für Inferenzanfragen über eine REST API verfügbar zu machen. Die Onlineinferenz ist synchron (in Echtzeit), d. h., sie gibt in kürzester Zeit eine Inferenz zurück, akzeptiert jedoch nur eine Inferenzanfrage pro API-Aufruf. Die Onlineinferenz eignet sich, wenn Ihr Modell Teil einer Anwendung ist und Teile Ihres Systems von einer schnellen Inferenzausgabe abhängig sind.
Bereinigen
Heben Sie die Bereitstellung des Modells auf, wenn es nicht verwendet wird, um unerwünschte Kosten zu vermeiden.
Wenn Sie mit der Verwendung Ihres Modells fertig sind, löschen Sie die von Ihnen erstellten Ressourcen, um unerwünschte Kosten für Ihr Konto zu vermeiden.