Anda membuat model kustom dengan melatihnya menggunakan set data yang telah disiapkan. AutoML Vision menggunakan item dari set data untuk melatih model, mengujinya, dan evaluate performanya. Anda meninjau hasilnya, menyesuaikan set data pelatihan sesuai kebutuhan, dan melatih model baru menggunakan set data yang telah ditingkatkan.
Proses pelatihan model dapat memakan waktu beberapa jam untuk diselesaikan. AutoML API memungkinkan Anda memeriksa status pelatihan.
Karena AutoML Vision membuat model baru setiap kali Anda memulai pelatihan, project Anda dapat menyertakan banyak model. Anda bisa mendapatkan daftar model di project dan dapat menghapus model yang tidak lagi diperlukan.
Model listingan
Bagian ini menjelaskan cara mengambil daftar model yang tersedia untuk sebuah project.
UI web
Untuk melihat daftar model yang tersedia menggunakan Vision Dashboard, klik ikon bola lampu di menu navigasi kiri.
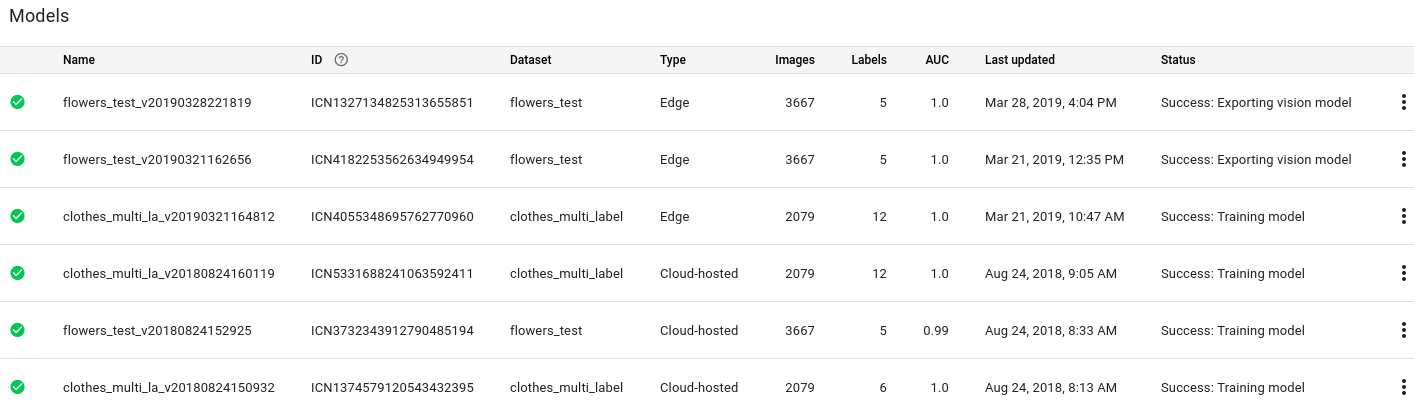
Untuk melihat model project yang berbeda, pilih project dari menu drop-down di kanan atas panel judul.
REST
Sebelum menggunakan salah satu data permintaan, lakukan penggantian berikut:
- project-id: Project ID GCP Anda.
Metode HTTP dan URL:
GET https://automl.googleapis.com/v1/projects/PROJECT_ID/locations/us-central1/models
Untuk mengirim permintaan Anda, pilih salah satu opsi berikut:
curl
Jalankan perintah berikut:
curl -X GET \
     -H "Authorization: Bearer $(gcloud auth print-access-token)" \
     -H "x-goog-user-project: project-id" \
     "https://automl.googleapis.com/v1/projects/PROJECT_ID/locations/us-central1/models"
PowerShell
Jalankan perintah berikut:
$cred = gcloud auth print-access-token
$headers = @{ "Authorization" = "Bearer $cred"; "x-goog-user-project" = "project-id" }

Invoke-WebRequest `
    -Method GET `
    -Headers $headers `
    -Uri "https://automl.googleapis.com/v1/projects/PROJECT_ID/locations/us-central1/models" | Select-Object -Expand Content
Anda akan menerima respons JSON yang mirip dengan contoh berikut. Respons ini menampilkan informasi tentang dua model yang dihosting di Cloud.
{
  "model": [
    {
      "name": "projects/PROJECT_ID/locations/us-central1/models/MODEL_ID_1",
      "displayName": "DISPLAY_NAME_1",
      "datasetId": "DATASET_ID",
      "createTime": "2019-10-30T20:06:08.253243Z",
      "deploymentState": "UNDEPLOYED",
      "updateTime": "2019-10-30T20:54:50.472328Z",
      "imageClassificationModelMetadata": {
        "trainBudget": "1",
        "modelType": "mobile-low-latency-1",
        "nodeQps": 3.2
      }
    },
    {
      "name": "projects/PROJECT_ID/locations/us-central1/models/MODEL_ID_2",
      "displayName": "DISPLAY_NAME_2",
      "datasetId": "DATASET_ID",
      "createTime": "2019-10-29T19:06:38.048492Z",
      "deploymentState": "UNDEPLOYED",
      "updateTime": "2019-10-29T19:35:19.104716Z",
      "imageClassificationModelMetadata": {
        "trainBudget": "1",
        "modelType": "cloud",
        "nodeQps": 3.2
      }
    }
  ]
}
Go
Sebelum mencoba contoh ini, ikuti petunjuk penyiapan untuk bahasa ini di halaman Library Klien.
Java
Sebelum mencoba contoh ini, ikuti petunjuk penyiapan untuk bahasa ini di halaman Library Klien.
Node.js
Sebelum mencoba contoh ini, ikuti petunjuk penyiapan untuk bahasa ini di halaman Library Klien.
Python
Sebelum mencoba contoh ini, ikuti petunjuk penyiapan untuk bahasa ini di halaman Library Klien.
Bahasa tambahan
C# : Ikuti Petunjuk penyiapan C# di halaman library klien, lalu kunjungi dokumentasi referensi AutoML Vision untuk .NET.
PHP : Ikuti Petunjuk penyiapan PHP di halaman library klien, lalu kunjungi dokumentasi referensi AutoML Vision untuk PHP.
Ruby: Ikuti Petunjuk persiapan Ruby di halaman library klien, lalu kunjungi Dokumentasi referensi AutoML Vision untuk Ruby.
Mendapatkan informasi tentang model
Gunakan contoh kode berikut untuk mendapatkan informasi tentang model terlatih tertentu. Anda dapat menggunakan informasi yang ditampilkan dari permintaan ini untuk mengubah mode atau mengirim permintaan prediksi.
REST
Sebelum menggunakan salah satu data permintaan, lakukan penggantian berikut:
- project-id: Project ID GCP Anda.
- model-id: ID model Anda, dari
respons saat membuat model. ID adalah elemen terakhir dari nama model Anda.
Misalnya:
- nama model:
projects/project-id/locations/location-id/models/IOD4412217016962778756 - id model:
IOD4412217016962778756
- nama model:
Metode HTTP dan URL:
GET https://automl.googleapis.com/v1/projects/project-id/locations/us-central1/models/model-id
Untuk mengirim permintaan Anda, pilih salah satu opsi berikut:
curl
Jalankan perintah berikut:
curl -X GET \
     -H "Authorization: Bearer $(gcloud auth print-access-token)" \
     -H "x-goog-user-project: project-id" \
     "https://automl.googleapis.com/v1/projects/project-id/locations/us-central1/models/model-id"
PowerShell
Jalankan perintah berikut:
$cred = gcloud auth print-access-token
$headers = @{ "Authorization" = "Bearer $cred"; "x-goog-user-project" = "project-id" }

Invoke-WebRequest `
    -Method GET `
    -Headers $headers `
    -Uri "https://automl.googleapis.com/v1/projects/project-id/locations/us-central1/models/model-id" | Select-Object -Expand Content
Anda akan menerima respons JSON yang mirip seperti berikut:
{
  "name": "projects/PROJECT_ID/locations/us-central1/models/MODEL_ID",
  "displayName": "DISPLAY_NAME",
  "datasetId": "DATASET_ID",
  "createTime": "2019-10-29T19:06:38.048492Z",
  "deploymentState": "UNDEPLOYED",
  "updateTime": "2019-10-29T19:35:19.104716Z",
  "imageClassificationModelMetadata": {
    "trainBudget": "1",
    "modelType": "cloud",
    "nodeQps": 3.2
  }
}
Go
Sebelum mencoba contoh ini, ikuti petunjuk penyiapan untuk bahasa ini di halaman Library Klien.
Java
Sebelum mencoba contoh ini, ikuti petunjuk penyiapan untuk bahasa ini di halaman Library Klien.
Node.js
Sebelum mencoba contoh ini, ikuti petunjuk penyiapan untuk bahasa ini di halaman Library Klien.
Python
Sebelum mencoba contoh ini, ikuti petunjuk penyiapan untuk bahasa ini di halaman Library Klien.
Bahasa tambahan
C# : Ikuti Petunjuk penyiapan C# di halaman library klien, lalu kunjungi Dokumentasi referensi Deteksi Objek Vision AutoML untuk .NET.
PHP : Ikuti petunjuk penyiapan PHP di halaman library klien, lalu kunjungi dokumentasi referensi Deteksi Objek AutoML Vision untuk PHP.
Ruby : Ikuti Petunjuk penyiapan Ruby di halaman library klien, lalu kunjungi Dokumentasi referensi AutoML Vision Object Detection untuk Ruby.
Memperbarui Nomor Node Model
Setelah memiliki model yang di-deploy dan dilatih, Anda dapat memperbarui jumlah node tempat model di-deploy untuk merespons jumlah traffic tertentu. Misalnya, jika Anda mendapati jumlah kueri per detik (QPS) yang lebih tinggi dari yang diperkirakan.
Anda dapat mengubah nomor node ini tanpa harus membatalkan deployment model terlebih dahulu. Memperbarui deployment akan mengubah nomor node tanpa mengganggu traffic prediksi yang Anda salurkan.
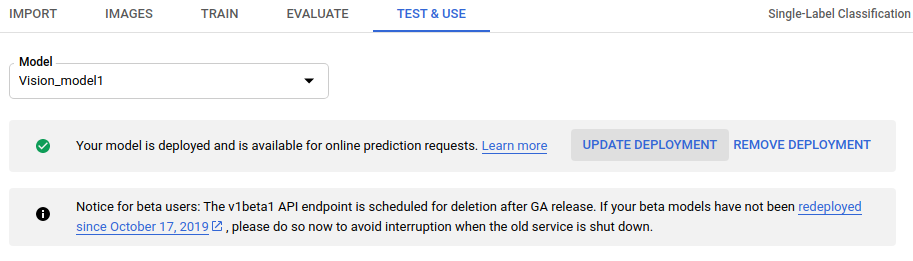
UI web
Di Vision Dashboard pilih tab Models di menu navigasi sebelah kiri untuk menampilkan model yang tersedia.
Untuk melihat model project yang berbeda, pilih project dari menu drop-down di kanan atas panel judul.
- Pilih model terlatih yang telah di-deploy.
- Pilih tab Pengujian & Penggunaan tepat di bawah panel judul.
-
Pesan akan ditampilkan dalam kotak di bagian atas halaman yang bertuliskan "Model Anda telah di-deploy dan tersedia untuk permintaan prediksi online". Pilih opsi Update deployment di samping teks ini.
- Di jendela Update deployment yang terbuka, pilih nomor
node baru untuk men-deploy model Anda dari daftar. Nomor node menampilkan perkiraan
kueri prediksi per detik (QPS).
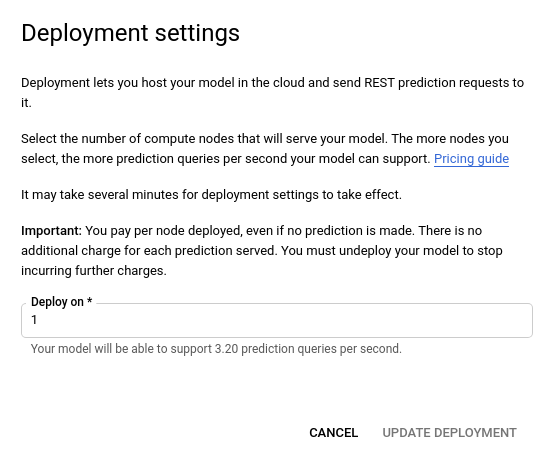
Setelah memilih nomor node baru dari daftar, pilih Update deployment untuk memperbarui nomor node tempat model di-deploy.
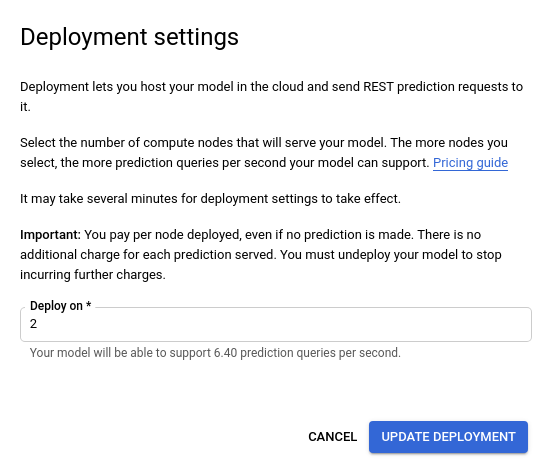
- Anda akan dikembalikan ke jendela Test & Use tempat Anda melihat kotak teks
sekarang menampilkan "Deploying model...".
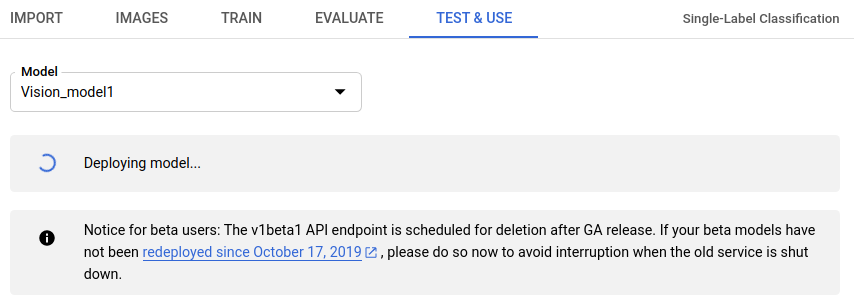
Setelah model berhasil di-deploy pada nomor node baru, Anda akan menerima email di alamat yang terkait dengan project Anda.
REST
Metode yang sama yang Anda gunakan untuk men-deploy model di awal juga digunakan untuk mengubah nomor node model yang di-deploy.Sebelum menggunakan salah satu data permintaan, buat pengganti berikut:
- project-id: Project ID GCP Anda.
- model-id: ID model Anda, dari
respons saat membuat model. ID adalah elemen terakhir dari nama model Anda.
Misalnya:
- nama model:
projects/project-id/locations/location-id/models/IOD4412217016962778756 - ID Model:
IOD4412217016962778756
- nama model:
Pertimbangan kolom:
nodeCount- Jumlah node tempat model akan di-deploy. Nilainya harus antara 1 dan 100, inklusif di kedua ujungnya. Node adalah abstraksi resource mesin, yang dapat menangani kueri prediksi online per detik (QPS) seperti yang diberikan dalamqps_per_nodemodel.
Metode HTTP dan URL:
POST https://automl.googleapis.com/v1/projects/PROJECT_ID/locations/us-central1/models/MODEL_ID:deploy
Isi JSON permintaan:
{
  "imageClassificationModelDeploymentMetadata": {
    "nodeCount": 2
  }
}
Untuk mengirim permintaan Anda, pilih salah satu opsi berikut:
curl
Simpan isi permintaan dalam file bernama request.json,
dan jalankan perintah berikut:
curl -X POST \
     -H "Authorization: Bearer $(gcloud auth print-access-token)" \
     -H "x-goog-user-project: project-id" \
     -H "Content-Type: application/json; charset=utf-8" \
     -d @request.json \
     "https://automl.googleapis.com/v1/projects/PROJECT_ID/locations/us-central1/models/MODEL_ID:deploy"
PowerShell
Simpan isi permintaan dalam file bernama request.json,
dan jalankan perintah berikut:
$cred = gcloud auth print-access-token
$headers = @{ "Authorization" = "Bearer $cred"; "x-goog-user-project" = "project-id" }

Invoke-WebRequest `
    -Method POST `
    -Headers $headers `
    -ContentType: "application/json; charset=utf-8" `
    -InFile request.json `
    -Uri "https://automl.googleapis.com/v1/projects/PROJECT_ID/locations/us-central1/models/MODEL_ID:deploy" | Select-Object -Expand Content
Anda akan melihat output yang serupa dengan berikut ini: Anda dapat menggunakan ID operasi untuk mendapatkan status tugas. Untuk mengetahui contohnya, lihat Bekerja dengan operasi yang berjalan lama
{
  "name": "projects/PROJECT_ID/locations/us-central1/operations/OPERATION_ID",
  "metadata": {
    "@type": "type.googleapis.com/google.cloud.automl.v1.OperationMetadata",
    "createTime": "2019-08-07T22:00:20.692109Z",
    "updateTime": "2019-08-07T22:00:20.692109Z",
    "deployModelDetails": {}
  }
}
Anda bisa mendapatkan status operasi dengan metode HTTP dan URL berikut:
GET https://automl.googleapis.com/v1/projects/PROJECT_ID/locations/us-central1/operations/OPERATION_ID
Status operasi yang selesai akan terlihat mirip dengan status berikut:
{
  "name": "projects/PROJECT_ID/locations/us-central1/operations/OPERATION_ID",
  "metadata": {
    "@type": "type.googleapis.com/google.cloud.automl.v1.OperationMetadata",
    "createTime": "2019-06-21T16:47:21.704674Z",
    "updateTime": "2019-06-21T17:01:00.802505Z",
    "deployModelDetails": {}
  },
  "done": true,
  "response": {
    "@type": "type.googleapis.com/google.protobuf.Empty"
  }
}
Go
Sebelum mencoba contoh ini, ikuti petunjuk penyiapan untuk bahasa ini di halaman Library Klien.
Java
Sebelum mencoba contoh ini, ikuti petunjuk penyiapan untuk bahasa ini di halaman Library Klien.
Node.js
Sebelum mencoba contoh ini, ikuti petunjuk penyiapan untuk bahasa ini di halaman Library Klien.
Python
Sebelum mencoba contoh ini, ikuti petunjuk penyiapan untuk bahasa ini di halaman Library Klien.
Bahasa tambahan
C# : Ikuti Petunjuk penyiapan C# di halaman library klien, lalu kunjungi dokumentasi referensi AutoML Vision untuk .NET.
PHP : Ikuti Petunjuk penyiapan PHP di halaman library klien, lalu kunjungi dokumentasi referensi AutoML Vision untuk PHP.
Ruby: Ikuti Petunjuk persiapan Ruby di halaman library klien, lalu kunjungi Dokumentasi referensi AutoML Vision untuk Ruby.
Menghapus model
Contoh berikut akan menghapus model.
UI web
Di Vision Dashboard, klik ikon bola lampu di menu navigasi sebelah kiri untuk menampilkan daftar model yang tersedia.
Klik menu tiga titik di ujung kanan baris yang ingin Anda hapus, lalu pilih Delete model.
Klik Hapus di kotak dialog konfirmasi.

REST
Sebelum menggunakan salah satu data permintaan, lakukan penggantian berikut:
- project-id: Project ID GCP Anda.
- model-id: ID model Anda, dari
respons saat membuat model. ID adalah elemen terakhir dari nama model Anda.
Misalnya:
- nama model:
projects/project-id/locations/location-id/models/IOD4412217016962778756 - id model:
IOD4412217016962778756
- nama model:
Metode HTTP dan URL:
DELETE https://automl.googleapis.com/v1/projects/PROJECT_ID/locations/us-
central1/models/MODEL_ID
Untuk mengirim permintaan Anda, pilih salah satu opsi berikut:
curl
Jalankan perintah berikut:
curl -X DELETE \
     -H "Authorization: Bearer $(gcloud auth print-access-token)" \
     -H "x-goog-user-project: project-id" \
     "https://automl.googleapis.com/v1/projects/PROJECT_ID/locations/us-
central1/models/MODEL_ID"
PowerShell
Jalankan perintah berikut:
$cred = gcloud auth print-access-token
$headers = @{ "Authorization" = "Bearer $cred"; "x-goog-user-project" = "project-id" }

Invoke-WebRequest `
    -Method DELETE `
    -Headers $headers `
    -Uri "https://automl.googleapis.com/v1/projects/PROJECT_ID/locations/us-
central1/models/MODEL_ID" | Select-Object -Expand Content
Anda akan melihat output yang mirip dengan berikut ini. Anda dapat menggunakan ID operasi untuk mendapatkan status tugas. Contohnya, lihat Bersama dengan operasi yang berjalan lama
{
  "name": "projects/PROJECT_ID/locations/us-central1/operations/OPERATION_ID",
  "metadata": {
    "@type": "type.googleapis.com/google.cloud.automl.v1.OperationMetadata",
    "createTime": "2018-11-01T15:59:36.196506Z",
    "updateTime": "2018-11-01T15:59:36.196506Z",
    "deleteDetails": {}
  }
}
Go
Sebelum mencoba contoh ini, ikuti petunjuk penyiapan untuk bahasa ini di halaman Library Klien.
Java
Sebelum mencoba contoh ini, ikuti petunjuk penyiapan untuk bahasa ini di halaman Library Klien.
Node.js
Sebelum mencoba contoh ini, ikuti petunjuk penyiapan untuk bahasa ini di halaman Library Klien.
Python
Sebelum mencoba contoh ini, ikuti petunjuk penyiapan untuk bahasa ini di halaman Library Klien.